This lab introduces the fundamentals of malware and antivirus technologies, focusing on how malicious software can compromise the CIA triad and how antivirus solutions defend against these threats. Explore the four major malware detection techniques: signature-based, heuristic, behavior-based, and adaptive antivirus to understand their strengths, limitations, and real-world applications.
Cybrary is a well established and free IT training platform with several intuitive labs to explore
A paid subscription with more advanced labs is available as well outside the scope of this platform
Head to https://www.cybrary.it to create a free account for learning available on their platform
Head to Antivirus Basics to complete this lab for yourself or perform it on your homelab below
Quick Links:
Requirements:
• Windows PC w/ Internet Connection
• USB Flash Drive w/ at least 64GB Capacity
• Unused PC w/ at least 4GB of Memory
1. Antivirus Overview
The term malware is short for malicious software, which means software that is designed to disrupt
Malicious software aims to compromise some aspect of the Confidentiality, Integrity or Availability
Malware has many varieties: worms, viruses, trojans, spyware, adware, keyloggers, and ransomware
However, software does not need to be destructive to systems to be considered as malicious in nature
Broadly speaking, any software that acts for the purpose of another and not for the user is malicious
Software that detects and removes malicious software is known as antivirus or anti-malware solutions
Antivirus software can scan files, monitor a system in real-time, quarantine files, and work with AI
There are four major types of malware detection techniques employed by antivirus software solutions:
• Signature-Based Antivirus
The most common, signature-based antivirus looks for patterns in known malware and quarantines matches
New signatures must be added to the local antivirus engine an new viruses are developed and released
Thus signature-based antivirus needs to be updated regularly to stay effective against current threats
• Heuristic Antivirus
This form of antivirus uses static and dynamic analysis to determine if a software contains malware
Heuristic Antivirus runs suspected code in a sandbox to see how it behaves when the code is executed
The advantage being the detection of new malware, the disadvantage is that it is resource intensive
Many vendors combine signature-based and heuristic detection methods to reduce the performance impact
• Behavior-Based Antivirus
This is a heuristic variant that focused more on what the malware does than on its actual source code
If the source code says "cow", yet the malware quacks, then behavioral analysis says that it's a duck
A behavioral engine will also establish a baseline of what is "normal" and take action at deviations
This behaves like an intrusion response tool while heuristic analysis works like intrusion detection
• Adaptive Antivirus
Has many marketing names. Some vendors tout machine learning, others claim its artificial intelligence
Adaptive antivirus is both heuristic and behavioral, learning and adapting to new forms of malware
Adaptive antivirus systems can also share information so that signatures can be known on many systems
The default antivirus solution for Windows systems is Microsoft Defender Antivirus, free with windows
Microsoft has come a long way regarding endpoint protection, as Windows are preferred malware targets
The current incarnation of Microsoft's Defender Antivirus operates as primarily signature based system
Those who buy Microsoft 365 E3 / E5 plans receive Microsoft Defender for endpoint protection included
Endpoint adds adaptive analysis, EDR features, and central management to the standard Windows Defender
Microsoft's Windows Defender is lightweight and is very effective for most users as antivirus solution
In the next lesson, you will practice using Microsoft Defender Antivirus to detect and remove malware
2. Create Windows 11 Live USB
Here we will simulate the end user through a USB live version of Windows 11 which won't save on the PCs disk
This type of installation was referred to as Windows On-the-Go in the past but is now possible with rufus.exe
Download Windows 11 Disk Image (ISO): Microsoft Windows 11 ISO
Download Rufus Disk Imaging Software: Rufus Official Download
Insert USB Flash Drive, run rufus.exe, select target drive as your USB Flash Drive, select Windows 11 ISO file
From the 'Image option' dropdown menu, select the 'Windows To Go' image option to create a live usb, hit start:

Use the rufus popup menu to customize the Windows 11 Live installation and disable data collection for this lab:

Remove USB Flash Drive and Insert into unused PC. Start PC and press hot boot key on startup:

Select UEFI USB Flash Boot. Allow Windows 11 Live to load and move through the setup to reach the desktop:
We now have our basic workstation that will simulate the end user PC for us to troubleshoot later
Be sure to connect this system to the internet with WI-FI or a wired connection for the next steps
3. Detect and Remove Malware
Here you will practice using Microsoft Defender Antivirus to detect and remove malware from Windows
To begin we must create a malicious file for our Windows Defender to detect, open an admin PowerShell
Run the following commands from the PowerShell Terminal to create an EICAR test file for antivirus:
PS C:\WINDOWS\system32> mkdir C:\Evil
PS C:\WINDOWS\system32> New-Item -Path "C:\Evil" -Name "eicar.com" -ItemType File
The EICAR file is a harmless text string, it is not a virus, but antivirus detects it like malware
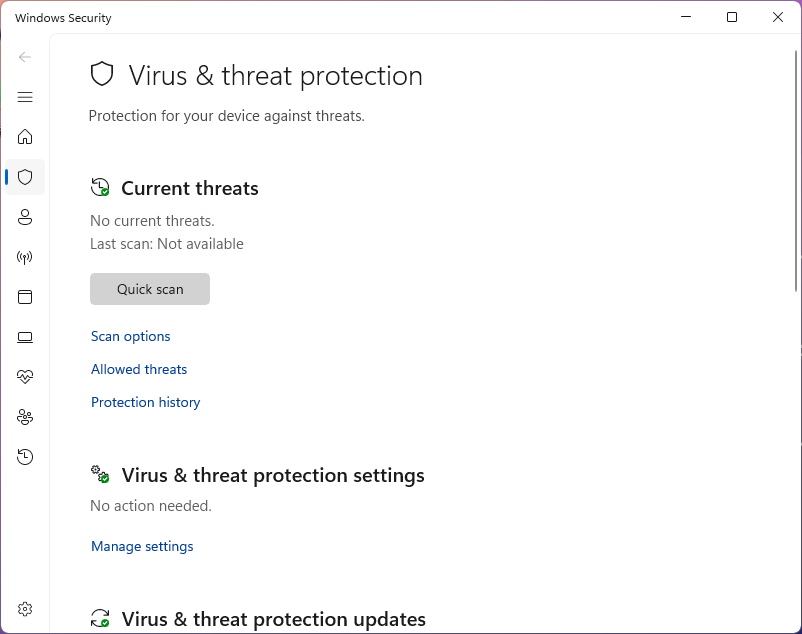
On the taskbar, search for virus, then click on to select the option for Virus and Threat Protection
In the Current Threats section, you can see the last scan, scan type, and if any threats were found:
Under Virus & Threat Protection, click manage settings, then confirm that real-time protection is on:
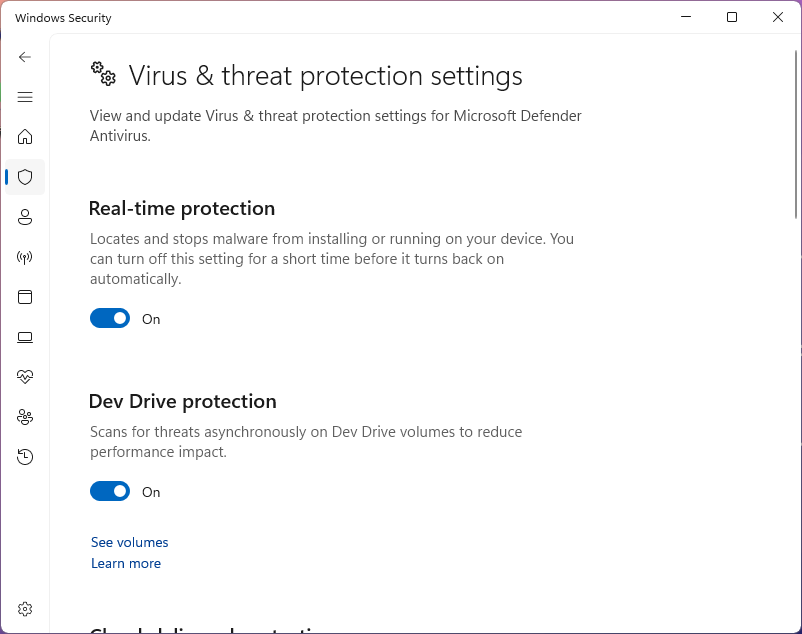
The Real-time protection function is responsible for actively scanning the file system for malware
This feature is also capable of removing any suspicious files that it detects from the live system
In the next steps, you will copy the malicious file we created previously to the C:\Drive for testing
Run the following command from the PowerShell Terminal to open the eicar.txt file with notepad:
PS C:\WINDOWS\system32> notepad.exe 'C:\Evil\eicar.txt'
Now from the notepad application, paste the following string into our eicar.txt file and click save:
X5O!P%@AP[4\PZX54(P^)7CC)7}$EICAR-STANDARD-ANTIVIRUS-TEST-FILE!$H+H*
Open a File explorer, then navigate to C:\Evil and copy the eicar.com file and paste it into the C:\
Now let's test our Real-time threat protection, from File Explorer, double-click the eicar.txt file:
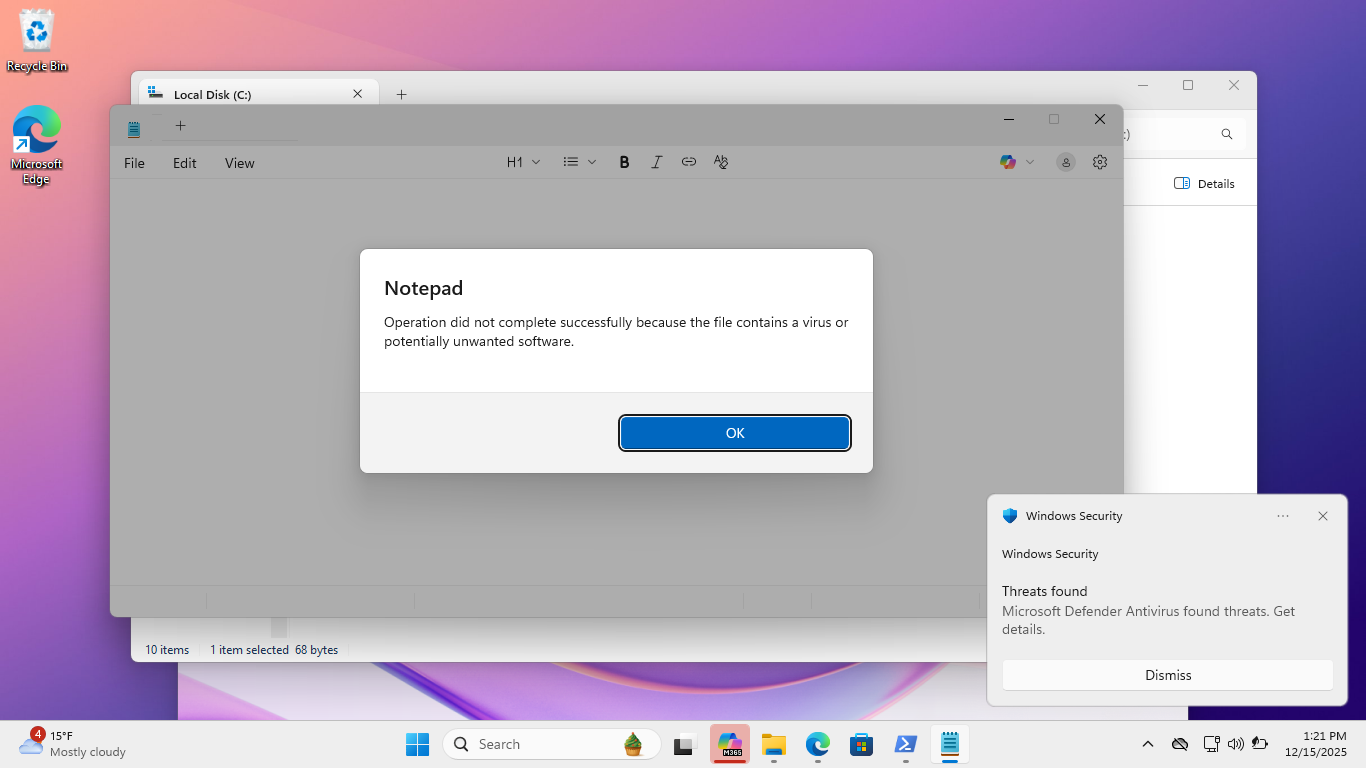
We can see an alert in the bottom-right corner that the Windows Defender has blocked created an alert
In the Windows Security window, in the sidebar, click Virus & Threat Protection to return to the page
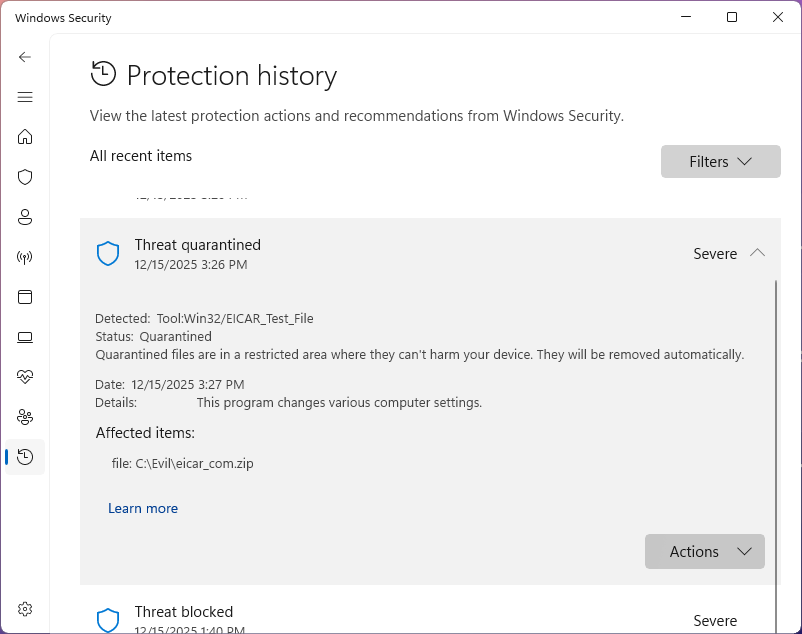
Under Current Threats, hit Protection History to view threats previously detected by Windows Defender:
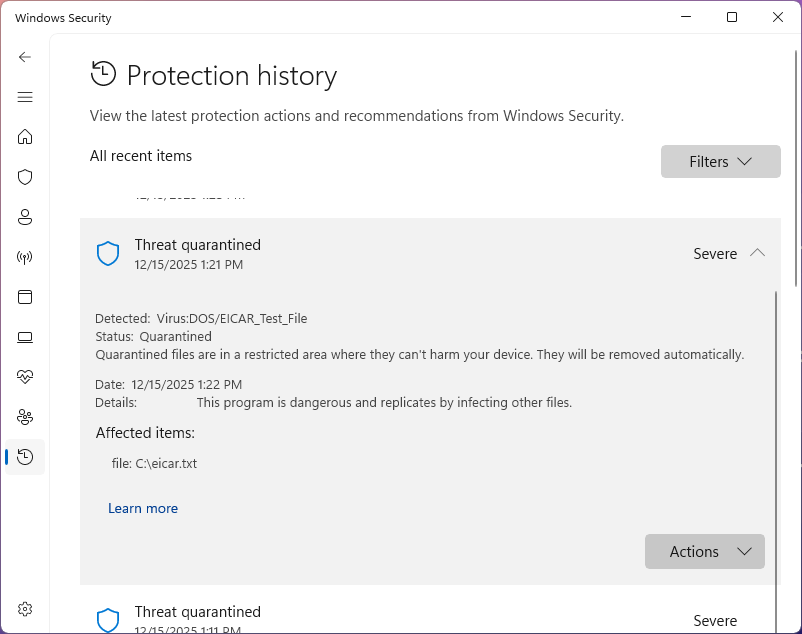
In the Quarantined Threats section, we can see a record of the test file that the antivirus removed
In the malware details window, click Learn more to open the Microsoft Security Intelligence web page:
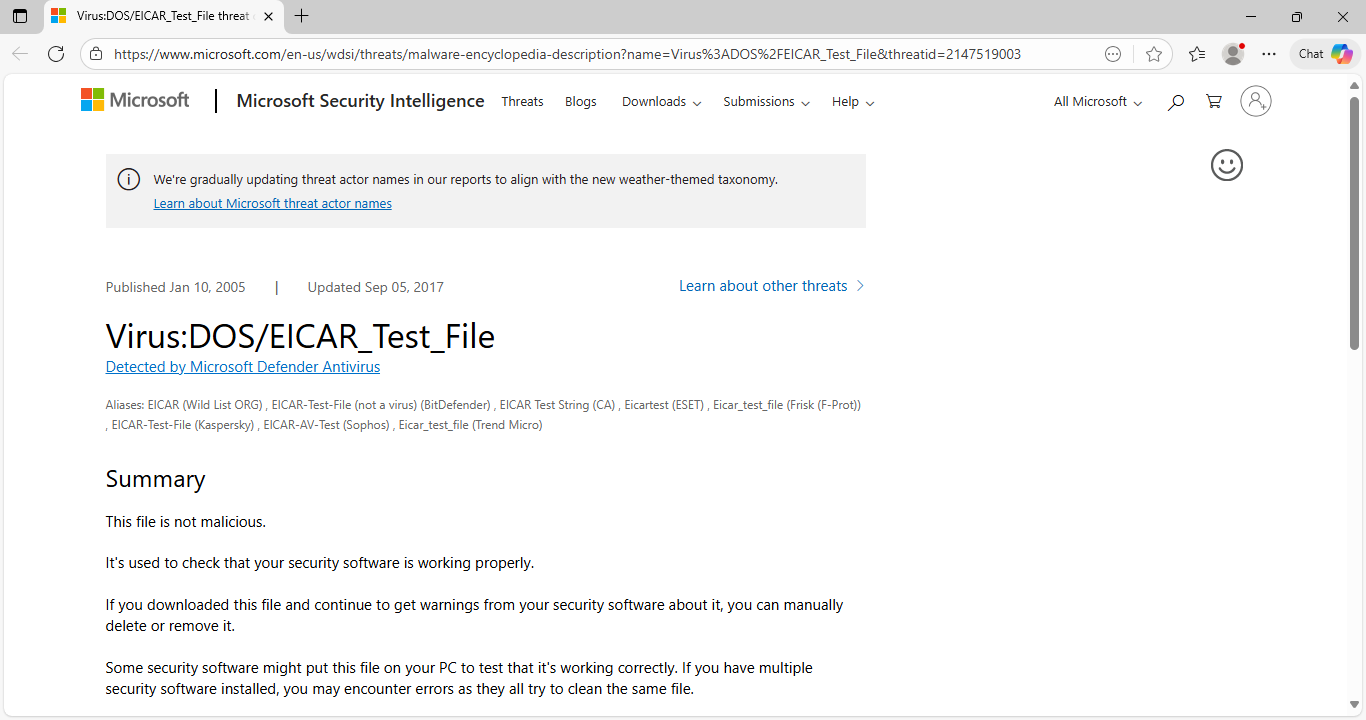
We can see that Microsoft shows us that this file is not malicious and is instead a tes file for AV
It is also possible to run Windows Defender Antivirus scans using PowerShell or Command Prompt CLI
In the next steps we will finish removal of the malware by scanning the remaining C:\Evil directory
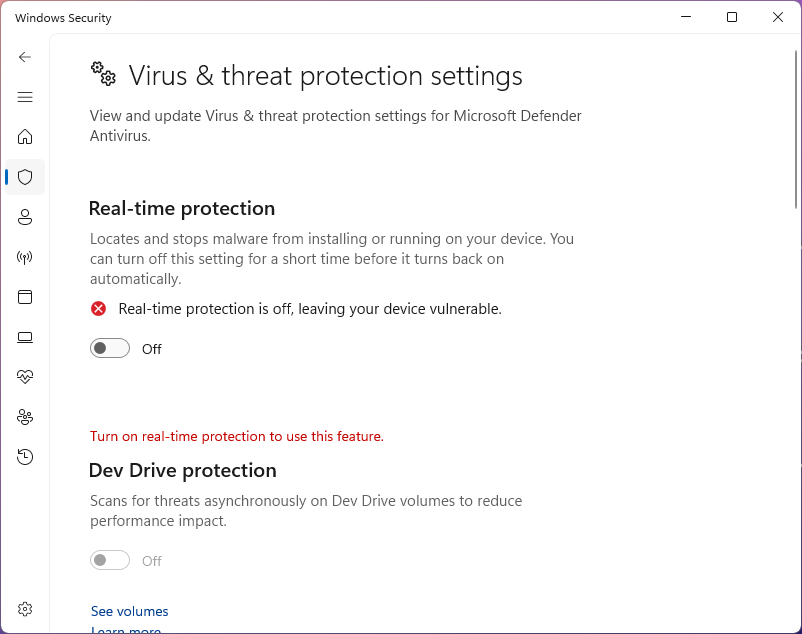
In the Windows Security window, head to the Virus & Threat Protection page and click Manage Settings
On the Settings page, click the toggle under Real-Time Protection to deactivate Real-Time Protection
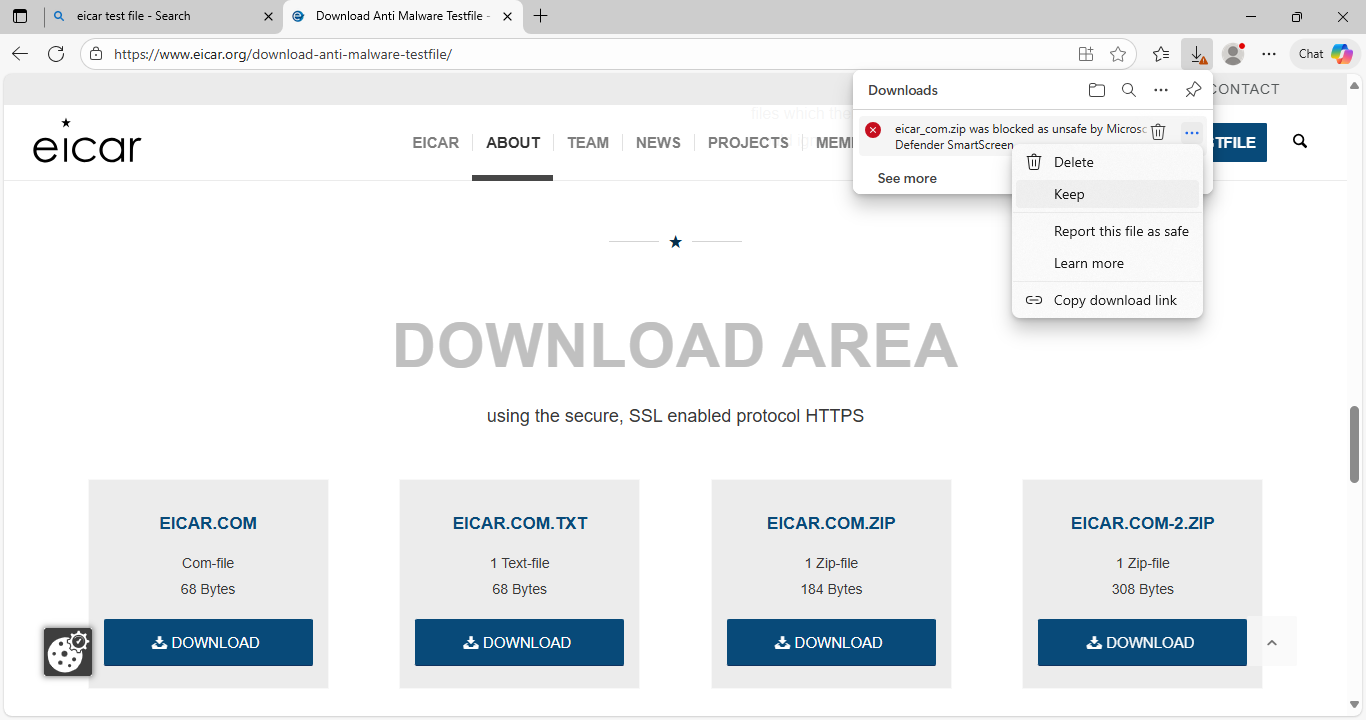
Now head to EICAR Test File and download the EICAR.COM.ZIP antivirus test file, then click on keep:
Now head into your Download folder and copy the eicar.com.zip file, paste it into the C:\Evil folder
From within the C:\Evil folder, right-click the compressed zip file and select Extract All -> Extract
Run the following command from the PowerShell Terminal to scan the C:\Evil directory for malware:
PS C:\WINDOWS\system32> Start-MPScan -ScanPath C:\Evil\ -ScanType CustomScan
You should receive an alert from the antivirus, in the folder you can see that the files are removed
In the Windows Security windows, return to the Threat History page and review the malware information:
To ensure that these files no longer take up space on your disk, click the actions button then remove
Congratulations, in this lab you used Microsoft Defender Antivirus to detect and remove malware files