This project demonstrates a fundamental understanding of firewalls as security controls used to reduce a system's attack surface. Through this lab, gain practical experience in transitioning from high-level security requirements to functional host-based firewall configurations. Core competencies demonstrated: Rule Logic and Optimization, Security Architecture, Network Emulation and Service Simulation
Cybrary is a well established and free IT training platform with several intuitive labs to explore
A paid subscription with more advanced labs is available as well outside the scope of this platform
Head to https://www.cybrary.it to create a free account for learning available on their platform
Head to Firewall Basics to complete it for yourself or you can perform it on your homelab below
1. Firewalls Overview
2. Install Gentoo Linux
3. Install Lab Tools
4. Deploy Network Topology Emulation
5. Configure an Iptables Firewall
6. Test an Iptables Firewall
• Windows PC w/ Internet Connection
• USB Flash Drives w/ at least 64GB Capacity
• Unused PC w/ at least 4GB of Memory
A firewall is a security control or appliance used to reduce the attack surface of a system or network
When you think of a firewall, you most likely imagine a dedicated network appliance that is standing guard
While that is somewhat accurate, it is important to understand that a firewall's primary role is to enable
access to a trusted network or host from an untrusted or even hostile network or host, not to block access

Types of Firewalls
Firewalls can be network-based, host-based, or both. A network-based firewall sits between one or more
networks and limits access to allowed services. Examples of network-based firewalls include the Cisco ASA
Palo Alto Networks, Juniper, Smoothwall, and pfSense. Network firewalls are managed remotely from hosts
As the name suggests, a host-based firewall runs on the host device itself. Host-based firewalls are often
managed locally using scripts or a GUI, and they use the host devices compute resources to perform filters
Examples of host-based firewalls are Windows Defender for Windows systems and iptables for Linux systems
Almost all modern antivirus products include host-based firewall functionality, in addition to antimalware
The most basic kind of firewall is a packet-filtering firewall. Packet-filtering firewalls operate at the
network level and use a simple top-down list of rules to allow or deny traffic. Here is an example ruleset
|
Source
|
Port
|
Destination
|
Port
|
Rule
|
|
192.168.1.100
|
any
|
192.168.2.10
|
22
|
allow
|
|
any
|
any
|
192.168.2.10
|
80
|
allow
|
|
192.168.1.0/24
|
any
|
192.168.2.10
|
21
|
allow
|
This ruleset allows the host 192.168.1.100 SSH (tcp port 22) access to the host 192.168.2.10, allows anyone
to reach the web server on 192.168.1.10, and allows anyone on the 192.168.1.0/24 network to access the FTP
What is not shown is a rule that is normally present, even if not explicitly written out: the default deny
By default, that which is not explicitly permitted is denied. But of course, every rule has it's exceptions
Every firewall has its own syntax used to create rules. These example rulesets are for learning purposes
and are not actual commands. When preparing to configure a firewall, it can be very helpful to map out what
you want the firewall to do before taking on the exact syntax required for configuration of a given product
Packet filtering firewalls are a bit archaic by today's standard, but they are still in use in the field
Cisco, for example, uses Access Control Lists (ACL) to restrict traffic between VLANs because ACLs are very
fast and efficient and ideal for moving packets quickly. With increased inspection comes a speed tradeoff
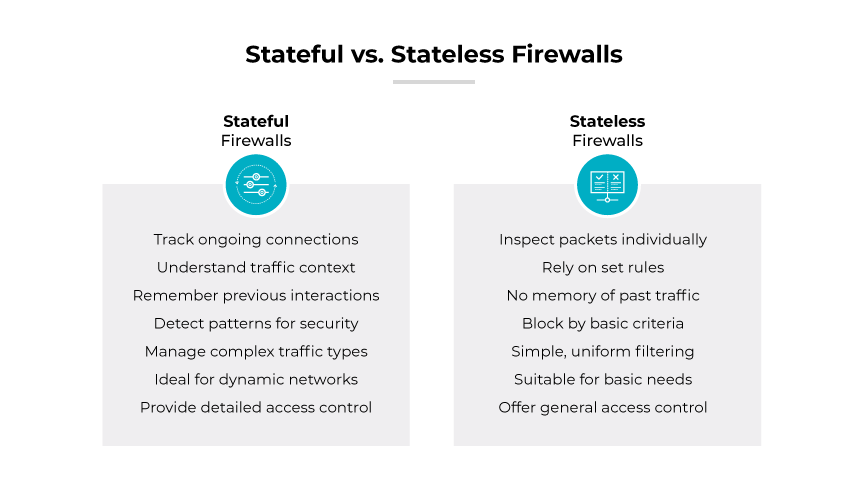
A step above the packet-filtering firewall is the stateful firewall. With a stateful firewall, you only
have to create rules in one direction - the firewall will create any rules needed to establish the traffic
In other words, stateful firewalls are session aware. Most firewalls in use today are stateful firewalls
Application layer firewalls are more advanced than both packet-filtering firewalls and stateful firewalls
Operating at the application layer, these firewalls can understand more than just destinations and ports
For example, an application layer firewall can look to see if HTTP traffic is conforming to HTTP standards
and can block potential threats from trying to pass non-HTTP traffic over the standard tcp ports 80 or 443
|
Source
|
Application
|
Destination
|
Application
|
Rule
|
|
192.168.1.100
|
SSH Client
|
192.168.2.10
|
Secure Shell
|
allow
|
|
any
|
Web Browser
|
192.168.2.10
|
HTTP
|
allow
|
|
192.168.1.0/24
|
FTP Client
|
192.168.2.10
|
FTP
|
allow
|
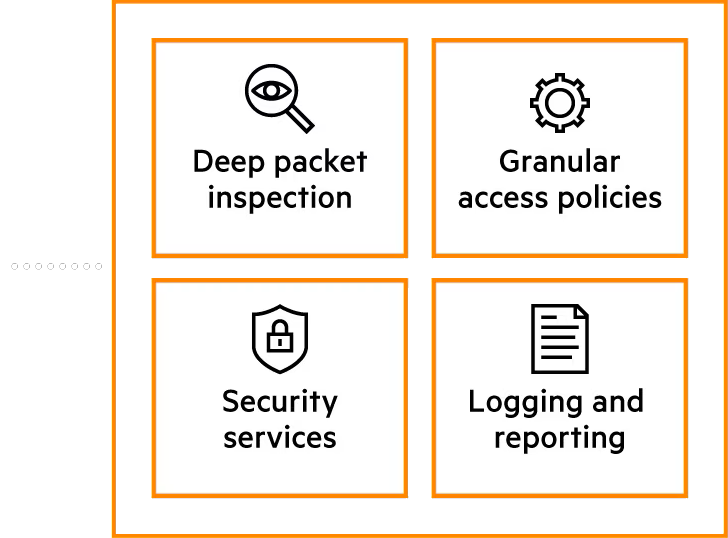
Next-generation firewalls (NGFW) are a mix of the application layer and stateful firewalls, combined with
deep packet inspection, intrusion prevention, and anti-malware services. A packet might pass through the
ruleset, but get stopped by the packet inspection service, the IPS service, or the anti-malware service
|
Source
|
Application
|
Destination
|
Application
|
Rule
|
|
192.168.1.100
|
SSH Client
|
192.168.2.10
|
Secure Shell
|
allow
|
|
any
|
Web Browser
|
192.168.2.10
|
HTTP
|
allow
|
|
192.168.1.0/24
|
FTP Client
|
192.168.2.10
|
FTP
|
allow
|
There is endless debate about what constitutes a firewall vs. a proxy. Many suggest an application layer
firewall is in fact a proxy and not a firewall. Then there are application-specific firewalls like the Web
Application Firewall (WAF), which do not regulate traffic at all, but fo perform deep inspection for HTTP
Iptables
With all of this in mind, let's focus on configuring iptables for Linux. As noted earlier, iptables is a
host-based firewall included in most Linux distributions. The iptables firewall uses three sets of rules:
• Inputs - Determines what traffic can come into the host
• Outputs - Determines what traffic can leave the host
• Forward - Used primarily for Network Address Translation (NAT)
If traffic passes through your Linux system, then IPTables can be used as a network-based firewall as well
New firewall rules are appended to an existing chain. Rules are read top to bottom, and the first match
is the one that is processed. Thus the order of the rules in the chain is important to the functionality
Configuring iptables can get very complex and there are entire courses dedicated to this topic. We will be
focusing on some basic iptables rules as representative examples of firewall rules, not all the options
Gentoo is a free and open source Linux distribution based on Arch which is highly customizable and open
It is marketed as the powerhouse of open source software and derives from the Openness, Choice and Power
Gentoo's tools are written on common programming languages, and the OS avoids forcing any specific method
The operating system can be automatically optimized and customized for just about any application or need
Similar to Arch Linux, we will need to build the operating system piece by piece using the command line
What makes Gentoo Linux unique is that packages are installed to the system by compiling source code from
upstream projects into binary format, meaning we must compile our OS. Configuration happens in text files
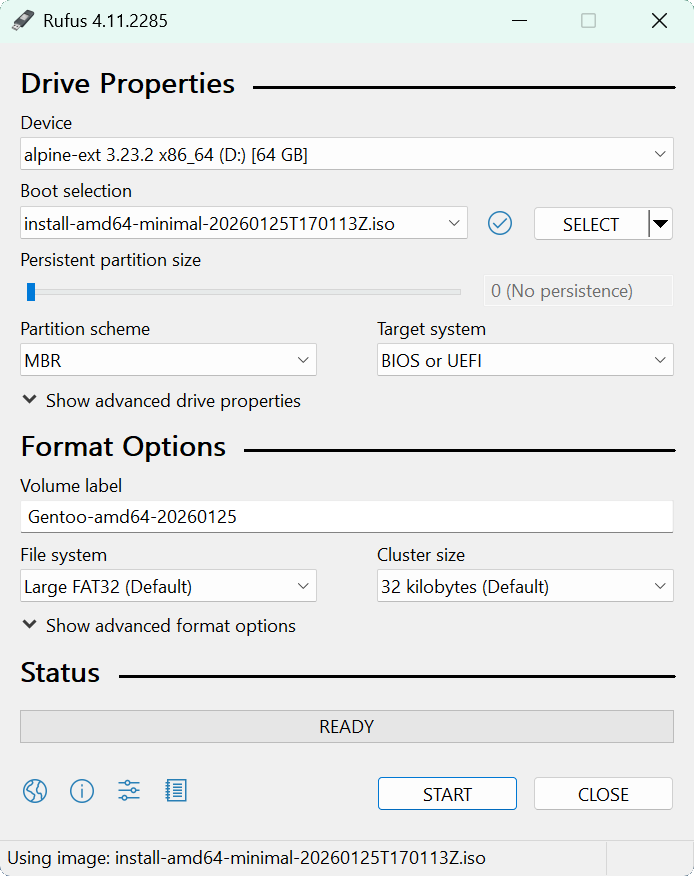
Download Gentoo AMD64 iso: Gentoo Minimal Installation CD
Download Rufus Disk Imaging Software: Rufus Official Download
Insert USB Flash Drive, run rufus.exe, select target drive, select the Gentoo CD Image, then hit start:
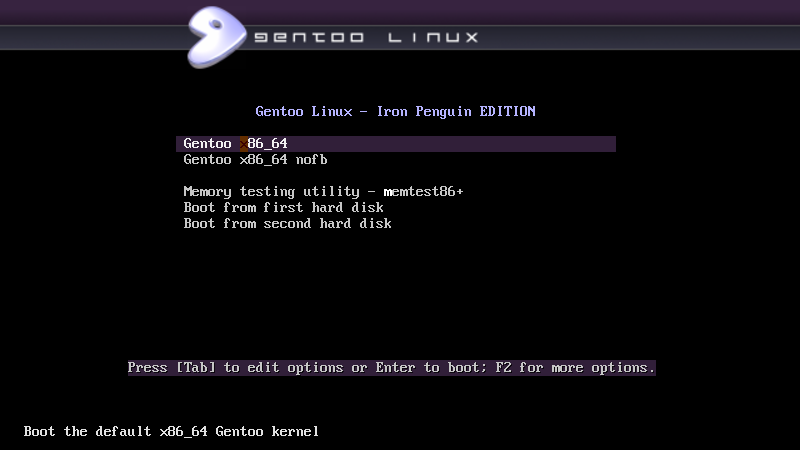
Remove the USB Flash Drive and Insert into unused PC. Start PC and press the hot boot key at the startup:

Select the option to boot from your USB Flash Drive, then select the Gentoo install medium from below:
Once the operating system loads you will be presented with a root command prompt to install the OS from
If the system is connected to an Ethernet network with a DHCP server then the network will autoconfigure
Run the following command from the Gentoo Installer CD to test connectivity, HTTPS, and DNS resolution:
livecd ~ # ip route && ping -c 3 8.8.8.8 && curl --location gentoo.org --output /dev/null
Expected Output:
default via 192.168.0.1 dev enp0s20f0u4 proto dhcp src 192,168.0.220 metric 100
192.168.0.0/24 dev enp0s20f0u4 proto kernel scope link src 192.168.0.220 metric 100
PING 8.8.8.8 (8.8.8.8) 56(84) bytes of data.
64 bytes from 8.8.8.8: icmp_seq=1 ttl=114 time=32.8 ms
64 bytes from 8.8.8.8: icmp_seq=2 ttl=114 time=24.1 ms
64 bytes from 8.8.8.8: icmp_seq=3 ttl=114 time=23.6 ms
--- 8.8.8.8 ping statistics ---
3 packets transmitted, 3 received, 0% packet loss, time 2004ms
rtt min/avg/max/mdev = 23.586/26.839/32.791/4.214 ms
% Total % Received % Xferd Average Speed Time Time Time Current
Dload Upload Total Spent Left Speed
0 0 0 0 0 0 0 0 --:--:-- 0:00:04 --:--:-- 0
100 162 100 162 0 0 31 0 0:00:05 0:00:05 --:--:-- 31
100 22189 100 22189 0 0 3642 0 0:00:06 0:00:06 --:--:-- 40939
Once connectivity has been verified, we can continue with preparing the disks for Gentoo's installation
Run the following command from the Gentoo Installer CD to disk the available disks on the target system
Nearly all modern systems utilize UEFI firmware and must have disks partitioned with GUID Partition Table
It is strongly recommended for installations on modern hardware to use UEFI boot along with GPT disk label
Our system in this example is using an nvme ssd storage device labelled by the system as nvme0n1 below:
|
Partition
|
Filesystem
|
Size
|
Description
|
|
/dev/nvme0n1p1
|
FAT32
|
1 GiB
|
EFI System Partition
|
|
/dev/nvme0n1p2
|
Linux-Swap
|
RAM Size * 2
|
Linux Swap Partition
|
|
/dev/nvme0n1p3
|
XFS
|
Remainder of the Disk
|
System Root Partition
|
We will use fdisk, a well known and stable disk partition utility which can handle both MBR and GPT disks
Run the following command from the Gentoo Installer CD to enter into the fdisk disk partitioning utility:
livecd ~ # fdisk /dev/nvme0n1
Pressing the g key and enter will instantly remove all existing partitions and create a new GPT disk label
Now that the memory partition table is empty, we're ready to create the partitions, starting with the EFI
Enter the commands in the following sequence below on the right, empty means to just hit the enter key:
Command (m for help): n
Partition number (1-128, default 1): 1
First sector (2048-500118158, default 2048):
Last sector, +/-sectors or +/-size{K,M,G,T,P} (2048-500118158, default 500117503): +1G
Created a new partition 1 of type 'Linux filesystem' and of size 1 GiB.
Partition #1 contains a vfat signature.
Do you want to remove the signature? [Y]es/[N]o: Y
The signature will be removed by a write command.
Next we must mark the partition as an EFI system partition type, it is defaulted to Linux filesystem type
Enter the commands in the following sequence below on the right, empty means to just hit the enter key:
Command (m for help): t
Selected partition 1
Partition type or alias (type L to list all):
Changed type of partition 'Linux filesystem' to 'EFI System'.
Next we will create the swap partition to be used as virtual memory on your disk when RAM is constrained
Enter the commands in the following sequence below on the right, empty means to just hit the enter key:
Command (m for help): n
Partition number (2-128, default 2): 2
First sector (2099200-500118158, default 2099200):
Last sector, +/-sectors or +/-size{K,M,G,T,P} (2099200-500118158, default 200117503): +16G
Created a new partition 2 of type 'Linux filesystem' and of size 16 GiB.
Next we must mark the partition as an Linux Swap partition type, it is defaulted to Linux filesystem type
Enter the commands in the following sequence below on the right, empty means to just hit the enter key:
Command (m for help): t
Partition number (1,2, default 2): 2
Partition type or alias (type L to list all): 19
Changed type of partition 'Linux filesystem' to 'Linux swap'.
Last we must create the Root partition which holds the linux systems actual filesystem and program files
Enter the commands in the following sequence below on the right, empty means to just hit the enter key:
Command (m for help): n
Partition number (3-128, default 3): 3
First sector (35653632-500118158, default 35653632):
Last sector, +/-sectors or +/-size{K,M,G,T,P} (35653632-500118158, default 500117503):
Created a new partition 3 of type 'Linux filesystem' and of size 221.5 GiB.
Next we must mark the partition as an Linux Root x86-64 partition type, it is defaulted to Linux filesystem
Enter the commands in the following sequence below on the right, empty means to just hit the enter key:
Command (m for help): t
Partition number (1-3, default 3): 3
Partition type or alias (type L to list all): 23
Changed type of partition 'Linux filesystem' to 'Linux root (x86-64)'.
After completing these, pressing p and enter should display a similar partition table to the following:
Command (m for help): p
Disk /dev/nvme0n1: 238.47 GiB, 256060514301 bytes, 500118192 sectors
Disk model: INTEL HBRPEKNX0101AH
Units: sector of 1 * 512 = 512 bytes
Sector size (logical/physical): 512 bytes / 512 bytes
I/O size (minimum/optimal): 512 bytes / 512 bytes
Disklabel type: gpt
Disk identifier: 9ED358FA-3E1D-450E-AE3A-E075D79E1EBB
Device Start End Sectors Size Type
/dev/nvme0n1p1 2048 2099199 2097152 1G EFI System
/dev/nvme0n1p2 2099200 35653631 33554432 16G Linux swap
/dev/nvme0n1p3 35653632 500117503 464463872 221.5G Linux root (x86-64)
Once we have confirmed the partitioning scheme, we can press w and enter to write our changes to the disk
Command (m for help): w
The partitioning table has been altered.
Calling ioctl() to re-read partition table.
Syncing disks.
Now that our disk is partitioned, we must now initialize the partitions for their associated filesystems
Run the following commands from the Gentoo Installer CD to initialize each partition for their filesystem
livecd # ~ mkfs.vfat -F 32 /dev/nvme0n1p1
livecd # ~ mkfs.xfs /dev/nvme0n1p3
livecd # ~ mkswap /dev/nvme0n1p2
Run the following command from the Gentoo Installer CD to activate the Linux swap partition we created
livecd # ~ swapon /dev/nvme0n1p2
The root partition will become our Gentoo Operating Systems filesystem once installation is completed
Run the following commands from the Gentoo Installer CD to create a mount directory and mount the root
livecd # ~ mkdir --parents /mnt/gentoo
livecd # ~ mount /dev/nvme0n1p3 /mnt/gentoo
The stage file acts as the seed for the Gentoo installation based on some target operating system profiles
For our target gentoo operating system we are targeting a graphical interface using the systemd manager
Run the following commands from the Gentoo Installer CD to prepare the image to downloaded our stage file
livecd # ~ cd /mnt/gentoo
livecd /mnt/gentoo # chronyd -q
Run the following command from the Gentoo Installer CD to view all the available to download stage files
livecd /mnt/gentoo # links https://www.gentoo.org/downloads/mirrors
Since we are targeting a desktop environment with systemd, navigate to the and64 systemd desktop profile
Hit enter within links and save the file, then use the q key to exit the links command line web browser
Run the following command from the Gentoo Installer CD to view and verify that our stage file downloaded
Expected Output:
stage3-amd64-desktop-systemd-20260125T170113Z.tar.xz
Run the following command from the Gentoo Installer CD once downloaded to extract the Gentoo stage file
livecd /mnt/gentoo # tar xpvf stage3-*.tar.xz --xattrs-include='*.*' --numeric-owner -C /mnt/gentoo
This may take a few minutes to compile, but when finished will distribute critical packages for our OS
Gentoo allows the optimization of the behavior of portage, the package manager for the operating system
While this high level of customization is beyond the scope of this lab, some flags do need to be set up
Run the following command from the Gentoo Installer CD to begin editing the portage configuration file
livecd /mnt/gentoo # nano /mnt/gentoo/etc/portage/make.conf
Update the portage configuration file to the text below and use CTRL+O to save and CTRL+X to exit nano
COMMON_FLAGS="-march=native -O2 -pipe"
CFLAGS="${COMMON_FLAGS}"
CXXFLAGS="${COMMON_FLAGS}"
FCFLAGS="${COMMON_FLAGS}"
FFLAGS="${COMMON_FLAGS}"
LC_MESSAGES=C.UTF-8
ACCEPT_LICENSE="-* @FREE"
USE="-gtk -gnome kde dist-kernel"
MAKEOPTS="-j16"
We have nearly arrived, it is time to begin installing the base system, first step is copying DNS info
This needs to be done to ensure that networking still works even after entering the new OS environment
Run the following command from the Gentoo Installer CD to copy the DNS resolution configuration to the OS
livecd /mnt/gentoo # cp --dereference /etc/resolv.conf /mnt/gentoo/etc/
In a few moments, the Linux root will be changed towards the new location. These filesystems we need made
Run the following commands from the Gentoo Installer CD to generate the filesystems for the live Gentoo
livecd /mnt/gentoo # mount --types proc /proc /mnt/gentoo/proc
livecd /mnt/gentoo # mount --rbind /sys /mnt/gentoo/sys
livecd /mnt/gentoo # mount --make-rslave /mnt/gentoo/sys
livecd /mnt/gentoo # mount --rbind /dev /mnt/gentoo/dev
livecd /mnt/gentoo # mount --make-rslave /mnt/gentoo/dev
livecd /mnt/gentoo # mount --bind /run /mnt/gentoo/run
livecd /mnt/gentoo # mount --make-slave /mnt/gentoo/run
Now that all partitions are initialized and the base environment installed, it is time to enter the new
environment by chrooting into it. This means that the session will change its root from the CD to the OS
Run the following commands from the Gentoo Installer CD to enter into the target operating system root:
livecd /mnt/gentoo # chroot /mnt/gentoo /bin/bash
livecd / # source /etc/profile
livecd / # export PS1="(chroot) ${PS1}"
Now that the new environment has been entered, it is necessary to prepare the new OS for the bootloader
It will be important to have the correct partition mounted when it is time to install the OS bootloader
Run the following commands from the Gentoo Installer CD to ensure a /efi directory exists and mount it
(chroot) livecd / # mkdir -p /efi
(chroot) livecd / # mount /dev/nvme0n1p1 /efi
Run the following command from the Gentoo Installer CD to fetch the latest Gentoo ebuild repo snapshot
(chroot) livecd / # emerge-webrsync
In order to download source code quickly it is recommended to select a fast, geographically close mirror
Run the following commands from the Gentoo Installer CD to select a geographically close and fast mirror
(chroot) livecd / # emerge --ask --verbose --oneshot app-portage/mirrorselect
(chroot) livecd / # mirrorselect -i -o >> /etc/portage/make.conf
A profile is a building block for a Gentoo system, it specifies USE flags and package versions for the OS
Since we are targeting a Desktop Environment with KDE Plasma and the systemd service manager hit profile 8
Run the following command from the Gentoo Installer CD to list all of the available profiles and select
(chroot) livecd / # eselect profile list
(chroot) livecd / # eselect profile set 8
Run the following command from the Gentoo Installer CD to list time zone options and set one for Gentoo
(chroot) livecd / # ls -l /usr/share/zoneinfo/US
(chroot) livecd / # ln -sf ../usr/share/zoneinfo/US/Eastern /etc/localtime
Locales specify the language that the user should use to interact with Gentoo as well as the characters
Run the following command from the Gentoo Installer CD to edit the locale file and add the following line
(chroot) livecd / # nano /etc/locale.gen
en_US.UTF-8 UTF-8
Save with CTRL+O and exit nano with CTRL+X. Then run the following command to generate the locality config
(chroot) livecd / # locale-gen
Once done, it is now time to set the system-wide locale settings. Again eselect is used, now with locale:
(chroot) livecd / # eselect locale list
(chroot) livecd / # eselect locale set 4
Setting the locale will avoid warnings and errors during the kernel and software compilations later on
Run the following command from the Gentoo Installer CD to reload the environment and apply locale changes
(chroot) livecd / # env-update && source /etc/profile && export PS1="(chroot) ${PS1}"
On many systems, firmware is required for certain hardware to function, including sound and video cards
For our firmware packages to merge nicely without complaining we must first accept the software licenses
Run the following command from the Gentoo Installer CD to edit the license file and add the following lines
(chroot) livecd / # nano /etc/portage/package.license
sys-kernel/linux-firmware linux-fw-redistributable
sys-kernel/linux-firmware @BINARY-REDISTRIBUTABLE
Save your changes with CTRL+O and exit nano with CTRL+X. Now we can properly include the firmware files
Run the following commands from the Gentoo Installer CD to load the various types of firmware available
(chroot) livecd / # emerge --ask sys-kernel/linux-firmware
(chroot) livecd / # emerge --ask sys-firmware/sof-firmware
For our bootloader we will be using the traditional GRUB bootloader, which must be configured on kernel
Initramfs is required to use the automated approach of Distributions kernels later on in the installation
Run the following command from the Gentoo Installer CD to edit the portage file and add the following lines
(chroot) livecd / # nano /etc/portage/package.use/installkernel
sys-kernel/installkernel grub
sys-kernel/installkernel dracut
Run the following commands from the Gentoo Installer CD to set up the kernel installer to include configs
(chroot) livecd / # mkdir -p /efi/EFI/Gentoo
(chroot) livecd / # mkdir /etc/dracut.conf.d
(chroot) livecd / # blkid
Resulting Output:
/dev/nvme0n1p3: UUID="d5f4e04c-643c-4285-97b0-4949dfdf00be"
You must match the root partitions UUID in the dracut config file, in the example above we would add lines:
(chroot) livecd / # nano /etc/dracut.conf.d/00-installkernel.conf
kernel_cmdline=" root=UUID=d5f4e04c-643c-4285-97b0-4949dfdf00be "
Use CTRL+O to save and CTRL+X to exit nano, then run the following command to prepare kernel compilation
(chroot) livecd / # emerge --ask sys-kernel/installkernel
A Distribution Kernel is used to configure, automatically build, and install the Linux Kernel and Modules
Run the following command from the Gentoo Installer CD to start the Gentoo Linux Kernel compilation process
(chroot) livecd / # emerge --ask sys-kernel/gentoo-kernel
Run the following command from the Gentoo Installer CD to perform a system wide clean up of old packages
(chroot) livecd / # emerge --depclean
The fstab file will tell our bootloader how to mount each disk partition within our new Gentoo filesystem
Run the following command from the Gentoo Installer CD to edit the fstab file and add the following lines
(chroot) livecd / # nano /etc/fstab
/dev/nvme0n1p1 /efi vfat umask=0077,tz=UTC 0 2
/dev/nvme0n1p2 none swap sw 0 0
/dev/nvme0n1p3 / xfs defaults,noatime 0 1
Run the following command from the Gentoo Installer CD to define the hostname for our newly installed OS
(chroot) livecd / # echo itlabcenter-gentoo > /etc/hostname
Run the following command from the Gentoo Installer CD to install dhcpcd and enable the DHCP client service
(chroot) livecd / # emerge --ask net-misc/dhcpcd
(chroot) livecd / # systemctl enable dhcpcd
Run the following command from the Gentoo Installer CD to set a new password for the root user account
(chroot) livecd / # passwd
Run the following commands from the Gentoo Installer CD to configure the systemd service manager for boot
(chroot) livecd / # systemd-machine-id-setup
(chroot) livecd / # systemd-firstboot --prompt
(chroot) livecd / # systemctl preset-all --preset-mode=enable-only
Run the following commands from the Gentoo Installer CD to install bash shell completion and time sync
(chroot) livecd / # emerge --ask app-shells/bash-completion
(chroot) livecd / # emerge --ask net-misc/chrony
(chroot) livecd / # systemctl enable chronyd.service
Run the following commands from the Gentoo Installer CD to install file system tools for our partitions
(chroot) livecd / # emerge --ask sys-fs/xfsprogs
(chroot) livecd / # emerge --ask sys-fs/dosfstools
Run the following commands from the Gentoo Installer CD to configure and install the GRUB OS bootloader
(chroot) livecd / # echo 'GRUB_PLATFORMS="efi-64"' >> /etc/portage/make.conf
(chroot) livecd / # emerge --ask sys-boot/grub
(chroot) livecd / # grub-install --efi-directory=/efi
(chroot) livecd / # grub-mkconfig -o /boot/grub/grub.cfg
Run the following commands from the Gentoo Installer CD to unmount the drive and boot the new Gentoo system
(chroot) livecd / # exit
livecd /mnt/gentoo # cd
livecd ~ # umount -l /mnt/gentoo/dev{/shm,/pts,}
livecd ~ # umount -R /mnt/gentoo
livecd ~ # reboot
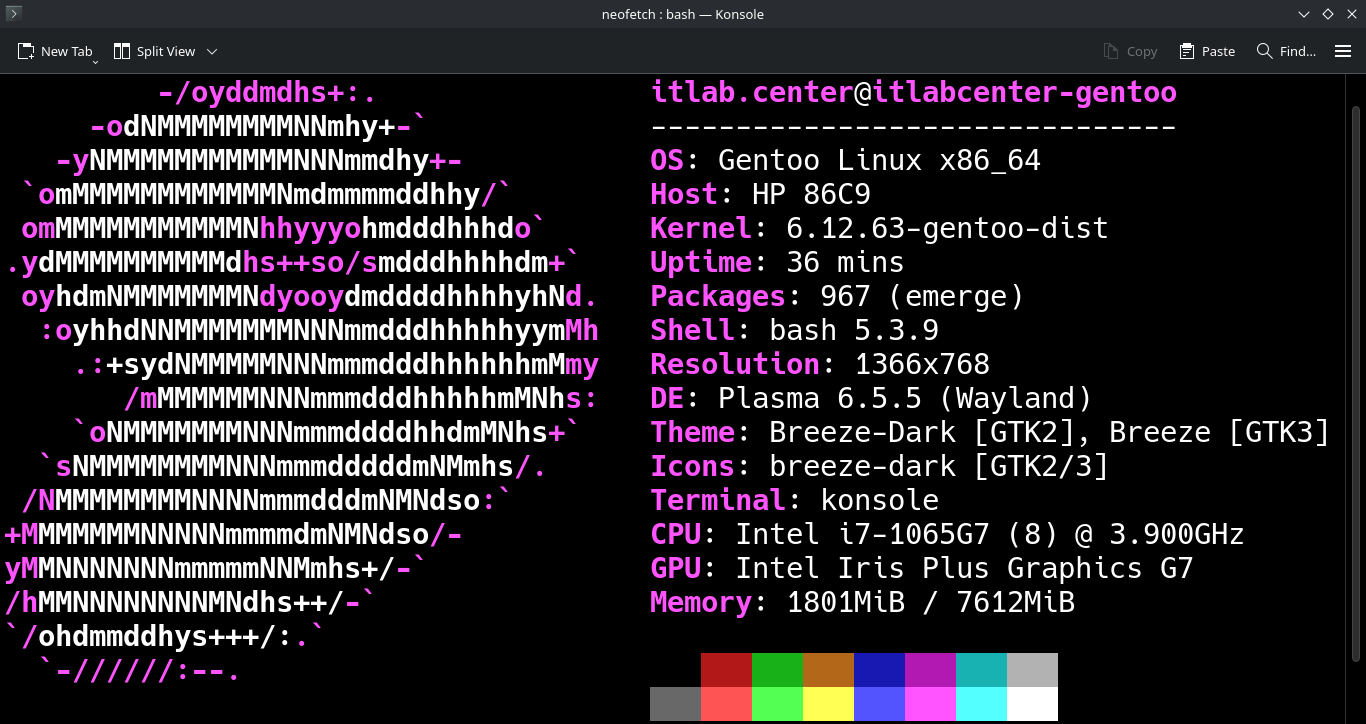
If your configuration and compilation followed correctly you will be presented with a CLI login prompt
Though we now have our base operating system, we will be using more tools in this iptables lesson exercise
Let's go and install these tools including a desktop environment, iptables, and the mininet virtual machine
Log in as root and run the following commands from the Gentoo Linux Terminal to install KDE Plasma desktop
root@itlabcenter-gentoo ~ # emerge --ask kde-plasma/plasma-meta
root@itlabcenter-gentoo ~ # emerge --ask kde-apps/dolphin
root@itlabcenter-gentoo ~ # echo "kde-apps/dolphin thumbnail" >> /etc/portage/package.use/dolphin
root@itlabcenter-gentoo ~ # emerge --ask kde-apps/thumbnailers
root@itlabcenter-gentoo ~ # emerge --ask kde-apps/konsole
root@itlabcenter-gentoo ~ # systemctl enable sddm
root@itlabcenter-gentoo ~ # systemctl enable NetworkManager
Run the following commands from the Gentoo Linux Terminal to create our user account and reboot to desktop
root@itlabcenter-gentoo ~ # useradd -m -G wheel,users,video,audio,lp -s /bin/bash itlab.center
root@itlabcenter-gentoo ~ # passwd itlab.center
root@itlabcenter-gentoo ~ # emerge --ask app-admin/sudo
Run the following command from the Gentoo Linux Terminal to edit the sudoers file to configure admin access
root@itlabcenter-gentoo ~ # visudo
Find the following line and remove the Hashtag to enable admin commands, save with CTRL+O and exit CTRL+X
Run the reboot command once more and you should load into your new desktop environment, be sure to log in

At the bottom on the taskbar, click the Konsole application to open a terminal. We will work from here
Run the following command from the Gentoo Linux Terminal to install our iptables firewall service package
itlab.center@itlabcenter-gentoo ~ # sudo emerge --ask net-firewall/iptables
Run the following command from the Gentoo Linux Terminal to install the Xterm terminal and Nmap scanner
itlab.center@itlabcenter-gentoo ~ # sudo emerge --ask x11-terms/xterm net-analyzer/nmap
Run the following command from the Gentoo Linux Terminal to install the Netcat command line network tool
itlab.center@itlabcenter-gentoo ~ # sudo emerge --ask net-analyzer/openbsd-netcat
This concludes the installation of our basic tools for this lab, let's move on to deploying our network
In this lab exercise we simulate the perspective of the network administrator performing network scanning
Before we move forward let's have a birds eye view of what we are trying to emulate so you can understand:
+------------------+ +------------------+
| Admin | | User |
| 10.0.0.1 | | 10.0.0.2 |
+--------+---------+ +---------+--------+
\ /
\ /
\ /
+--------------+
| Switch |
+--------------+
|
|
+---------+--------+
| Lab Server |
| 10.0.0.3 |
| |
+------------------+
Now in order for us to deploy network topology emulation with Mininet later we need to make kernel support
Run the following commands from the Gentoo Linux Terminal to navigate to the kernel configuration file:
itlab.center@itlabcenter-gentoo ~ # cd /usr/src/linux
itlab.center@itlabcenter-gentoo /usr/src/linux # make menuconfig
Run the following command from the Gentoo Linux Terminal to install the OpenvSwitch dependencies and tools
itlab.center@itlabcenter-gentoo /usr/src/linux # sudo emerge --ask net-misc/openvswitch
Portage will ask you to update your USE flags, type Yes and hit enter, then run the following command:
itlab.center@itlabcenter-gentoo /usr/src/linux # sudo dispatch-conf
This will show you a comparison of the changes needing made, press the u key to update your USE flags
Run the following command from the Gentoo Linux Terminal to install the OpenvSwitch dependencies and tools
itlab.center@itlabcenter-gentoo /usr/src/linux # sudo emerge --ask net-misc/openvswitch
Run the following command from the Gentoo Linux Terminal to install the Git tool for using github tools
itlab.center@itlabcenter-gentoo /usr/src/linux # sudo emerge --ask dev-vcs/git
Run the following command from the Gentoo Linux Terminal to install python and the cgroup dependencies
itlab.center@itlabcenter-gentoo /usr/src/linux # sudo emerge --ask dev-python/setuptools sys-apps/coreutils
Mininet is a tool we will use to create emulated network topologies from the command line to test iptables
Run the following commands from the Gentoo Linux Terminal to clone the Mininet git repository and enter it
itlab.center@itlabcenter-gentoo /usr/src/linux # cd /usr/local/src
itlab.center@itlabcenter-gentoo /usr/local/src # sudo git clone https://github.com/mininet/mininet
itlab.center@itlabcenter-gentoo /usr/local/src # cd mininet
Last part we need to take care of before our virtual switch can begin routing packets and assigning IPs
Run the following commands from the Gentoo Linux Terminal to perform the openvswitch database basic setup
itlab.center@itlabcenter-gentoo /usr/local/src/mininet # sudo mkdir -p /etc/openvswitch
itlab.center@itlabcenter-gentoo /usr/local/src/mininet # sudo ovsdb-tool create /etc/openvswitch/conf.db /usr/share/openvswitch/vswitch.ovsschema
itlab.center@itlabcenter-gentoo /usr/local/src/mininet # sudo ovsdb-server --remote=punix:/var/run/openvswitch/db.sock --remote=db:Open_vSwitch,Open_vSwitch,manager_options --pidfile --detach
itlab.center@itlabcenter-gentoo /usr/local/src/mininet # sudo ovs-vswitchd --pidfile --detach
Run the following command from the Gentoo Linux Terminal to initialize all the mininet core dependencies
itlab.center@itlabcenter-gentoo /usr/local/src/mininet # sudo python setup.py install
We also need to build the mnexec binary. This is a C helper that handles the heavy lifting of namespaces
Run the following command from the Gentoo Linux Terminal to build the mnexec binary from source code:
itlab.center@itlabcenter-gentoo /usr/local/src/mininet # sudo make mnexec
itlab.center@itlabcenter-gentoo /usr/local/src/mininet # sudo cp mnexec /usr/bin/
Telnet is the protocol mininet uses to check on the status of it's nodes and receive information about them
Run the following command from the Gentoo Linux Terminal to install the telnet protocol and application:
itlab.center@itlabcenter-gentoo /usr/local/src/mininet # sudo emerge --ask net-misc/telnet-bsd
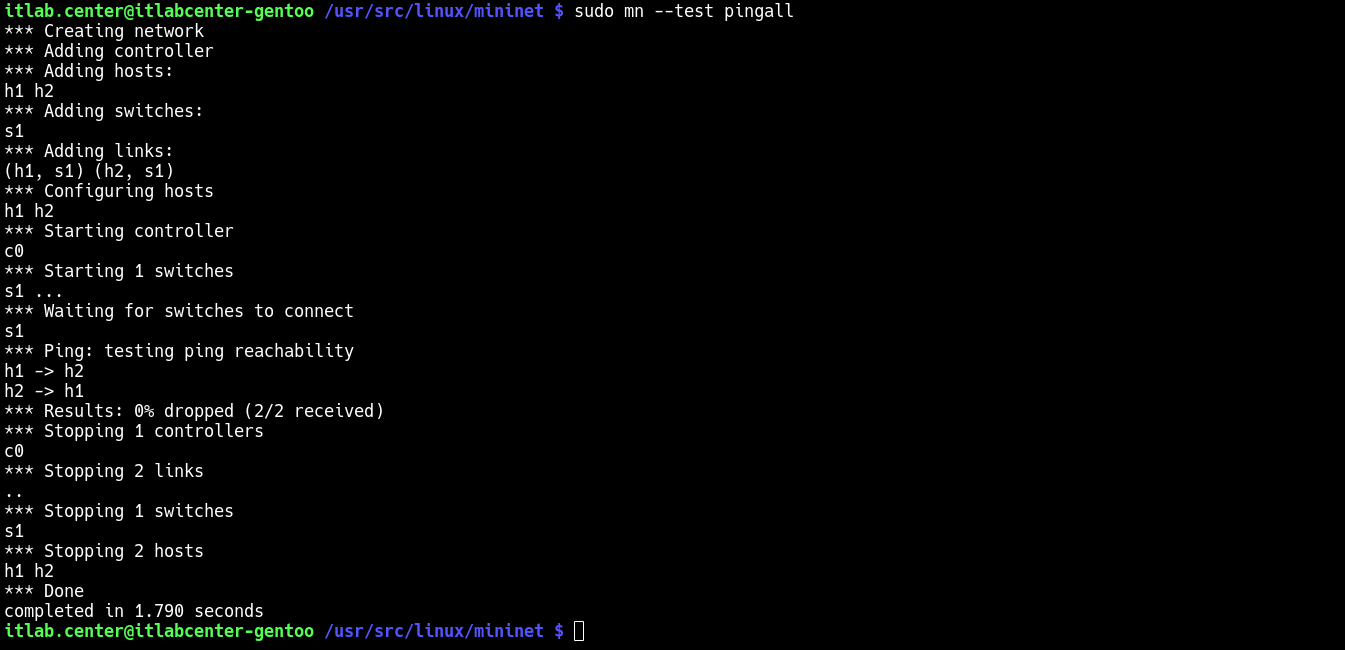
Run the following command from the Gentoo Linux Terminal to test that Mininet has been properly set up:
itlab.center@itlabcenter-gentoo /usr/local/src/mininet # sudo mn --test pingall
Expected Output:
Now that our images are created, we are tasked with connecting them with virtual links to a network switch
This is precisely what mininet is for, which can be programmed with python scripting to create topologies
Run the following commands from the Gentoo Linux Terminal to create and edit our Mininet python script:
itlab.center@itlabcenter-gentoo /usr/local/src/mininet # cd ~
itlab.center@itlabcenter-gentoo ~ # nano topology.py
Type out the Python script below to perform calls to the Mininet Python modules and link hosts virtually:
#!/usr/bin/python3
from mininet.net import Mininet
from mininet.node import Controller, OVSBridge
from mininet.cli import CLI
from mininet.log import setLogLevel, info
from mininet.term import makeTerm
def start_lab():
net = Mininet(controller=Controller)
net.addController('c0')
admin = net.addHost('admin', ip='10.0.0.1/24', mac='00:00:00:00:00:0A')
user = net.addHost('user', ip='10.0.0.2/24', mac='00:00:00:00:00:08')
s1 = net.addSwitch('s1', cls=OVSBridge)
net.addLink(admin, s1)
net.addLink(user, s1)
net.start()
CLI(net)
net.stop()
if __name__ == '__main__':
setLogLevel('info')
start_lab()
This will create our lab environment and bring it live, use CTRL+O to save the script and CTRL+X to exit
Run the following commands from the Gentoo Linux Terminal to grant X11 permissions to our Mininet hosts:
itlab.center@itlabcenter-gentoo ~ # sudo emerge --ask x11-apps/xhost
itlab.center@itlabcenter-gentoo ~ # xhost +
With our virtual network topology provisioned, we can move on to the exercise involving Iptables firewalls
In this lesson, you will apply what you have learned so far to configure an iptables firewall on our host
Make sure that you have a terminal open, you can do this by clicking the Konsole application on the taskbar
Iptables refers to its ruleset as policy chains, where chains are read with a specific order of operations
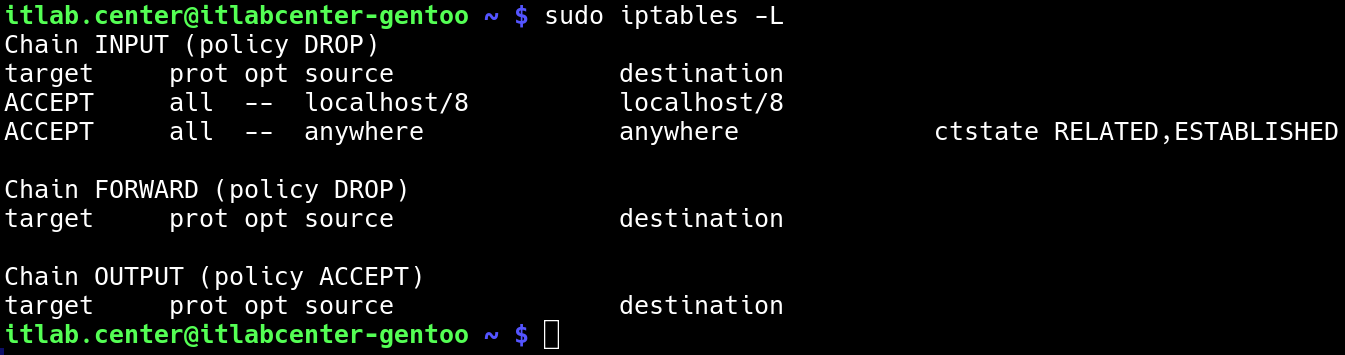
Run the following command from the Gentoo Linux Terminal to list the currently set iptables policy chains:
itlab.center@itlabcenter-gentoo ~ $ sudo iptables -L
Resulting Output:
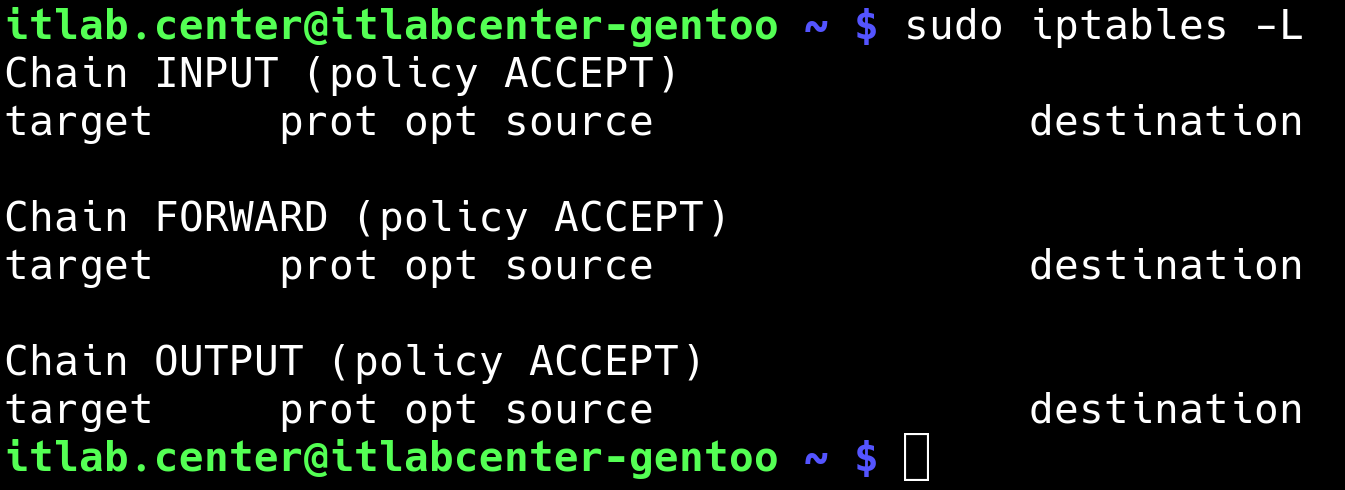
The output shown above tells us that the three chains are all using the default policy of ACCEPT and have
no other rules. In essence, the firewall is allowing all kinds of traffic both in and out of the system
Do you recall what we said about there always being a default DROP ALL policy at the bottom of every rule
Well, meet the exception to that rule. After every rule is examined in this chain, the default will allow
On a secure system with direct console access, the default policy can be safely set to default DENY/DROP
Run the following commands from the Gentoo Linux Terminal to change iptables policy chains to default DENY
itlab.center@itlabcenter-gentoo ~ # sudo iptables -F && sudo iptables -A INPUT -i lo -s 127.0.0.0/8 -d 127.0.0.0/8 -j ACCEPT
itlab.center@itlabcenter-gentoo ~ # sudo iptables -A INPUT -m conntrack --ctstate ESTABLISHED,RELATED -j ACCEPT
itlab.center@itlabcenter-gentoo ~ # sudo iptables -P INPUT DROP && sudo iptables -P FORWARD DROP
These commands create an exception for loopback and established traffic but will deny all others inbound
On Gentoo linux, the iptables rules are lost on reboot unless we save them and enable the iptables service
Run the following commands from the Gentoo Linux Terminal to save the new rules and enable the service:
itlab.center@itlabcenter-gentoo ~ # su -
itlabcenter-gentoo ~ # iptables-save > /var/lib/iptables/rules-save
itlabcenter-gentoo ~ # systemctl enable iptables-restore
itlabcenter-gentoo ~ # systemctl enable iptables-store
itlabcenter-gentoo ~ # reboot
Run the following command from the Gentoo Linux Terminal after the reboot to ensure that our rules saved
itlab.center@itlabcenter-gentoo ~ # sudo iptables -L
Expected Output:
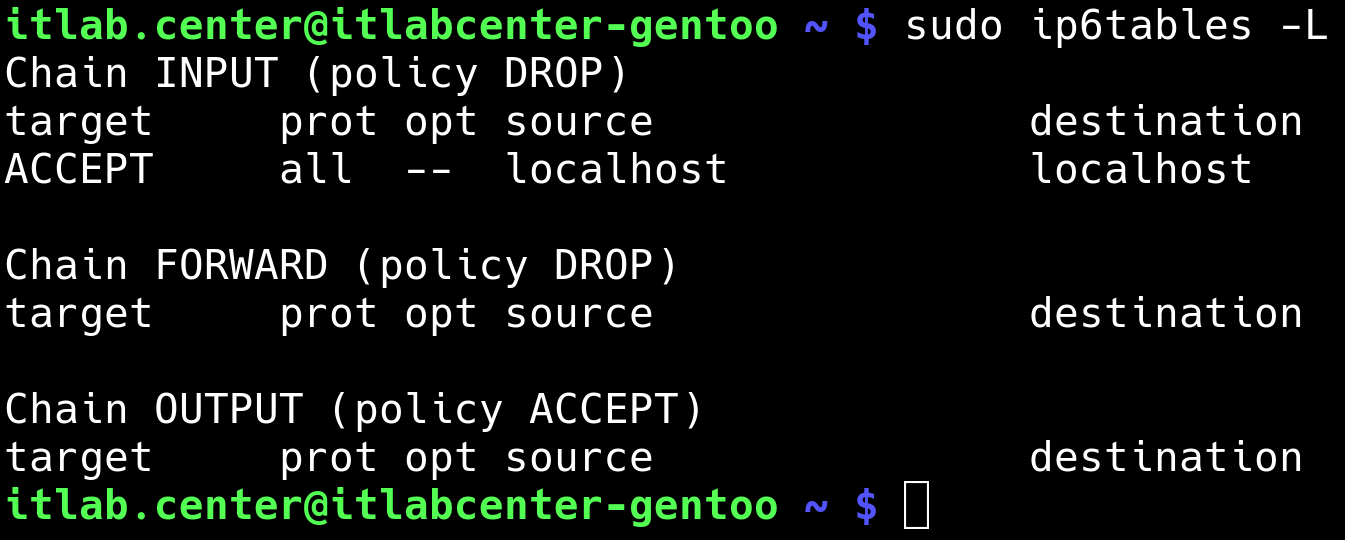
Iptables handles the IPv4 connections, since this lab does not utilize IPv6 it should also be set as DROP
Otherwise an attacker could simply bypass our security controls all together by sending IPv6 type packets
Run the following commands from the Gentoo Linux Terminal to set all IPv6 addressed packets to DENY/DROP
itlab.center@itlabcenter-gentoo ~ # sudo ip6tables -F
itlab.center@itlabcenter-gentoo ~ # sudo ip6tables -P INPUT DROP
itlab.center@itlabcenter-gentoo ~ # sudo ip6tables -P FORWARD DROP
itlab.center@itlabcenter-gentoo ~ # sudo ip6tables -P OUTPUT DROP
itlab.center@itlabcenter-gentoo ~ # sudo ip6tables -A INPUT -i lo -s ::1/128 -d ::1/128 -j ACCEPT
Run the following commands from the Gentoo Linux Terminal to save the new rules and enable the service:
itlab.center@itlabcenter-gentoo ~ # su -
itlabcenter-gentoo ~ # ip6tables-save > /var/lib/ip6tables/rules-save
itlabcenter-gentoo ~ # systemctl enable ip6tables-restore
itlabcenter-gentoo ~ # systemctl enable ip6tables-store
itlabcenter-gentoo ~ # reboot
Run the following command from the Gentoo Linux Terminal after the reboot to ensure that our rules saved
itlab.center@itlabcenter-gentoo ~ # sudo ip6tables -L
Expected Output:
Let's create a fictional network we can use to test the iptables firewall. Let's say the lab Gentoo system
is both a web and an FTP server and there are two client systems on our network: admin (10.0.0.1) and user
(10.0.0.2). We want to allow admin SSH access to the remote lab system, but not allow anyone else access
We want to allow HTTP access to everyone on the 10.0.0.0/24 network, but only allow FTP access to the user
With all of this in mind, our firewall rules table to be executed with Iptables tool would look like this:
|
Task
|
Chain
|
Source
|
Protocol
|
Port
|
Rule
|
Meaning
|
|
APPEND
|
INPUT
|
10.0.0.1
|
TCP
|
22
|
ACCEPT
|
Allow 10.0.0.1 SSH Access
|
|
APPEND
|
INPUT
|
10.0.0.0/24
|
TCP
|
22
|
DROP
|
Deny the 10.0.0.0 network SSH access
|
|
APPEND
|
INPUT
|
10.0.0.2
|
TCP
|
21
|
ACCEPT
|
Allow 10.0.0.2 FTP Access
|
|
APPEND
|
INPUT
|
10.0.0.0/24
|
TCP
|
21
|
DROP
|
Deny the 10.0.0.0 network FTP access
|
|
APPEND
|
INPUT
|
10.0.0.0/24
|
TCP
|
80
|
ACCEPT
|
Allow the 10.0.0.0 network HTTP access
|
|
APPEND
|
INPUT
|
10.0.0.0/24
|
ANY
|
ANY
|
DROP
|
Deny all traffic from the 10.0.0.0 network
|
Run the following command from the Gentoo Linux Terminal to configure our first of these firewall rules
itlab.center@itlabcenter-gentoo ~ # sudo iptables -A INPUT -s 10.0.0.1 -p tcp --dport 22 -j ACCEPT
There are many options used and defined here so this is how the iptables rule command above breaks down:
• -A - Append
• INPUT - to the INPUT Chain
• -s - from Source IP
• -p - to Protocol
• --dport - to Destination Port
• -j - Jump (stop processing rules and take action)
• ACCEPT - Allow this traffic
Run the following command from the Gentoo Linux Terminal to display the updated iptables firewall rules
itlab.center@itlabcenter-gentoo ~ # sudo iptables -L
Resulting Output:
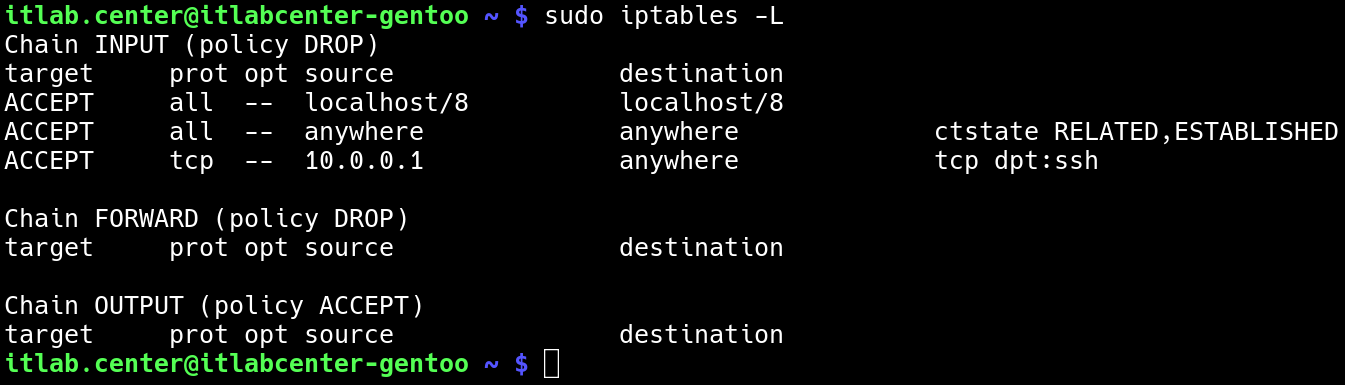
The iptables firewall will accept TCP traffic from 10.0.0.1 destined for anywhere, as long as it's port 22
We could have specified a destination instead of leaving it as "anywhere", but this rule meets our needs
What happens if the iptables firewall receives a packet that does not match our rule? It will be dropped
This is because of our default DENY policy, but let's create a more granular rule for cases without policy
Run the following command from the Gentoo Linux Terminal to create an explicit deny iptables firewall rule
itlab.center@itlabcenter-gentoo ~ # sudo iptables -A INPUT -s 10.0.0.0/24 -p tcp --dport 22 -j DROP
Run the following command from the Gentoo Linux Terminal to display the updated iptables firewall rules
itlab.center@itlabcenter-gentoo ~ # sudo iptables -L
Resulting Output:
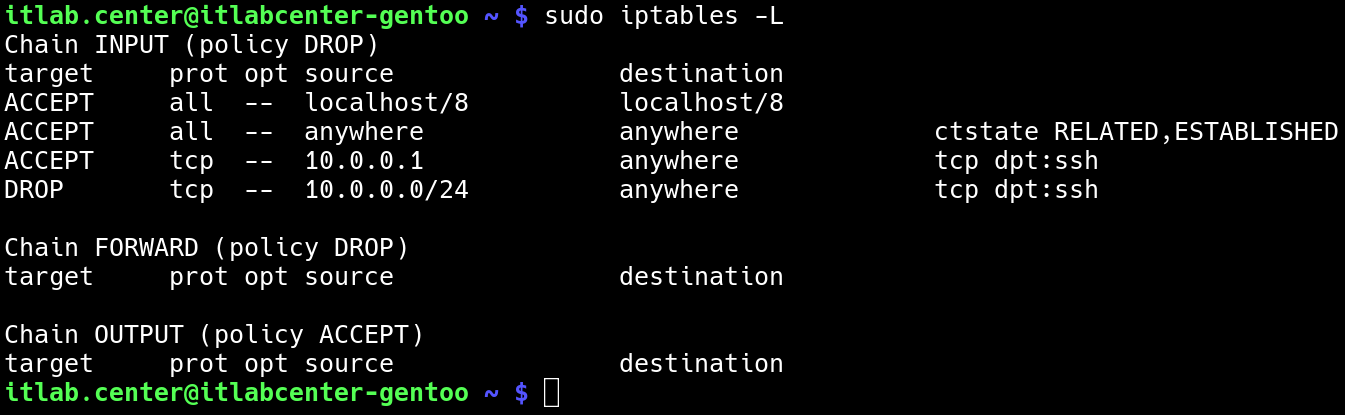
The second rule we just created will drop any traffic sent to TCP port 22 from the 10.0.0.0 network while
redundant, there are scenarios that may prohibit your from taking the default deny approach where needed
In such scenarios this rule would mean only 10.0.0.1 will be able to SSH to the remote lab desktop server
Run the following commands from the Gentoo Linux Terminal to add two additional iptables firewall rules
itlab.center@itlabcenter-gentoo ~ # sudo iptables -A INPUT -s 10.0.0.2 -p tcp --dport 21 -j ACCEPT
itlab.center@itlabcenter-gentoo ~ # sudo iptables -A INPUT -s 10.0.0.0/24 -p tcp --dport 21 -j DROP
itlab.center@itlabcenter-gentoo ~ # sudo iptables -L
Resulting Output:
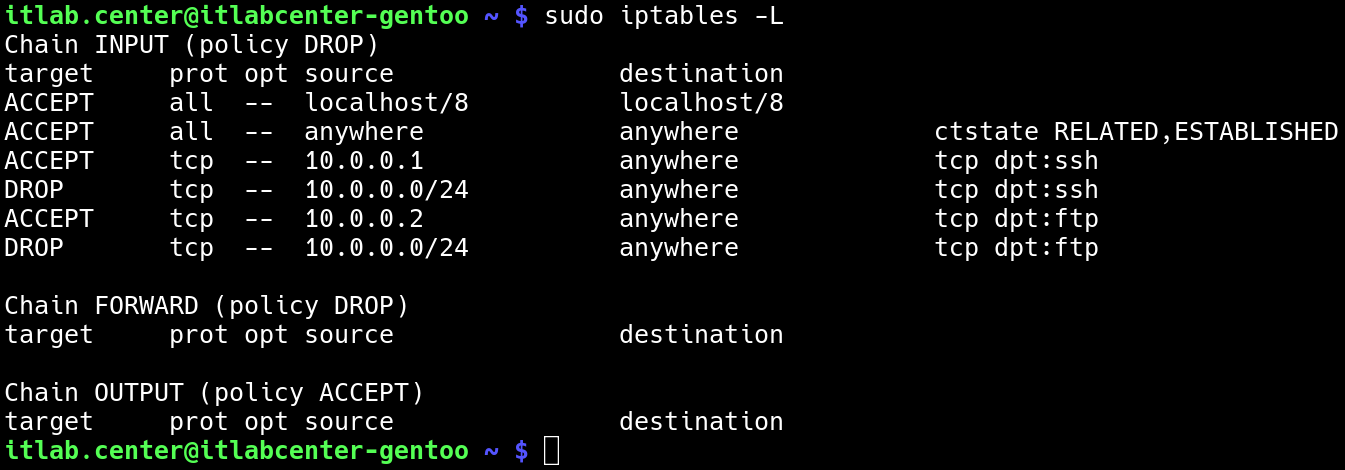
These rules now allow 10.0.0.1 to use SSH and 10.0.0.2 to user port 21 (FTP), just the same the firewall
will now drop any other traffic from the 10.0.0.0/24 network to port 22 (SSH) and also to port 21 (FTP)
Run the following commands from the Gentoo Linux Terminal to add two additional iptables firewall rules
itlab.center@itlabcenter-gentoo ~ # sudo iptables -A INPUT -s 10.0.0.0/24 -p tcp --dport 80 -j ACCEPT
itlab.center@itlabcenter-gentoo ~ # sudo iptables -A INPUT -s 10.0.0.0/24 -j DROP
itlab.center@itlabcenter-gentoo ~ # sudo iptables -L
Resulting Output:
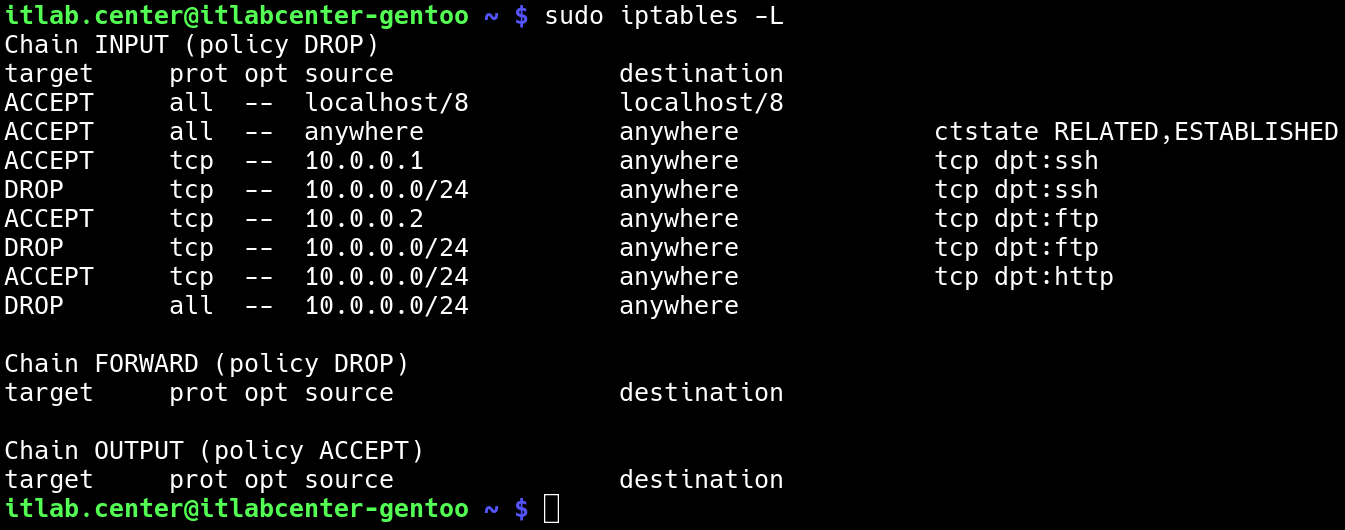
The rules now allow the entire 10.0.0.0 network to access port 80, meaning that both hosts have HTTP access
The last rule drops any other traffic from the 10.0.0.0 network, making our rules create a proper firewall
In this part of the lab, you will test your changes to the iptables firewall from our configuration process
In order to demonstrate the effectiveness of our explicit deny rules, let's remove the policy level rules
Run the following command from the Gentoo Linux Terminal to adjust the policy chains for iptables to ACCEPT
itlab.center@itlabcenter-gentoo ~ # sudo iptables -P INPUT ACCEPT
itlab.center@itlabcenter-gentoo ~ # sudo iptables -P FORWARD ACCEPT
itlab.center@itlabcenter-gentoo ~ # sudo iptables -L
Resulting Output:
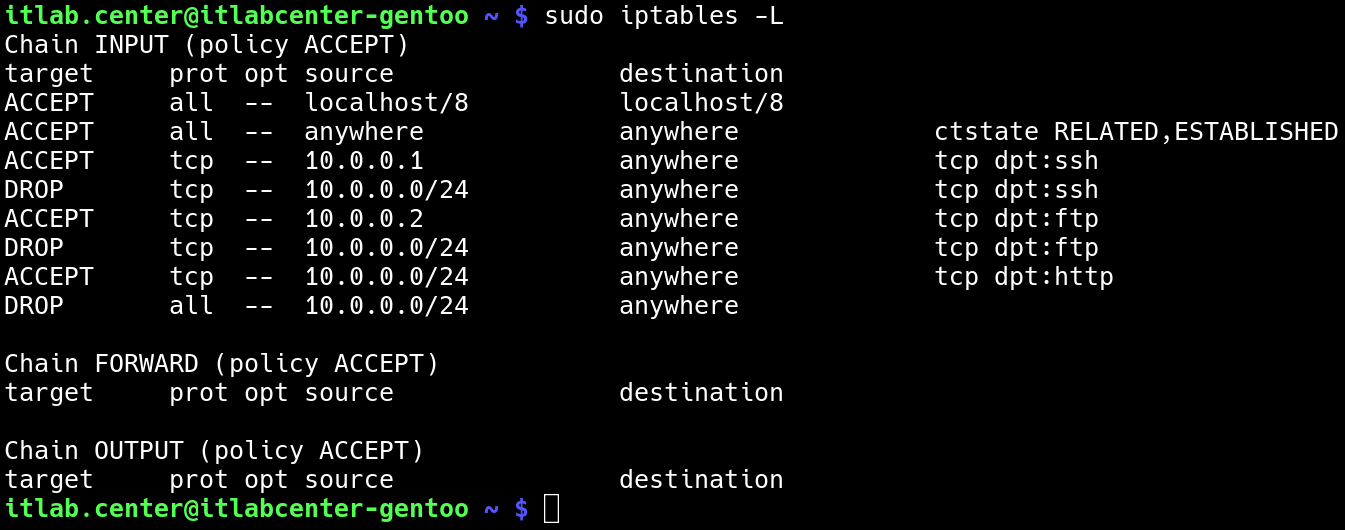
Based on the ruleset we have defined for our iptables firewall, we should be able to confirm this access:
• Admin (10.0.0.1) - TCP 22, 80
• User (10.0.0.2) - TCP 21, 80
To test the firewall, we will use a tool called Mininet to emulate the Admin and User hosts and Nmap scans
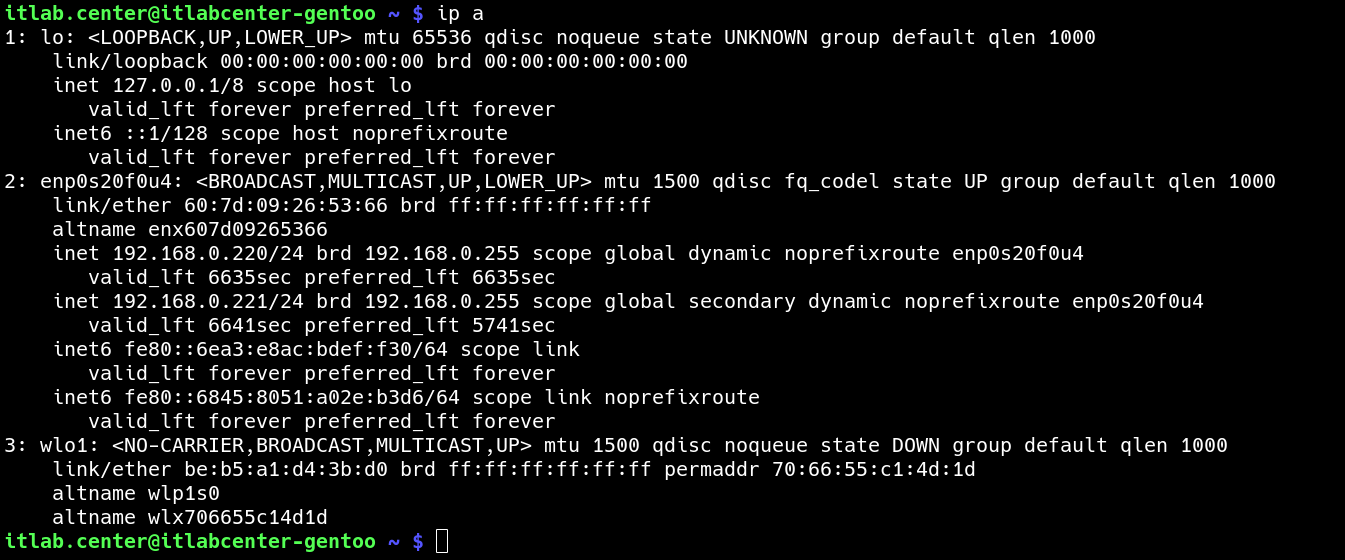
Run the following command from the Gentoo Linux Terminal to display the current IP Address configurations:
itlab.center@itlabcenter-gentoo ~ # ip a
Resulting Output:
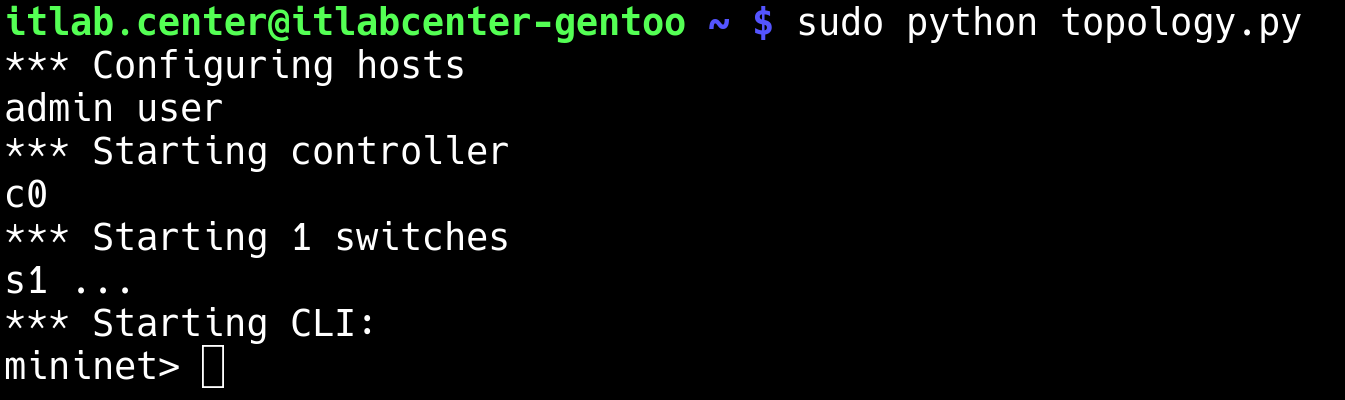
Run the following command from the Gentoo Linux Terminal to Deploy our virtual topology with our python:
itlab.center@itlabcenter-gentoo ~ # sudo python topology.py
Resulting Output:
Open a second terminal window by clicking New Tab in the top left of the console, we must connect Gentoo
Run the following command from the Gentoo Linux Terminal to set up a virtual interface with our Mininet:
itlab.center@itlabcenter-gentoo ~ # sudo ip link add veth-gentoo type veth peer name veth-mininet
itlab.center@itlabcenter-gentoo ~ # sudo ip link set veth-gentoo up
itlab.center@itlabcenter-gentoo ~ # sudo ovs-vsctl add-port s1 veth-mininet
itlab.center@itlabcenter-gentoo ~ # sudo ip link set veth-mininet up
itlab.center@itlabcenter-gentoo ~ # sudo ip addr add 10.0.0.3/24 dev veth-gentoo
Run the following command from the Mininet Terminal to open terminals for each of our simulated desktops
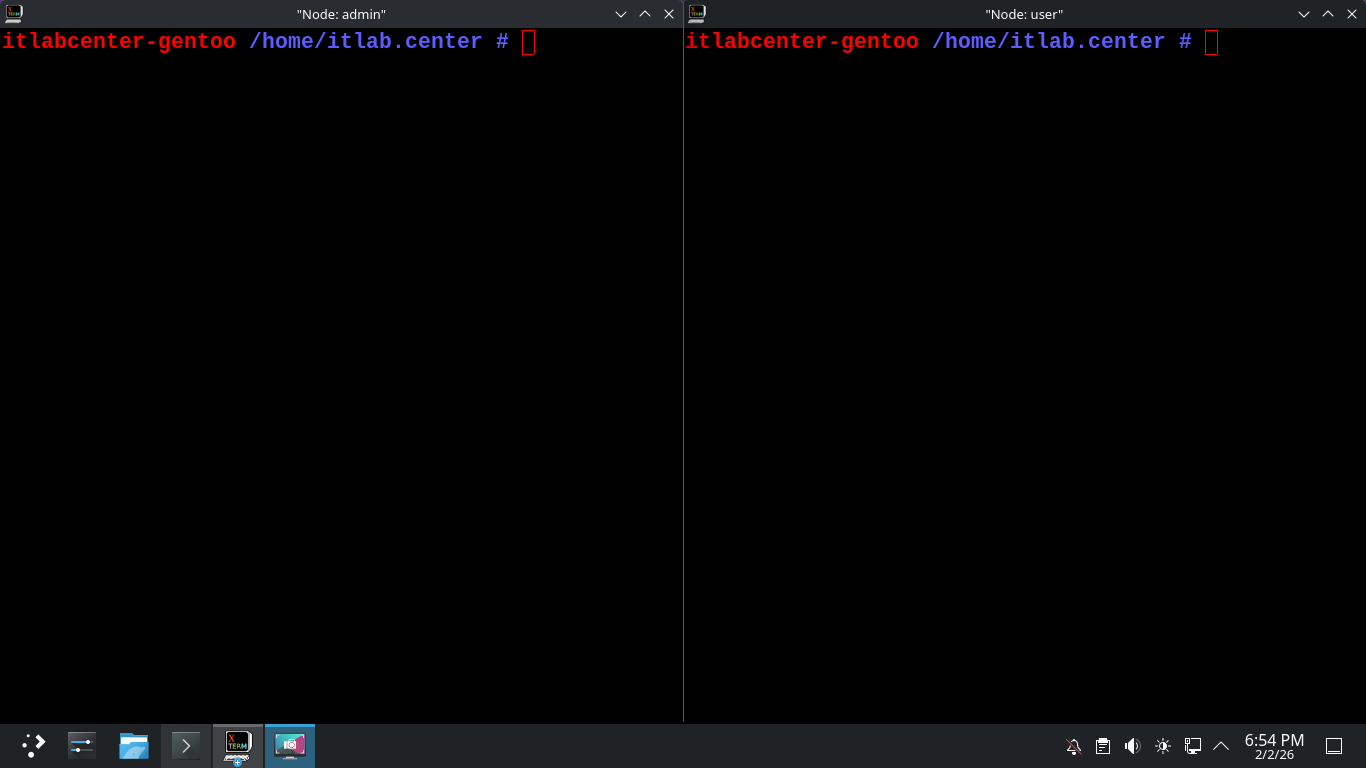
mininet> xterm admin user
Resulting Output:
Keep the terminal window with Mininet running open for the rest of the lab, you can move or minimize it
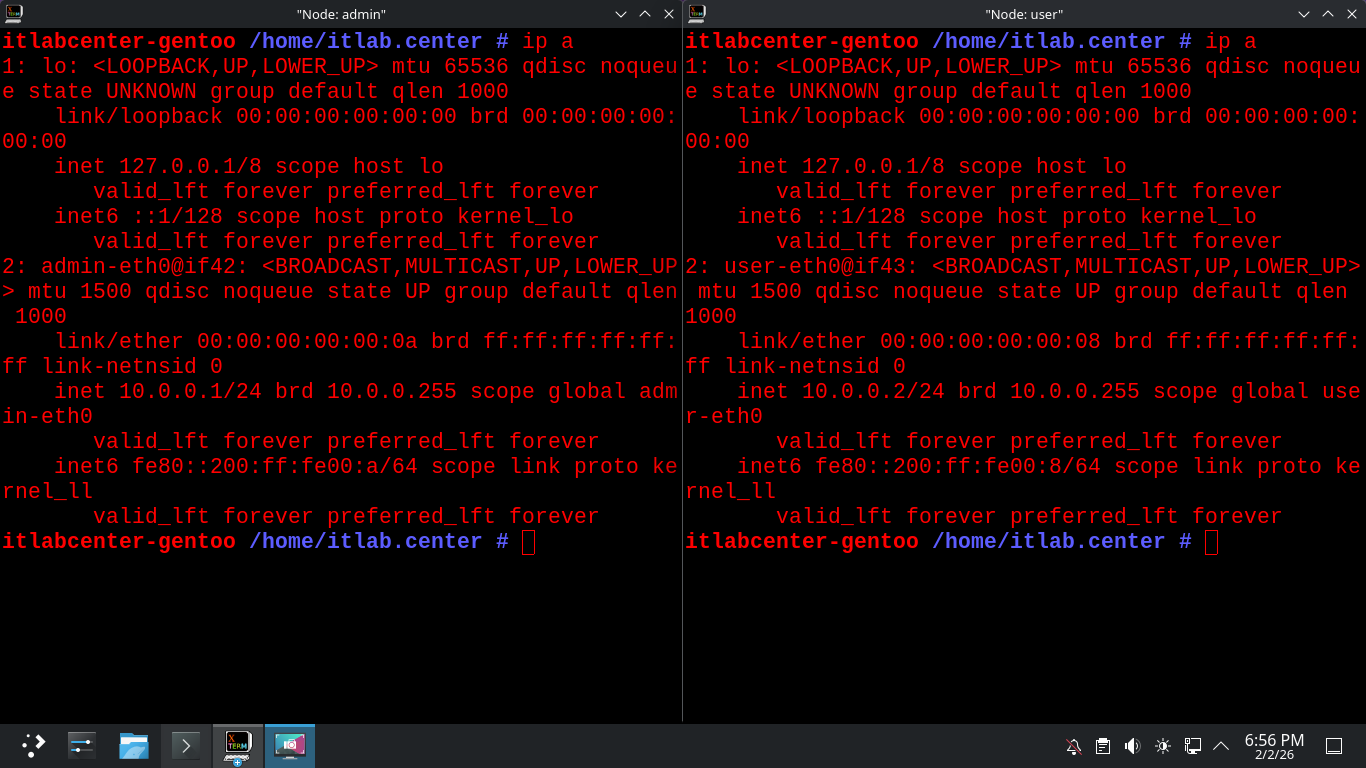
Remember that Admin is 10.0.0.1 and User is 10.0.0.2, run the following command to confirm the Addresses
itlabcenter-gentoo /home/itlab.center # ip a
Resulting Output:
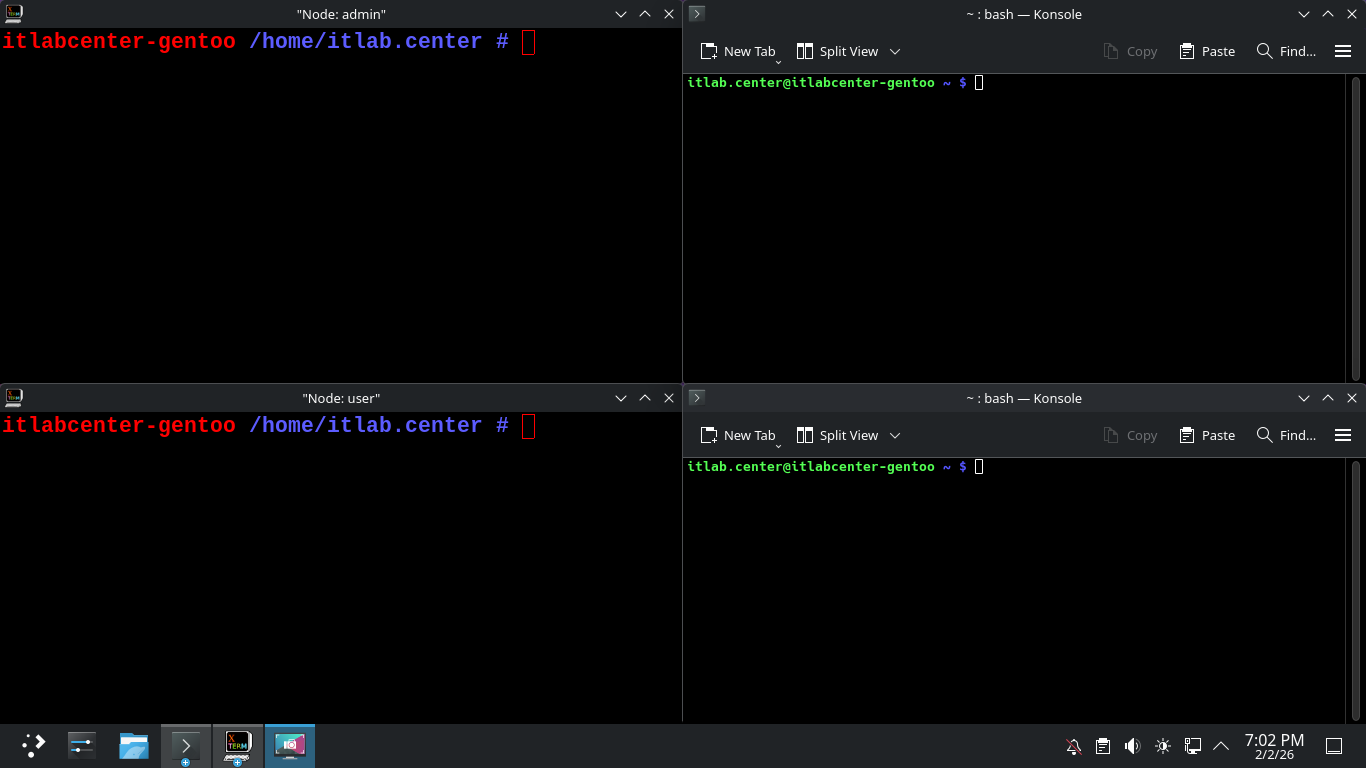
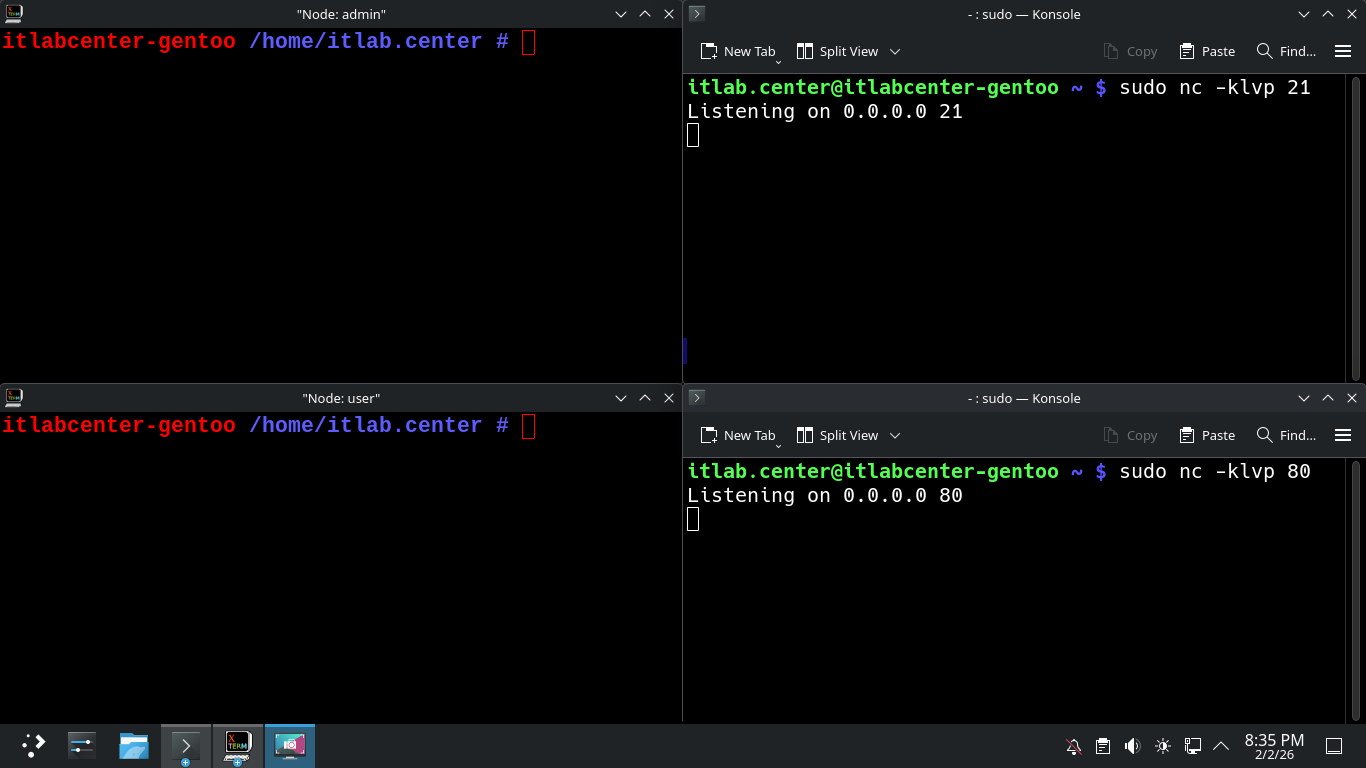
To simulate services let's open up 2 new instances of the Konsole application, these will act as servers
Now we will simulate our FTP server using a tool called netcat, this will allow is to listen on port 21
Run the following command from the Upper-Right Gentoo Terminal to simulate an FTP Server using Netcat:
itlab.center@itlabcenter-gentoo ~ # sudo nc -klvp 21
Run the following command from the Lower-Right Gentoo Terminal to simulate an HTTP Server using Netcat:
itlab.center@itlabcenter-gentoo ~ # sudo nc -klvp 80
Resulting Output:
Now that our listeners are set up, we will perform the remainder of the commands from the left terminals
Run the following command from the Admin X-Terminal Window to perform an Nmap TCP connect scan on Gentoo
itlabcenter-gentoo /home/itlab.center # nmap -sT 10.0.0.3
Resulting Output:

The iptables firewall is allowing the admin host access to SSH and HTTP but not FTP, SSH port 22 is closed
No other ports provide any information since the iptables firewall is dropping the nmap scanning packets
Run the following command from the User X-Terminal Window to perform an Nmap TCP connect scan on Gentoo
itlabcenter-gentoo /home/itlab.center # nmap -sT 10.0.0.3
Resulting Output:

Notice that the user desktop has access to the FTP port and the HTTP port, but does not have ssh access
Our Nmap scans have proven that Iptables firewall is configured to meet our stated security requirements
• Admin (10.0.0.1) - TCP 22, 80
• User (10.0.0.2) - TCP 21, 80
What is we need to add a new rule to our firewall? Recall that the iptables firewall is a chain of rules
Each rule is a link in the chain. Also recall that we added a DROP ALL rule at the bottom of that chain
In the next steps, we will do work in a new terminal window, leave all the other terminals open for now
Run the following commands from the Gentoo Linux Terminal to add an SSH access rule to Iptables firewall
itlab.center@itlabcenter-gentoo ~ # sudo iptables -A INPUT -s 10.0.0.2 -p tcp --dport 22 -j ACCEPT
itlab.center@itlabcenter-gentoo ~ # sudo iptables -L
Resulting Output:

On its own this rule should allow SSH access to the user host, but as we can see the rule is at the bottom
Iptables will read the chain in order and our new rule will be blocked by the 4th and 8th rules above it
If we truly want to implement this rule, the simplest fix is to clear the firewall and rewrite the chain
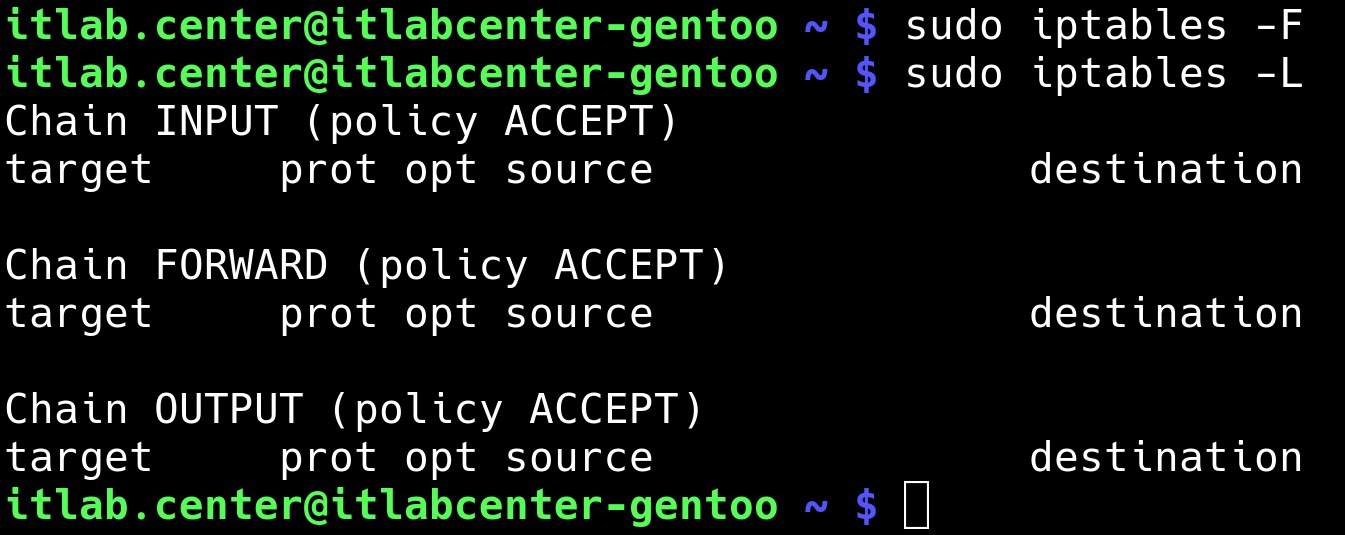
Run the following commands from the Gentoo Linux Terminal to clear the firewall rules and validate them
itlab.center@itlabcenter-gentoo ~ # sudo iptables -F
itlab.center@itlabcenter-gentoo ~ # sudo iptables -L
Resulting Output:
Now we can rebuild the iptables rule chain to place our allow rule in the proper order, before the DROP
Run the following commands from the Gentoo Linux Terminal to rebuild the Iptables firewalls rule chain:
itlab.center@itlabcenter-gentoo ~ # sudo iptables -A INPUT -s 10.0.0.1 -p tcp --dport 22 -j ACCEPT
itlab.center@itlabcenter-gentoo ~ # sudo iptables -A INPUT -s 10.0.0.2 -p tcp --dport 22 -j ACCEPT
itlab.center@itlabcenter-gentoo ~ # sudo iptables -A INPUT -s 10.0.0.0/24 -p tcp --dport 22 -j DROP
itlab.center@itlabcenter-gentoo ~ # sudo iptables -A INPUT -s 10.0.0.2 -p tcp --dport 21 -j ACCEPT
itlab.center@itlabcenter-gentoo ~ # sudo iptables -A INPUT -s 10.0.0.0/24 -p tcp --dport 21 -j DROP
itlab.center@itlabcenter-gentoo ~ # sudo iptables -A INPUT -s 10.0.0.0/24 -p tcp --dport 80 -j ACCEPT
itlab.center@itlabcenter-gentoo ~ # sudo iptables -A INPUT -s 10.0.0.0/24 -j DROP
itlab.center@itlabcenter-gentoo ~ # sudo iptables -L
Resulting Output:
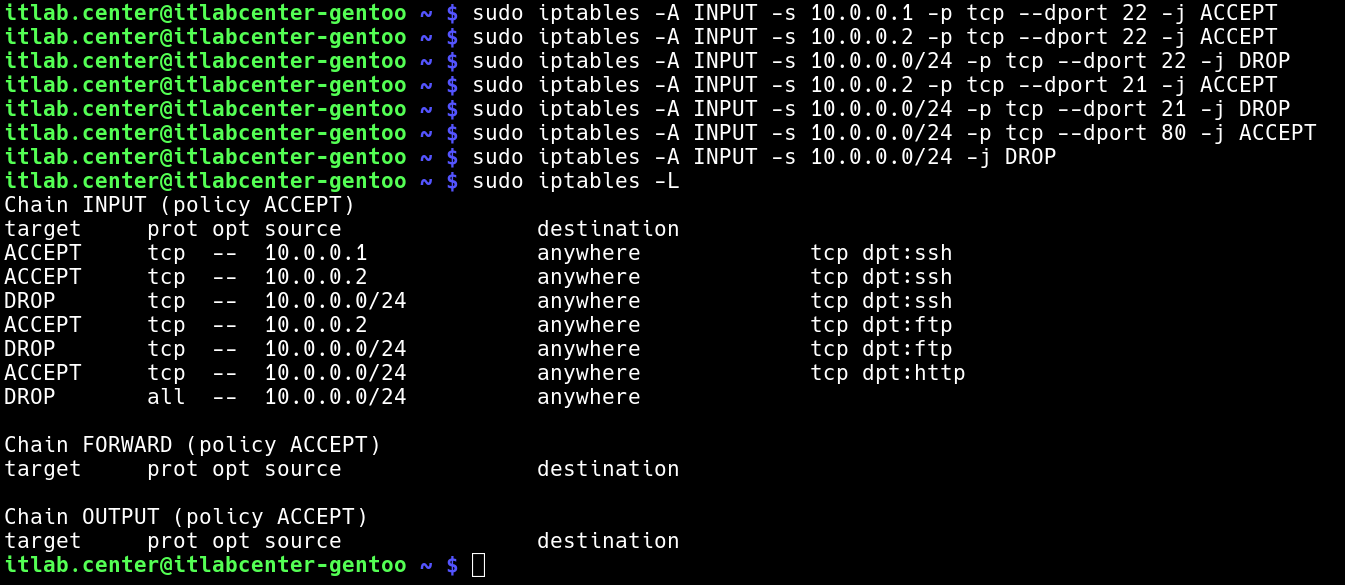
Both Admin (10.0.0.1) and User (10.0.0.2) should be able to access SSH, but any other host will be blocked
Now here's the real question, since we have a DROP rule at the bottom, do we really need other DROP rules?
The answer is no. The DROP ANY rules at the bottom will drop any packet not explicitly permitted above it
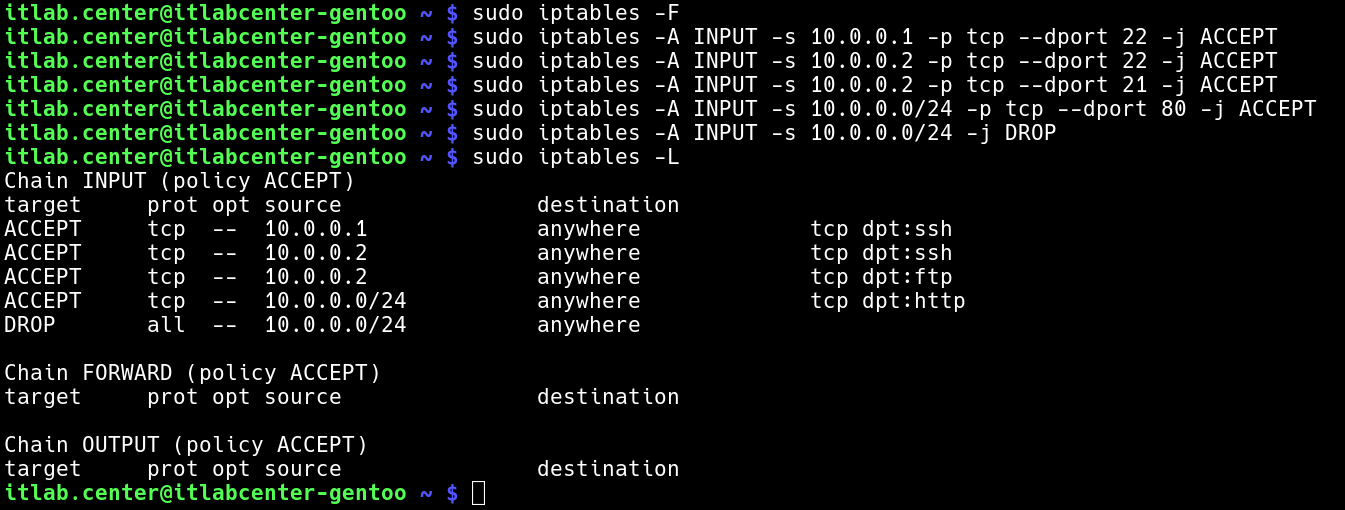
Run the following commands from the Gentoo Linux Terminal to rebuild the Iptables rules without extra DROP
itlab.center@itlabcenter-gentoo ~ # sudo iptables -F
itlab.center@itlabcenter-gentoo ~ # sudo iptables -A INPUT -s 10.0.0.1 -p tcp --dport 22 -j ACCEPT
itlab.center@itlabcenter-gentoo ~ # sudo iptables -A INPUT -s 10.0.0.2 -p tcp --dport 22 -j ACCEPT
itlab.center@itlabcenter-gentoo ~ # sudo iptables -A INPUT -s 10.0.0.2 -p tcp --dport 21 -j ACCEPT
itlab.center@itlabcenter-gentoo ~ # sudo iptables -A INPUT -s 10.0.0.0/24 -p tcp --dport 80 -j ACCEPT
itlab.center@itlabcenter-gentoo ~ # sudo iptables -A INPUT -s 10.0.0.0/24 -j DROP
itlab.center@itlabcenter-gentoo ~ # sudo iptables -L
Resulting Output:
Since we have removed the loopback rule, we scan use our bottom right terminal to perform a scan as well
Hit CTRL+C on each of the right terminals to stop the netcat process from listening on ports 21 and 80
Run the following command from the Upper-Right Gentoo Terminal to begin listening on both ports with netcat
itlab.center@itlabcenter-gentoo ~ # sudo nc -klvp 21 & sudo nc -klvp 80
Run the following command from the Three Remaining Terminals to scan the 10.0.0.3 host using Nmap TCP:
itlabcenter-gentoo /home/itlab.center # nmap -sT 10.0.0.3
itlab.center@itlabcenter-gentoo ~ # nmap -sT -Pn 10.0.0.3
Resulting Output:
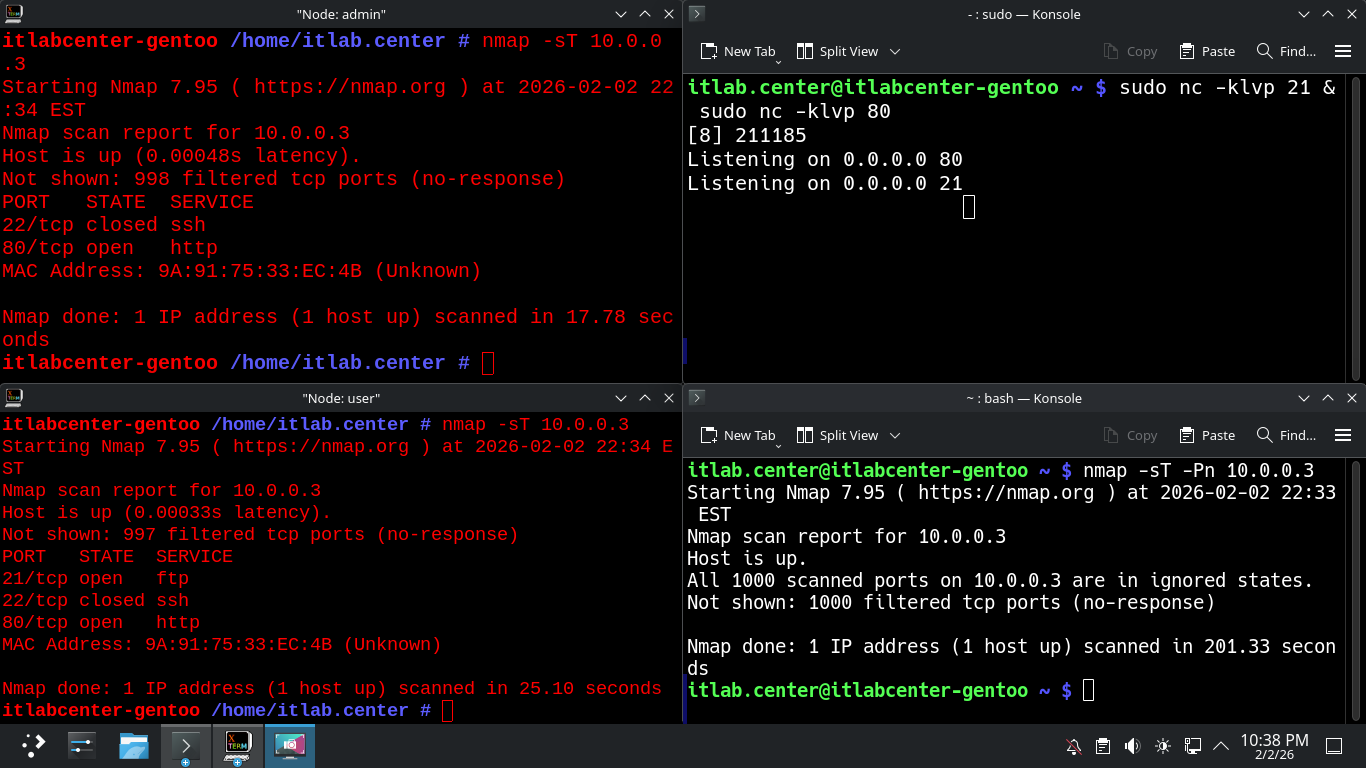
We can see that both the Admin and the User hosts have SSH access now, but our firewall blocks the third
Congratulations, in this lesson, you practiced configuring an iptables firewall and testing your changes
You gained valuable hands on experience with configuring firewalls, open source software, and nmap scans