Explore the foundational structure of Linux file systems, including directory hierarchy, permissions, and essential commands. This lab demonstrates practical navigation, file management, and system organization skills critical for any aspiring system administrator or IT professional. Gain hands-on experience with tools like ls, cd, chmod, and df to confidently manage Linux environments.
Cybrary is a well established and free IT training platform with several intuitive labs to explore
A paid subscription with more advanced labs is available as well outside the scope of this platform
Head to https://www.cybrary.it to create a free account for learning available on their platform
Head to Linux File System Basics to complete this training lab yourself or perform on homelab below
Quick Links:
Requirements:
• Windows PC w/ Internet Connection
• USB Flash Drive w/ at least 8GB Capacity
• Second PC with at least 2GB of memory
1. File System Overview
Each computer uses an operating system to store and categorize types of data to be used by the system
Data is used to interact with the hardware components of the PC depending on the function and information
Some data pertains to the storage devices, other interacts with the CPU or memory and others are programs
In order for the system to know where each type of data is stored the OS uses a standardized file system
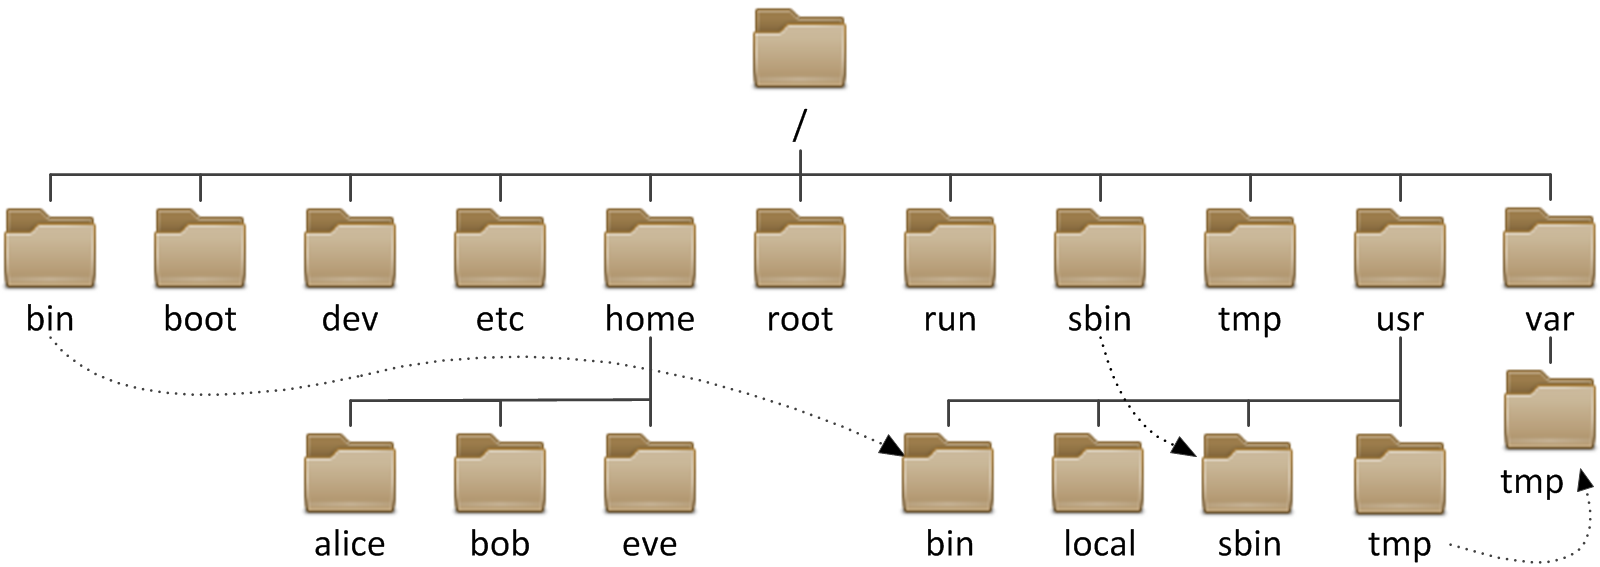
In Linux based systems the file system structure is composed of directories branching from a root directory
Root or / is the highest directory with multiple system level directories branching off from the root or /
There are many different file system structure formats which dictate how the information is organized:
• Windows: FAT, NTFS
• MacOS: HFS, APFS
• Linux: EXT, XFS
The majority of Linux based systems use the EXT filesystem or one of its four versions to index data
The file system and storage location is known as MetaData and is a rich source of forensic information
Understanding the underlying file system structure of systems is crucial for a digital forensics career
2. Create CentOS Live USB
CentOS is an Open Source variant of the Enterprise Red Hat Linux Distribution which is 100% free
You can use the operating system without having to install it onto your hard drive with a live usb
Download CentOS x86_64 Live ISO: CentOS Stream Alternate Images
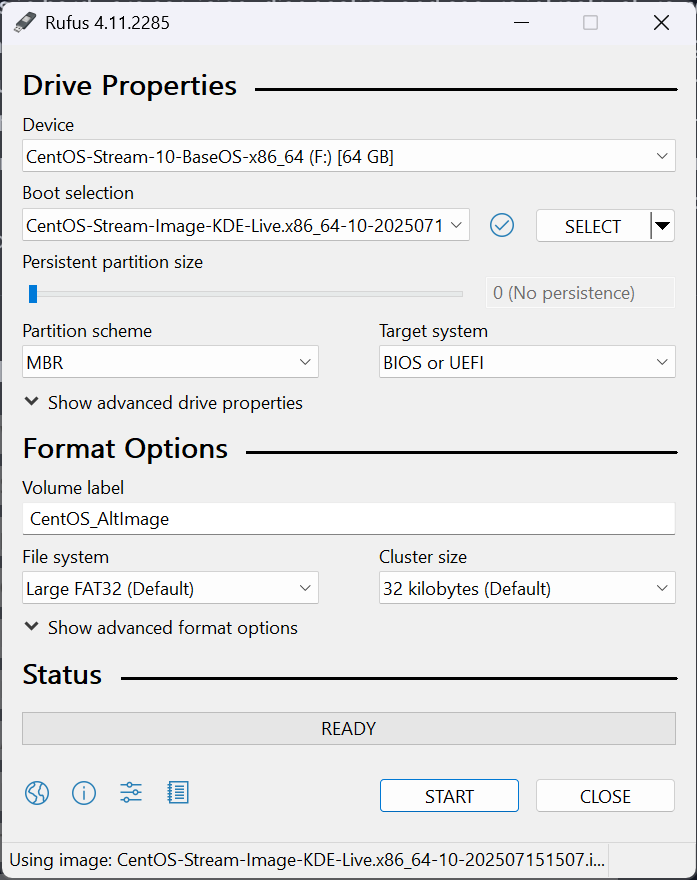
Download Rufus Disk Imager: Rufus Official Download
Insert USB Flash Drive, run rufus.exe, select target drive, select CentOS x86_64 Live Iso, start:
Remove USB Flash Drive and Insert into unused PC. Start PC and press hot boot key on startup:

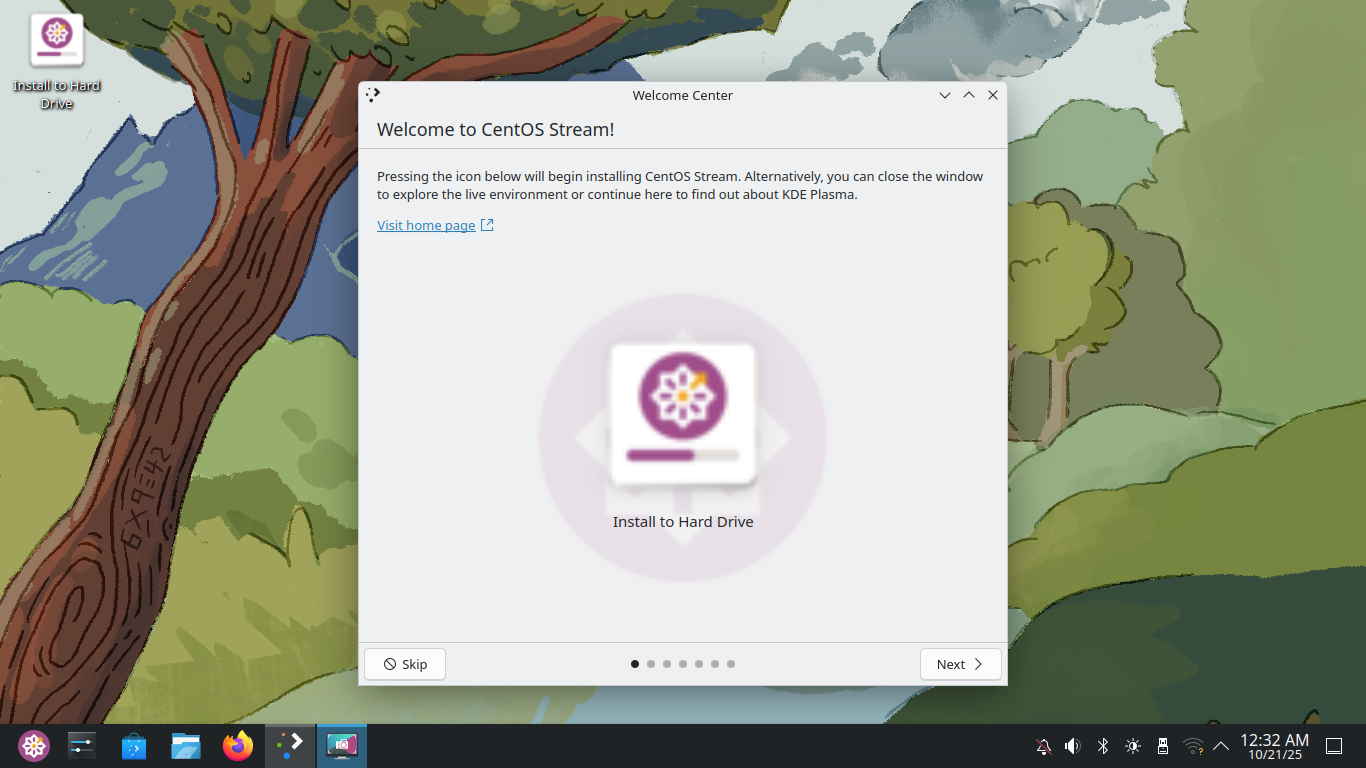
Select UEFI USB Flash Boot. Allow CentOS to load and scroll to select the Start CentOS Stream 10:

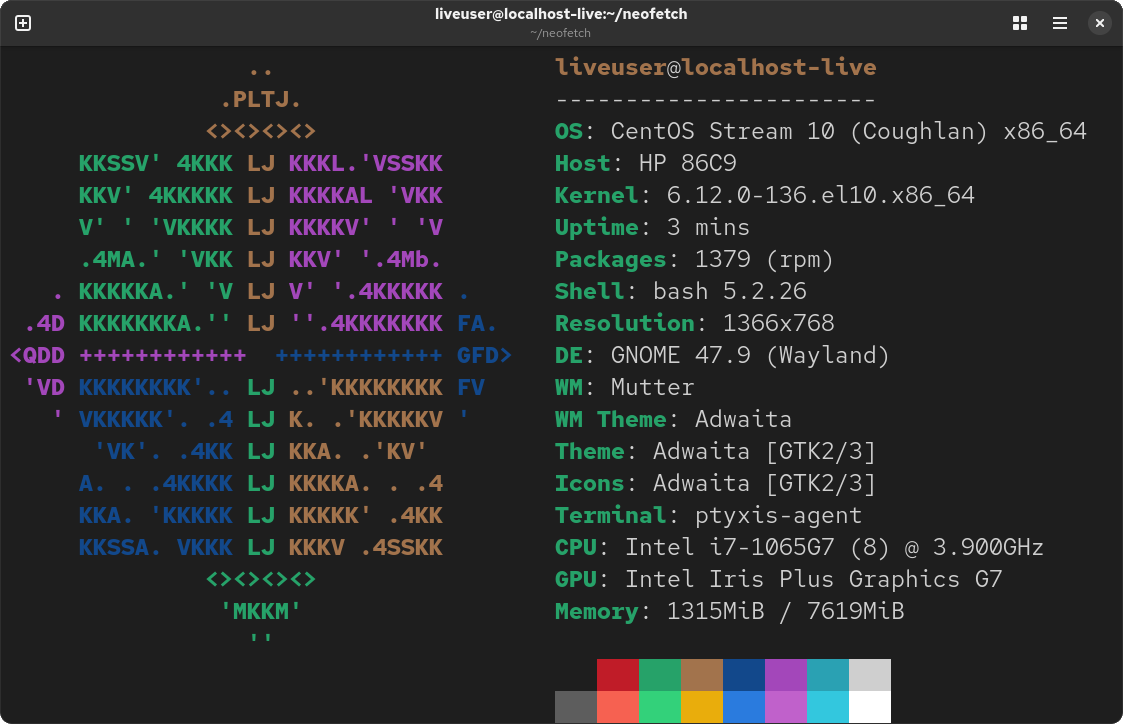
Now allow your workstation a moment to load and you will be taken to the CentOS Desktop Utility:
3. Explore the Linux File System
Command Line Interfaces are know as shells, the most common for Linux is Bourne Again Shell (BASH)
Here we will explore the CentOS Filesystem FHS, right click the desktop and select Open in Terminal:

Linux utilizes the Filesystem Hierarchy Standard (FHS) which means directories branch off from others
Run the following commands from the CentOS Terminal to navigate to the root directory and list contents:
liveuser@localhost-live:~$ cd /
liveuser@localhost-live:/$ ls -l
Resulting Output:
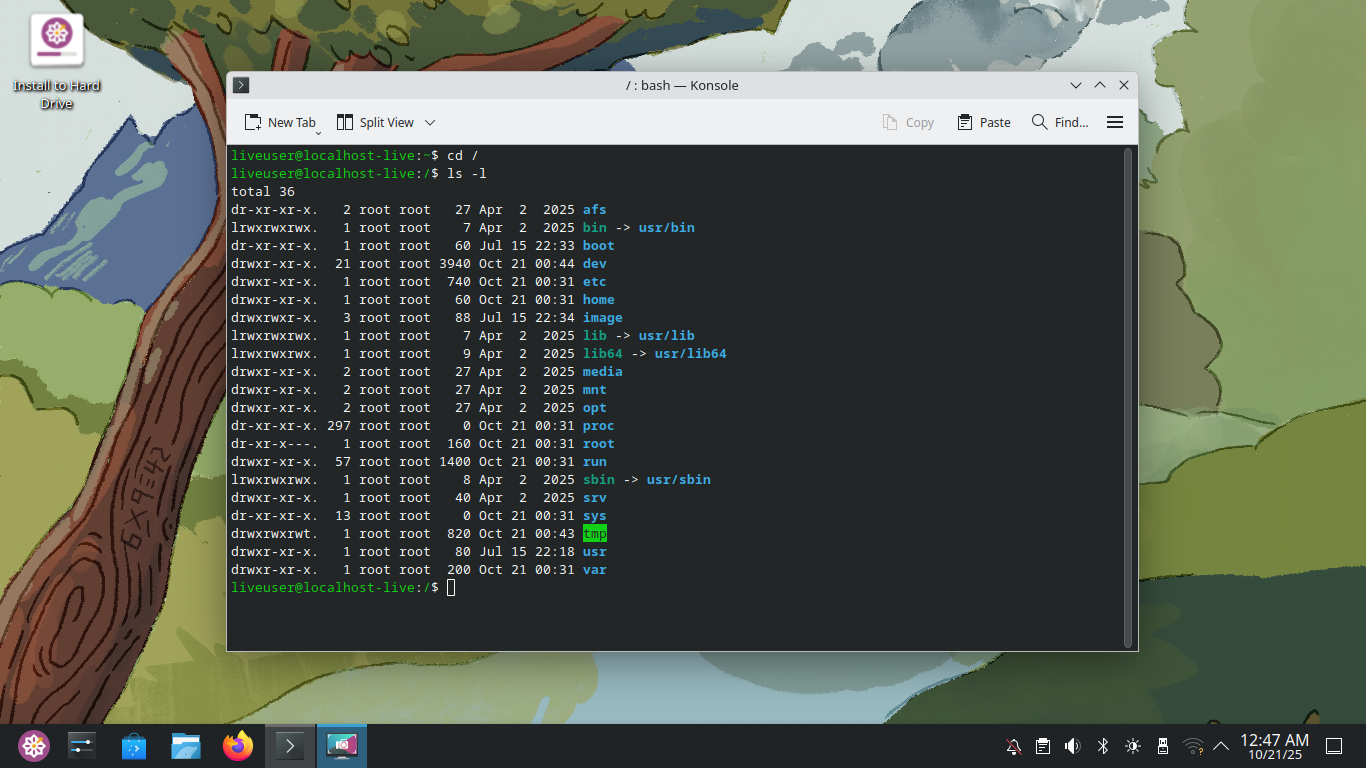
The dark blue color of several items indicates that they are directories, also indicated by the initial d
The light blue color of several items indicates that they are symbolic links which point to other items
The type of item is indicated by the first character in the permissions which can be d, l or - respectively
For the Symbolic Links you can see which file or directory it points to at the end marked with an -> arrow
The /bin directory is where Linux stores binaries: command line tools like ls, pwd, cat, more, less, etc.
Modern Linux Systems moved this location to /usr/bin but a symbolic link exists for backwards compatibility
The combination of rwx characters are the permissions section indicating read, write and execute permissions
The first thruple indicates file owner permissions, next group permissions, and finally permissions for all
For /bin we can see that all users have read, write and execute, allowing any user to utilize the cli tools
For /home we can see only the file owner has read, write and execute. Others having only read and execute
The /home directory is where users' files are kept. When you log in, you are placed in /home/yourusername
Run the following commands from the CentOS Terminal to print another view of the Linux Directory Structure:
liveuser@localhost-live:/$ sudo yum install tree -y
liveuser@localhost-live:/$ tree / -L 1
Resulting Output:
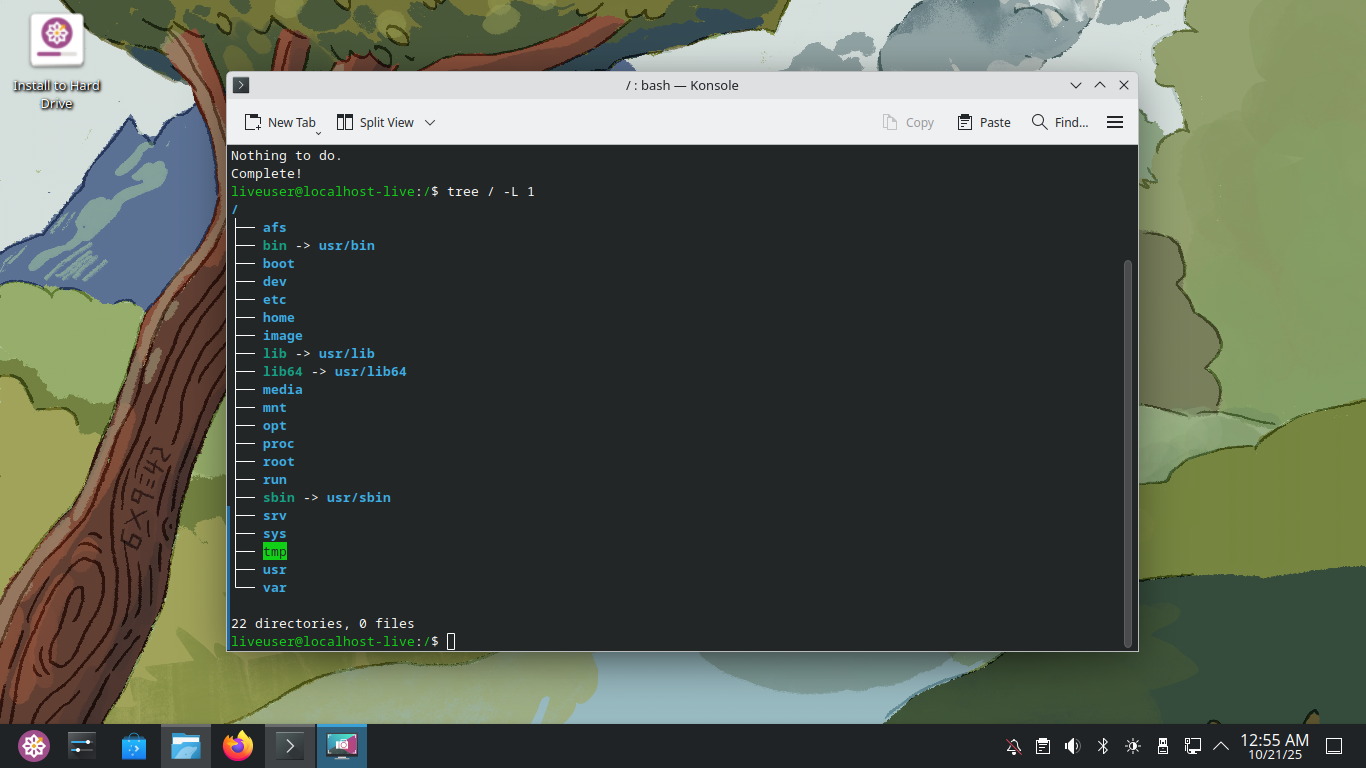
The tree utility gives us an overview of the branching structure of the directories in our current location
The -L 1 command options tells the tool to only go one level deep, you can check what -L 2 and -L 3 look like
Run the following command from the CentOS Terminal to view the directory structure for the /home directory:
liveuser@localhost-live:/$ sudo tree /home
Resulting Output:

Note: the sudo command in linux tells the system to run the proceeding commands with root level privileges
This view of the home directory allows us to see the users on the system and all of the directories they have
Run the following command from the CentOS Terminal to create a new user account on the system:
liveuser@localhost-live:/$ sudo adduser michael
Use 'password' if prompted for the account password and then complete the remaining prompts as follows:
• Full Name: Michael Corleone
• Room Number: leave blank
• Work Phone: leave blank
• Home Phone: leave blank
• Other: leave blank
Run the following command from the CentOS Terminal to view the directory structure of /home once again:
liveuser@localhost-live:/$ sudo tree /home
Resulting Output:

Notice that there are no additional files for the user Michael, these are only created once they log in
Run the following command from the CentOS Terminal to view the permissions for the current user account:
liveuser@localhost-live:/$ ls -l /home/liveuser
Resulting Output:
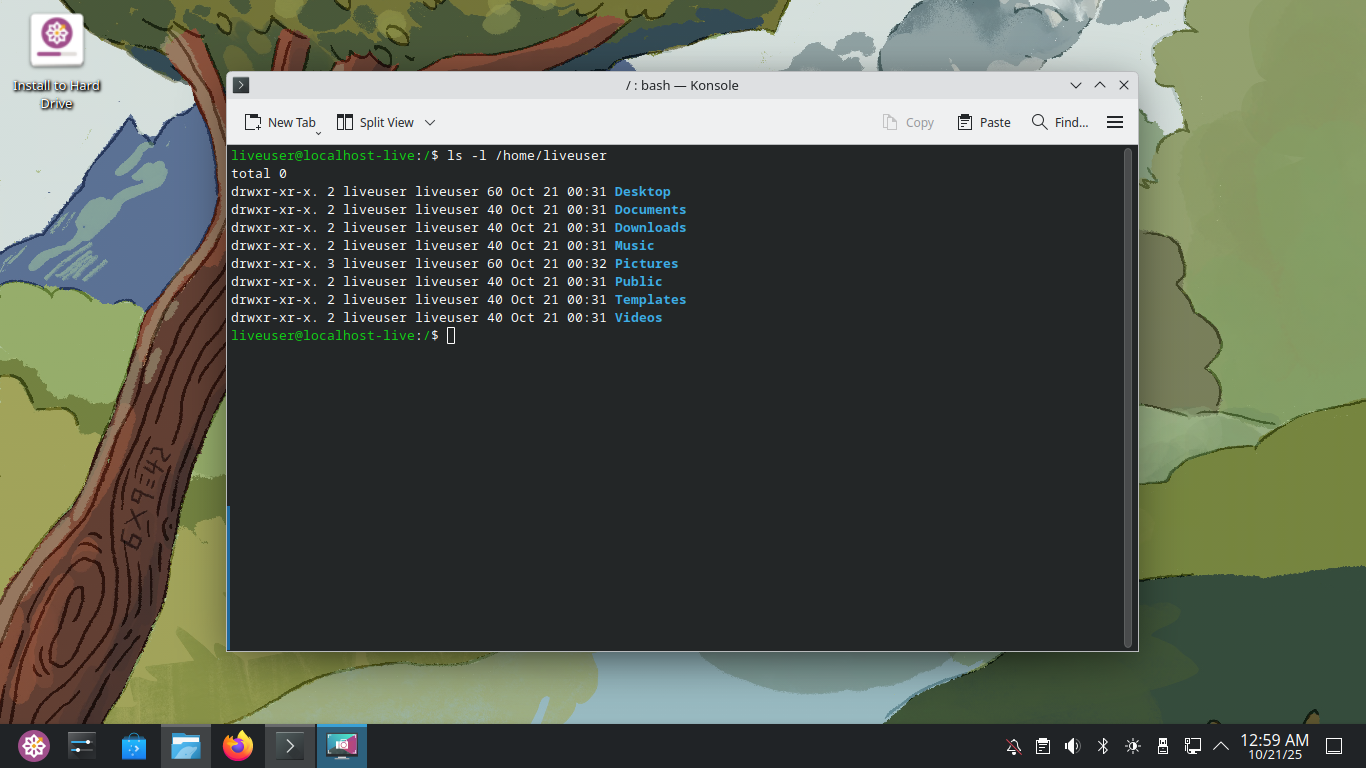
Notice that the owner of the files and directories maintains read, write and execute permissions for all
Run the following command from the CentOS Terminal to view the files and directories within /etc:
liveuser@localhost-live:/$ ls /etc
Resulting Output:
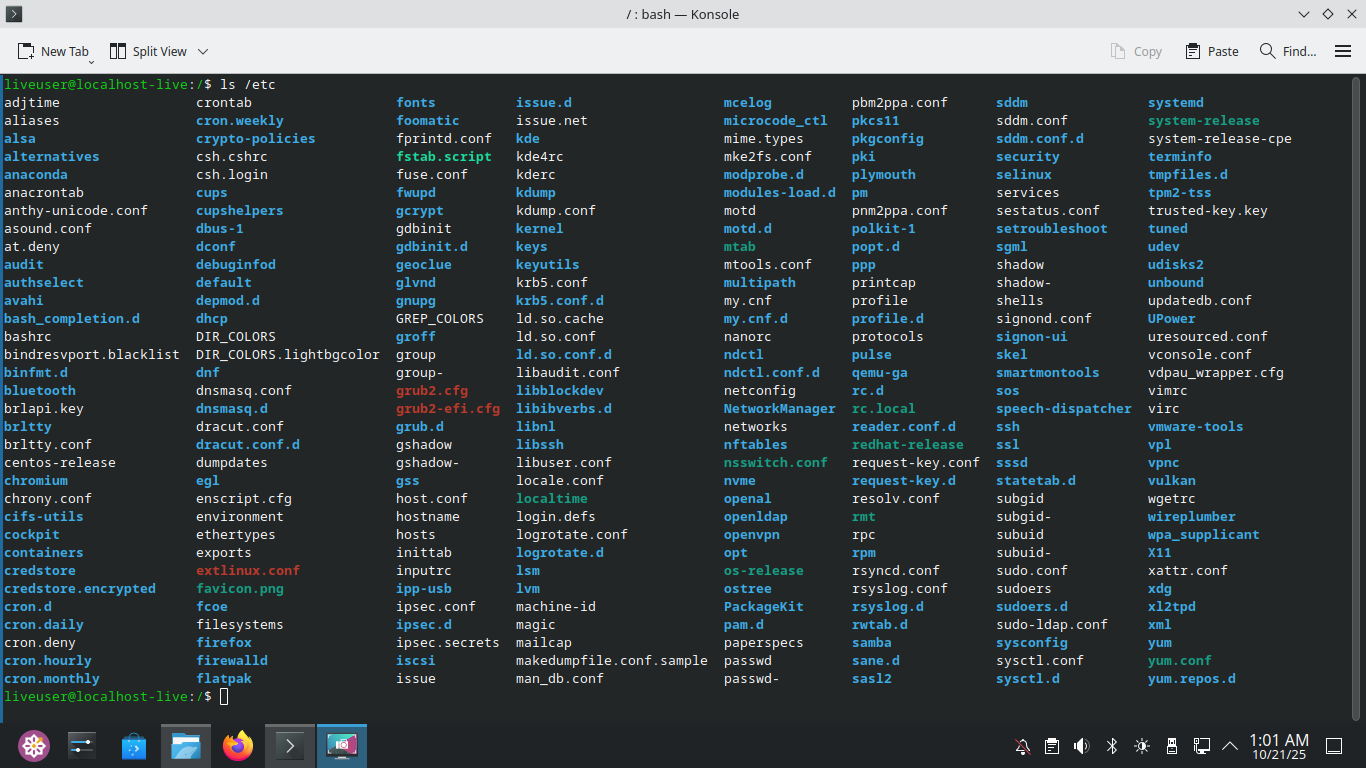
The /etc directory contains configuration files for Linux Operating Systems and installed software tools:
• /etc/hosts - Contains local IP to Domain Name mappings
• /etc/fstab - Used to mount and unmount filesystems and removable media
• /etc/crontab - Contains commands that run on a timing schedule
• /etc/rc0.d-rc5.d - Contains commands that run on system startup
• /etc/netplan - Contains networking information on modern Linux Systems
Run the following command from the CentOS Terminal to view the contents of the /var directory:
liveuser@localhost-live:/$ ls /var
Resulting Output:

The /var directory is where Linux stores variables. The /var/log is one of the most important located here
Run the following command from the CentOS Terminal to view the contents of the /var/log directory:
liveuser@localhost-live:/$ ls /var/log
Resulting Output:

This is where logs are of everything that happens on the system, .gz are directories that have been zipped
Linux will automatically compress logs to save space, here are some of the more critical logs kept here:
• /var/log/dmesg - Contains kernel-related messages
• /var/log/messages - Contains all system messages
• /var/log/secure - Contains authentication-related logs
• /var/log/lastlog - Contains a log of all logins to the system
• /var/log/wtmp - Contains logs of who is currently logged on
While most logs are just text files, lastlog must be opened with last and wtmp must be opened with who
Run the following command from the CentOS Terminal to view the contents of /var/log/lastlog:
liveuser@localhost-live:/$ sudo last
Resulting Output:

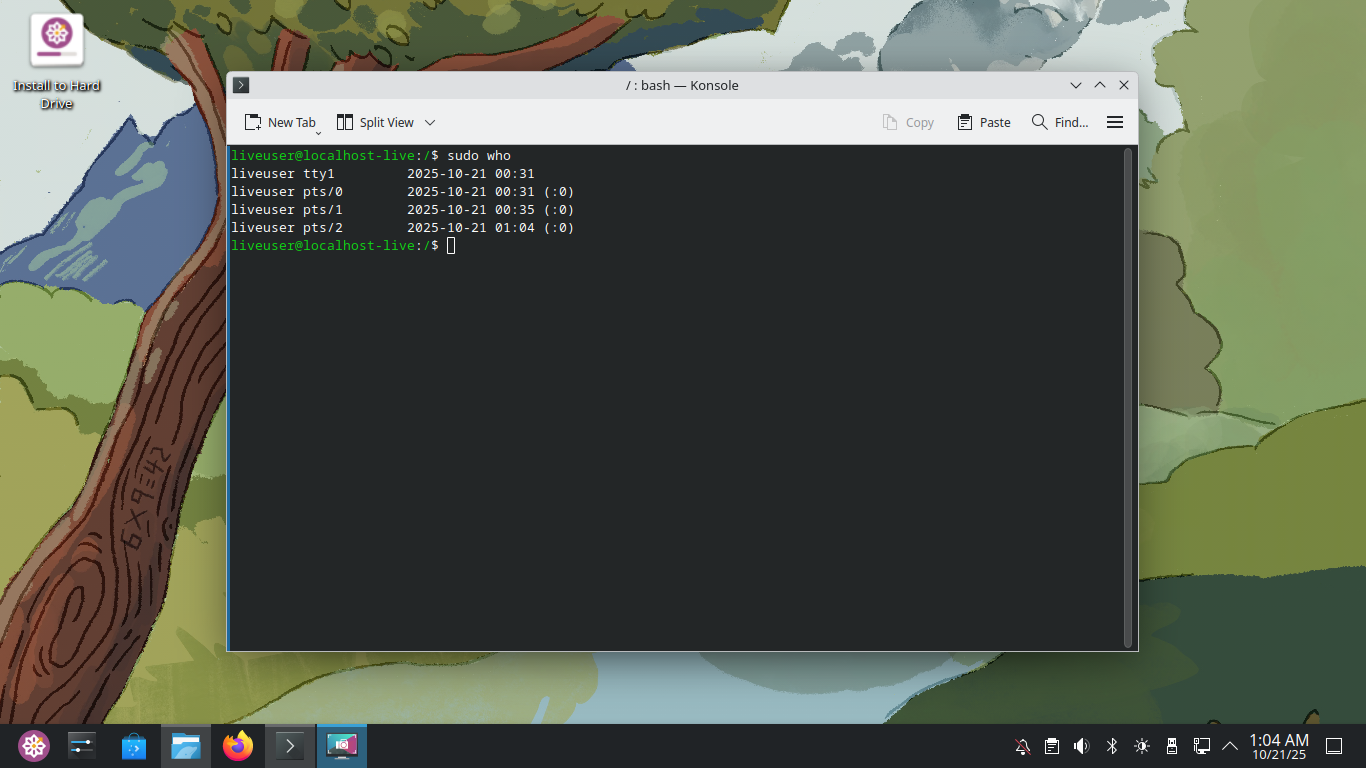
Run the following command from the CentOS Terminal to view the contents of /var/log/wtmp:
liveuser@localhost-live:/$ sudo who
Resulting Output:
Run the following command from the CentOS Terminal to view live /messages messages:
liveuser@localhost-live:/$ sudo tail -f /var/log/messages
Resulting Output:
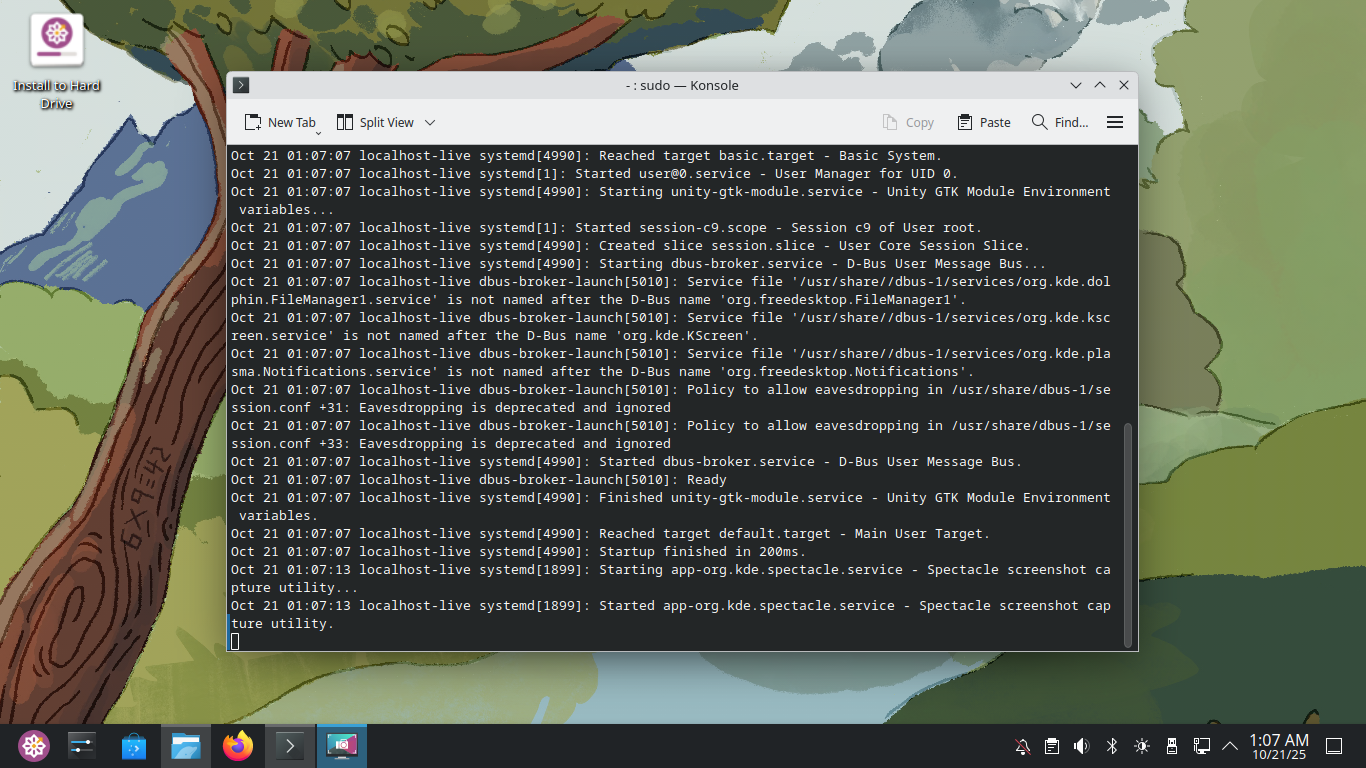
The tail command shows the bottom part of a list or file while the head command shows the top
The -f option tells tail to keep showing any new entries added to a list or file in real time
Because very little is happening on the system currently you may see nothing, use CTRL+C to quit
Run the following command from the CentOS Terminal to view directories within the /usr directory:
liveuser@localhost-live:/$ tree /usr -L 1
Resulting Output:
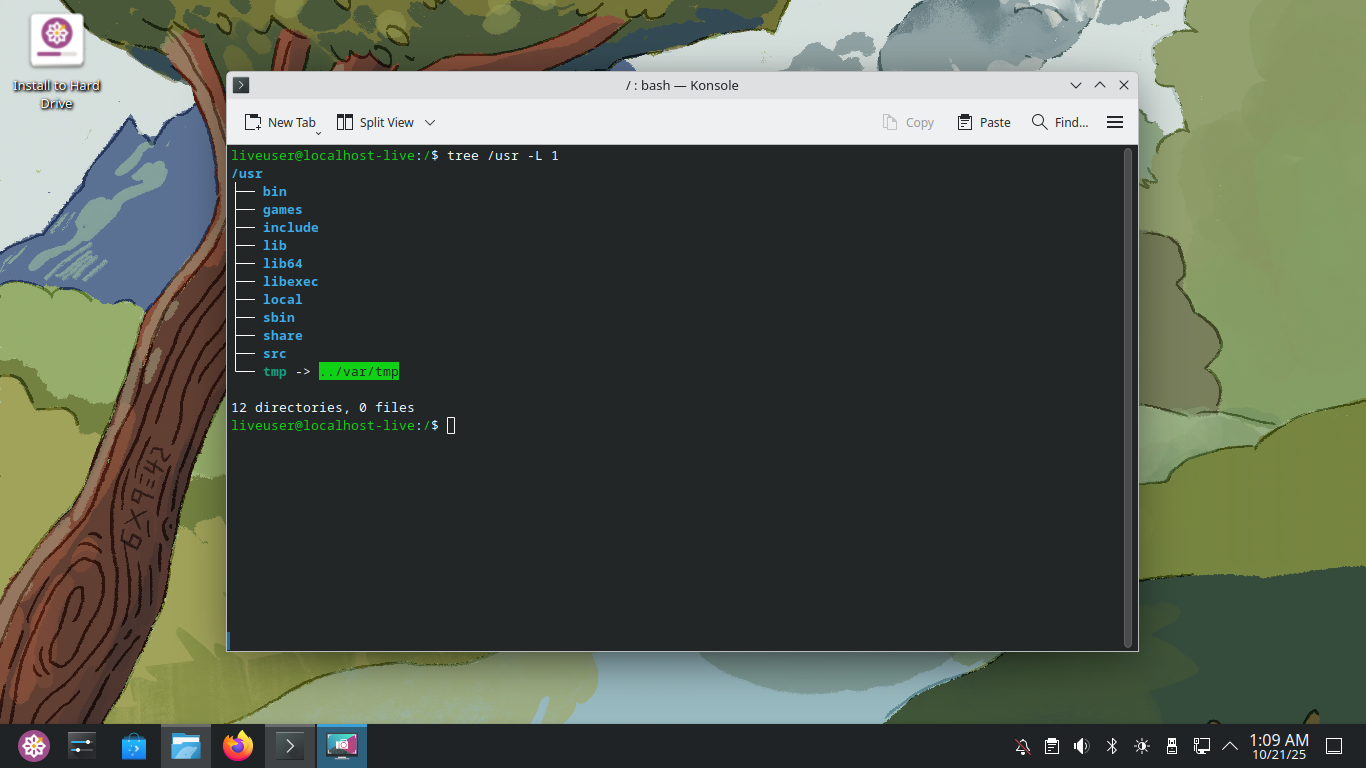
The /usr directory is where Linux based operating systems stores executables and support files:
• /usr/bin - Where commands are kept and where /bin points to
• /usr/sbin - Where administrative tools are kept
• /usr/lib - Where system libraries are kept
• /usr/share - Where documentation is kept
• /usr/local - Where admins should compile tools
Run the following command from the CentOS Terminal to view the directories contained within /opt:
liveuser@localhost-live:/$ ls /opt
You'll notice the directory is empty, this is where unbundled third-party packages are installed
Run the following command from the CentOS Terminal to view directories within the /dev directory:
liveuser@localhost-live:/$ ls /dev
Resulting Output:
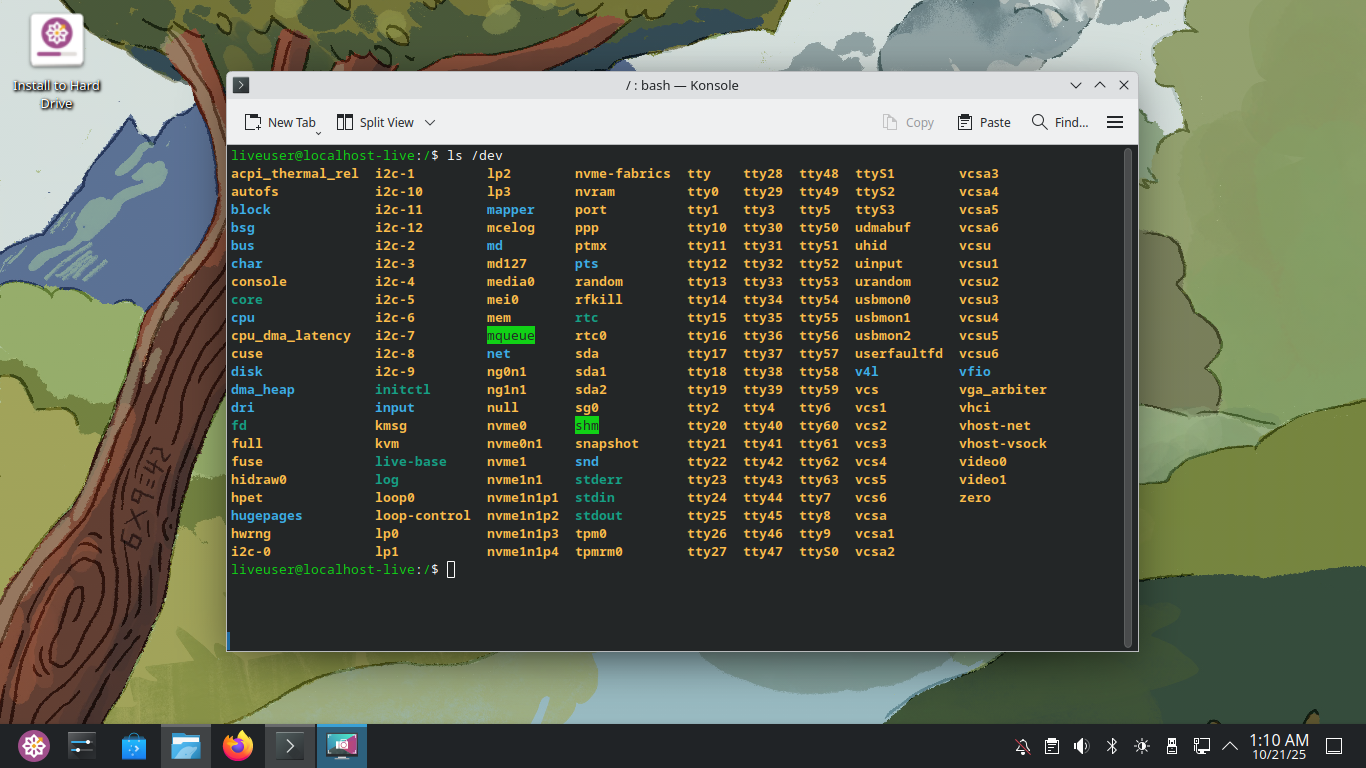
Dev is short for device, in Linux each device are treated as though it were a file on the system
Take note of the file called xvda, this is actually a device representing the entire hard drive
There are many devices which are preloaded on the system when booted, some other interesting ones:
• /dev/null - Used as a black whole directory to dump unwanted output
• /dev/urandom - Used to generate random numbers
Note that the files in /dev are device files and are not human-readable, these are colored orange
Run the following command from the CentOS Terminal to list all non-loopback storage devices:
liveuser@localhost-live:/$ sudo fdisk -l | grep dev | grep -v loop
Resulting Output:
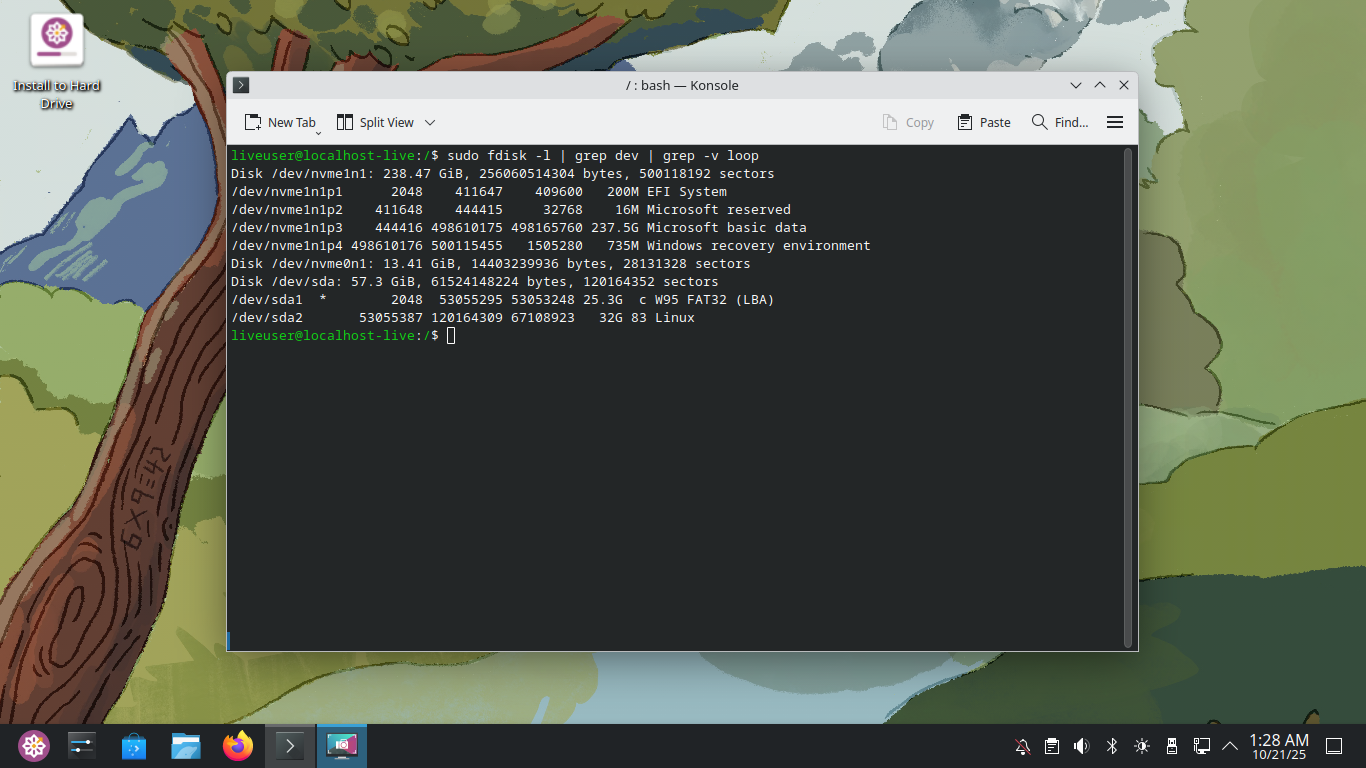
Note the device labeled 'Disk', this is the physical drive with capacity listed in GiB (1000 bytes)
Run the following command from the CentOS Terminal to list all disk partitions:
liveuser@localhost-live:/$ sudo df -h
Resulting Output:
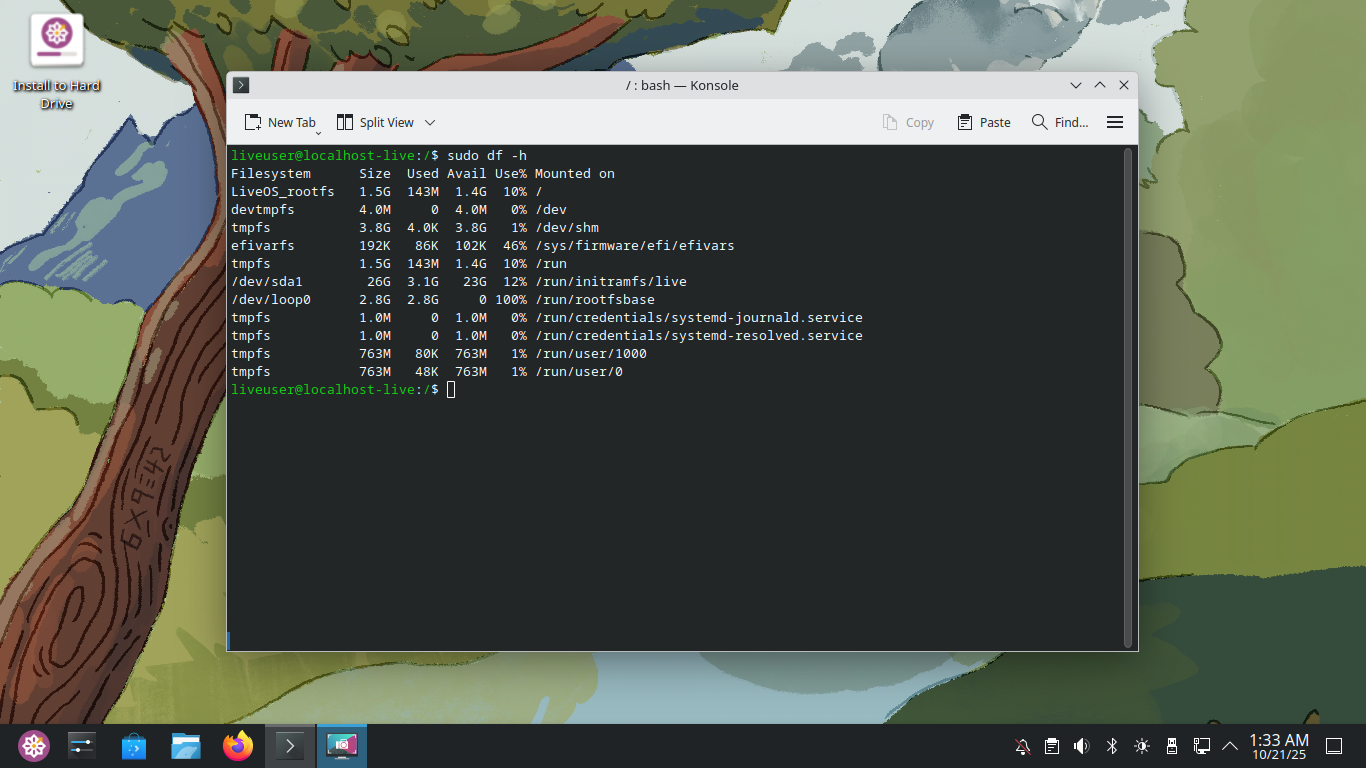
The -h option tells the df command to show the partition sizes in human-readable numbers vs bytes
Note the size of the root partition '/' compare that to the listed size for the physical drive
Run the following command from the CentOS Terminal to list all detected disks in another way:
liveuser@localhost-live:/$ lsblk
Resulting Output:
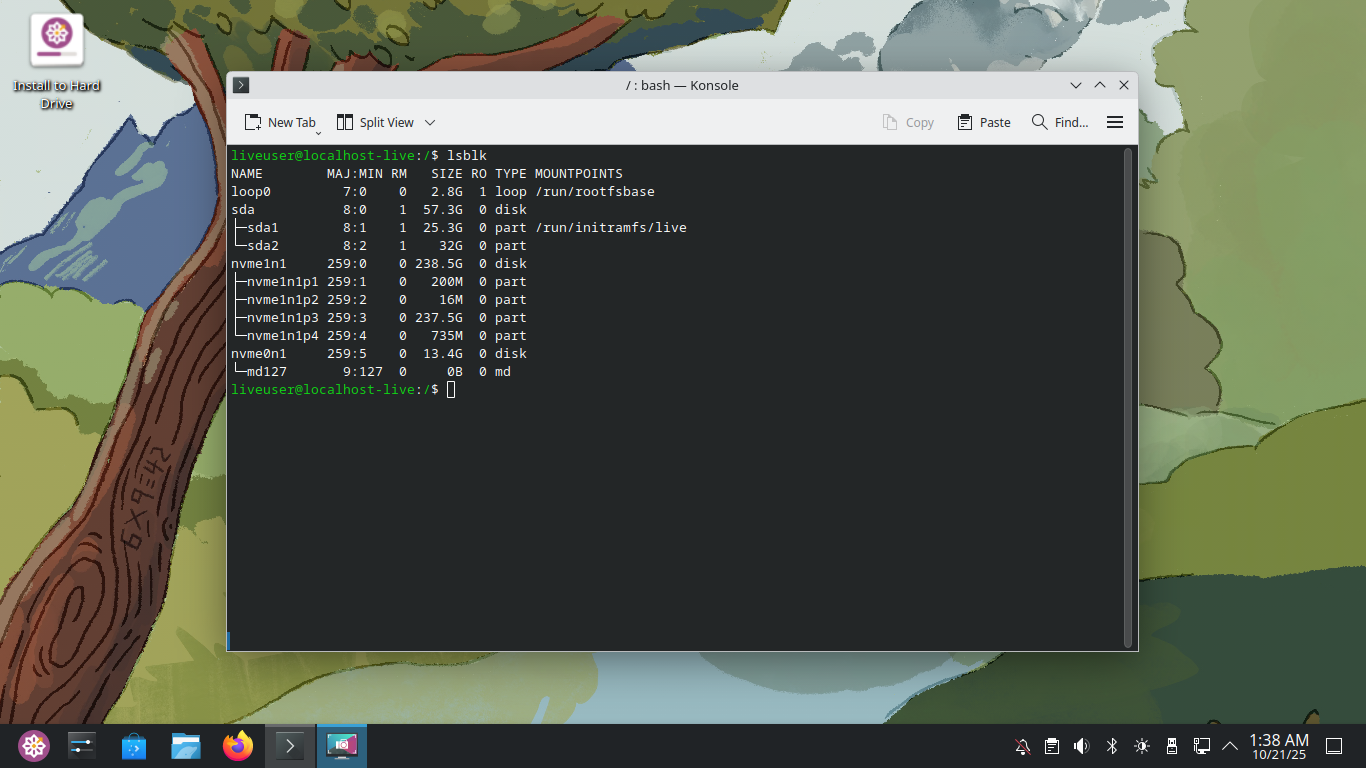
The lsblk command is short for 'list block devices' and provides detailed information on drives
Run the following command from the CentOS Terminal to view the directories contained within /mnt:
liveuser@localhost-live:/$ ls /mnt
The /mnt directory stands for 'mount' and is used to list removable media, it is currently empty
The /media directory is actually meant for this purpose, but it is very common to see /mnt used
Run the following command from the CentOS Terminal to once again view the directories in root:
liveuser@localhost-live:/$ ls /
Resulting Output:

The /root directory is actually the root users home directory do not confuse with the / directory
Run the following command from the CentOS Terminal to view the directories contained within /proc:
liveuser@localhost-live:/$ ls /proc
Resulting Output:
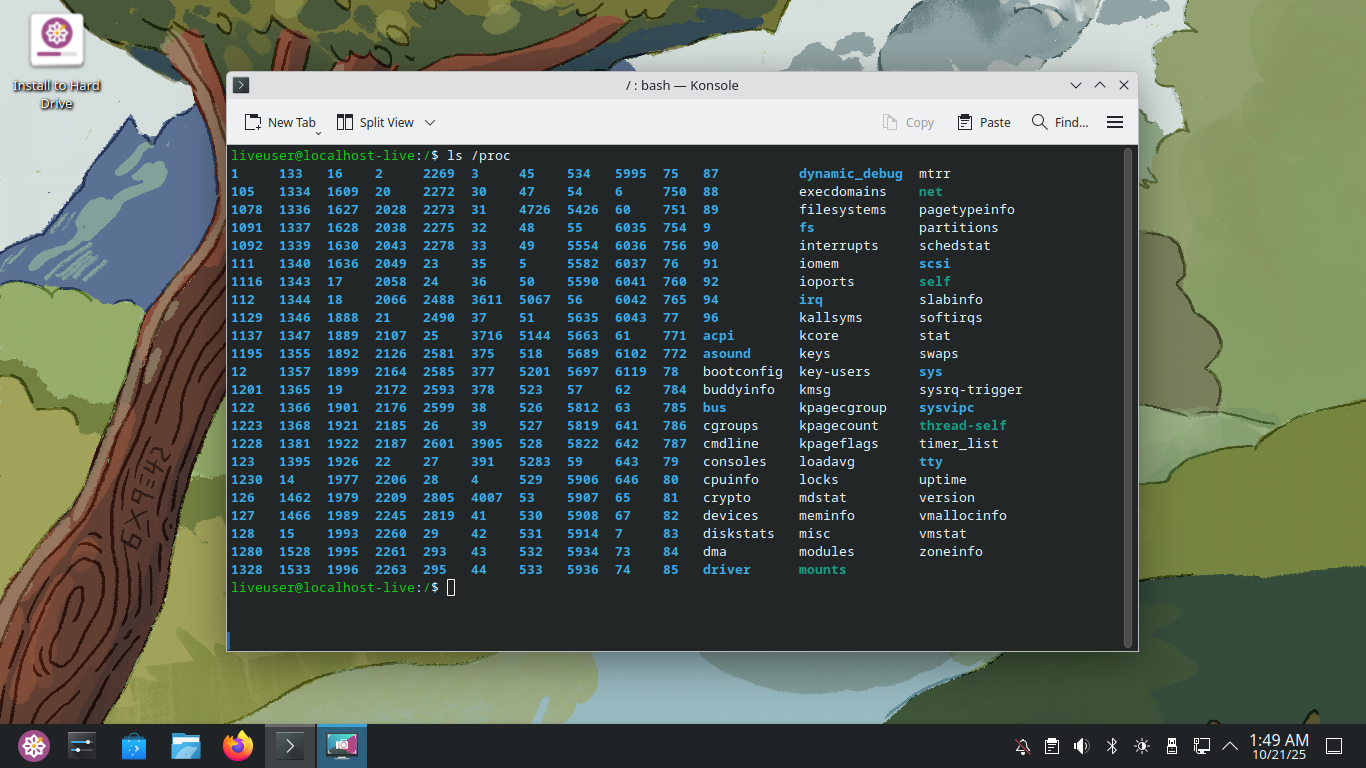
The /proc directory is short for processes, which is removed on shutdown and created on startup
Each numbered directory listed here represents a running process (PID) within the Linux system
Within the CentOS Terminal window, click on the 'New Tab' option to open a second Terminal
Run the following command from the second CentOS Terminal to view a list of running processes:
liveuser@localhost-live:/$ ps -e
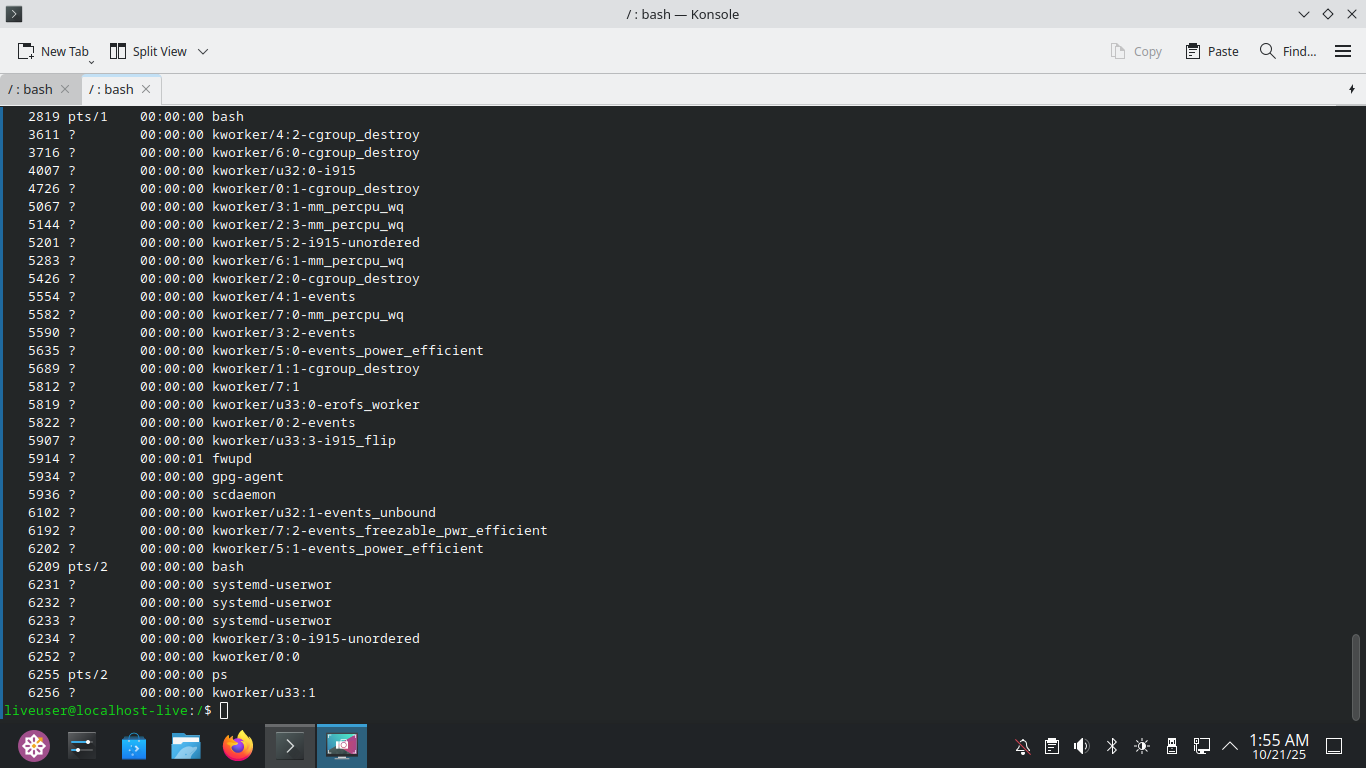
Every process ID you see has a matching directory under the /proc directory, close one terminal
Run the following command from the CentOS Terminal to view the directories contained within /boot:
liveuser@localhost-live:/$ ls /boot
Resulting Output:
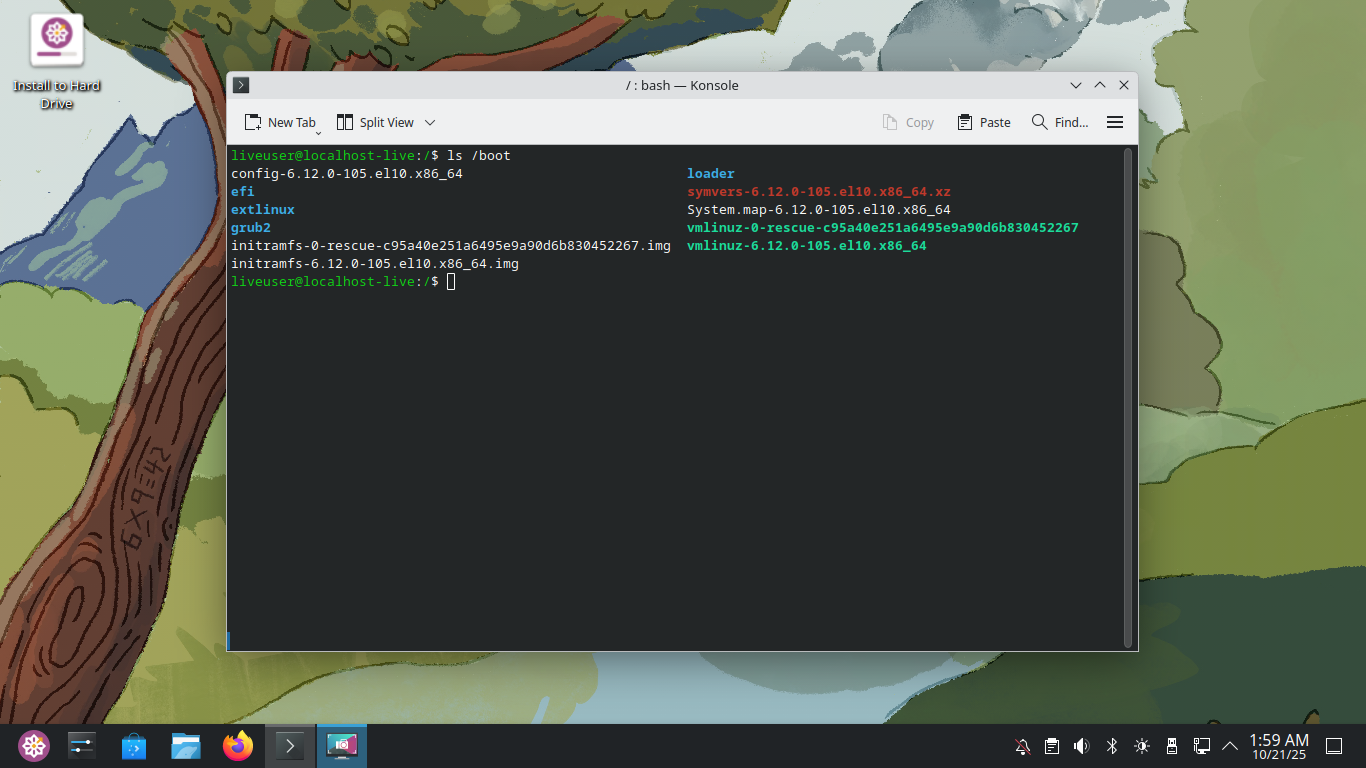
Linux uses the /boot directory to store boot files used before the kernel starts any user programs
Congratulations on finding your way around the Linux Filesystem and FHS using the open source CentOS
In this lab we explored this filesystem, learned about important directories and practiced commands