This lab demonstrates hands-on experience with Windows access control models and permission management. Explore how authentication leads to authorization, how security principals interact with objects, and how access control lists (ACLs) enforce confidentiality across a system. This lab highlights ability to manage Windows security permissions in a structured, role-based environment.
Cybrary is a well established and free IT training platform with several intuitive labs to explore
A paid subscription with more advanced labs is available as well outside the scope of this platform
Head to https://www.cybrary.it to create a free account for learning available on their platform
Head to Access Control Basics to complete this lab for yourself or perform it on your homelab below
Quick Links:
Requirements:
• Windows PC w/ Internet Connection
• USB Flash Drive w/ at least 64GB Capacity
• Unused PC w/ at least 4GB of Memory
1. Access Control Overview
Access control is the process of authorizing a subject to access an object on a network or computer
Access control occurs after authentication - the process by which the subject proves their identity
Once they are authenticated, the subject is referred to as a security principal with a matching SID
Through this process, access control systems help maintain confidentiality of stored information
By ensuring only authenticated subjects with permissions can create, view or modify system objects
There are three primary access control models:
• Mandatory Access Control (MAC)
• Discretionary Access Control (DAC)
• Role-Based Access Control (RBAC)
MAC is the strictest of the access control models, two security labels get assigned to each subject
Within MAC, these security labels must match each other before a subject gains access to an object
The two security labels used within Mandatory Access Control models are classification and category
For example, if a file is classified as high security with a category of top secret, then only those
subjects granted with a top secret security clearance to high security documents would have access
Outside of the government or military, Mandatory Access Control based systems are rarely utilized
In Discretionary Access Control, subject's are granted direct permissions to objects case by case
The operating system uses a list of Access Control Entries (ACE) that map permissions for objects
SID + Permissions = ACE. Permissions are access representations like read, write, and modify ability
The complete list of all the Access Control Entries (ACE) is known as an Access Control List (ACL)
In Role-Based Access Control, subject's are granted access to objects based on the subject's role
In this access control implementation, users would have no access to any object based on SID alone
Instead a role for the user is created, and Access Control Entries (ACE) are granted to this role
In Windows, Role Based Access Control is typically implemented using groups where users are added to
The key to RBAC is that groups represent job functions, working best with clearly defined job roles
Security objects can contain other security objects, for example, a folder can contain many folders
ACEs mapped to the parent folder flow to the child folders, which may be parents to other folders
This downward flow of ACEs is called inheritance. Children inherit security mappings from parents
What happens to ACEs when a object is moved or copied to another parent object or another folder?
On Windows, most objects in question will typically retain any of the explicitly granted permissions
However, if an object moves to a parent folder on a different volume it will lose all permissions
After losing it's former permissions, the object will inherit a new set of them from its new parent
|
Operation |
From |
To |
On |
Explicit Permissions |
|
Copy |
Old Folder |
New Folder |
Same Volume |
Keep |
|
Copy |
Old Folder |
New Folder |
Different Volume |
Keep |
|
Move |
Old Folder |
New Folder |
Same Volume |
Keep |
|
Move |
Old Folder |
New Folder |
Different Volume |
Lose |
A copied or moved object will inherit from the new parent folder and lose its previous inheritance
Now let's discuss Windows Permissions. In Windows, there exists six standard security permissions:
• Full Control
• Modify
• Read & Execute
• List Folder Contents
• Read
• Write
Each permission can be allowed or denied. A denied permission takes precedence over an allowed one
Thus is a subject has ALLOW modify but DENY read, the subject cannot open the file to then modify it
In most cases, it is better to not grant a permission at all rather than to grant it explicit deny
In addition to the six standard security permissions, there are 14 advanced security permissions
However, changing advanced permissions often causes permissions knots that are difficult to unwind
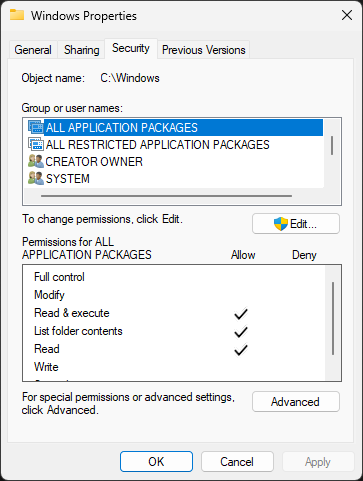
To view the security permissions for a given file or folder, right-click and select the properties
Within the properties window, the Security tab shows the full Access Control list for the object:
Windows also provides a command line utility called icacls which can display, copy, and modify ACLs
Icacls can show ACLs across all child objects under parents, making it an ideal tool for permissions
2. Create Windows 11 Live USB
Here we will simulate the end user through a USB live version of Windows 11 which won't save on the PCs disk
This type of installation was referred to as Windows On-the-Go in the past but is now possible with rufus.exe
Download Windows 11 Disk Image (ISO): Microsoft Windows 11 ISO
Download Rufus Disk Imaging Software: Rufus Official Download
Insert USB Flash Drive, run rufus.exe, select target drive as your USB Flash Drive, select Windows 11 ISO file
From the 'Image option' dropdown menu, select the 'Windows To Go' image option to create a live usb, hit start:

Use the rufus popup menu to customize the Windows 11 Live installation and disable data collection for this lab:

Remove USB Flash Drive and Insert into unused PC. Start PC and press hot boot key on startup:

Select UEFI USB Flash Boot. Allow Windows 11 Live to load and move through the setup to reach the desktop:
We now have our basic workstation that will simulate the end user PC for us to troubleshoot later
Be sure to connect this system to the internet with WI-FI or a wired connection for the next steps
3. Review Permissions
In this lessons we will apply permissions to folders and files using the security tab and icacls cli
We will use these tools to get some hands-on practice and basic understanding of access controls
You will begin by reviewing the current structure and permissions for the folder you will manipulate
On the taskbar, click the File Explorer and navigate to Local Disk (C:), type cmd in the address bar:
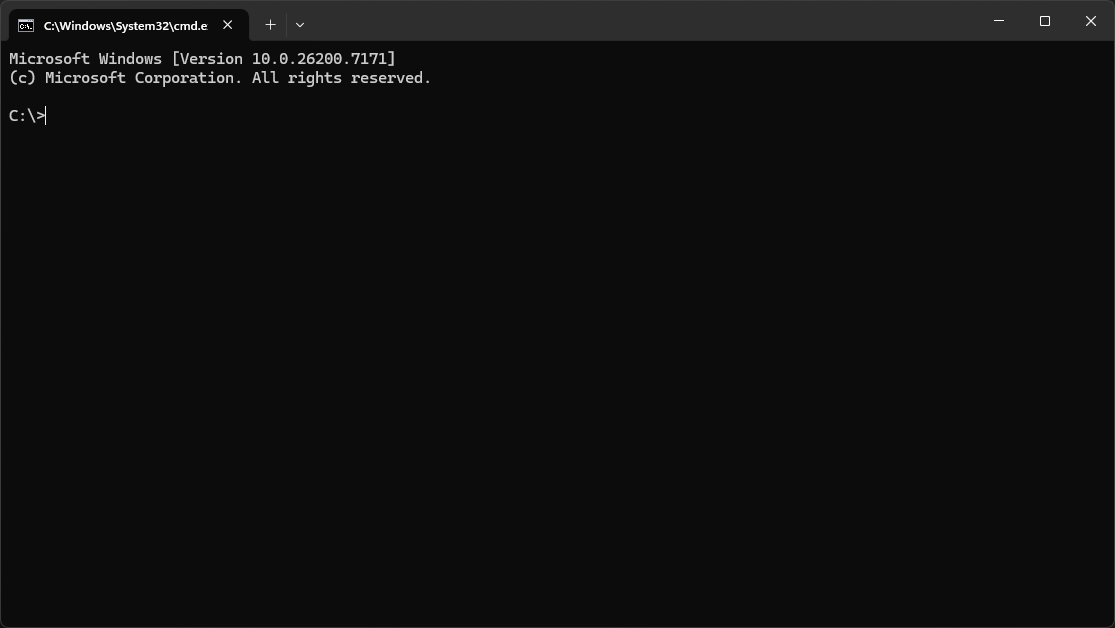
Run the following commands from the Command Prompt to create some directories and files to view:
C:\>mkdir Hall_of_Justice Hall_of_Doom
C:\>mkdir C:\Hall_of_Justice\Heroes C:\Hall_of_Justice\Leadership
C:\>mkdir C:\Hall_of_Doom\Manuals C:\Hall_of_Justice\Heroes\Manuals
C:\>echo. > C:\Hall_of_Justice\Heroes\Manuals\Hero_Code_of_Ethics.txt C:\Hall_of_Justice\Leadership\Leadership_Notes.txt C:\Hall_of_Doom\Manuals\Villain_Code_of_Non-Ethics.txt
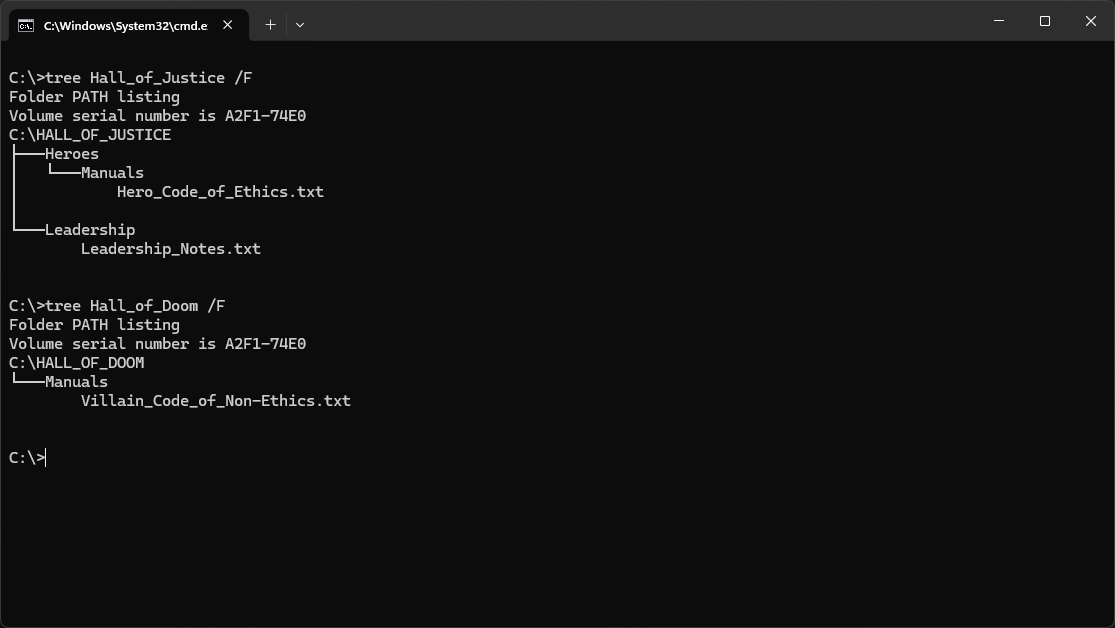
Run the following commands from the Command Prompt to view our directories internal file structures:
C:\>tree Hall_of_Justice /F
C:\>tree Hall_of_Doom /F
Resulting Output:
Run the following command from the Command Prompt to view the access permissions for Hall_of_Justice:
C:\>icacls Hall_of_Justice
Resulting Output:
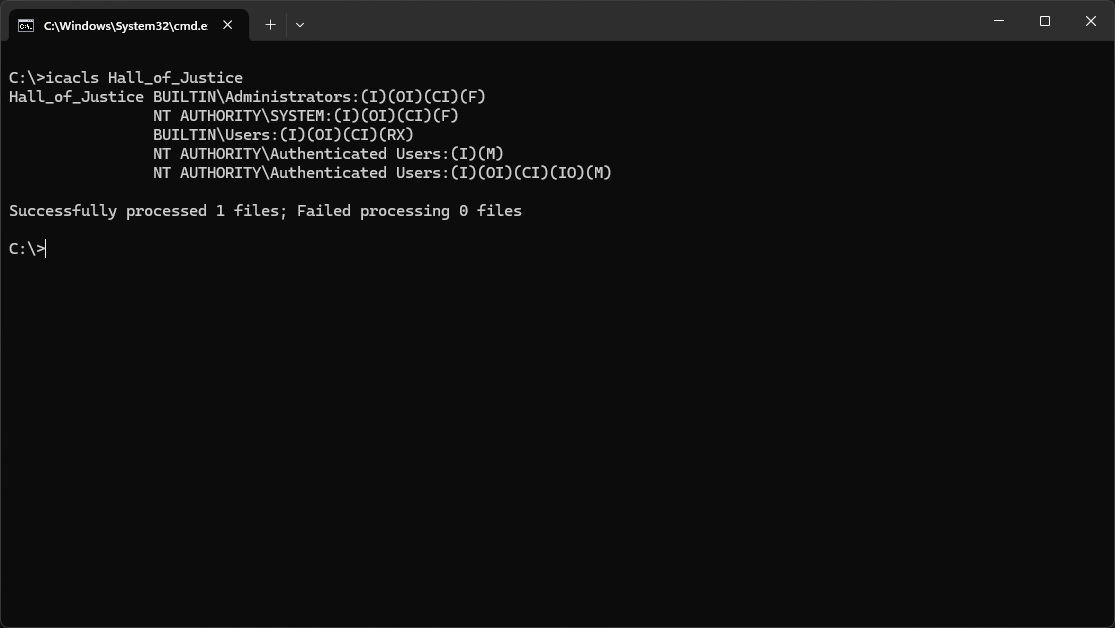
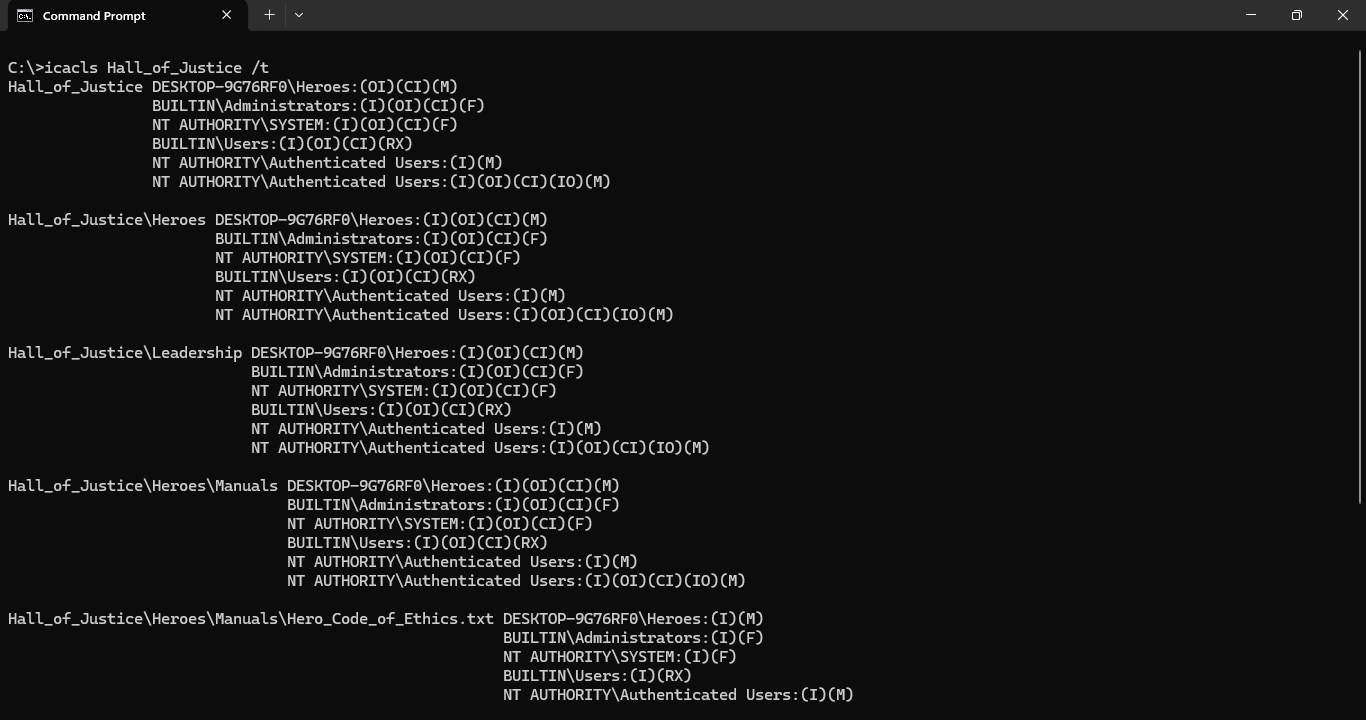
In icacls notation, the (OI) and (CI) tell us that files and subfolders will inherit the permissions
The (IO) means that those who create files and folders will inherit Full (F) access to those files
Next let's go and see what this Access Control List looks like in the Security Tab of the object
Head back to the File Explorer and right click the Hall_of_Justice folder and select the Properties
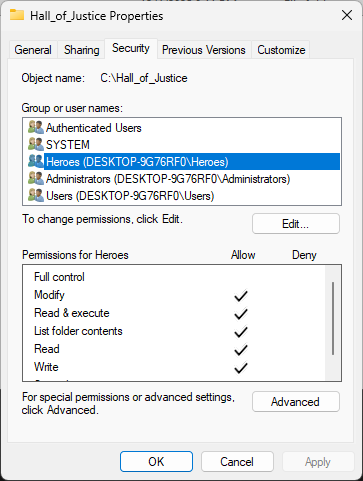
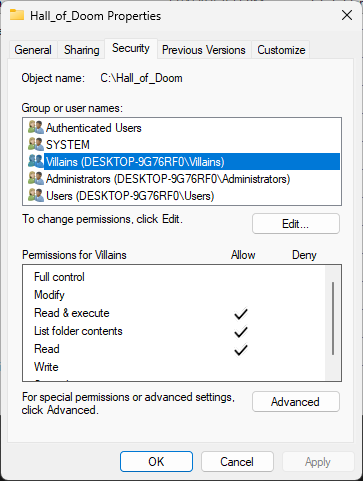
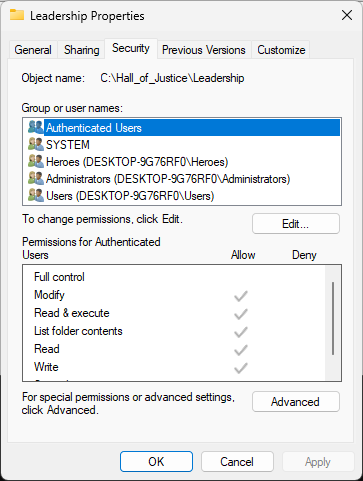
In the Properties windows, click the Security tab to view security permissions for Hall_of_Justice:

From the Security tab, select each user listed and take note of all the permissions that are granted
Again we see that the SYSTEM account, and the Administrators group each have FUll access permissions
Special Permissions is a niche category which indicates the account has advanced permissions set up
Run the following command from the Command Prompt to see all permissions in the Hall_of_Justice tree:
C:\>icacls Hall_of_Justice /t
Resulting Output:
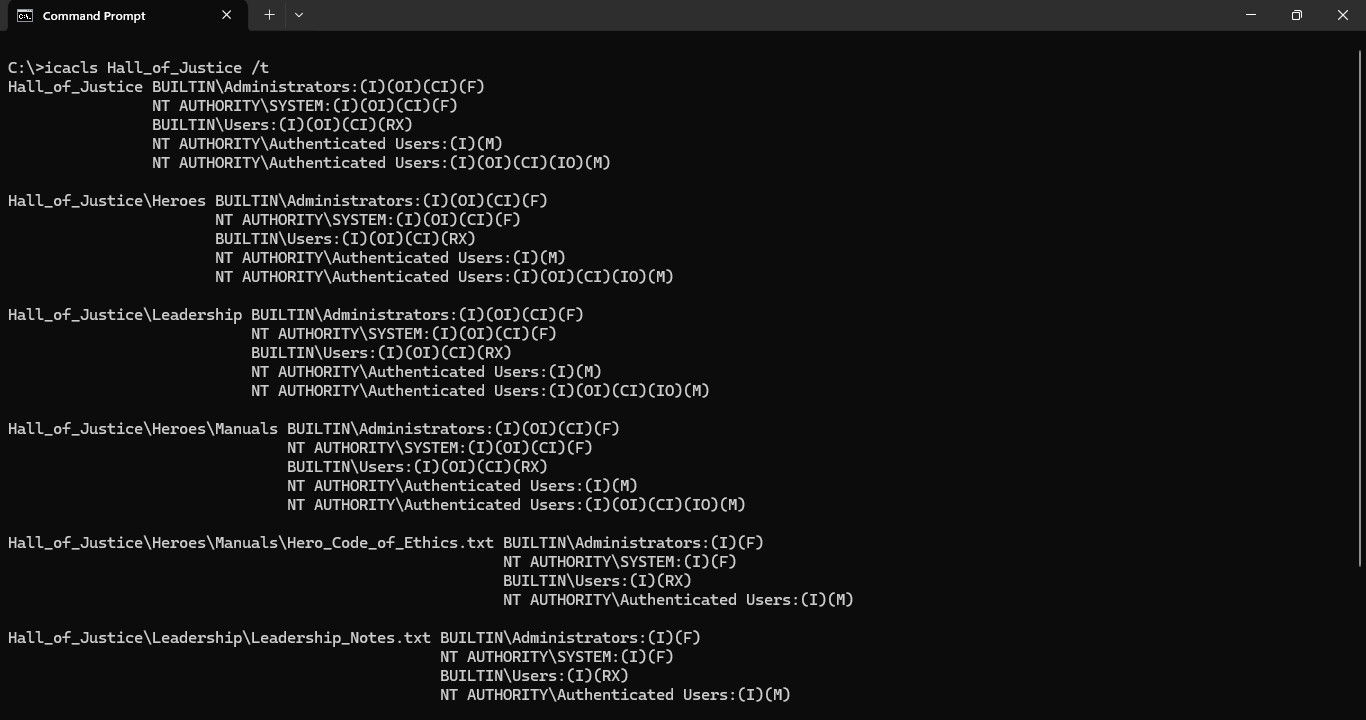
While the Security tab is nice for viewing ACLs on a single object, it cannot view tree like icacls
4. Modify Permissions
In this part of the lab, you will manipulate the permissions on both Hall_of_Justice and Hall_of_Doom
We will create two different groups and assign modify permissions to each group for one of the folders
We want members of the Heroes group to have modification permissions for the Hall_of_Justice folder
We want members of the Villains group to have Read and List Folder content permissions on Hall_of_Doom
Heroes can create new files and folders, while Villains can only read what files others make for them
Close the command prompt and search cmd from the windows taskbar, click Run as Administrator for cmd
Run the following command from the Command Prompt to create two new Groups for our permissions:
C:\>net localgroup "Heroes" /ADD
C:\>net localgroup "Villains" /ADD
In the Hall_of_Justice Properties window, click the Edit button option to open the Permissions window
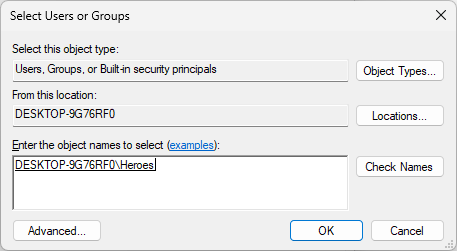
In the Permissions window, click on the Add button option to open the Select Users or Groups window
In the Select Users or Groups window, type Heroes into the Enter the object names to select field
Click Check Names, then click on OK to add the Heroes group to the Hall_of_Justice folder permissions:
From the Permissions window, select the Heroes group and click the Allow Modify checkbox, click ok:
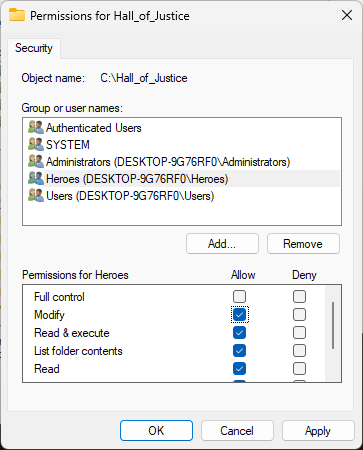
In the Hall_of_Justice Properties window, ensure the Heroes group has Modify, click apply and then ok:
Run the following command from the Command Prompt to view the folders updated security permissions:
C:\>icacls Hall_of_Justice /t
Resulting Output:
Notice that members of the Heroes Group have Modify (M) access to Hall_of Justice folder and children
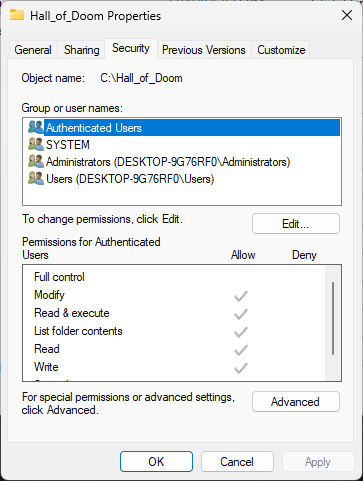
Head back to the File Explorer and right click the Hall_of_Doom folder and select the Properties tab
In the Properties windows, click the Security tab to view security permissions for the Hall_of_Doom:
In the Hall_of_Doom Properties window, click the Edit button option to open the Permissions window
In the Permissions window, click on the Add button option to open the Select Users or Groups window
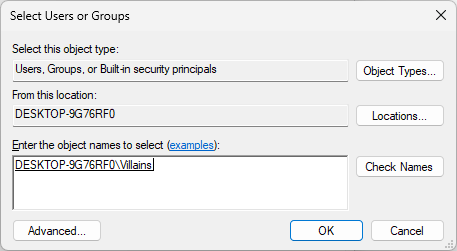
In the Select Users or Groups window, type Villains into the Enter the object names to select field
Click Check Names, then click on OK to add the Villains group to the Hall_of_Doom folder permissions:
From the Permissions window, click on apply, then click okay, ensure Villains has Read and Execute:
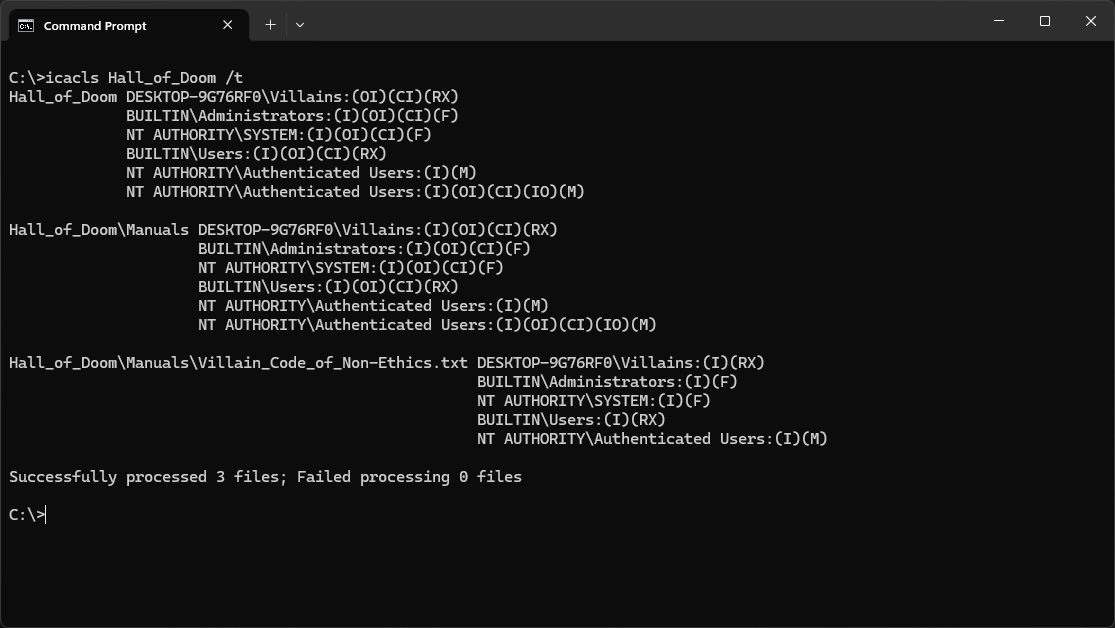
Run the following command from the Command Prompt to view the folders updated security permissions:
C:\>icacls Hall_of_Doom /t
Resulting Output:
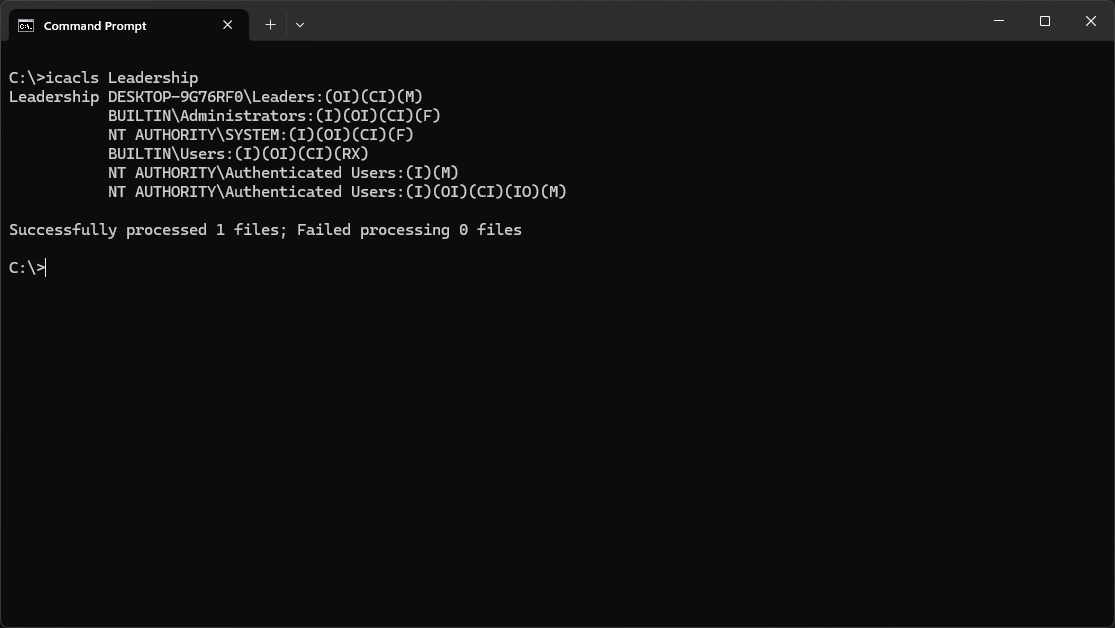
Run the following command from the Command Prompt to view the permissions for the Leadership folder:
C:\>icacls Hall_of_Justice\Leadership
Resulting Output:
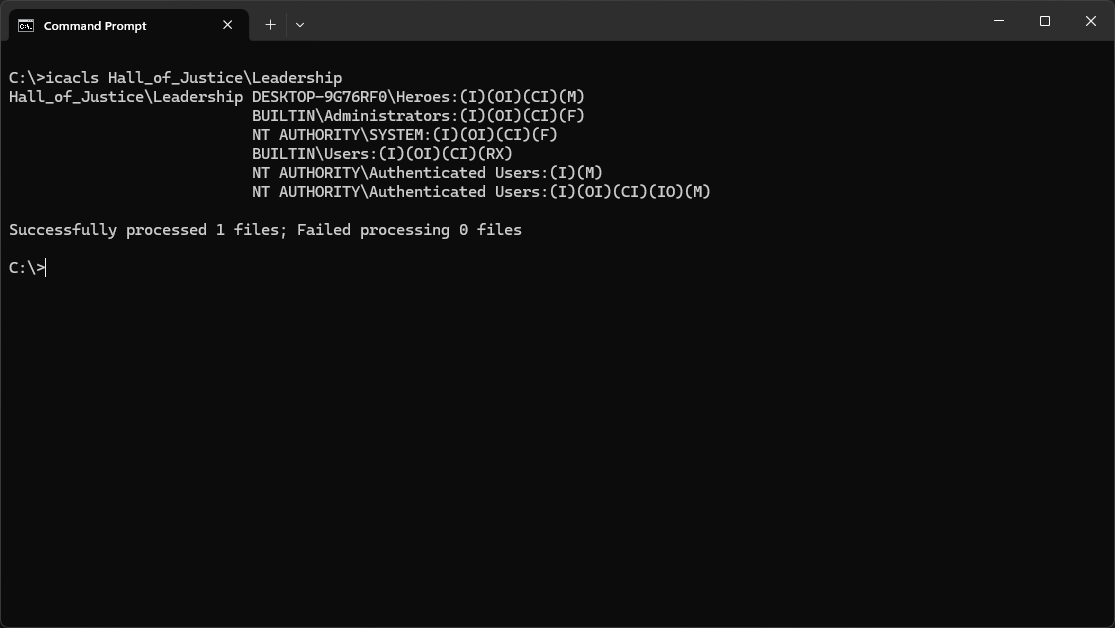
In the output above, notice that the Heroes group has Modify (M) permission that was inherited (I)
Suppose the Justice League and the Legion of Doom want a place where their leaders can collaborate
They wish to use Role Based Access Control to grant access to their leaders for this shared resource
Run the following command from the Command Prompt to create a new Leader group for shared access:
C:\>net localgroup "Leaders" /ADD
Run the following commands from the Command prompt to add Lex.Luther to the Leaders group members:
C:\>net user Lex.Luther password /ADD
C:\>net localgroup Leaders Lex.Luther /ADD
Run the following command from the Command Prompt to display all users from the Leaders group:
C:\>net localgroup Leaders
Resulting Output:
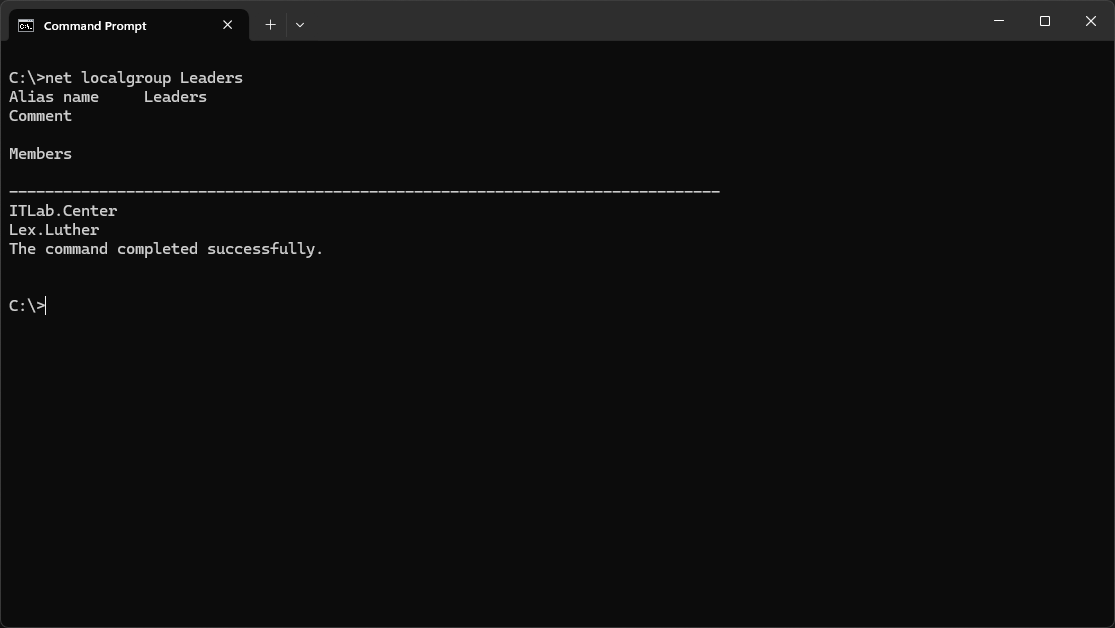
Lex.Luther is a member of the Leadership group. If we simply grant the Leaders group Allow Modify
permissions to the Leadership folder, will Lex.Luther be able to modify files within Leadership?
Consider that ITLab.Center is not a member of the Heroes group and has no permissions on the parent
Head back to the File Explorer and right click the Leadership folder and select the Properties tab:
In the Properties windows, click the Security tab to view security permissions for the Leadership:
In the Leadership Properties window, click the Edit button option to open the Permissions window
In the Permissions window, click on the Add button option to open the Select Users or Groups window
In the Select Users or Groups window, type Leaders into the Enter the object names to select field
Click Check Names, then click on OK to add the Leaders group to the Leadership folder permissions:

From the Permissions window, select the Leaders group and click the Allow Modify checkbox, click ok:

In the Leadership Properties window, ensure the Leaders group has Modify, click apply and then ok:

Run the following command from the Command Prompt to view the permissions for the Leadership folder:
C:\>icacls Hall_of_Justice\Leadership
Resulting Output:
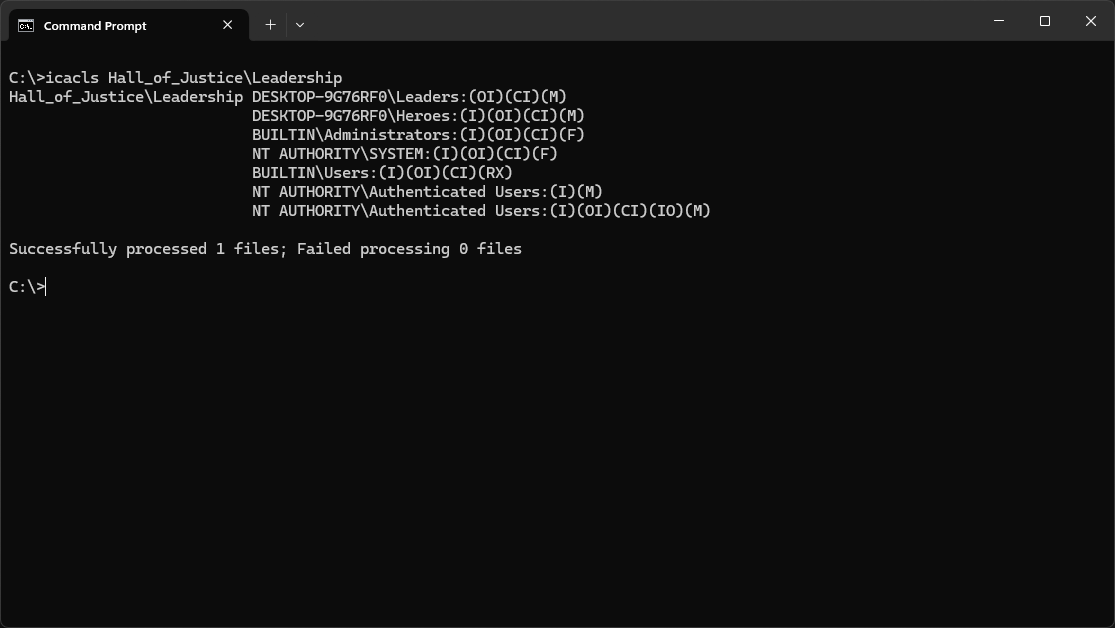
Notice that the Modify (M) permissions granted to Leaders were not inherited (I) from the parents
Head back to the Leadership folders Properties Window and the Security tab, then click on Advanced:

In the Advanced Security Settings window, click the Effective Access tab, then Select a user link
In the Select User or Group window, type Lex.Luther, click Check Names, then click ok to add user:
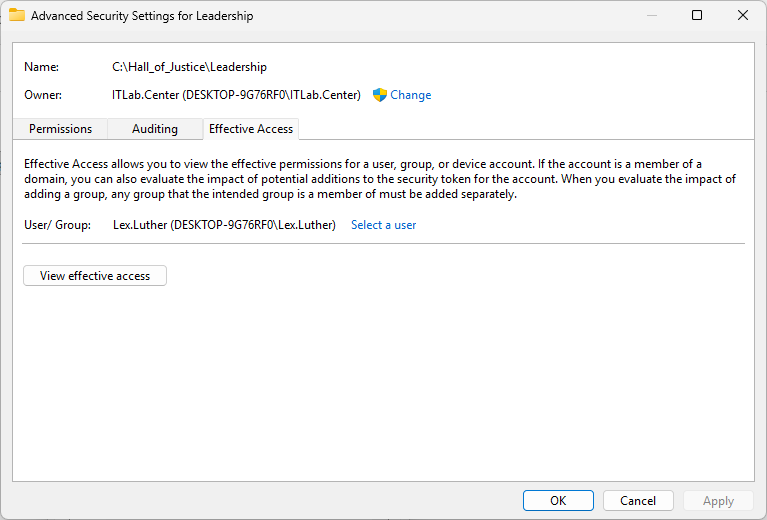
As noted above, Effective Access allows you to view permissions for a user, group, or device account
Effective permissions are determined by calculating the user's complete security permissions profile
This included all the group permissions and permissions which are inherited from the parent object
From within the Advanced Security Settings window, click on the View Effective Access button option:
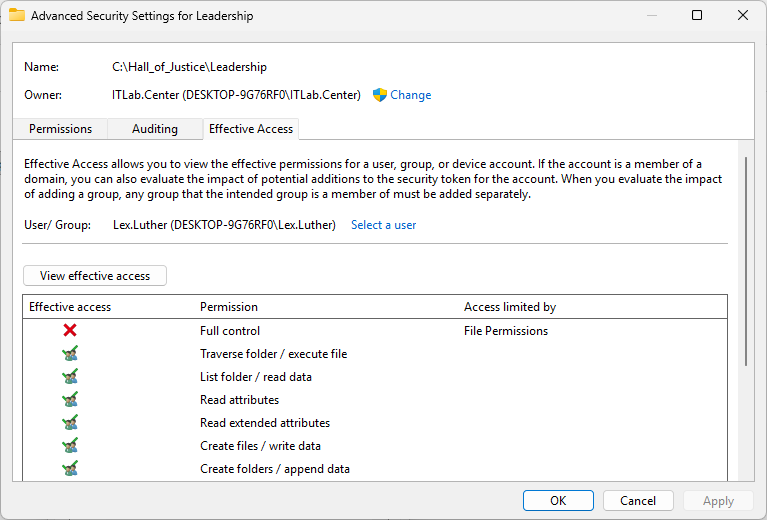
Notice that the Lex.Luther account has many permissions to the Leadership folder and its contents
Close the Advanced Security Settings and Leadership Properties window for the Leadership directory
Head back to the Hall_of_Justice folders Properties Window and the Security tab, then click Advanced
From the Advanced Security Settings window, click Disabled Inheritance, then Convert to Explicit:
Click apply, then head back to the Security tab for Hall_of_Justice Properties and click on Edit
For both Authenticated Users as well as Users, uncheck each of the permissions boxes and hit apply:
In the Advanced Security Settings window, click the Effective Access tab, then Select a user link
In the Select User or Group window, type Lex.Luther, click Check Names, then click ok to add user
From within the Advanced Security Settings window, click on the View Effective Access button option:

We want leaders, including Lex, to have Modify access to the Leadership folder within Hall_of_Justice
One solution would be to grantLex Luther granular access (Traverse Folder) to the Hall_of_Justice
However "solving" permissions issues in this way can become problematic from a security standpoint
Instead, we will move the Leadership folder and all its contacts to the Local Disk or the C:\ drive
Afterwards we will have the ability to change the access permissions for the Leadership as needed
Close both the Advanced Security Settings and Properties windows for the Hall_of_Justice directory
From the File Explorer, navigate to the Hall_of_Justice folder, then click on Leadership and CTRL+X
From the File Explorer, head back to the Local Drive (C:) and right-click open space and hit paste
Run the following command from the Command Prompt to check the permissions for the Leadership folder:
C:\>icacls Leadership
Resulting Output:
Notice that the BUILTIN\Users group has inherited (I) permissions from the new parent Local Disk C:\
All users are part of the built-in Users group, this would grant unwanted access to all local users
You may also have noticed that the Heroes group permission is gone, as it was previously inherited
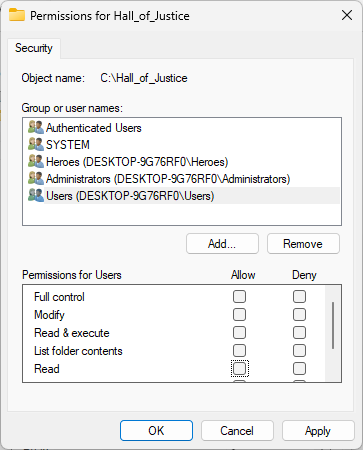
From the File Explorer, right-click the Leadership folder and select Properties to open Properties
In the Leadership Properties window, click the Security tab to view the folders security permissions
From the Security Permissions window, click the Edit button to open the internal Permissions window
From the Internal Permissions window. select the Users group from the list and then click on Remove:
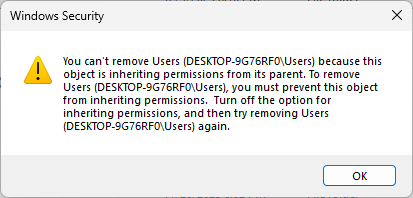
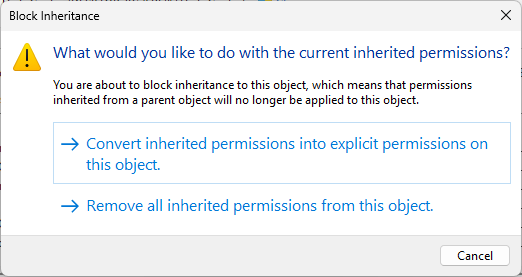
Click OK to close the error. We need to block inheritance before we can change Leadership permissions
From Permissions click Cancel, then in the Leadership Properties window, click on the Advanced button
From the Advanced Security Settings window, click on Disable inheritance and then convert to explicit
Note that when disabling inheritance, you must either copy the existing rules or begin from scratch
In the Advanced Security Settings window, click OK to apply your changes and close out of the window
Now repeat the previous steps above and attempt to remove the Users and Authenticated Users groups
Run the following command from the Command Prompt to check the permissions for the Leadership folder:
C:\>icacls Leadership
Resulting Output:
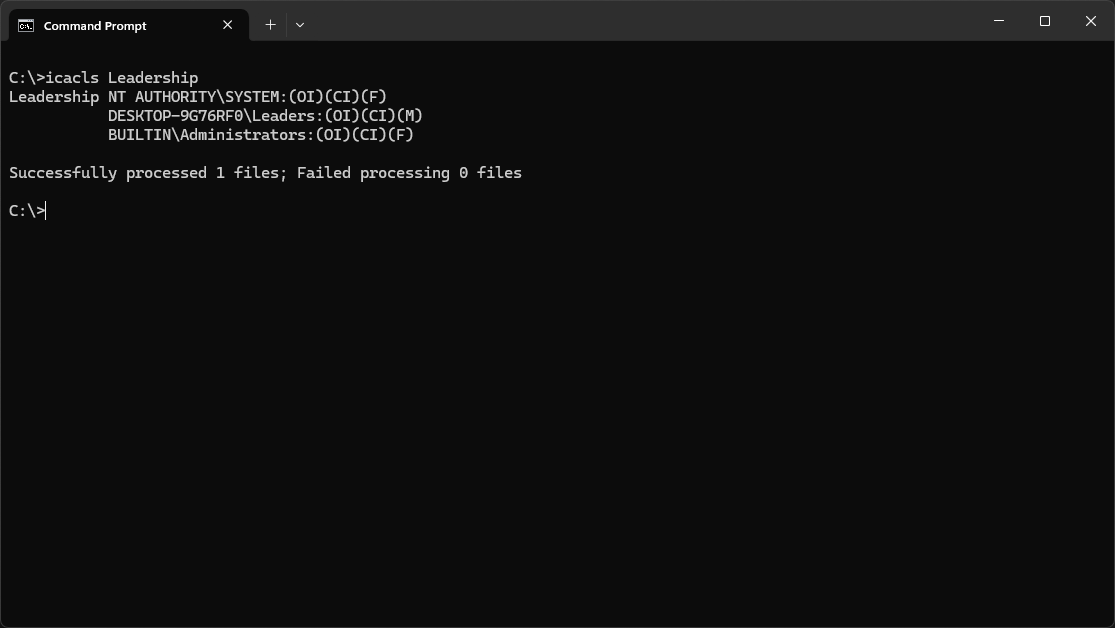
Notice that all inherited permissions are gone along with the Users and Authenticated Users groups
Along with this, members of the Leaders group now have Allow Modify (M) access just like previously
As you did earlier in this lab, check the permissions of Lex for the Leadership folder, unchanged
Navigate to This PC, then use the Effective Access tool to check Lex Luther's permissions for C:\:

Notice that this time Lex Luther has just enough permissions on the parent object for child access
No access pinholes or security concerns are required to get Lex.Luther into the Leadership folder
Congratulations! In this lesson, you've learned a lot about the Windows access control mechanisms
You used the Security tab to configure group-level access and the icacls tool to perform validation
You also learned how to view a user's effective access to files and folders and their permissions