This hands-on lab tutorial walks you through the essential steps to securely connect a custom domain to your network infrastructure using SSL/TLS encryption. By the end of this lab, you'll have a fully functional, secure domain setup that demonstrates your ability to integrate networking, security, and system administration skills in a real-world scenario. This lab is a continuation of the LEMP Stack Web Server Deployment Lab
Quick Links:
Requirements:
• Windows PC w/ Internet Connection
• Linux Server Running the LEMP Stack
• Firewall or Router Administrator Access
• Ownership of a Fully Qualified Domain
1. Configure Firewall/Router Port Forwarding
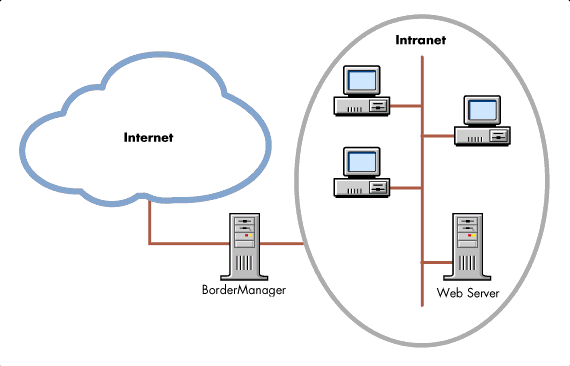
For requests from external machines to reach your web server a process called NAT takes place a the edge
Network Address Translation (NAT) converts the external public IP address into an internal private IP
By default, your network endpoint already handles NAT but must be configured to translate specific ports
Unencrypted web traffic from users' browsers attempts to interact with port 80 on the server or target IP
Arrange the physical topology of your network such that the pfSense Firewall is the direct endpoint:
Boot up your Web Server and test everything is working by going to localhost:8080 in the web browser:

With a terminal, check and make a note of your internal ipv4 address with the following command:
<user@host> hostname -I
With your browser, check and make a note of your public ipv4 address with: https://www.whatismyip.com/
When attempting to connect to that public IP address from your Windows machine notice that you time out:

The reason for this is that the pfSense Firewall is not configured to expect inbound web traffic only outbound
Firewalls operate on the security principle of implicit deny, so unless expected traffic is blocked by default
Let's set this expectation by configuring some rules in the firewall. Head to 192.168.0.1 in Windows browser:

If your firewall hasn't been configured previously then the login credentials are admin pfsense
If you have not previously configured pfSense you will be prompted to enter the setup wizard to do so
Once configured use the top menu to head to Firewall > NAT > Port Forward then click the green Add
From here you will be presented with a large menu of configuration options, we will walk through each:
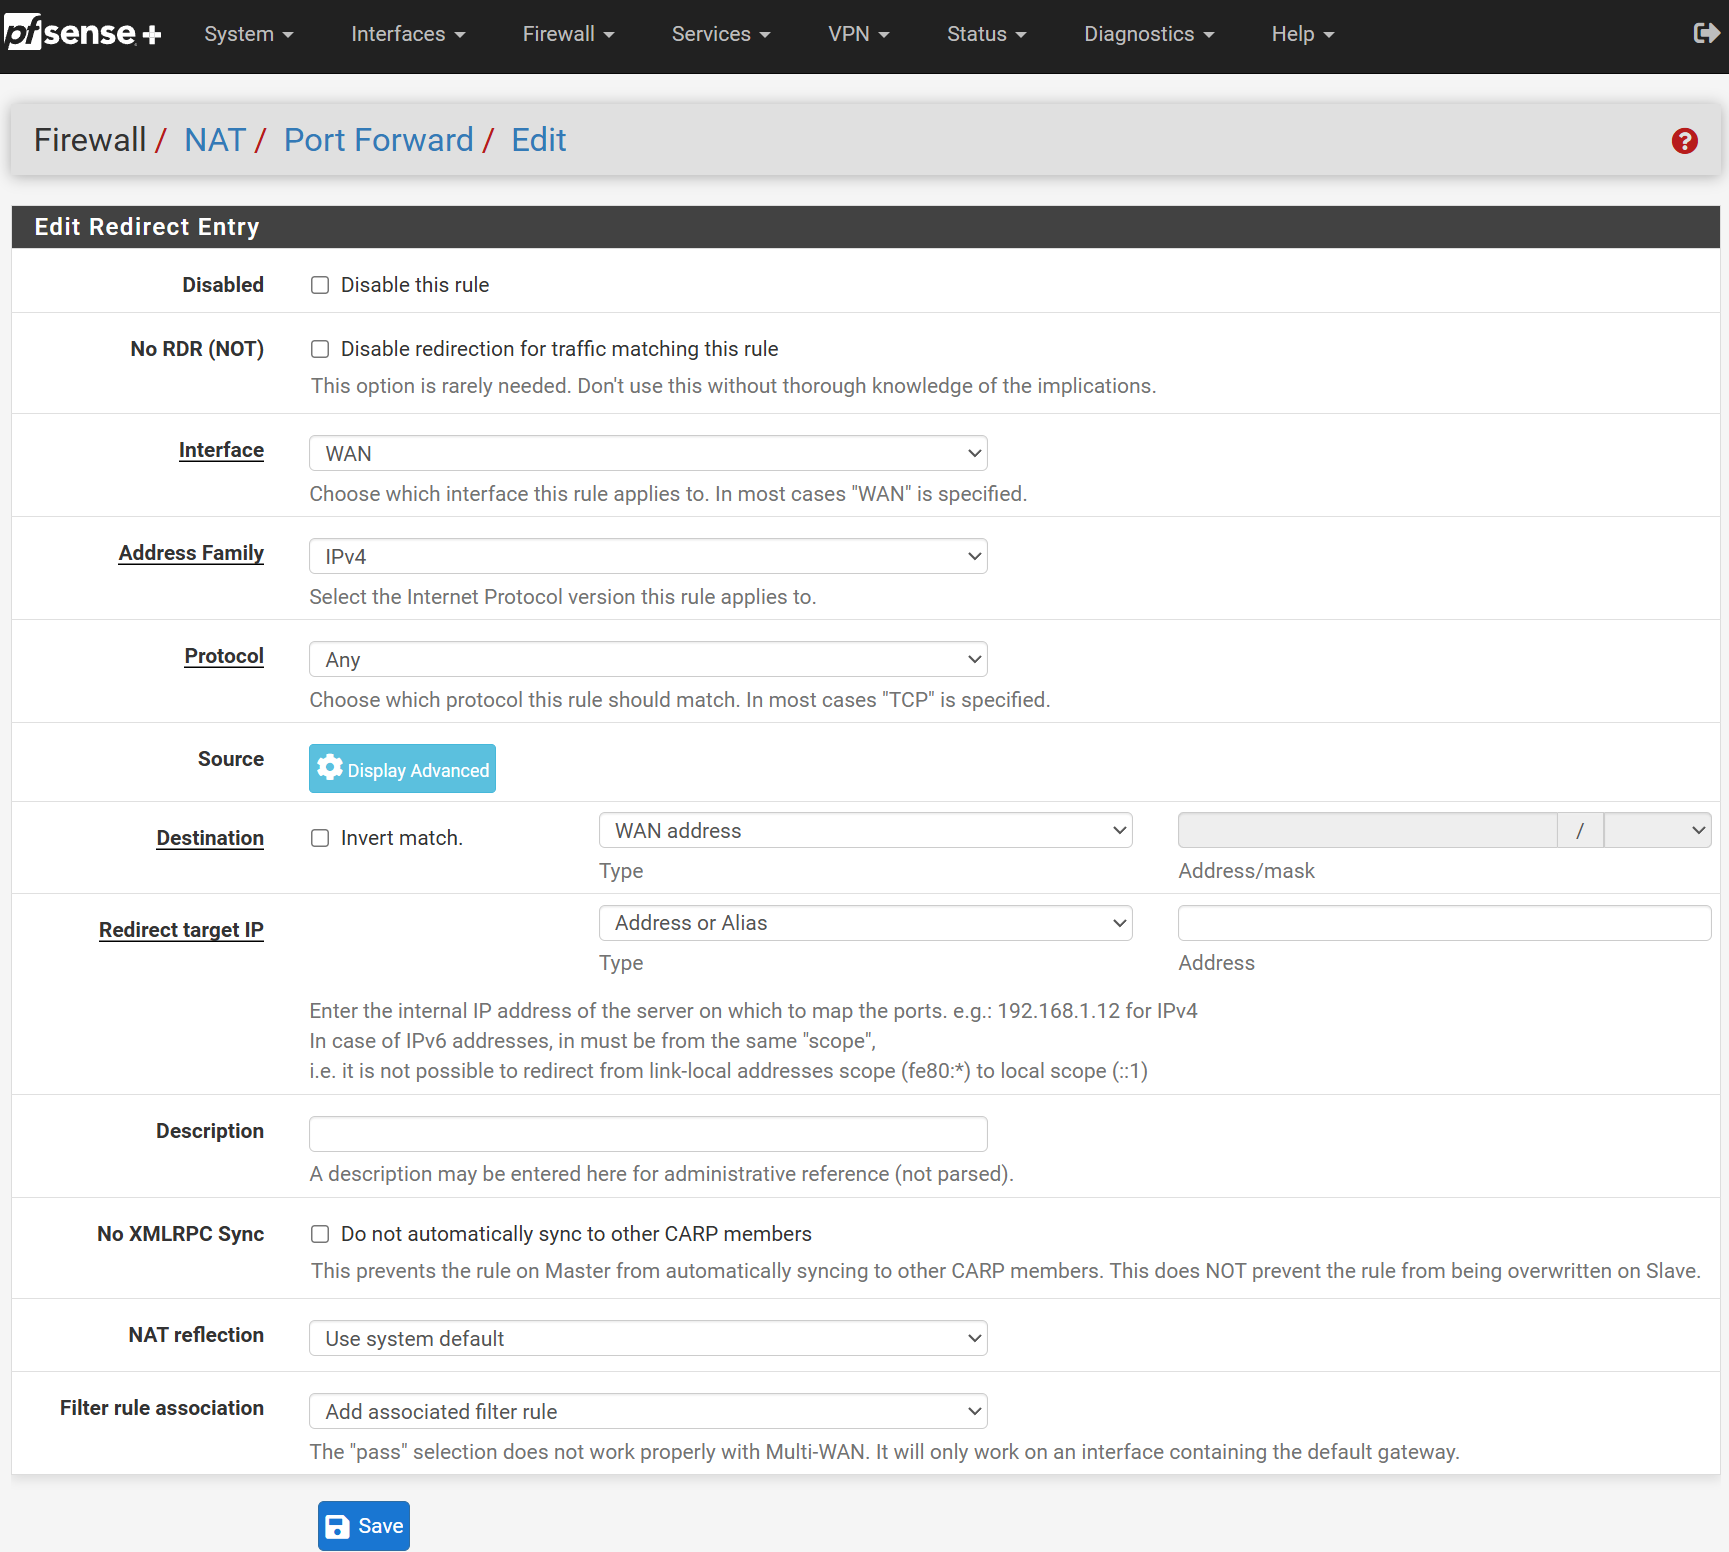
Configure the port forwarding rule like so:
• Disabled: Leave Unchecked
• No RDR (NOT): Leave Unchecked
• Interface: WAN
• Address Family: IPv4
• Protocol: TCP
• Source: No Advanced Options Needed
• Destination: WAN Address
• Destination Port Range: HTTP & HTTP
• Redirect Target IP: Enter the Internal IP Address noted earlier in this Lab
• Redirect Target Port: Custom, 8080
• Description: Can be any name for this rule, let's use HTTP to Web Server
• No XMLRPC Sync: Leave Unchecked
• NAT Reflection: Pure NAT
• Filter Rule Association: Pass
Apply the configuration and reload, while we are here let's also forward port 443 for HTTPS:
• Disabled: Leave Unchecked
• No RDR (NOT): Leave Unchecked
• Interface: WAN
• Address Family: IPv4
• Protocol: TCP
• Source: No Advanced Options Needed
• Destination: WAN Address
• Destination Port Range: HTTPS & HTTPS
• Redirect Target IP: Enter the Internal IP Address noted earlier in this Lab
• Redirect Target Port: HTTPS
• Description: Can be any name for this rule, let's use HTTPS to Web Server
• No XMLRPC Sync: Leave Unchecked
• NAT Reflection: Pure NAT
• Filter Rule Association: Pass
Apply the configuration and reload:
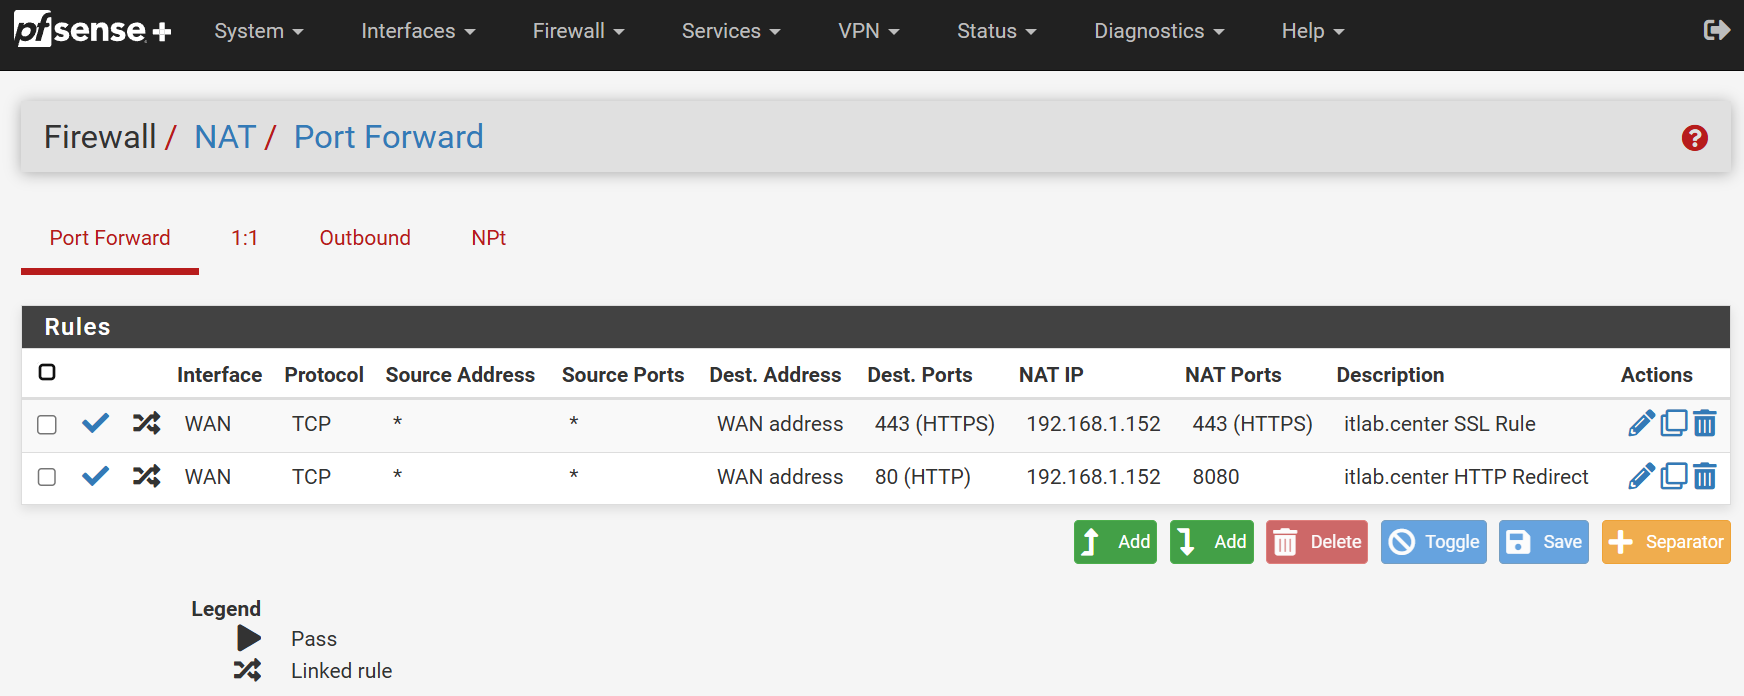
Head to the browser to test the configuration by entering the public IP noted earlier in this lab:
Now your network endpoint is forwarding external traffic on port 80 to the web servers IP port 8080
The server is technically published now and accessible from any computer in the world on the internet
However, connecting to a website by entering its publicly assigned IP address is not user friendly
To solve this problem, we will connect the public IP address to a Fully Qualified Domain Name (FQDN)
2. Redirecting Domain to IP Address
To perform this portion of the lab you must own a domain you've purchased from a hosting provider
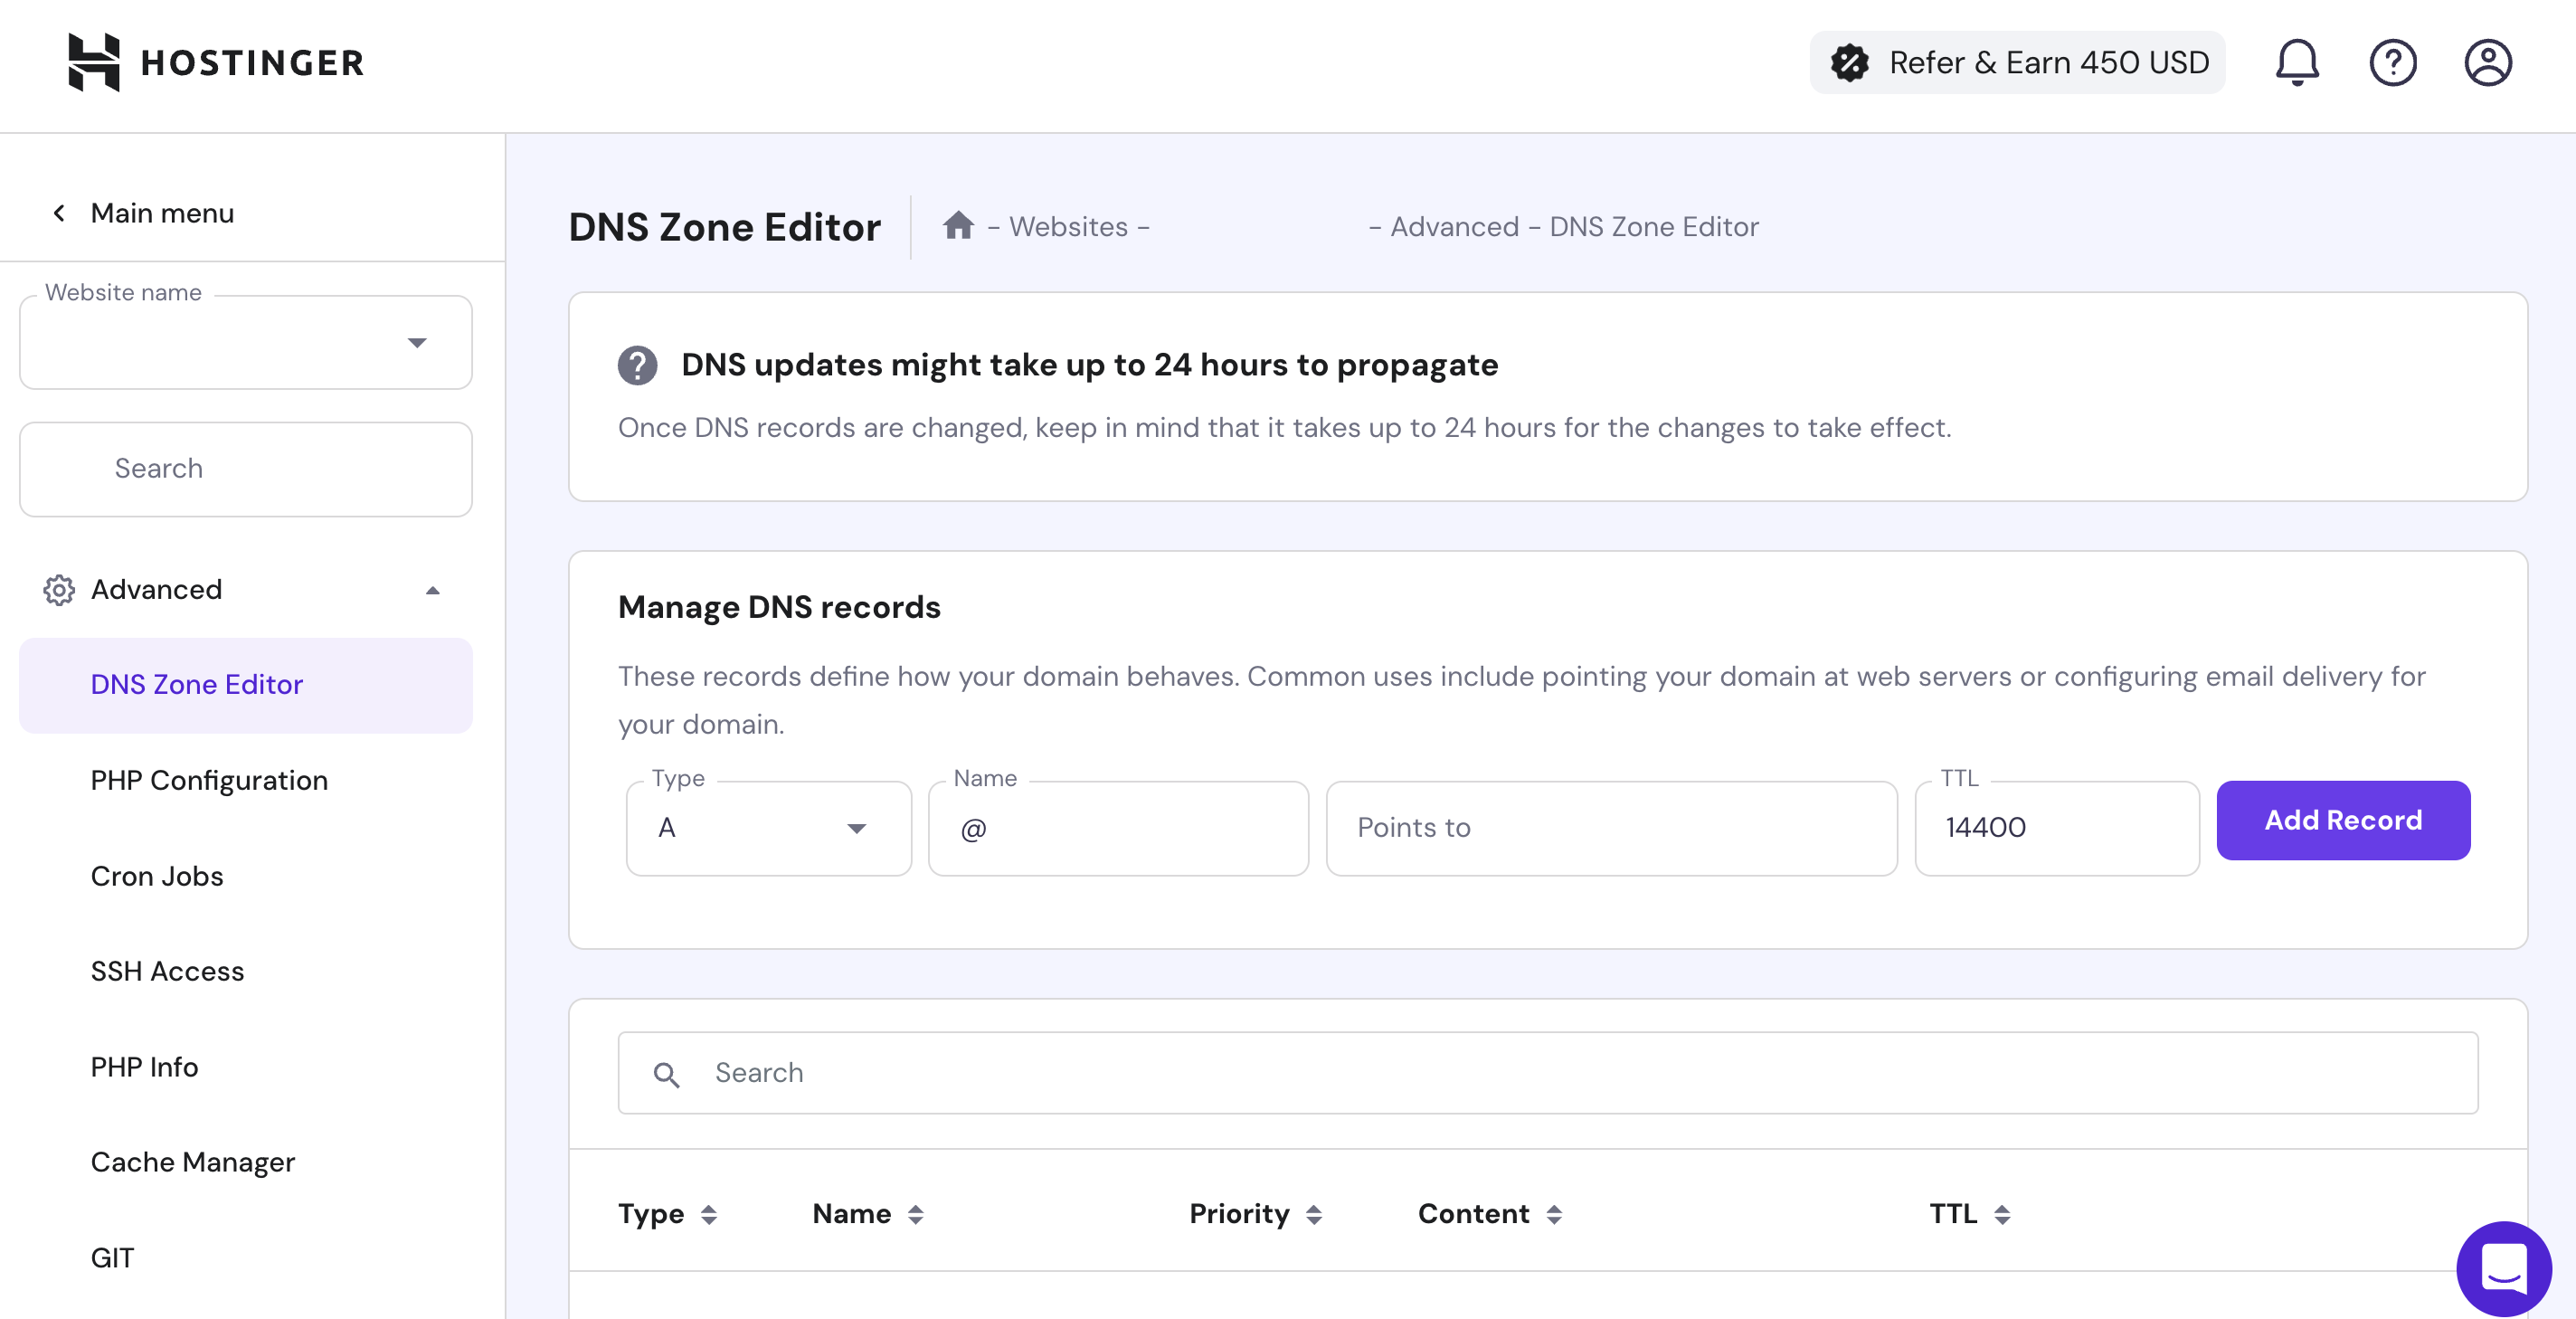
There are many hosting providers, but each will offer a domain management platform for DNS Records
While each hosting providers platform is different in nature there will be a section for these records
Head to this portion of your hosting providers domain management platform and remove included records
Now notice when you attempt to access your domain from the browser you are automatically timed out:
Add a DNS Record to your Domain Registrar:
• Record Type: A
• Record Name: @
• Record Points to: Public IP Address
• Record TTL: 14400
Once the reload has taken place head back to http://your.domain and behold your power:
Optional: Add a Sub-Domain
Head back to your Domain Registrar and add another DNS Record:
• Record Type: CNAME
• Record Name: www
• Record Points to: www.your.domain
• Record TTL: 14400
Once the reload has taken place head back to http://www.your.domain and behold your power:
3. Generate TLS Certificates
HTTPS or HTTP Secure is a protocol which encrypts web traffic in transit using cryptographic certificates
SSL or Secure Socket Layer is commonly used to refer to this process but is an outdated method for security
The modern equivalent is TLS or Transport Layer Security using larger key size and a more secure algorithm
We will be using the tool Certbot to generate TLS Certificates for NGINX using the Let's Encrypt protocol
You will need both your Windows PC and your server for this, begin by installing Snapd and Certbot below:
<user@host> sudo apt-get update
<user@host> sudo apt-get install snapd
<user@host> sudo snap install snapd
<user@host> sudo snap install --classic certbot
It is often the case that your server machine cannot actually access your domain from the browser due to NAT
Certbot by default tries to ping that domain to verify ownership, get around this using a manual challenge:
<user@host> sudo certbot certonly --manuel --preferred-challenges=dns -d yourdomain
You will be given a DNS Record challenge to prove your ownership of the domain by adding a TXT DNS record
On your Windows PC open your domain registrar and follow the Certbot instructions to add a TXT DNS record
Once completed Certbot will exit with a message relaying successful certificate and private key generation
Before the next step we must move the crt and key files to be accessible to NGINX. Run the following commands:
<user@host> sudo mkdir /etc/nginx/ssl
<user@host> sudo cp /etc/letsencrypt/live/yourdomain/cert.pem /etc/nginx/ssl/yourdomain.crt
<user@host> sudo cp /etc/letsencrypt/live/yourdomain/privkey.pem /etc/nginx/ssl/yourdomain.key
Take note of the expiration date of your certificate and remember to use Certbot to renew the certificate
4. Configure NGINX to Enable TLS
We must make some adjustments to the server's configuration file to encrypt the traffic, open below:
<user@host> sudo nano /etc/nginx/sites-available/yourdomain
From the nano text editor, make the changes and add the lines to match the configuration file below:
server {
listen 443 yourdomain;
listen [::]:443 yourdomain;
ssl_certificate /etc/nginx/ssl/yourdomain.crt;
ssl_certificate_key /etc/nginx/ssl/yourdomain.key;
root /var/www/yourdomain;
index index.php index.html;
server_name yourdomain www.yourdomain;
location / {
try_files $uri $uri/ =404;
}
location ~ \.php$ {
include snippets/fastcgi-php.conf;
fastcgi_pass unix:/var/run/php/php8.4-fpm.sock;
}
location ~ /\.ht {
deny all;
}
}
Save the basic configuration with CTRL+O and exit the nano text editor with CTRL+X, test and reload NGINX:
<user@host> sudo nginx -t
<user@host> sudo systemctl reload nginx
Once the reload has taken place head back to https://your.domain and behold your power:
Optional: Optimize and Secure SSL/TLS
There are a few tweaks I would recommend making to the NGINX configuration file using the nano text editor
These are option enhancements. Add these lines outside of the main server block to force HTTPS connections:
server {
listen 8080;
listen [::]:8080;
server_name yourdomain www.yourdomain;
return 301 https://$host$request_uri;
}
Add these lines inside of the main server block to force secure TLS protocols and ciphers:
ssl_protocols TLSv1.2 TLSv1.3;
ssl_ciphers HIGH:!aNULL:!MD5;
Add these lines inside of the main server block to optimize browser session caching:
ssl_session_cache shared:SSL:10m;
ssl_session_timeout 10m;
When the time comes to renew your websites certificate, you can do so with certbot with the following commands:
<user@host> sudo certbot renew --force-renewal
<user@host> sudo cp /etc/letsencrypt/live/yourdomain/fullchain.pem /etc/nginx/ssl/yourdomain.crt
<user@host> sudo cp /etc/letsencrypt/live/yourdomain/privkey.pem /etc/nginx/ssl/yourdomain.key
<user@host> sudo systemctl reload nginx
Nice work on making it through, you now have a fully sharable and relatively secure website running from home
It's time to get to work typing up those HTML, CSS, JS, PHP and SQL files to serve to your user base securely
If you'd like to take this a step further, check out the upcoming Software Development and Penetration Testing Labs:
Advanced NGINX Web Configuration and Reverse Proxy
Web Application Testing with ZED Attack Proxy and Nessus