In this lab, explore the fundamentals of network scanning and reconnaissance using Nmap, one of the most widely used tools in cybersecurity. The goal is to understand how Nmap identifies hosts, discovers open ports, and detects services running across a network—core skills for both defensive and offensive security work. Here you'll gain hands-on experience with host discovery, port scanning, and service/version detection.
Cybrary is a well established and free IT training platform with several intuitive labs to explore
A paid subscription with more advanced labs is available as well outside the scope of this platform
Head to https://www.cybrary.it to create a free account for learning available on their platform
Head to Nmap Basics to complete this lab for yourself or you can perform it on your homelab below
Quick Links:
Requirements:
• Windows PC w/ Internet Connection
• 2 USB Flash Drives w/ at least 64GB Capacity
• Unused PC w/ at least 4GB of Memory
1. Nmap Overview
Are you tired of seeing IP ranges not knowing what servers live within them? Or what ports lead to data?
Are you thirsty for knowledge and in search of the right tools and techniques to help quench your thirst?
Search no more. In this lab, we'll turn you from a junior network cartographer into a full-blown wizard

Ready to get started? Great, then let's get some fundamentals out of the way so can be prepared for this
You need to know what you are trying to accomplish before you can appreciate the 'how to do it' methods
Scanning and enumeration are common techniques for gathering information about network hosts and services
Scanning refers to the use of tools and techniques to survey a network for the hosts, ports, and services
Enumeration refers to gathering detailed information about the discoveries made using scanning techniques
This information includes the operating systems, software versions, and even associated vulnerabilities
Now, networks, these constellations of buzzing machines, can seem inscrutable if you don't have the tools
And one of the most popular and effective tools in this space is Nmap, the network exploration toolkit
Originally conceived for quickly mapping hosts on networks, it has since developed additional functions
Nmap is your cure for understanding, infiltrating and plugging the holes in a networks hosts and services
In this lab you will learn the full details about four of the eleven total phases in an Nmap network scan
The first two are focused on initial scanning, and the latter two are focused on enumeration of details:
• Host Discovery
• Port Scanning
• Operating System Detection
• Service/Version Detection
Let's touch up with a primer on ports, as this concept will be foundational in understanding of this lab
Ports are how network applications are identified on a host, like how an IP address identifies the host
The IP address is like the apartment complex address, and the port number is like the apartment unit #
Furthermore, you'll be hunting for services running on TCP ports, the most common types of ports online
TCP is a network protocol, which is just a set of rules and specifications for how systems communicate
Computers need rules to follow. TCP has one important rule, connections all begin with a 3-way handshake:
• Client: SYN (synchronize)
• Server: SYN/ACK (synchronize/acknowledge)
• Client: ACK (acknowledge)
And just like that you've established a TCP connection. And now you can speak TCP. SYN, SYNACK, SYN, FIN
That handshake rule makes scanning for TCP ports easy, a service on that port will always respond to a SYN
Whether scanning for open ports or enumerating services and versions on a host, Nmap takes the same route
As part of its analysis, Nmap maintains a database of fingerprints, profiles it compares responses against
If Nmap can get a host to talk enough, it can sufficiently disambiguate it from the alternative host types
Alright, we get what Nmap is. Let's cover the basics for using it. Just a few more sections until action
2. Nmap Scan Types
In most scenarios. you'll be using one of these TCP scan types. Say hello to your bread and your butter:
Also called a full-open or Connect scan, this completes the TCP handshake, then terminates the connection
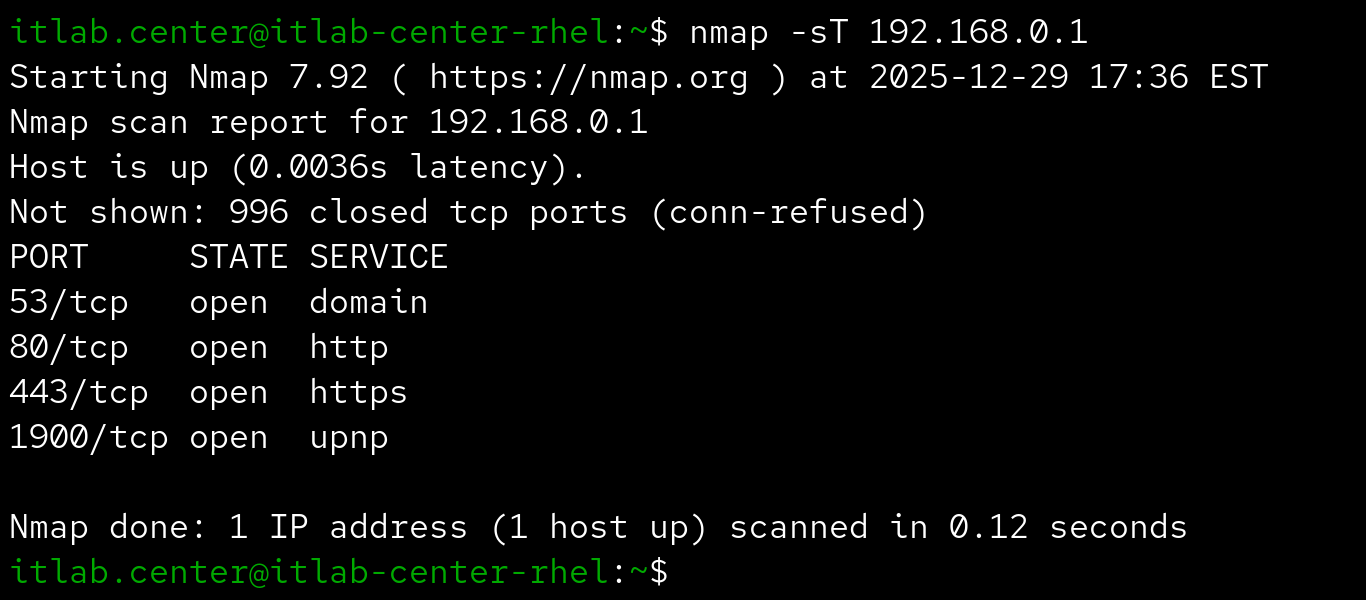
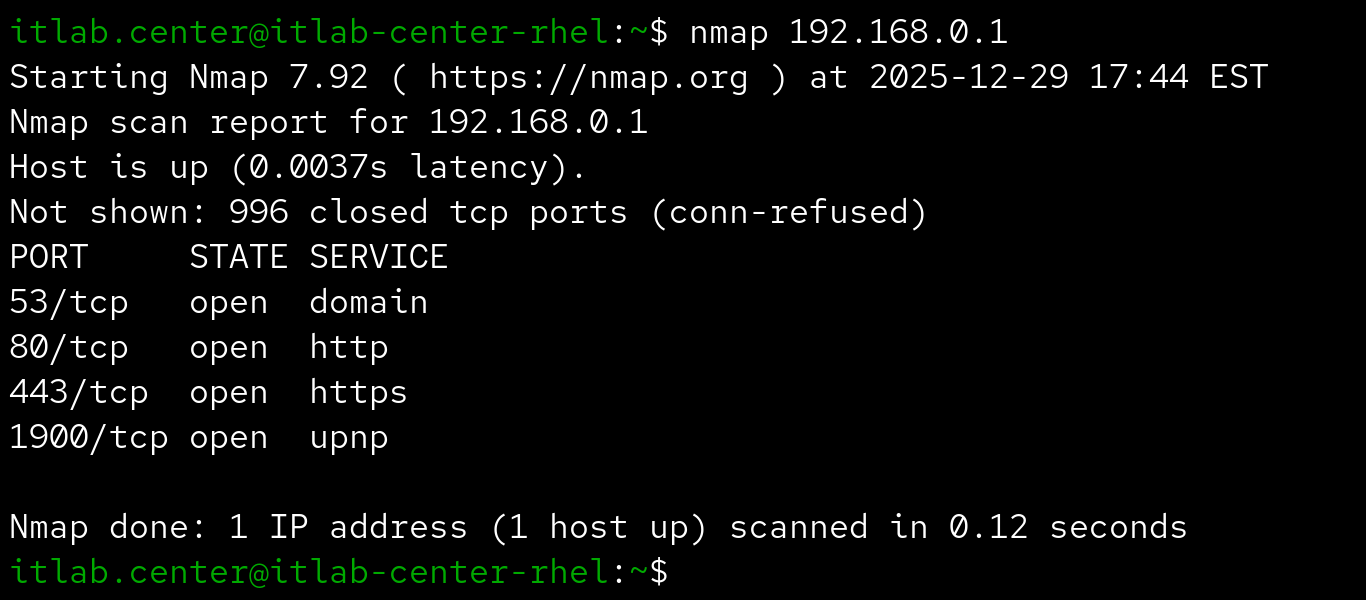
This is the default scan if running Nmap without root privileges, so the following command is equivalent:
Also called a half-open scan, because it begins then abruptly ends the 3-way handshake with a reset packet
Stealth refers to application logging, if connection doesn't complete, then it probably won't be logged
Although modern firewall/IDS solutions are likely to detect such traffic, it is not stealthier but lighter
It is not necessarily stealthier than full-open scans, but the stealth scan is faster and lower bandwidth
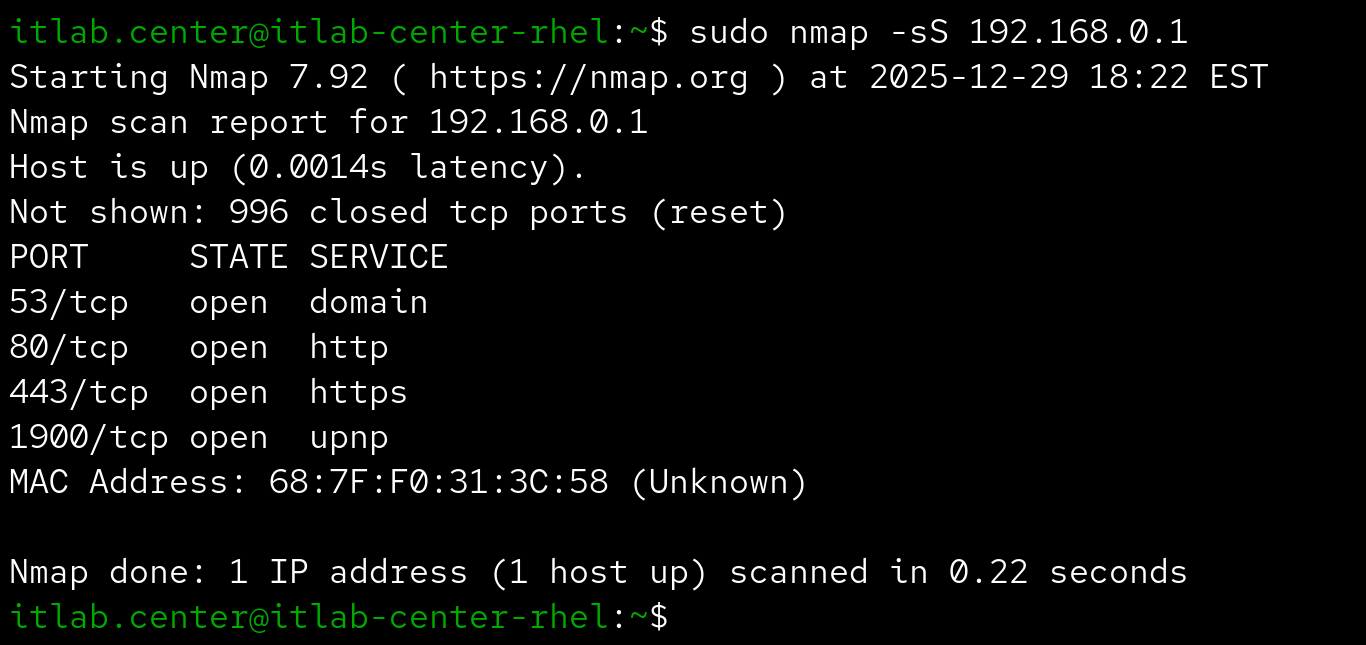
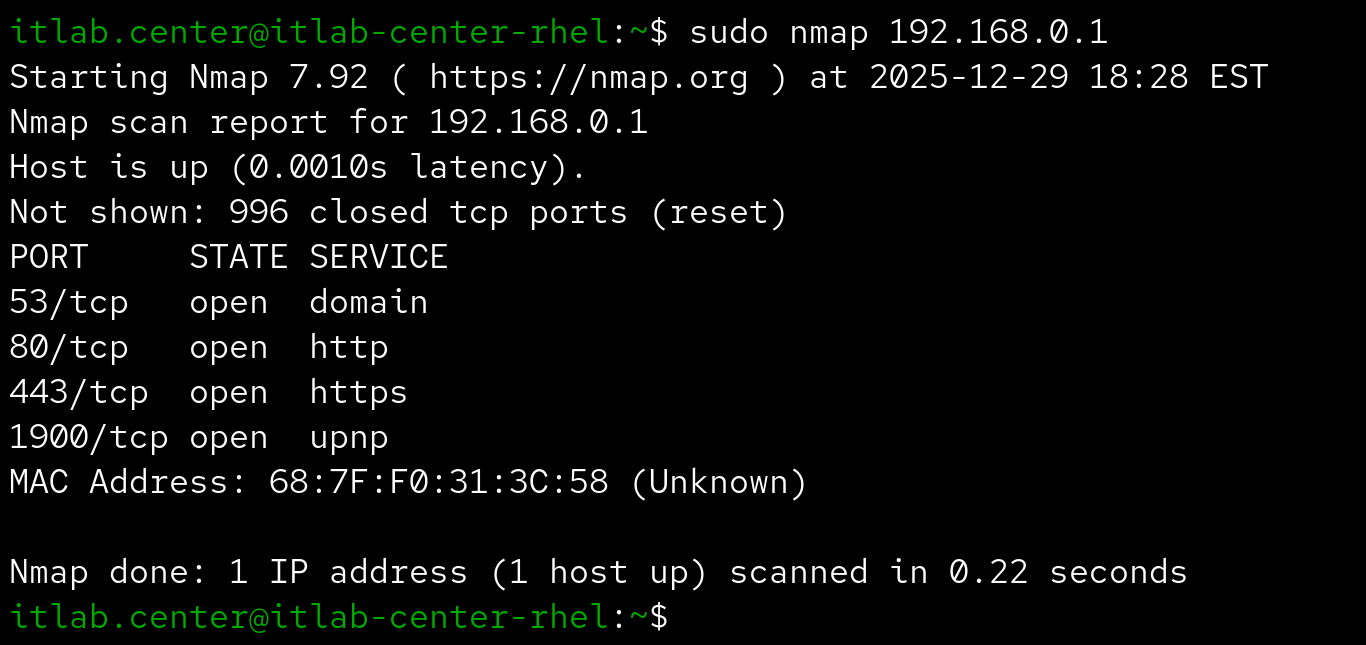
This is the default scan if running Nmap with root privileges, so the following command is equivalent:
The scans pictured above identified an additional MAC address, typically -sT and -sS reveal the same info
That being said, it is not completely unusual to see variations in the results between various scan types
Nmap also provides some more niche scanning options, including -sA for firewalls and -sU for UDP ports
However, these are used much less frequently that the half-connect or full-connect scans mentioned above
Now, how about those port states returned? Running Nmap is only part of the battle, and the smaller part
3. Nmap Port States
There are three primary port states that can be reported when using Nmap. They are defined as follows:
• Open - the port is reachable and a service is listening on it
• Closed - the port is reachable an no service is listening on it
• Filtered - the port is not reachable so we cannot tell (usually indicates a firewall)
Here is an example of a scanned being performed on a workstation behind a firewall using deny all rules:
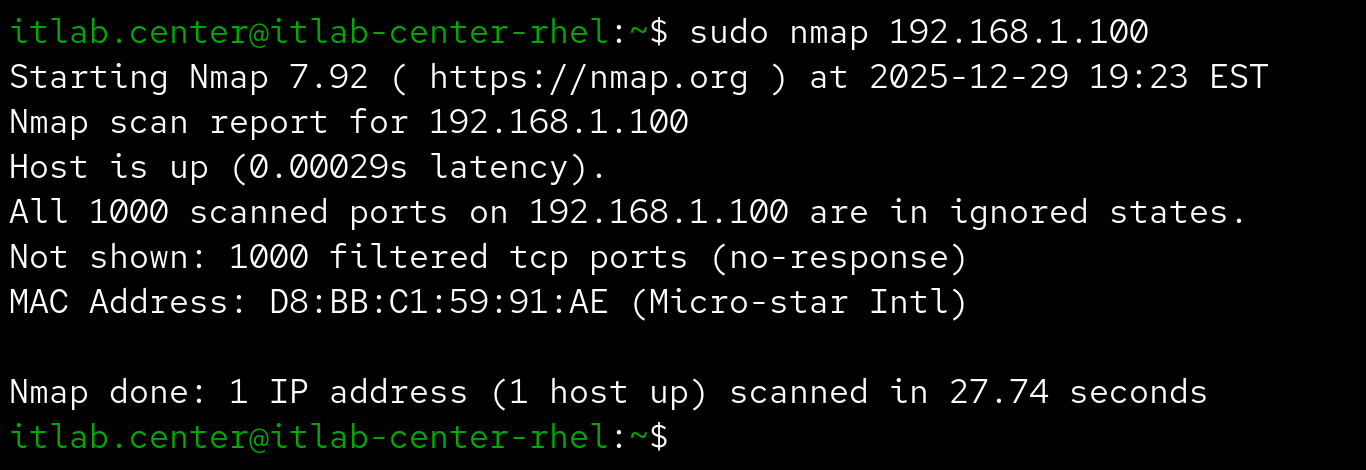
So we can be fairly certain a service lives on an open port and that one does not live on a closed port
We can also make an educated guess that a filtered port is being specifically disallowed by a firewall
There are three other states but you're unlikely to see them until you engage in more advanced scanning
Now that you are familiar with the basic functionality of Nmap, let's review the options you can utilize
4. Nmap Options
Determining which of the 1000 most common ports are listening is a good start, but what if we want others?
Or what if we want to know more about the ports we've identified or the services running on them? Options
The following options can be utilized with Nmap to target specific ports during your Nmap scan processes:
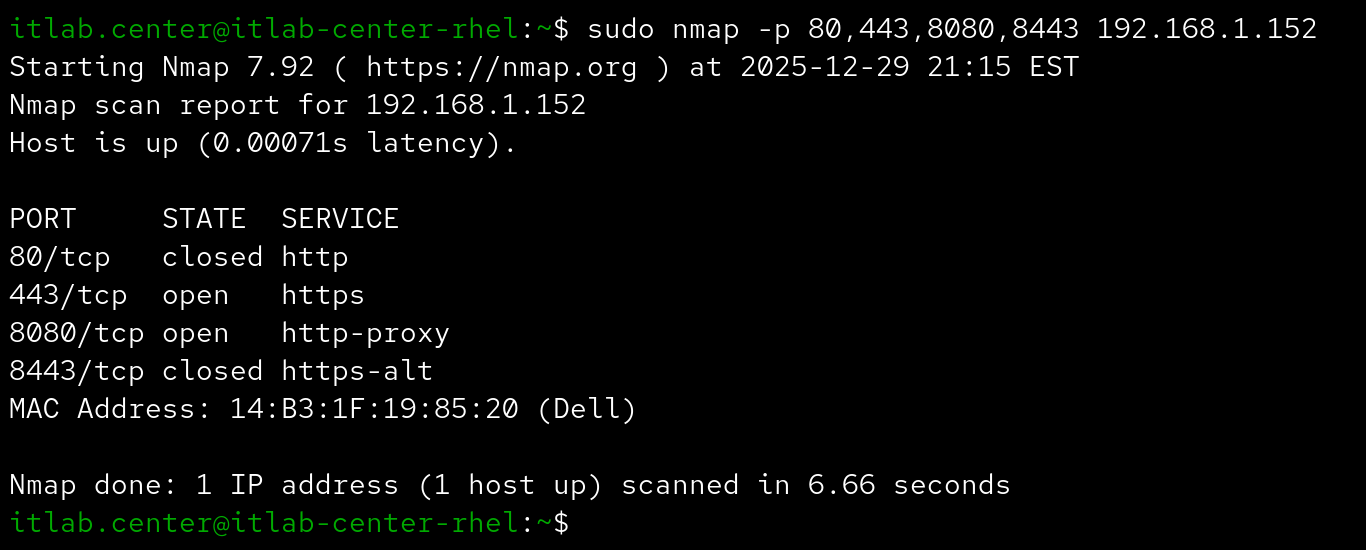
Are you looking for web servers on a host? Running nmap -p 80,443,8080,8443 is a great place to search
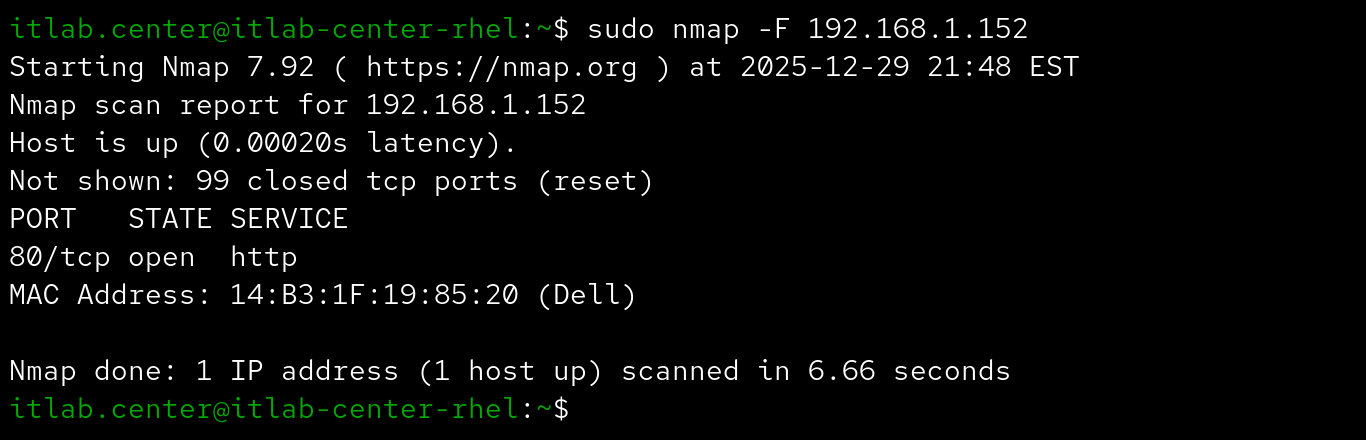
Maybe you're working with a pretty large network and scanning the top 1000 ports is a little too slow
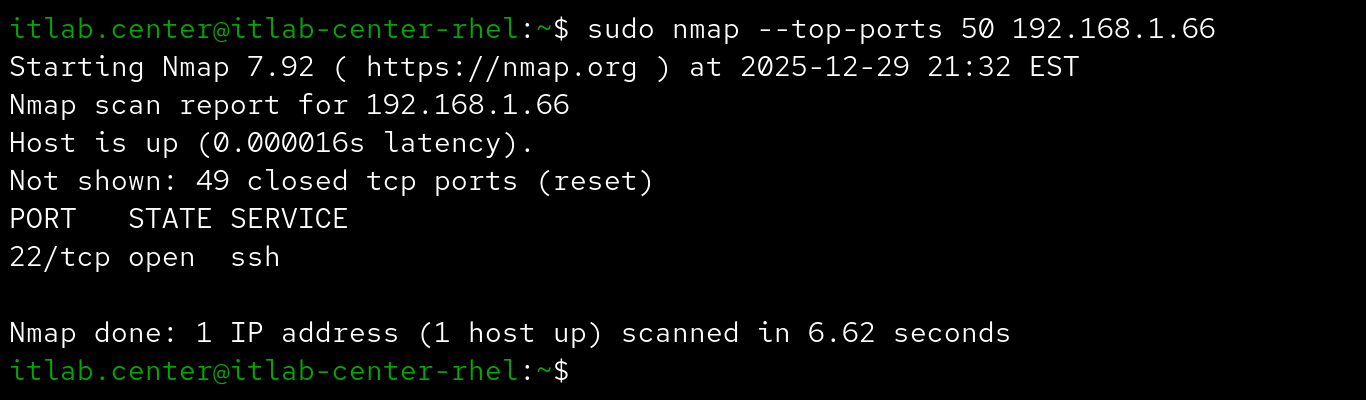
Maybe the top 100 ports sounds like a good net to cast but you're too lazy to type --top-ports number
The following options can be used to perform and control host discovery techniques during your Nmap scan
Nmap won't scan a target that wasn't found in the host discovery phase, which could leas to missed targets
If you suspect a target is blocking Nmap's host discovery probes, you can tell Nmap to skip the discovery
The following options can be used to detect operating systems and services when performing network scans
If the target system is a close enough match to an OS fingerprint in Nmap's database it will report the OS
Otherwise, you can force it to guess more aggressively by adding -osscan-guess to the Nmap scanning command
This provides some additional information about the host operating system, mainly to find vulnerabilities
The following options can be used to control the speed at which Nmap performs scans based on aggressiveness
These templates are grouped as Paranoid(0) | Sneaky(1) | Polite(2) | Normal(3) | Aggressive(4) | Insane(5)
The default is Normal. You may want to speed your scan up or slow it down so that you don't trip a filter
Now that you are familiar with all of Nmaps options for scanning, let's move on to the hands-on exercise
5. Install Red Hat Enterprise Linux
Red Hat Enterprise Linux is a database level proprietary linux distribution maintained by the Red Hat Co
It is a commercial, enterprise-grade linux operating system designed to provide stability for businesses
The high-performance foundation is widely used across industries for both servers and cloud environments
We will be using RHEL for this lab to simulate performing Nmap port scanning on an enterprise network:
Download RHEL with Developer Subscription: RHEL 10.0 ISO File
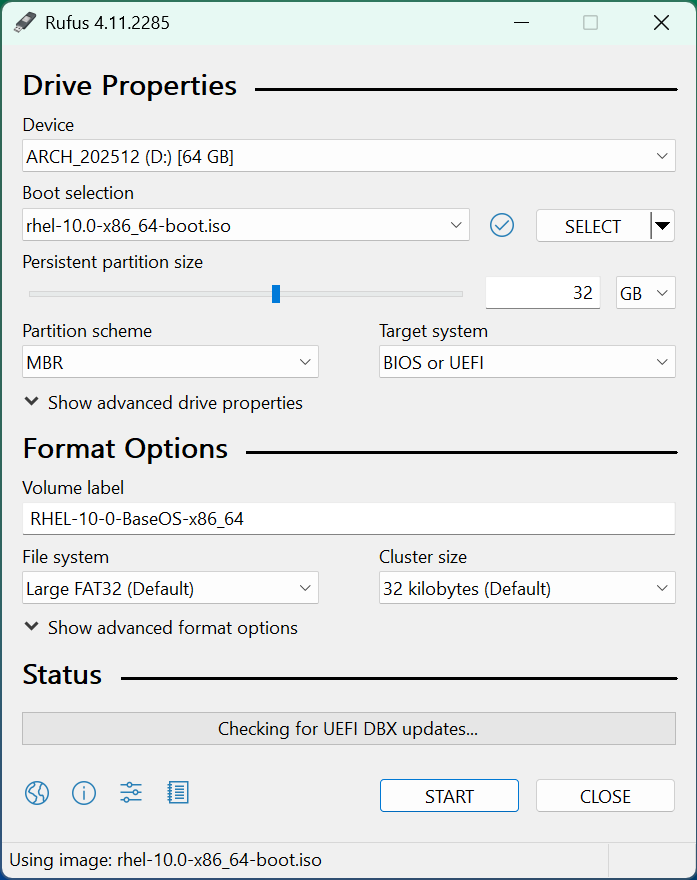
Download Rufus Disk Imaging Software: Rufus Official Download
Insert USB Flash Drive, run rufus.exe, select target drive as your USB Flash Drive, select RHEL 10.0 ISO:
Remove the USB Flash Drive and Insert into unused PC. Start PC and press the hot boot key at the startup:

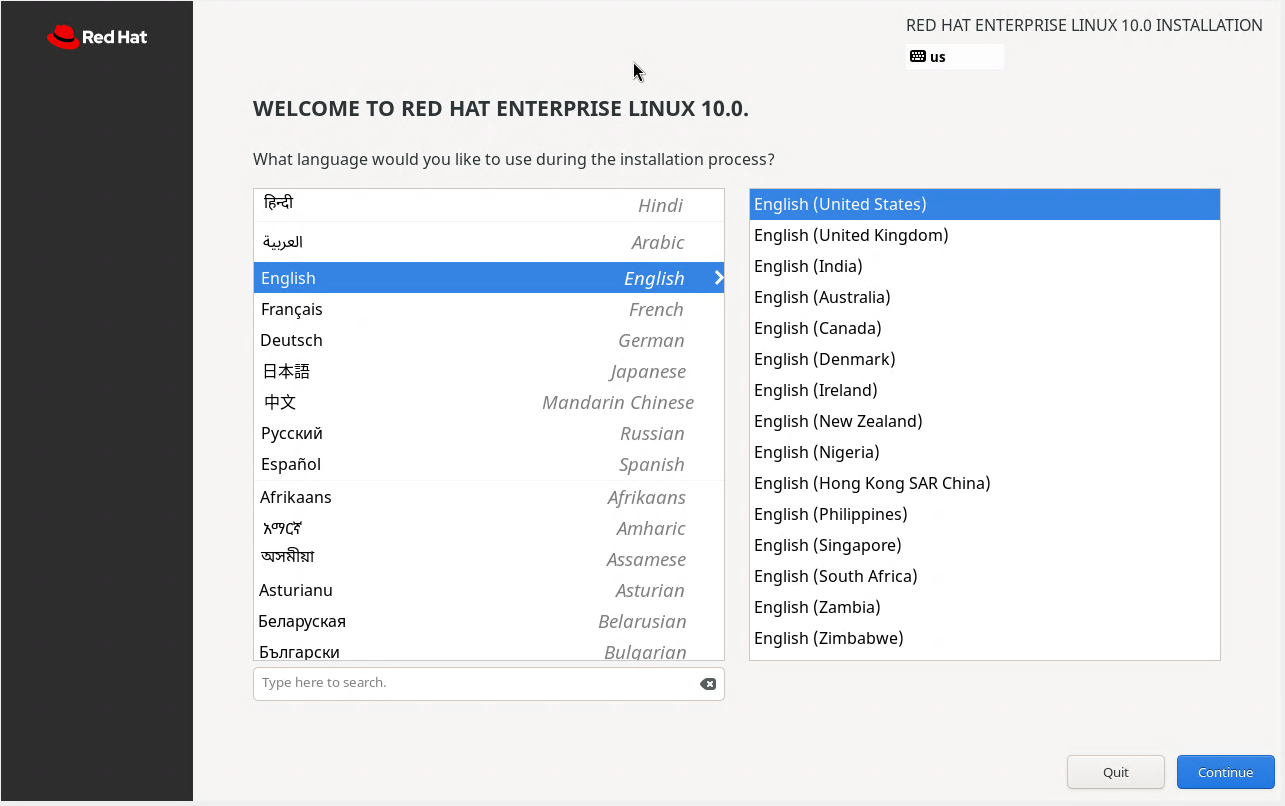
You will be greeted with the GRUB bootloader screen, select the option to Install Red Hat Linux v10.0:

This will load the GUI installer, click continue to use the default english language and keyboard layout:
As a commercial operating system, we can see that the graphical installer is extremely visually polished
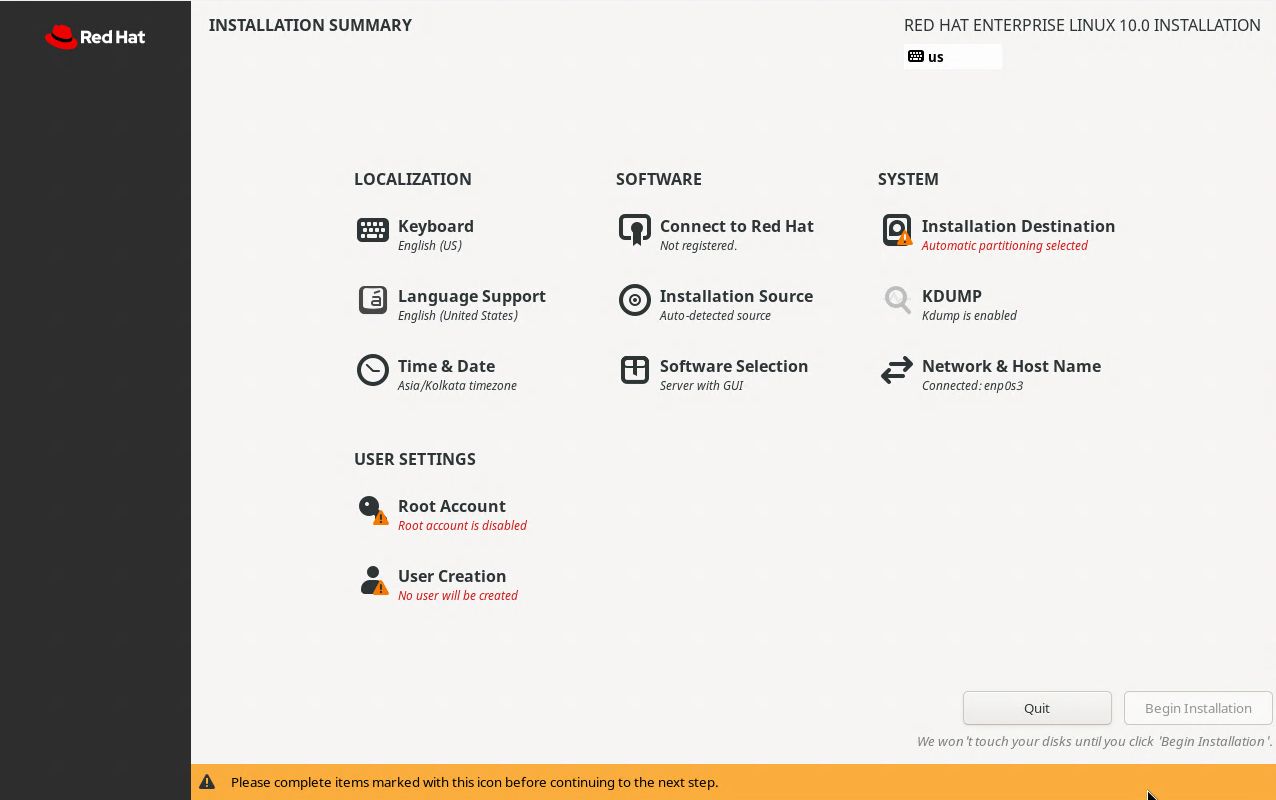
Under the Software Settings, click the option to Connect to Red Hat to allow for software installation
An authentication dialogue box will appear, enter in your credentials for your Red Hat developer account
Leave unchecked the options to set system purpose and connect to Red Hat insights, then click register
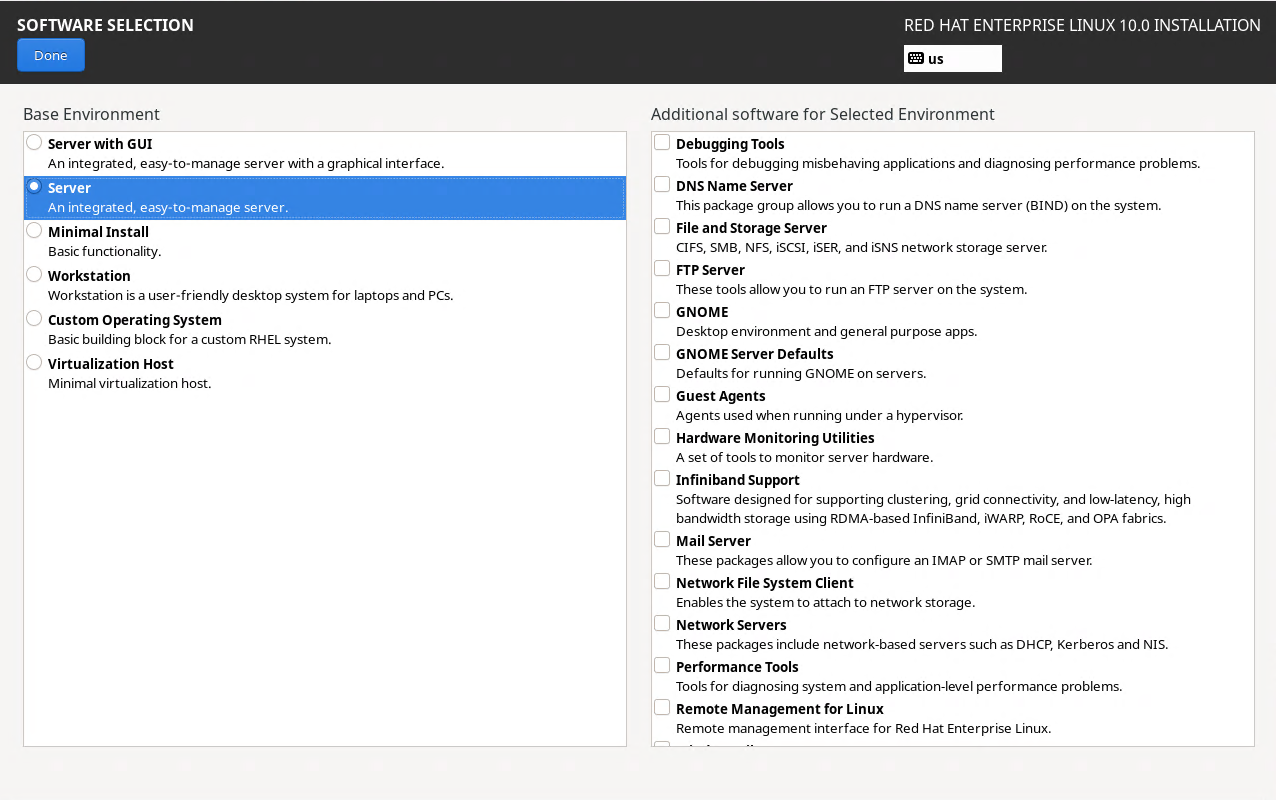
Click done to be returned to the main RHEL installation screen, from here click on the Software Selection
From the leftmost pane, select the options to install the Server with GUI Base Environment and click done
While Red Hat Enterprise Linux includes a variety of software bundles, we will install the tools ourself:
Next from the main installation screen, under the system options, click the installation destination tab
From here select the disk we will be installing to, check the box to Free up space by removing partitions
Click done, a menu for disk partitioning will appear, select the option to delete all and reclaim space:
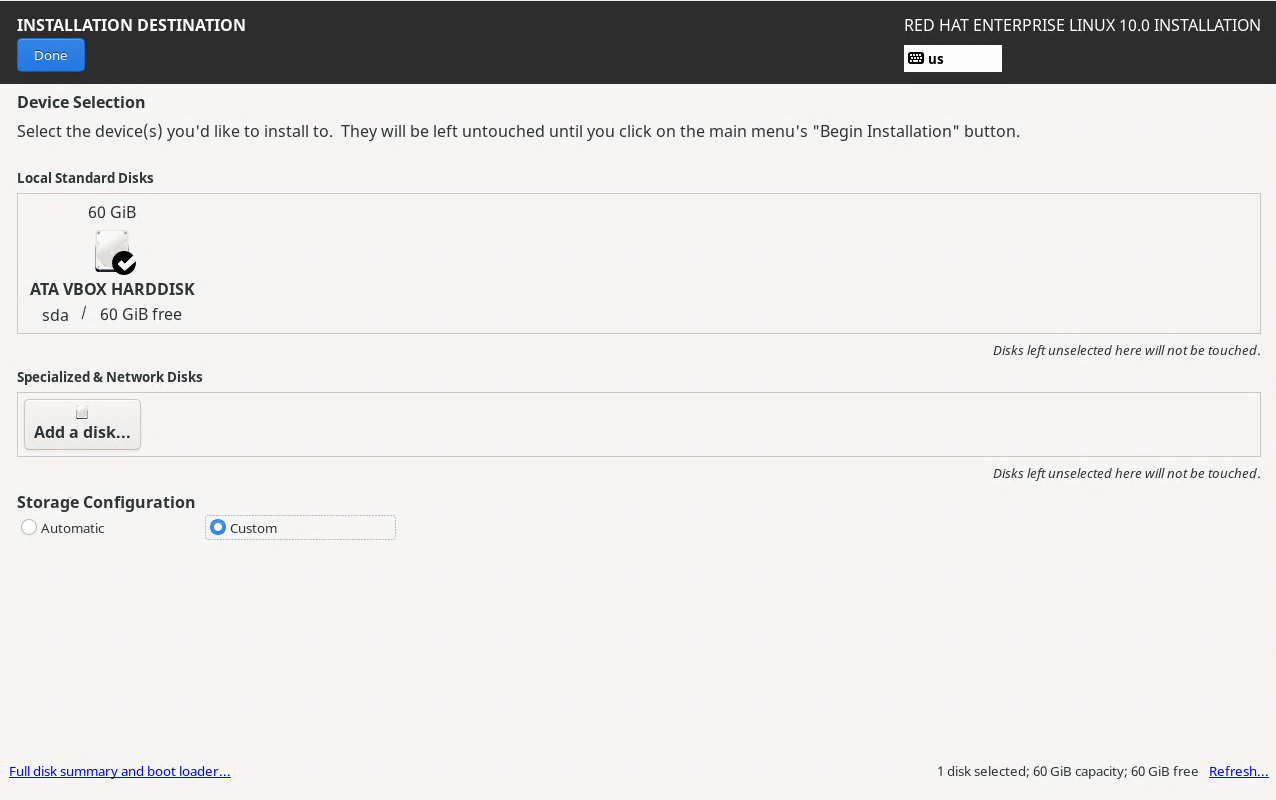
Select the network settings option, enter in the hostname itlab-center-rhel at the bottom and click apply
Lastly, make sure to enable the root account and create a user account named itlab.center, begin install
Our operating system will take some time to install, once the installation is complete, click reboot system
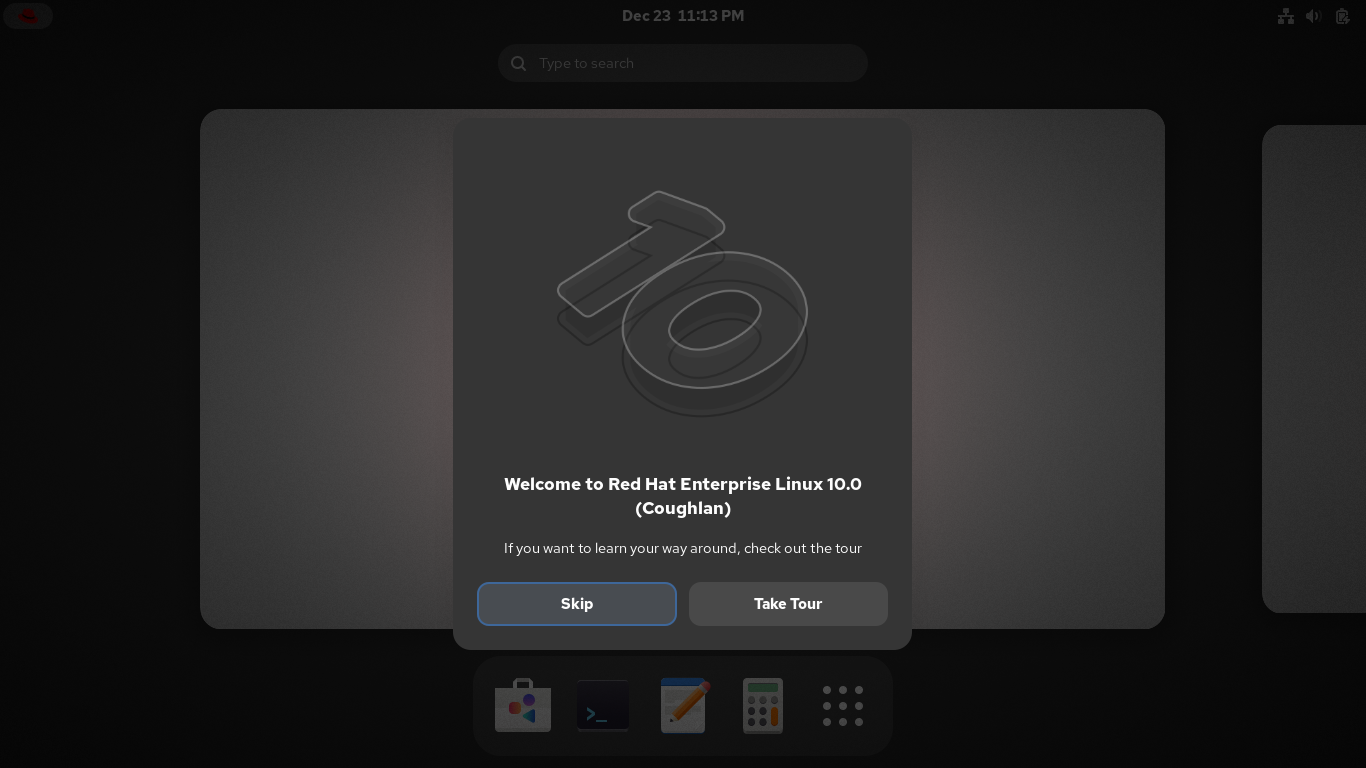
We now have our base system to complete the rest of this lab exercise from, and a powerful one at that
6. Install Lab Tools
Now that we have our platform, let's build upon it by installing the rest of the tools for this activity
To begin, we want to open a terminal from the bottom of the screen, we will spend most of our time here:

Docker is a container deployment tool which we will use in this lab to create virtual network environments
Run the following commands from the Red Hat Enterprise Linux Terminal to install and enable docker service:
itlab.center@itlab-center-rhel:~$ sudo dnf install dnf-plugins-core -y
itlab.center@itlab-center-rhel:~$ sudo dnf config-manager --add-repo https://download.docker.com/linux/rhel/docker-ce.repo
itlab.center@itlab-center-rhel:~$ sudo dnf install docker-ce docker-ce-cli containerd.io docker-buildx-plugin docker-compose-plugin -y
itlab.center@itlab-center-rhel:~$ sudo systemctl enable --now docker
Xterm is a terminal emulator which will allow use to access the command line from our docker containers
Run the following command from the Red Hat Enterprise Linux terminal to install Xterm and the Nmap tool:
itlab.center@itlab-center-rhel:~$ sudo dnf install xterm xhost nmap -y
Containernet is a network emulator and allows us to use docker containers as hosts in emulated topologies
Python is a multi-purpose scripting language and git allows us to use the plethora of tools on Github.com
Run the following commands from the Red Hat Enterprise Terminal to install Containernet and dependencies:
itlab.center@itlab-center-rhel:~$ sudo dnf install gcc make glibc-devel telnet autoconf -y
itlab.center@itlab-center-rhel:~$ sudo dnf install python3 python3-pip git automake -y
itlab.center@itlab-center-rhel:~$ git clone https://github.com/containernet/containernet
itlab.center@itlab-center-rhel:~$ cd containernet
Run the following commands from the Red Hat Enterprise Linux Terminal to compile the mnexec dependency:
itlab.center@itlab-center-rhel:~/containernet$ sudo pip3 install .
itlab.center@itlab-center-rhel:~/containernet$ sudo make mnexec
itlab.center@itlab-center-rhel:~/containernet$ sudo cp mnexec /usr/bin/
itlab.center@itlab-center-rhel:~/containernet$ sudo chmod +x /usr/bin/mnexec
The installation script for containernet is not updated for RHEL 10, it will work but we must make changes
Run the following command from the Red Hat Enterprise Linux Terminal to open the install.sh file with nano:
itlab.center@itlab-center-rhel:~/containernet$ sudo nano util/install.sh
Now scroll to find the lines listed below and comment them out by adding preceding hashtags just like such:
# if ! which lsb_release &> /dev/null; then
# $install redhat-lsb-core
# fi
Almost there, find these lines and comment them out as well, then save with CTRL+O and exit with CTRL+X:
# patch -p1 < $MININET_DIR/containernet/util/openflow-patches/controller.patch
# patch -p1 < $MININET_DIR/containernet/util/openflow-patches/strlcpy.patch
Now run the following command from the Red Hat Enterprise Linux Terminal to install the Containernet tool:
itlab.center@itlab-center-rhel:~/containernet$ sudo util/install.sh -a
Since we have ContainerNet installed, we can move on to building the container images for our docker nodes
In this lab environment we will simulate a topology with a web, file, and utils server, plus a workstation
Let's also add in some other hosts for our Nmap scans to pickup on, these will be unspecified workstations
Each container is deployed with an image file which we can customize to select the software we'll include
Run the following command from the Red Hat Enterprise Linux Terminal to begin building our web server node:
itlab.center@itlab-center-rhel:~/containernet$ sudo nano Dockerfile-web
Our web server will run Ubuntu Linux as the OS and NGINX as the web server, type out the below and save:
FROM ubuntu:22.04
RUN apt-get update && apt-get install -y iproute2 iputils-ping nginx iptables
RUN update-alternatives --set iptables /usr/sbin/iptables-legacy
RUN echo "server {" >> /etc/nginx/sites-available/default && echo "listen 1000;" >> /etc/nginx/sites-available/default
RUN echo "server_name _;" >> /etc/nginx/sites-available/default && echo "root /var/www/html;" >> /etc/nginx/sites-available/default
RUN echo "index index.nginx-debian.html;" >> /etc/nginx/sites-available/default && echo "location / {" >> /etc/nginx/sites-available/default
RUN echo "try_files \$uri \$uri/ =404;" >> /etc/nginx/sites-available/default && echo "}" >> /etc/nginx/sites-available/default
RUN echo "}" >> /etc/nginx/sites-available/default
RUN echo "server {" >> /etc/nginx/sites-available/default && echo "listen 2099;" >> /etc/nginx/sites-available/default
RUN echo "server_name _;" >> /etc/nginx/sites-available/default && echo "root /var/www/html;" >> /etc/nginx/sites-available/default
RUN echo "index index.nginx-debian.html;" >> /etc/nginx/sites-available/default && echo "location / {" >> /etc/nginx/sites-available/default
RUN echo "try_files \$uri \$uri/ =404;" >> /etc/nginx/sites-available/default && echo "}" >> /etc/nginx/sites-available/default
RUN echo "}" >> /etc/nginx/sites-available/default
CMD ["nginx", "-g", "daemon off;"]
Run the following command from the Red Hat Enterprise Linux Terminal to begin building our file server node:
itlab.center@itlab-center-rhel:~/containernet$ sudo nano Dockerfile-file
Our file server will run Ubuntu Linux as the OS and vsftpd as the file server, type out the below and save:
FROM ubuntu:22.04
RUN apt-get update && apt-get install -y vsftpd ftp iproute2 iputils-ping nginx
RUN mkdir -p /var/run/vsftpd/empty
RUN echo "server {" > /etc/nginx/sites-available/default && echo "listen 1150;" >> /etc/nginx/sites-available/default
RUN echo "server_name _;" >> /etc/nginx/sites-available/default && echo "root /var/www/html;" >> /etc/nginx/sites-available/default
RUN echo "index index.nginx-debian.html;" >> /etc/nginx/sites-available/default && echo "location / {" >> /etc/nginx/sites-available/default
RUN echo "try_files \$uri \$uri/ =404;" >> /etc/nginx/sites-available/default && echo "}" >> /etc/nginx/sites-available/default
RUN echo "}" >> /etc/nginx/sites-available/default
CMD ["/usr/bin/vsftpd", "/etc/vsftpd.conf"]
Run the following command from the Red Hat Enterprise Linux Terminal to begin building a utils server node:
itlab.center@itlab-center-rhel:~/containernet$ sudo nano Dockerfile-utils
Our utils server will run Ubuntu Linux as the OS and includes networking tools, type out the below and save:
FROM ubuntu:22.04
RUN apt-get update && apt-get install -y iproute2 iputils-ping busybox-static
CMD ["telnetd", "-F", "-l", "/bin/sh"]
Run the following command from the Red Hat Enterprise Linux Terminal to begin building a workstation node:
itlab.center@itlab-center-rhel:~/containernet$ sudo nano Dockerfile-workstation
Our workstation will run Ubuntu as the OS and will include Xterm and our Nmap, type out the below and save:
FROM ubuntu:22.04
RUN apt update && apt install -y nmap xterm iputils-ping iproute2 sudo iptables openssh-server
RUN useradd -m -s /bin/bash itlab-center && usermod -aG sudo itlab-center && echo "itlab-center:password123" | chpasswd
RUN mkdir -p /var/run/sshd && update-alternatives --set iptables /usr/sbin/iptables-legacy
CMD ["bash"]
Run the following command from the Red Hat Enterprise Linux Terminal to begin building the additional nodes:
itlab.center@itlab-center-rhel:~/containernet$ sudo nano Dockerfile-node
Our workstations will run Ubuntu as the OS and will have all 100 ports closed, type out the below and save:
FROM ubuntu:22.04
RUN apt update && apt install -y iputils-ping iproute2
CMD ["bash"]
Run the following commands from the Red Hat Linux Terminal to build the Docker containers with our images:
itlab.center@itlab-center-rhel:~/containernet$ sudo docker build -t webserver -f Dockerfile-web .
itlab.center@itlab-center-rhel:~/containernet$ sudo docker build -t fileserver -f Dockerfile-file .
itlab.center@itlab-center-rhel:~/containernet$ sudo docker build -t utilsserver -f Dockerfile-utils .
itlab.center@itlab-center-rhel:~/containernet$ sudo docker build -t workstation -f Dockerfile-workstation .
itlab.center@itlab-center-rhel:~/containernet$ sudo docker build -t node -f Dockerfile-node .
We have all of the containers built with there respective images and software, let's move on to networking
7. Deploy Network Topology Emulation
We've put much thought into our node images, but they are useless if they don't communicate with each other
In this lab exercise we simulate the perspective of the network administrator performing network scanning
Before we move forward let's have a birds eye view of what we are trying to emulate so you can understand:
+------------------+ +------------------+ +-----------------+ +-----------------+
| Web Server | | File Server | | Workstation | | Workstation |
| NGINX | | VSFTPD | | | | |
+---------+--------+ +---------+--------+ +--------+--------+ +--------+--------+
\ / | |
\ / | |
\ / | |
+--------------+ | |
| Switch |----------------------------------------|-----------------------------|
+--------------+ | |
/ \ | |
/ \ | |
+---------+--------+ +------------------+ +--------+--------+ +--------+--------+
| Utils Server | | Workstation | | Workstation | | Workstation |
| TELNETD | | NMAP + OpenSSH | | | | |
| | | YOU ARE HERE | | | | |
+------------------+ +------------------+ +-----------------+ +-----------------+
In order for us to execute Nmap scan commands, we need to connect these virtual containers with a switch
This will allow us to generate traffic between the nodes and study all the interactions that they create
Run the following commands from the Red Hat Enterprise Linux Terminal to compile our virtual switch source:
itlab.center@itlab-center-rhel:~/containernet$ sudo dnf install libtool openssl-devel python3-devel kernel-devel libcap-ng-devel -y
itlab.center@itlab-center-rhel:~/containernet$ git clone https://github.com/openvswitch/ovs.git
itlab.center@itlab-center-rhel:~/containernet$ cd ovs
itlab.center@itlab-center-rhel:~/containernet/ovs$ git checkout v3.3.0
The Open vSwitch is the optimal package choice here, being compatible with RHEL, docker and containernet
Run the following commands from the Red Hat Enterprise Linux Terminal to build the OVS tool from source:
itlab.center@itlab-center-rhel:~/containernet/ovs$ ./boot.sh
itlab.center@itlab-center-rhel:~/containernet/ovs$ ./configure
itlab.center@itlab-center-rhel:~/containernet/ovs$ make -j$(nproc)
itlab.center@itlab-center-rhel:~/containernet/ovs$ sudo make install
The OpenvSwitch commands are located in /usr/local/bin and /usr/local/sbin, we must add them to the PATH
Run the following commands from the Red Hat Enterprise Linux Terminal to edit the sudoers config file:
itlab.center@itlab-center-rhel:~/containernet/ovs$ sudo visudo
Scroll to the following line and add the paths by hitting i, entering them, hitting escape, them typing :wq
Defaults secure_path - /sbin:/bin:/usr/sbin:/usr/bin:/usr/local/bin:/usr/local/sbin
Last part we need to take care of before our virtual switch can begin routing packets and assigning IPs
Run the following commands from the Red Hat Enterprise Linux Terminal to perform the OVS database setup:
itlab.center@itlab-center-rhel:~/containernet/ovs$ sudo mkdir -p /usr/local/etc/openvswitch /usr/local/var/run/openvswitch
itlab.center@itlab-center-rhel:~/containernet/ovs$ sudo ovsdb-tool create /usr/local/etc/openvswitch/conf.db /usr/local/share/openvswitch/vswitch.ovsschema
itlab.center@itlab-center-rhel:~/containernet/ovs$ sudo ovsdb-server --remote=punix:/usr/local/var/run/openvswitch/db.sock --remote=db:Open_vSwitch,Open_vSwitch,manager_options --pidfile --detach
itlab.center@itlab-center-rhel:~/containernet/ovs$ sudo ovs-vswitchd --pidfile --detach
Now that our images are created, we are tasked with connecting them with virtual links to a network switch
This is precisely what ContainerNet is for, which uses Python scripting to create the emulated connections
Run the following commands from the Red Hat Enterprise Linux Terminal to create and edit our python script:
itlab.center@itlab-center-rhel:~/containernet/ovs$ cd ..
itlab.center@itlab-center-rhel:~/containernet$ nano topology.py
Type out the Python script below to perform calls to the Containernet modules and link the hosts virtually:
#!/user/bin/python3
from mininet.net import Containernet
from mininet.node import Controller, OVSBridge
from mininet.cli import CLI
from mininet.link import TCLink
from mininet.term import makeTerm
def build_topology():
net = Containernet(controller=Controller)
net.addController("c0")
print("Adding Docker containers...")
web = net.addDocker("web", ip="10.0.0.2/24", dimage="webserver")
file = net.addDocker("file", ip="10.0.0.20/24", dimage="fileserver")
utils = net.addDocker("utils", ip="10.0.0.7/24", dimage="utilsserver")
workstation = net.addDocker("ws", ip="10.0.0.1/24", dimage="workstation")
node1 = net.addDocker("node1", ip="10.0.0.32/24", dimage="node")
node2 = net.addDocker("node2", ip="10.0.0.98/24", dimage="node")
node3 = net.addDocker("node3", ip="10.0.0.99/24", dimage="node")
node4 = net.addDocker("node4", ip="10.0.0.100/24", dimage="node")
print("Adding switch...")
s1 = net.addSwitch("s1", cls=OVSBridge)
print("Creating links...")
net.addLink(web, s1)
net.addLink(file, s1)
net.addLink(utils, s1)
net.addLink(workstation, s1)
net.addLink(node1, s1)
net.addLink(node2, s1)
net.addLink(node3, s1)
net.addLink(node4, s1)
print("Starting network...")
net.start()
print("Setting up interfaces...")
workstation.cmd("ip link set ws-eth0 up")
file.cmd("ip link set file-eth0 up")
utils.cmd("ip link set utils-eth0 up")
web.cmd("ip link set web-eth0 up")
node1.cmd("ip link set node1-eth0 up")
node2.cmd("ip link set node2-eth0 up")
node3.cmd("ip link set node3-eth0 up")
node4.cmd("ip link set node4-eth0 up")
print("Starting services...")
file.cmd("/usr/sbin/vsftpd /etc/vsftpd.conf &")
file.cmd("nginx")
utils.cmd("busybox telnetd -l /bin/sh -p 23 &")
web.cmd("nginx && iptables -P INPUT DROP && iptables -A INPUT -p tcp --dport 80 -j ACCEPT")
web.cmd("iptables -A INPUT -p tcp --dport 1000 -j ACCEPT")
web.cmd("iptables -A INPUT -p tcp --dport 2099 -j ACCEPT")
workstation.cmd("/usr/sbin/sshd && iptables -A INPUT -p tcp --dport 3389 -j DROP")
print("Network ready. Use CLI to test.")
makeTerm(workstation, cmd="su - itlab-center")
CLI(net)
net.stop()
if __name__ == "__main__":
build_topology()
This will create our lab environment and bring it live, use CTRL+O to save the script and CTRL+X to exit
In this lesson you will apply what you learned in the overview and perform some network scanning with Nmap
Before we proceed, we need to start the emulated network we have designed to begin performing inspection
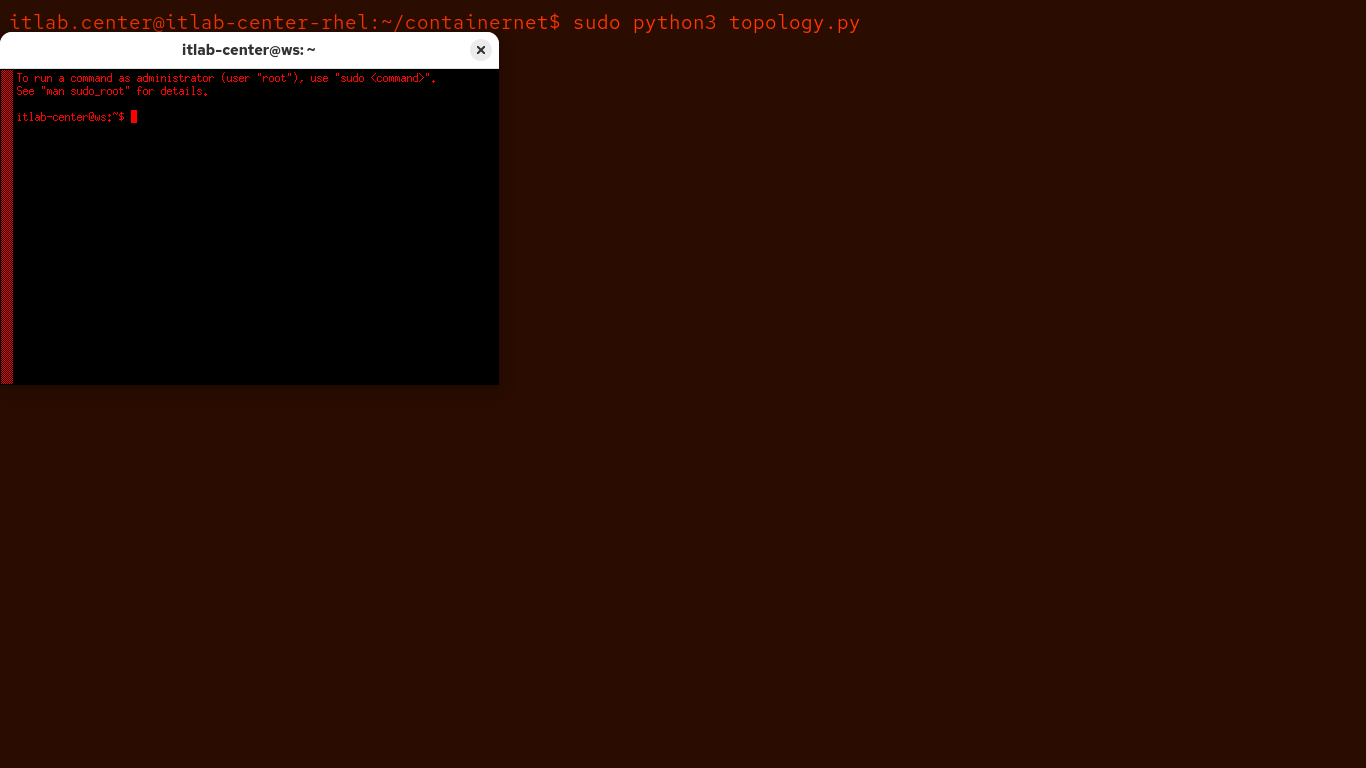
Run the following command from the Red Hat Linux Terminal to start the xterm network topology emulation:
itlab.center@itlab-center-rhel:~/containernet$ sudo python3 topology.py
Once our script executes you will be greeted with a Xterm Virtual Terminal for our workstation system:
Our setup is complete, let's move into the lab exercise to investigate how to use Wireshark for networking
8. Run a Basic Nmap Scan
In this part of the lab, you will fire off two basic Nmap scans in your virtual network to get comfortable
This will prepare you for part 2 of the exercise, where you will scan an enumerate the rest of the network
Run the following command from the Workstation Nodes Xterm Terminal to perform a Nmap scan on our system:
itlab-center@ws:/# nmap 10.0.0.1
Resulting Output:
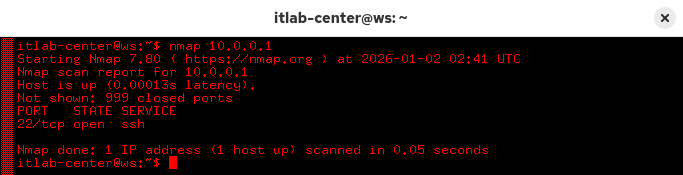
This is your first TCP connect scan, you can specify this type of scan explicitly by using the -sT option
As the default without root, this type of scan, also known as full-open, performs a full 3-way handshake
It completes a connection to each port to check for services running, we can see port 22 is running ssh
If run as root, Nmap will default to a SYN stealth scan, which you can specify explicitly by using -sS
Run the following command from the Workstation Nodes Xterm Terminal to perform a stealth scan with Nmap:
itlab-center@ws:/# sudo nmap 10.0.0.1
When prompted, authenticate with password123. Resulting Output:

This type of scan, also known as half-open, does not complete the TCP handshake, it terminates it prior
As you can see, it also identified one additional port, typically both TCP scan will reveal the same ports
However, it is not totally uncommon to see variations in results between the various scanning techniques
You should see a network scan result indicating one open port, one filtered port, and 998 closed ports
9. Enumerate the Target Network
In this part of the lab, you will perform scanning and enumeration using a range of different Nmap options
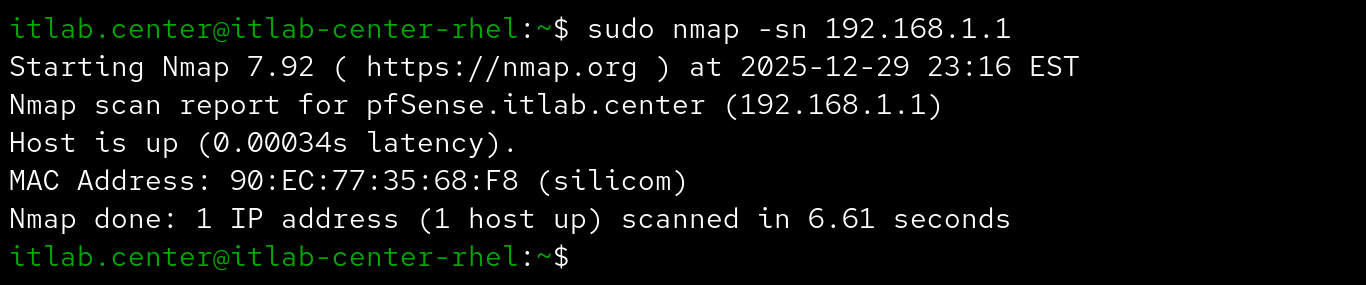
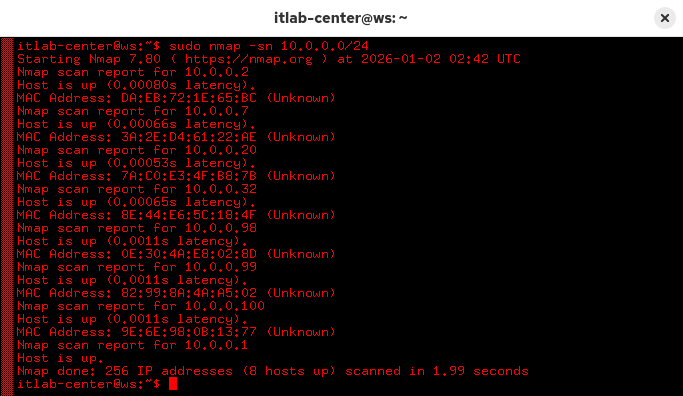
You will begin the exercise by running a host discovery type scan on the entire target network with Nmap
Run the following command from the Workstation Nodes Xterm Terminal to perform a network host discovery:
itlab-center@ws:/# sudo nmap -sn 10.0.0.0/24
Resulting Output:
Run the following command from the Workstation Nodes Xterm Terminal to ask Nmap how it determined hosts:
itlab-center@ws:/# sudo nmap -sn -reason 10.0.0.0/24
Resulting Output:
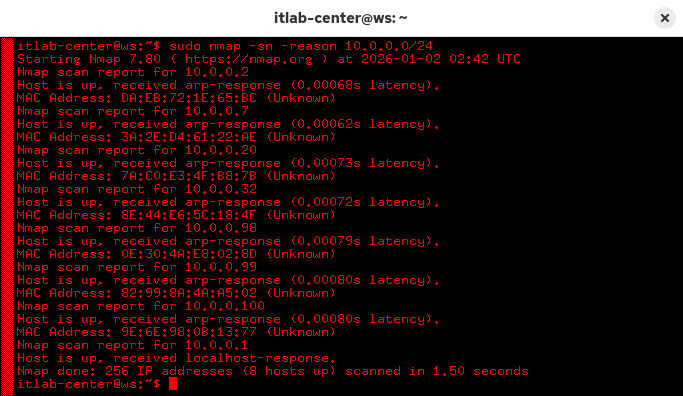
Nmap utilizes several techniques for host discovery. If running a ping scan, Nmap will primarily use ARP
Address Resolution Protocol is used by systems on the same network to determine which MAC has which IP
It does this by broadcasting ARP to the Network. Who has this IP and what is your MAC? Like attendance
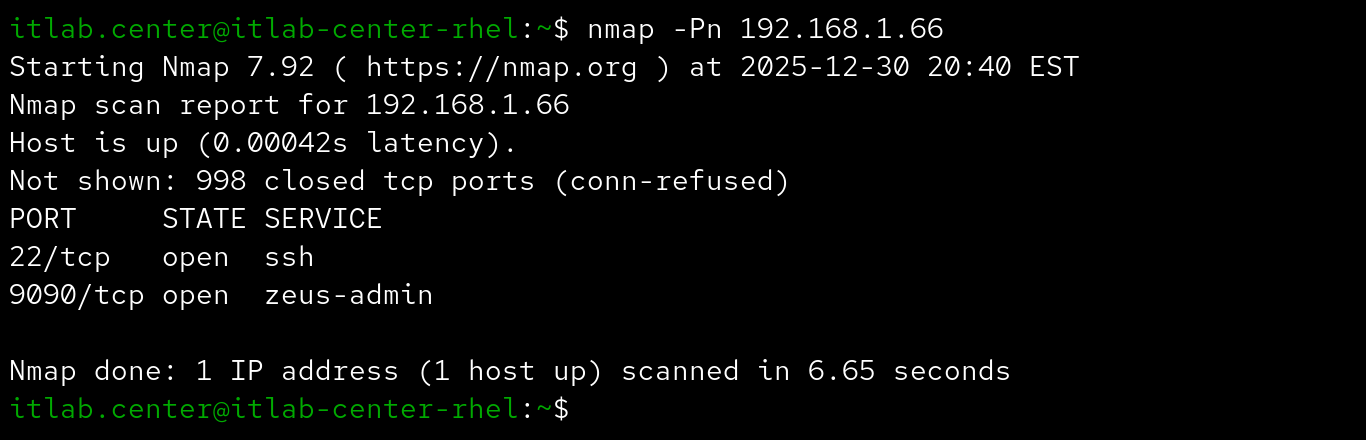
Now that you've discovered some hosts, it's time to see if any of them have open ports on the network
With your next scan, you will alter the range of the scan, now that you know the IP addresses available
Run the following command from the Workstation Nodes Xterm Terminal to scan the top 100 network ports:
itlab-center@ws:/# sudo nmap -Pn 10.0.0.2-100 -F
Resulting Output:
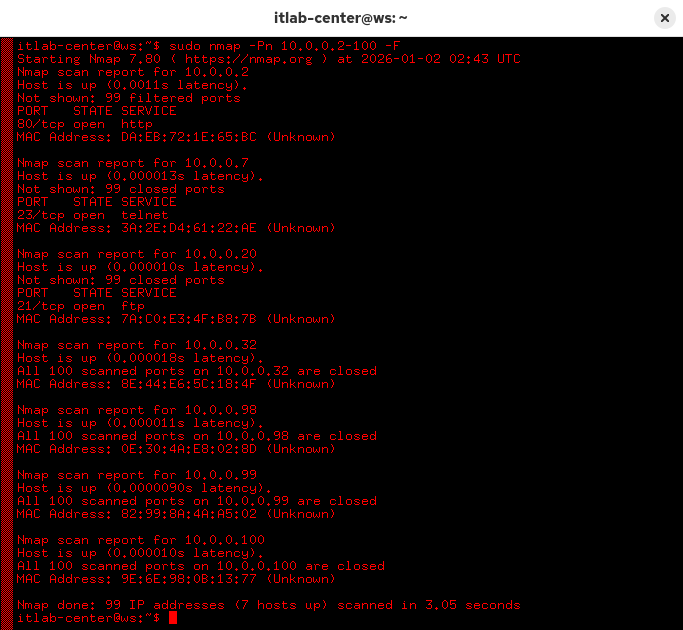
This performs a SYN Stealth scan on a smaller range, skipping host discovery, and only the top 100 ports
Since you are running Nmap with root, the following would also be equivalent: nmap -sS -Pn 10.0.0.2-100 -F
You skipped the host discovery scan here because you know the target hosts are all up from previous scans
That said, it is common for modern devices to block ping probes, and Nmap will not proceed without hosts
If you are certain that a host is alive, but it is blocking your ping probes, the -Pn option is the path
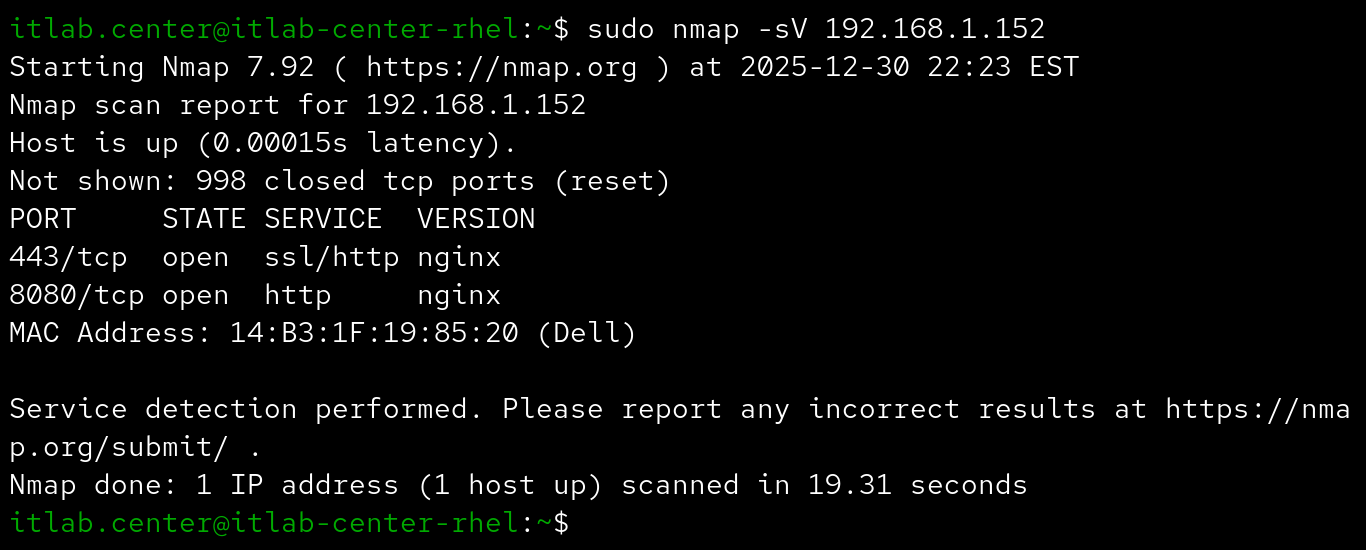
At this point, you have three targets: webserver, fileserver, and utilsserver with ports 80, 21, and 23
Nmap also performs reverse DNS resolution, and the hostnames it finds can often indicate the nodes purpose
Let's start with the fileserver host at 10.0.0.20, which has closed ports, meaning reachable but no service
Another target 10.0.0.2 has the remainder of its ports filtered by a firewall, we will circle back to that
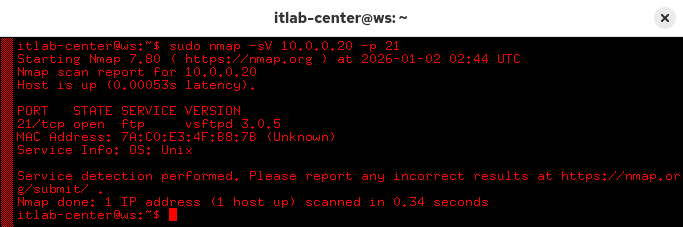
Run the following command from the Workstations Nodes Xterm Terminal to enumerate the ftp service version:
itlab-center@ws:/# sudo nmap -sV 10.0.0.20 -p 21
Resulting Output:
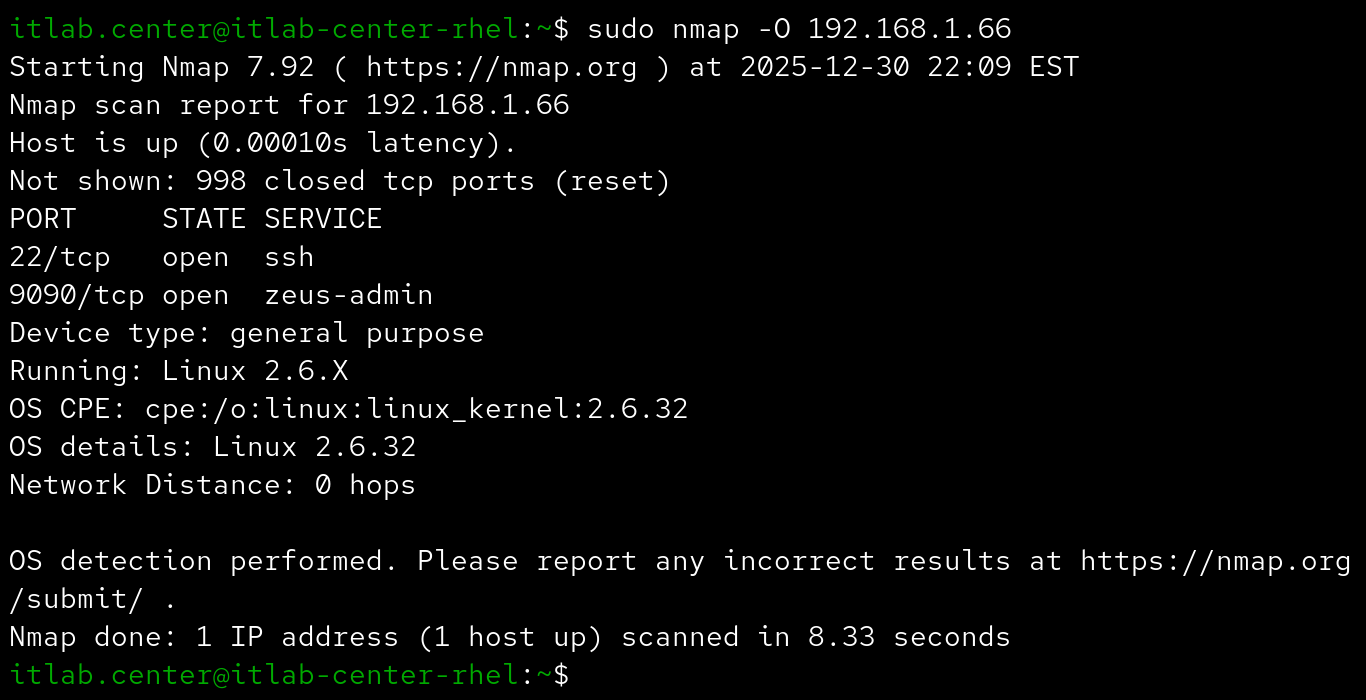
Run the following command from the Workstation Nodes Xterm Terminal to detect the hosts operating system:
itlab-center@ws:/# sudo nmap -O 10.0.0.20
Resulting Output:
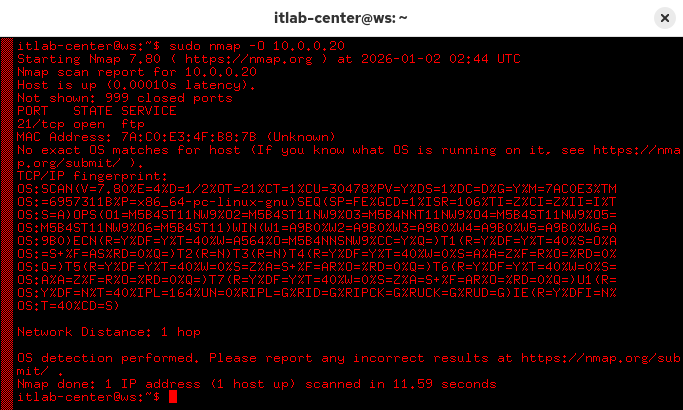
If Nmap doesn't find a high enough match in its database, it will provide a fingerprint of characteristics
We encourage you not to waste their time by submitting this for entry, we promise this is not a novelty OS
If you are content with receiving a guess, despite Nmap's lack of confidence, you can request their list
Run the following command from the Workstation Nodes Xterm Terminal to receive Nmaps best guess for the OS:
itlab-center@ws:/# sudo nmap -O -osscan-guess 10.0.0.20
Resulting Output:

We can see that our top aggressive guess is a Linux system with kernel version 3.2-4.9, it's close enough
In your next scan, you will run a scan on all ports to ensure you didn't miss any, 65535 ports in total
This is a lot of scanning to accomplish, so let's use Nmaps timing options to ensure we get results quick
Run the following command from the Workstation Nodes Xterm Terminal to perform an insane scan on all ports:
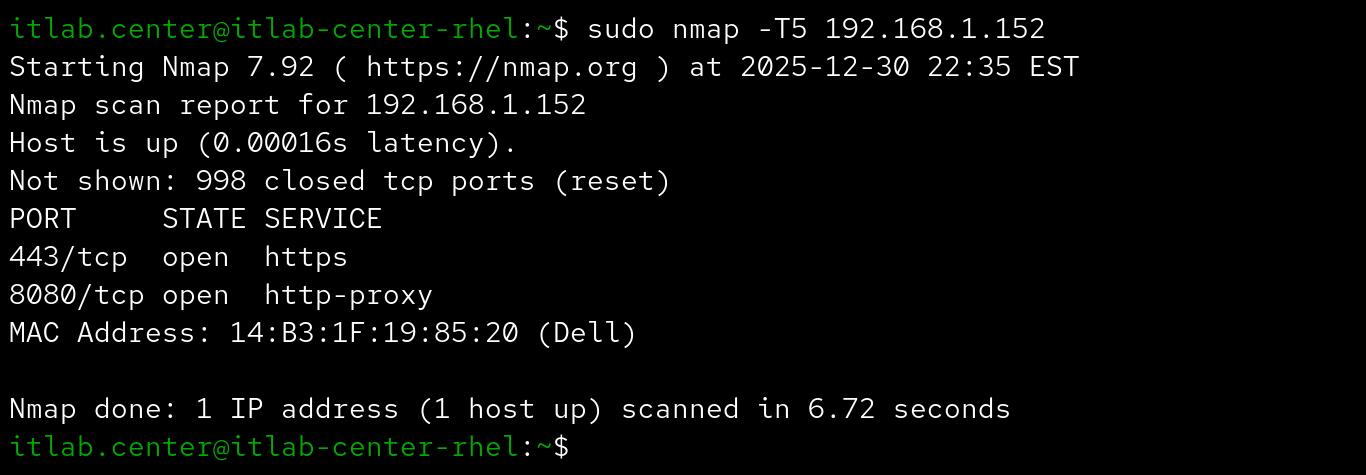
itlab-center@ws:/# sudo nmap -Pn 10.0.0.20 -T5 -p-
Resulting Output:

Speed means you may miss some things, but it's common to run a quick scan to start and then a longer one
It is also important to consider your goal, if you're attempting to evade detection, utilize slower scans
If you are a penetration tester, you have no such obligations, and can be as noisy as you want with scans
We can see that we have discovered an additional port open on this machine, let's go back to the web node
We're only giving you a handful of ports, otherwise this scan could take a long time to fully complete
Run the following command from the Workstation Nodes Xterm Terminal to scan the port range for 10.0.0.2:
itlab-center@ws:/# sudo nmap -Pn -T5 10.0.0.2 -p 25,80,1000,2099,8080,8888
Resulting Output:
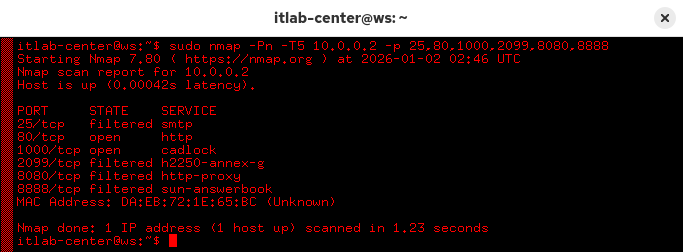
Are you satisfied with what you see? Some filtered ports, others open. You ready to declare victory yet?
Not so fast. It's possible the firewall is protecting against denial-of-service attacks by dropping ports
You may want to slow down the scan to ensure you don't inadvertently sound the alarm, causing packet drop
It may even be a good idea to switch to TCP connect scans in this case, the firewall may be blocking -Ss
These are the kinds of crossroads you'll reach when scanning and enumerating unfamiliar network settings
Each scan may provide useful information, some more than others, but they are often not always conclusive
Sometimes you need to synthesize the output of several scans to build an accurate profile of your target
Part of reconnaissance is knowing how to use your tool, but even larger is knowing how to read the output
This is the difference between script kiddies blasting networks and seasoned professionals doing the work
Run the following command from the Workstation Nodes Xterm Terminal to perform a slower full-connect scan:
itlab-center@ws:/# nmap -Pn -T1 10.0.0.2 -p 25,80,1000,2099,8080,8888
Resulting Output:
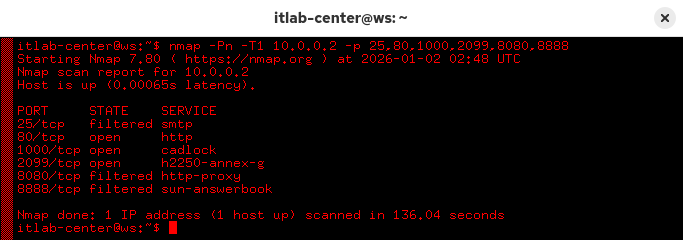
Despite a handful of ports, this scan may still take 1-2 minutes. Press Enter to view the scans progress
3 of these ports are open, did you discover which? If so, well done! You've fooled a shoddy packet filter
Congratulations, you made it! Welcome to the Nmap club, and you've learned a secret TCP handshake as well
This is just the tip of the Nmap iceberg, but you now have a strong foundation for scanning techniques
May your scans be fruitful, your enumerations be detailed, and your network environments secure my friend