Security
Network
Desktops
Servers
Wazuh SIEM
This lab documents the deployment and configuration of a robust Security Information and Event Management (SIEM) environment to monitor enterprise assets and detect indicators of compromise (IOC). The environment centralizes log ingestion using both Wazuh and Splunk, providing a comprehensive look at how security professionals visualize events and hunt for threats across modern hybrid systems and gain visibility into their array of endpoints.
Cybrary is a well established and free IT training platform with several intuitive labs to explore
A paid subscription with more advanced labs is available as well outside the scope of this platform
Head to https://www.cybrary.it to create a free account for learning available on their platform
Head to SIEM Basics to complete it yourself or you can perform it on your homelab with the steps below
Quick Links:
Requirements:
• Windows PC w/ Internet Connection
• USB Flash Drive w/ at least 32GB Capacity
• 2 unused PCs w/ at least 4GB of Memory
1. SIEM Overview
SIEM (pronounced "sim") stands for Security Information and Event Management. As the name suggests, a SIEM
is more than a collection of aggregated logs like a syslog server. Systems can feed their logs directly or
indirectly into a SIEM, which assesses them to find likely security events. This process can turn a stream
of log entries into actionable intelligence. Very often, a log aggregator is used to normalize or reformat
data before that data is fed into the SIEM. Security professionals use a SIEM to visualize security events
across the entire enterprise and search for indicators of compromise (IOC) or gain context to an attack

Popular SIEM solutions include Splunk, IBM QRadar, LogRhythm, Microsoft Sentinel, Elastic Stack, and Wazuh
In this lab you will gain hands-on experience using Wazuh (pronounced wah-zoo). Wazuh is an open-source
XDR/SIEM based on OSSEC and Elastic Stack XDR (eXtended Detection & Response). Wazuh agents installed on
endpoints provide the SIEM with a rich source of security information, including intrusion detection, file
integrity monitoring, compliance checks, vulnerability detection, configuration assessments and many more
The primary components of Wazuh are:
• Agent (OSSEC): Installed on Endpoints
• Server: Analyzes Agent Data
• Indexer (Elastic): Stores Alert Data
• Dashboard (Kibana): Used to Search and Visualize Data






The Wazuh Server can also ingest logs from agentless devices (firewalls, routers, switches, etc.) through
Syslog, SSH, and API. The primary Wazuh interface consists of four main sections: Endpoint Security, Threat
Intelligence, Security Operations, and Cloud Security. These sections have recently changed in this version
In this lab, you focus on the Threat Hunting dashboard within the Threat Intelligence dashboard section
Let's perform a quick walk through of that interface before you start using it for security yourself.
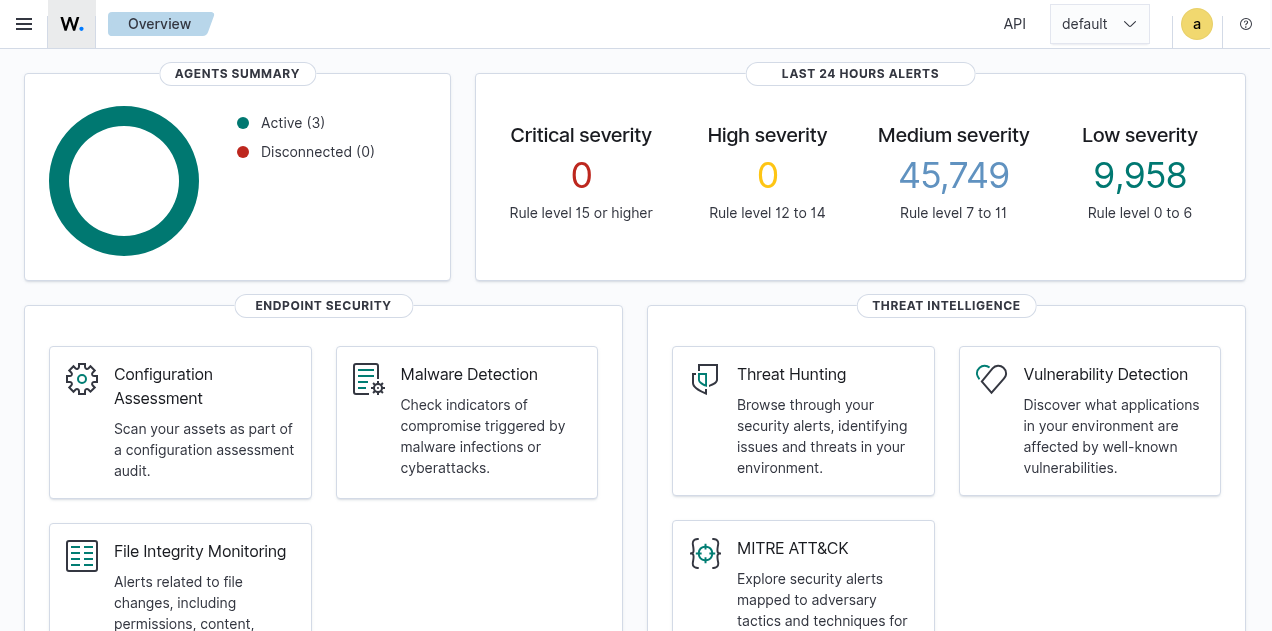
At the top of the Threat Hunting Dashboard is a Search field on the left and a date range on the right
By default, Wazuh uses Apache Lucene query syntax for searching. Lucene queries use a key: value pair to
generate queries. You can use Boolean expressions to filter data or enhance searching. It is also possible
to use simple keywords, for example, login, sally AND login, "Fred", "Fred" AND "Barney", etc. You will
use Lucene query syntax in this lab exercise for both filtering out data and finding information in data
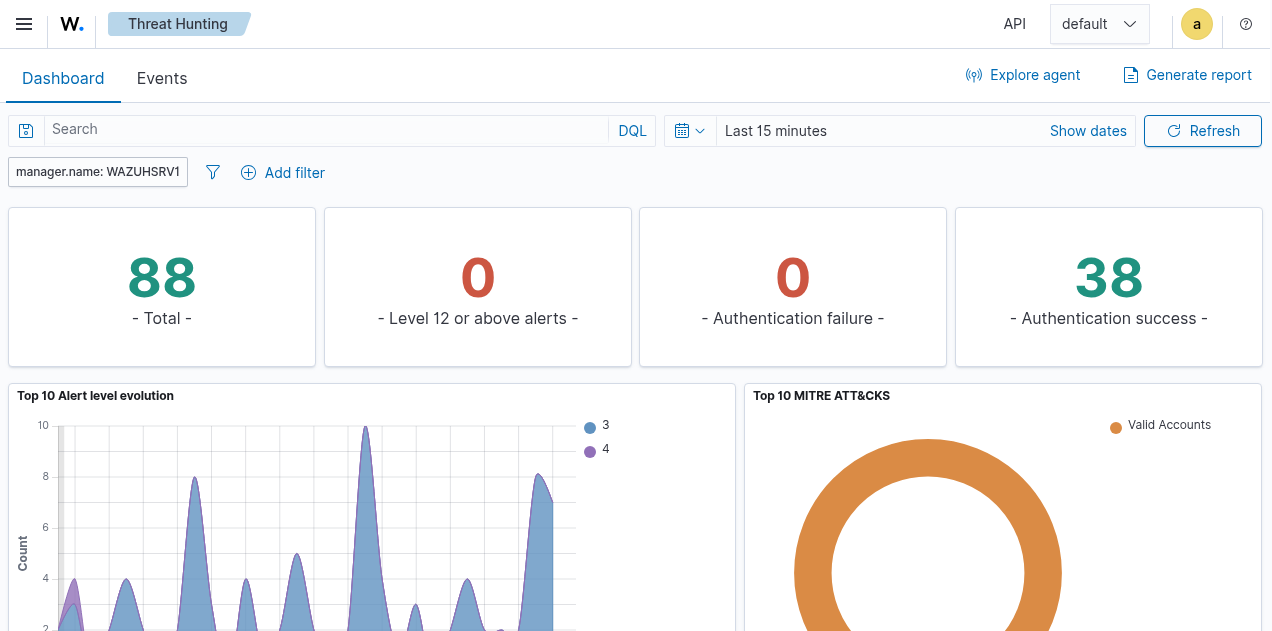
Just below the Search field, you can see how many security events have happened in the date range selected
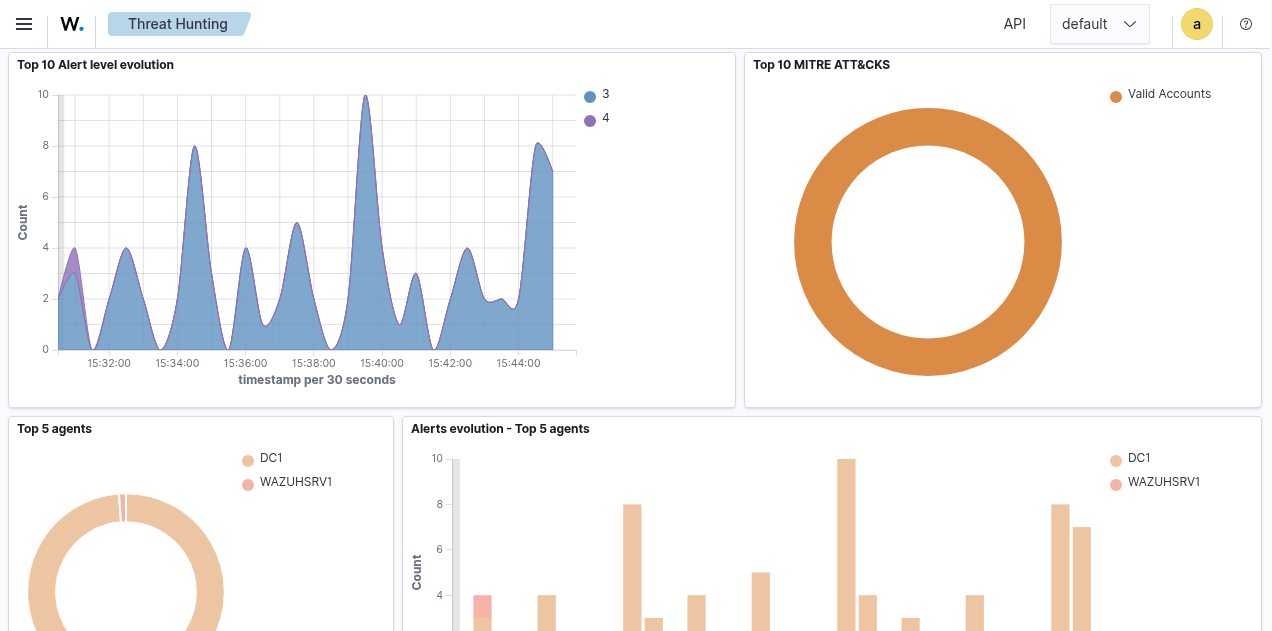
Next are the active data visualizations, which allow you to click on the chart data to drill down details
And within the Events tab at the top are all the Security Alerts, in date order, for the date range selected
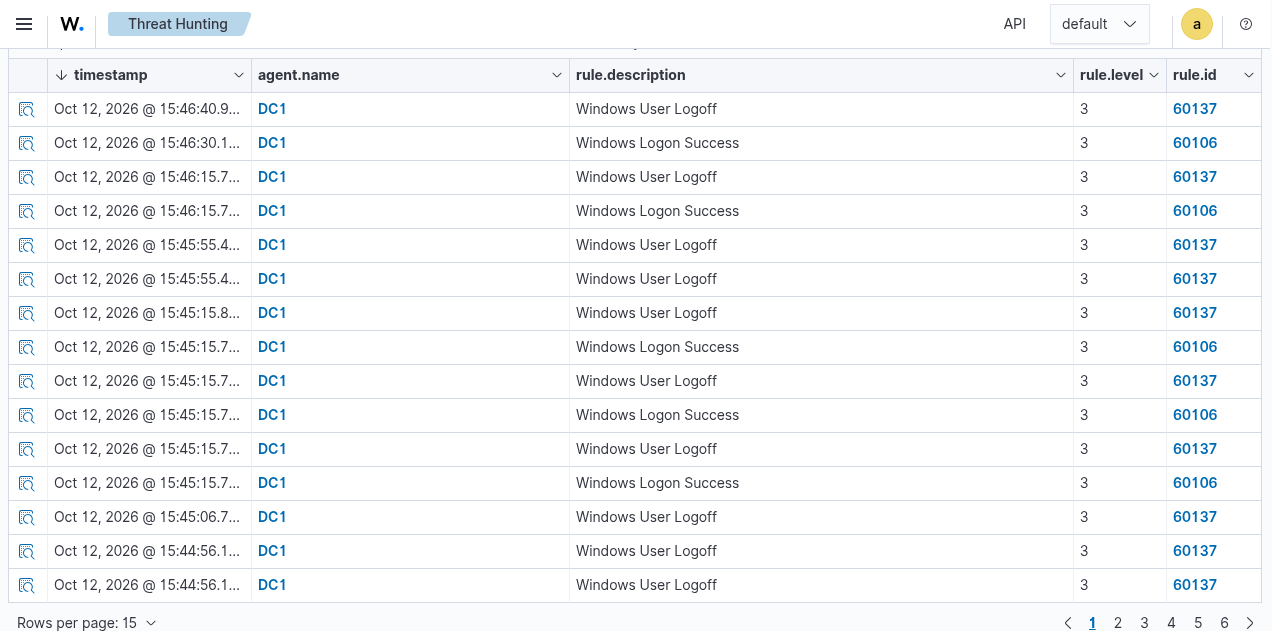
You can sort events by column header simply by clicking on the header itself. By default, events are sorted
from newest to oldest. By clicking on the arrow next to the Time column header, you can sort from oldest to
newest. You can expand each event by clicking the > symbol on the far left to see the event information
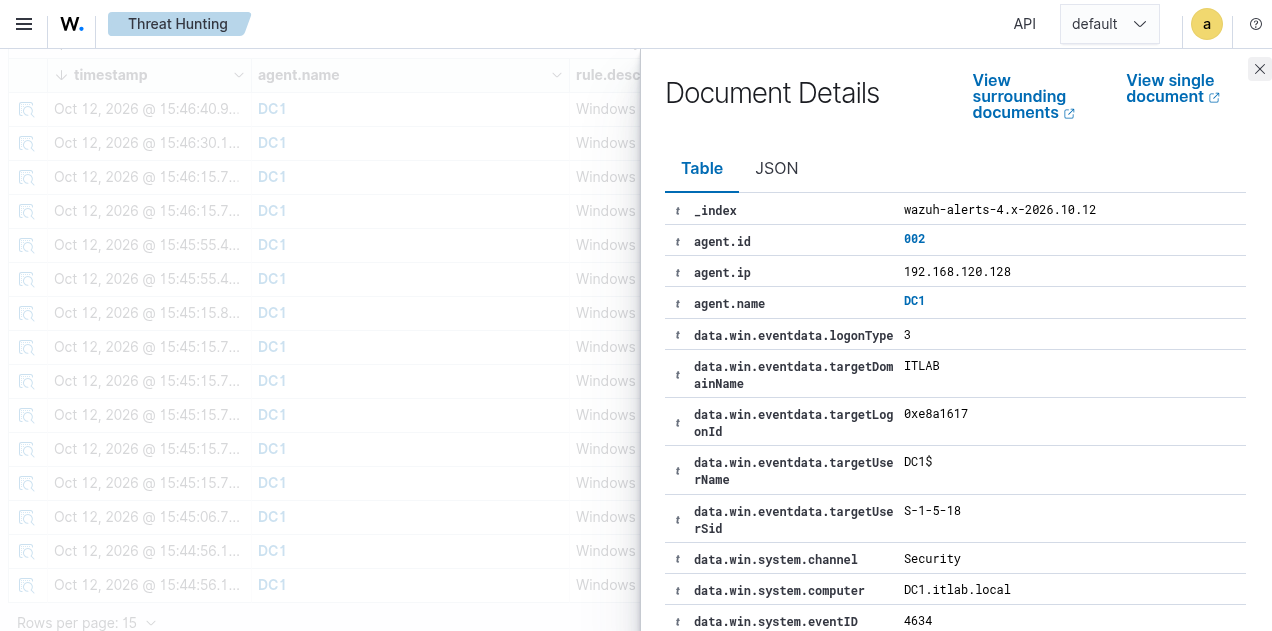
You may notice that one of the column headers is labeled Technique. Wazuh will attempt to associate each
event with a MITRE ATT&CK TTP (Tactic, Technique, or Procedure). Note that just because an event is aligned
with an ATT&CK TTP, it is not necessarily malicious. Events need to be correlated holistically to see intent
2. Install Void Linux
Void is a general purpose operating system, based on the monolithic Linux kernel. Its package system allows
you to quickly install and remove software. Software packages can be built natively or cross compiled with
through the XBPS source packages collection. Being built from the ground up from the Linux kernel sets the
operating system apart from other forked distributions. This creates its own island as a security ecosystem
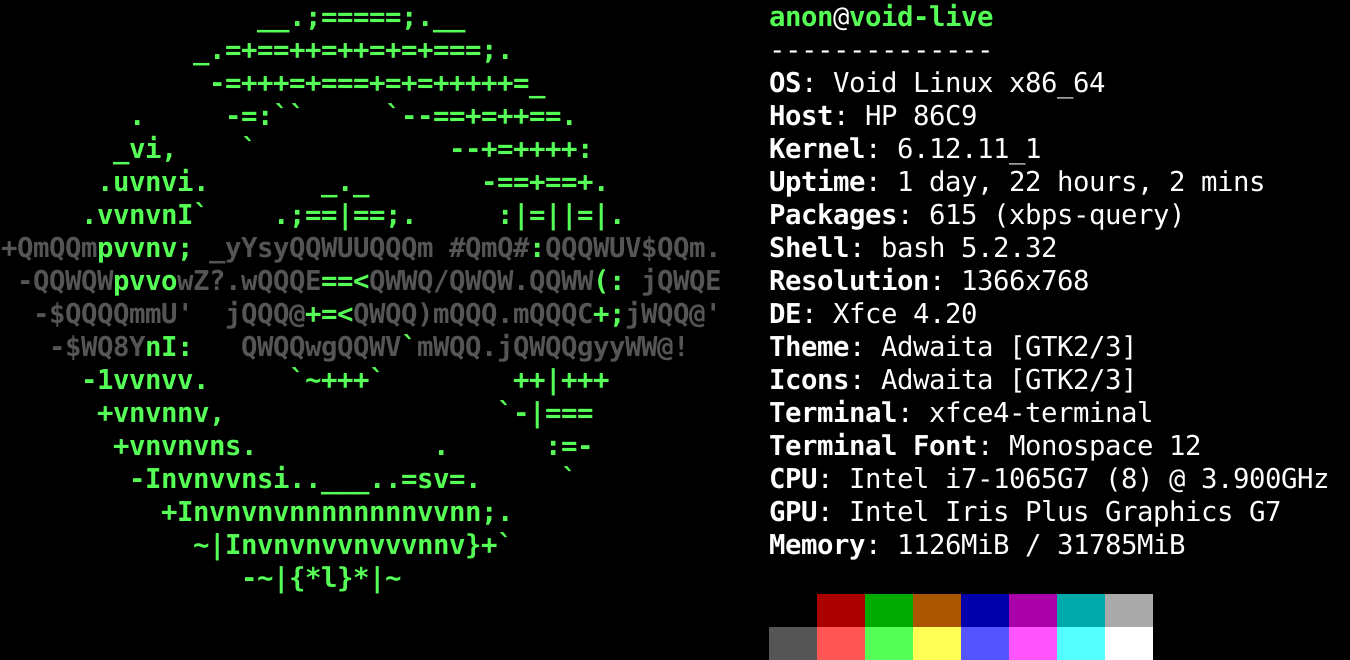
This is perfect to act as our Syslog host, in addition to having a dedicated community of enthusiests. We
are also benefitting from security through obscurity, as very little exploits are designed for this system
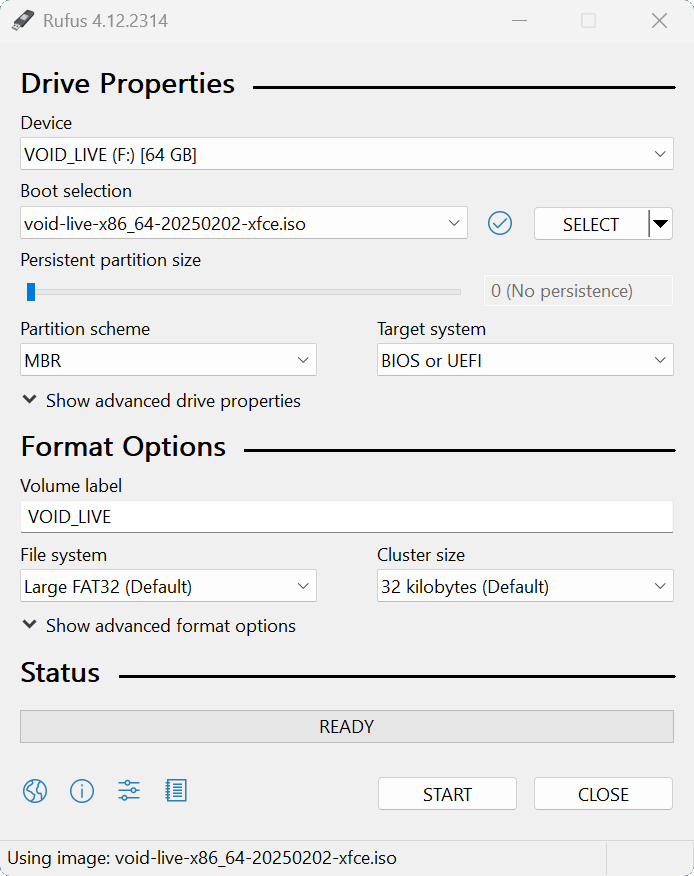
Download Void Linux XFCE ISO: void-live-x86_64-20250202-xfce.iso
Download Rufus Disk Imaging Software: Rufus Official Download
Insert USB Flash Drive, run rufus.exe, select target drive as your USB Flash Drive, select VOID Linux ISO:
Remove the USB Flash Drive and Insert into unused PC. Start PC and press the hot boot key at the startup:
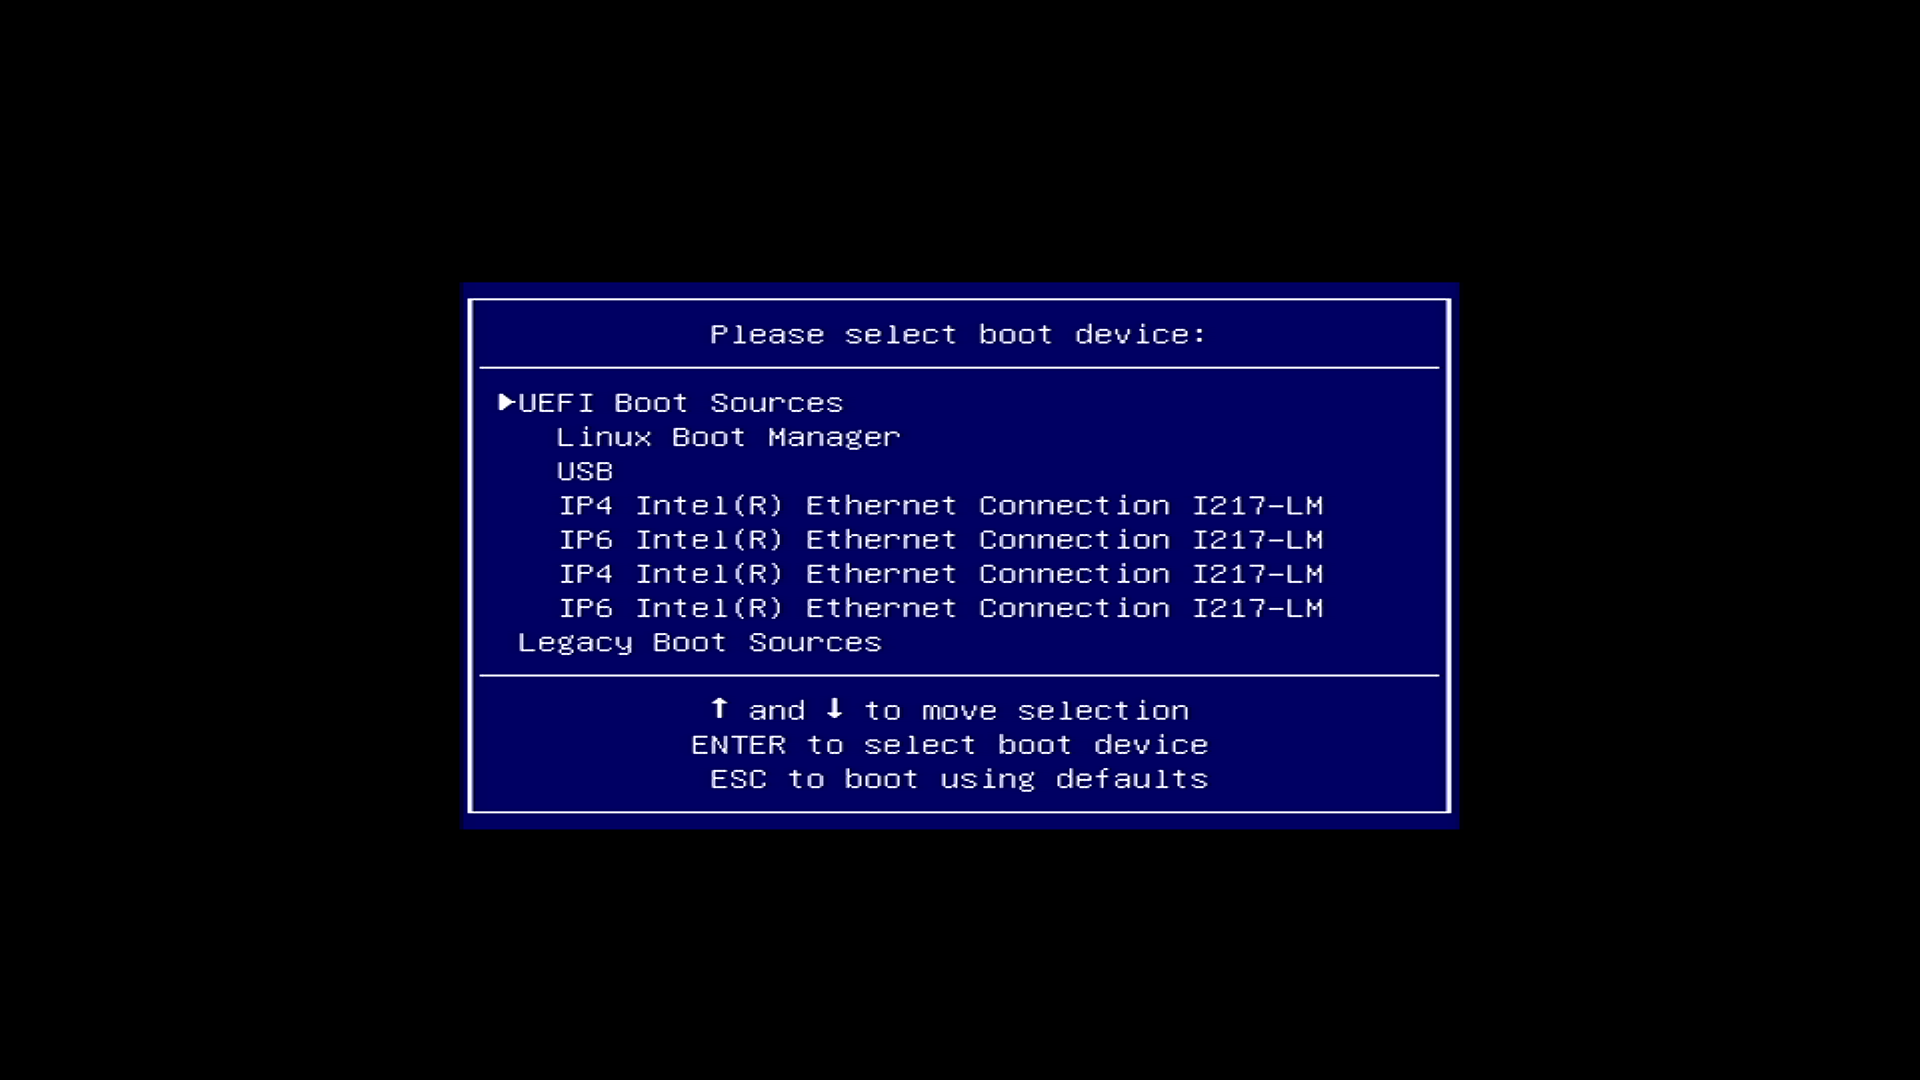
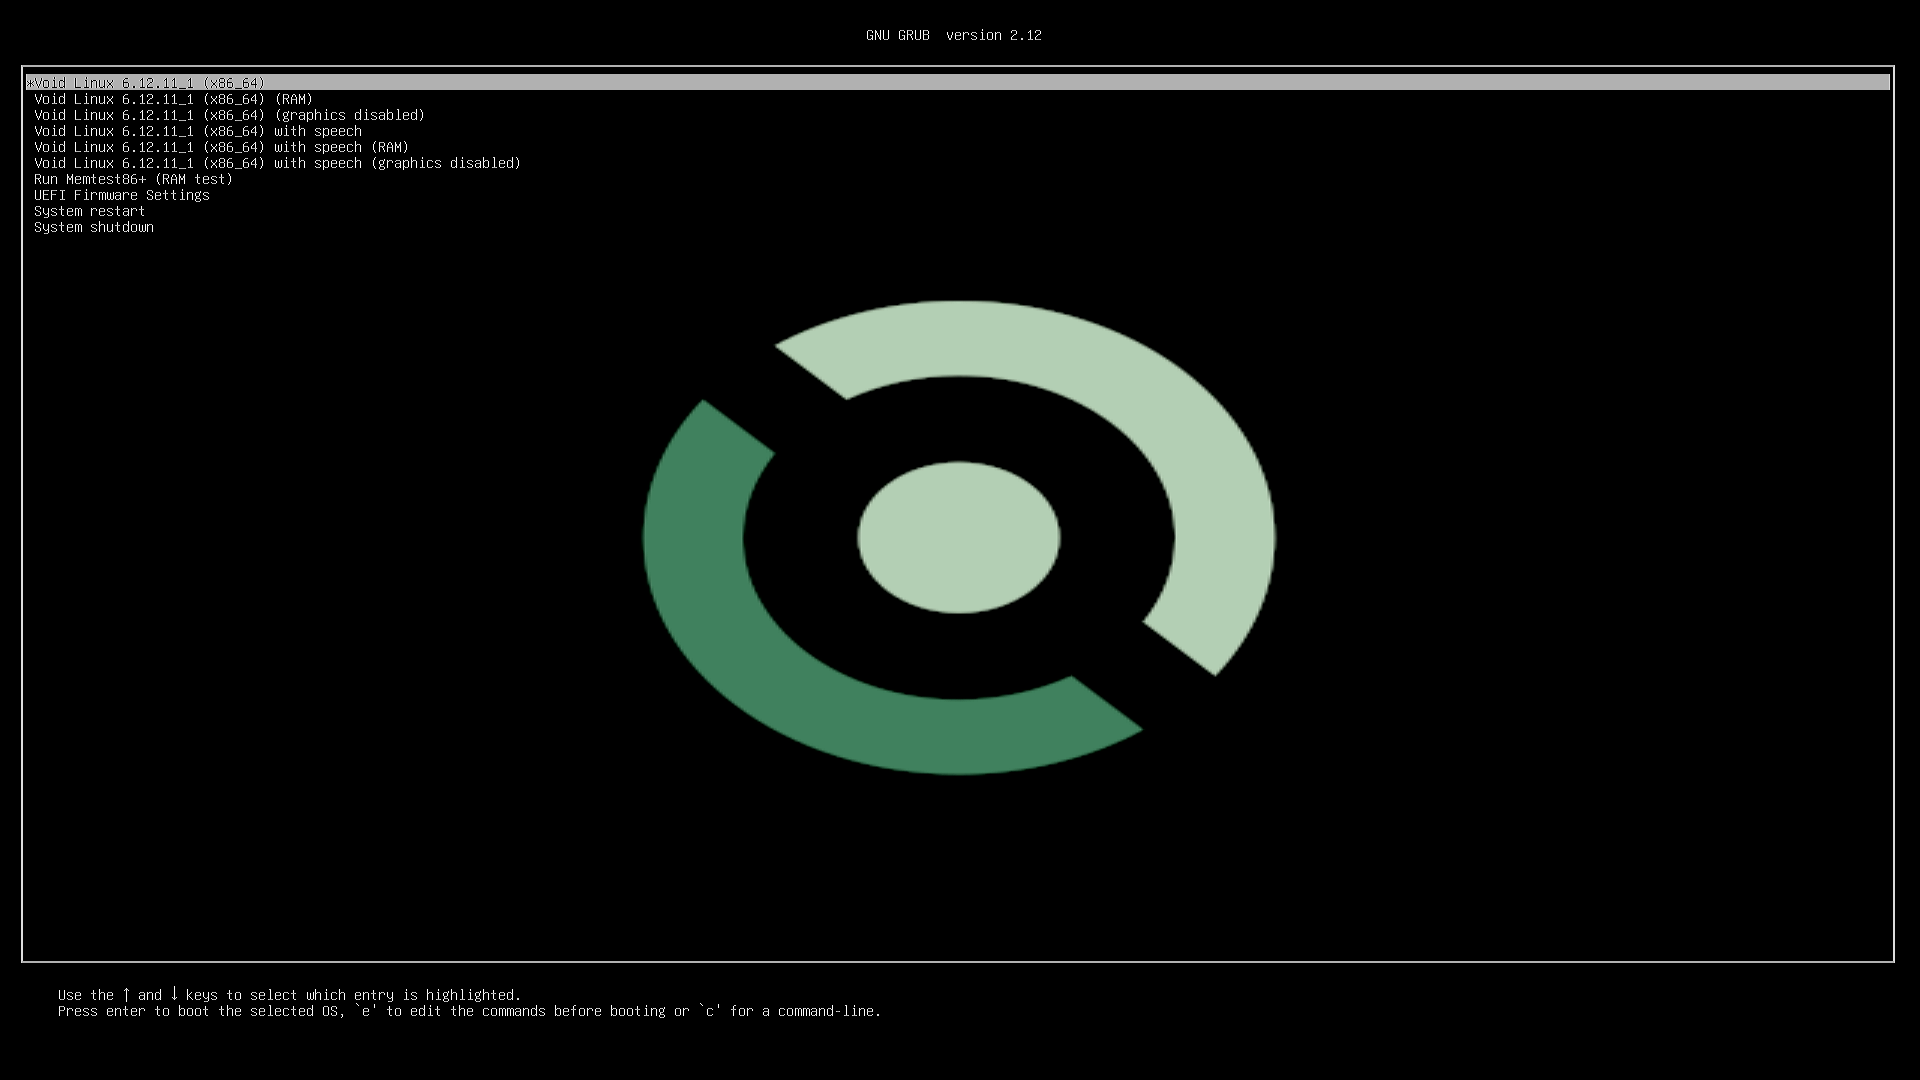
Select USB to be greeted with the GRUB bootloader screen, then select the option for Void Linux at the top
This will take you to the live desktop environment. Here you can click the terminal icon at the bottom
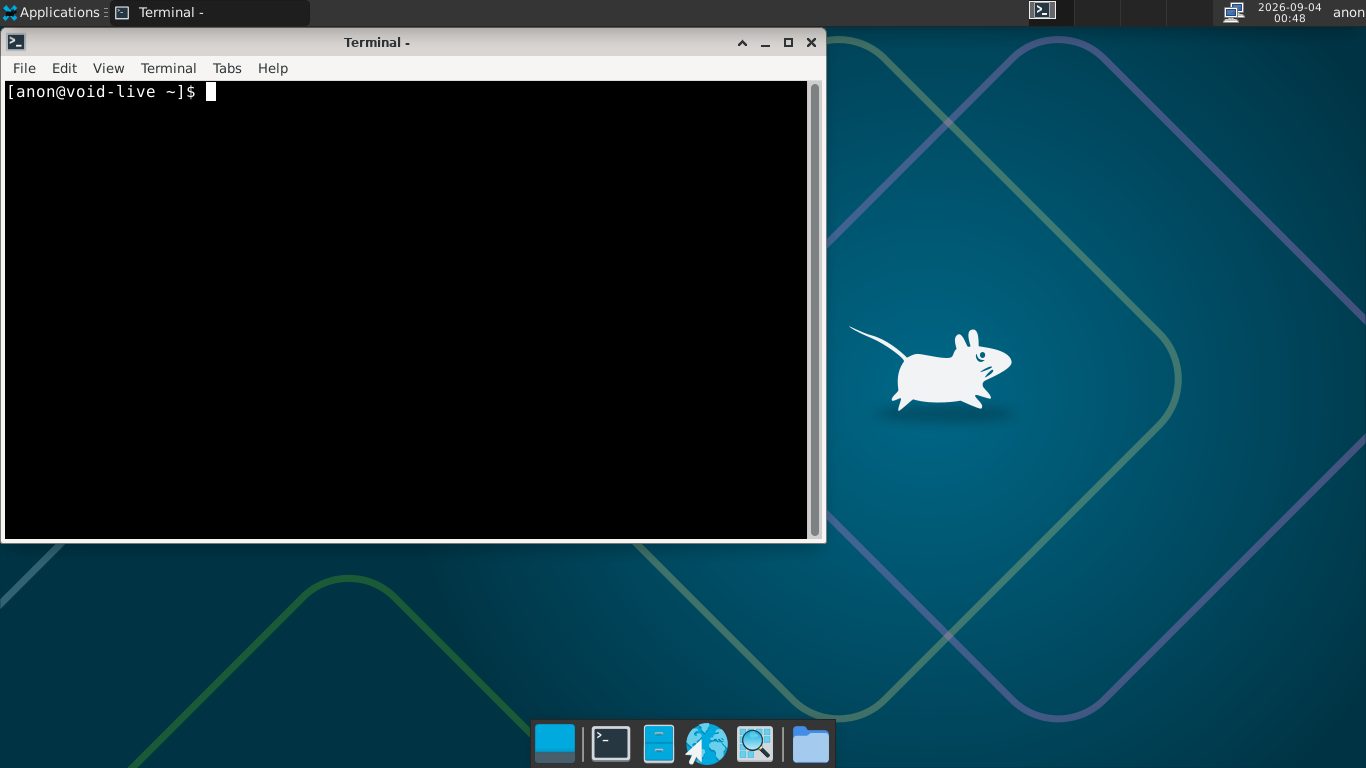
Run the following commands from the Void Linux Terminal to begin the installer. The password is voidlinux
[anon@void-live ~]$ su root
[anon@void-live ~]$ void-installer
Resulting Output:
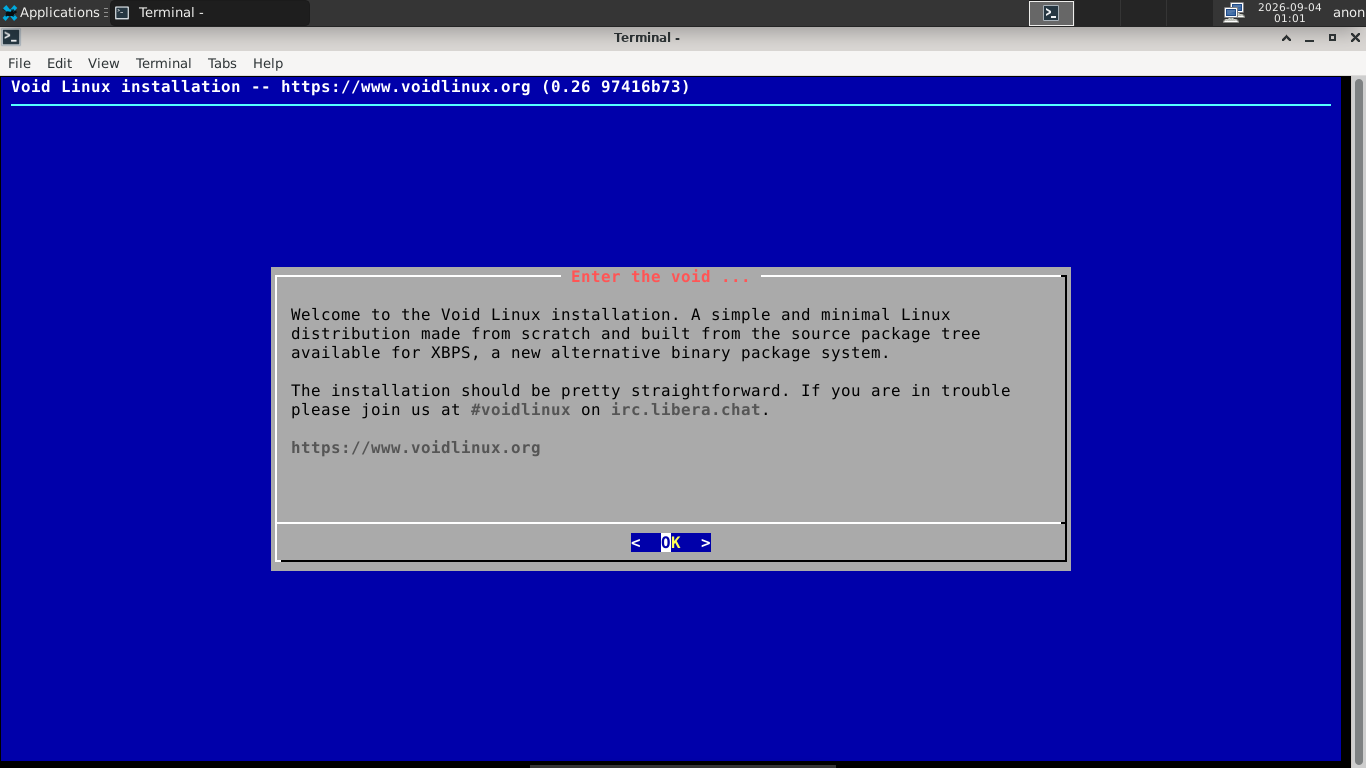
From here press Enter > Enter and scroll down to select the US keymap. Then press Enter again to confirm
Press Enter to navigate to the network configuration, if you are using ethernet you won't need to set up
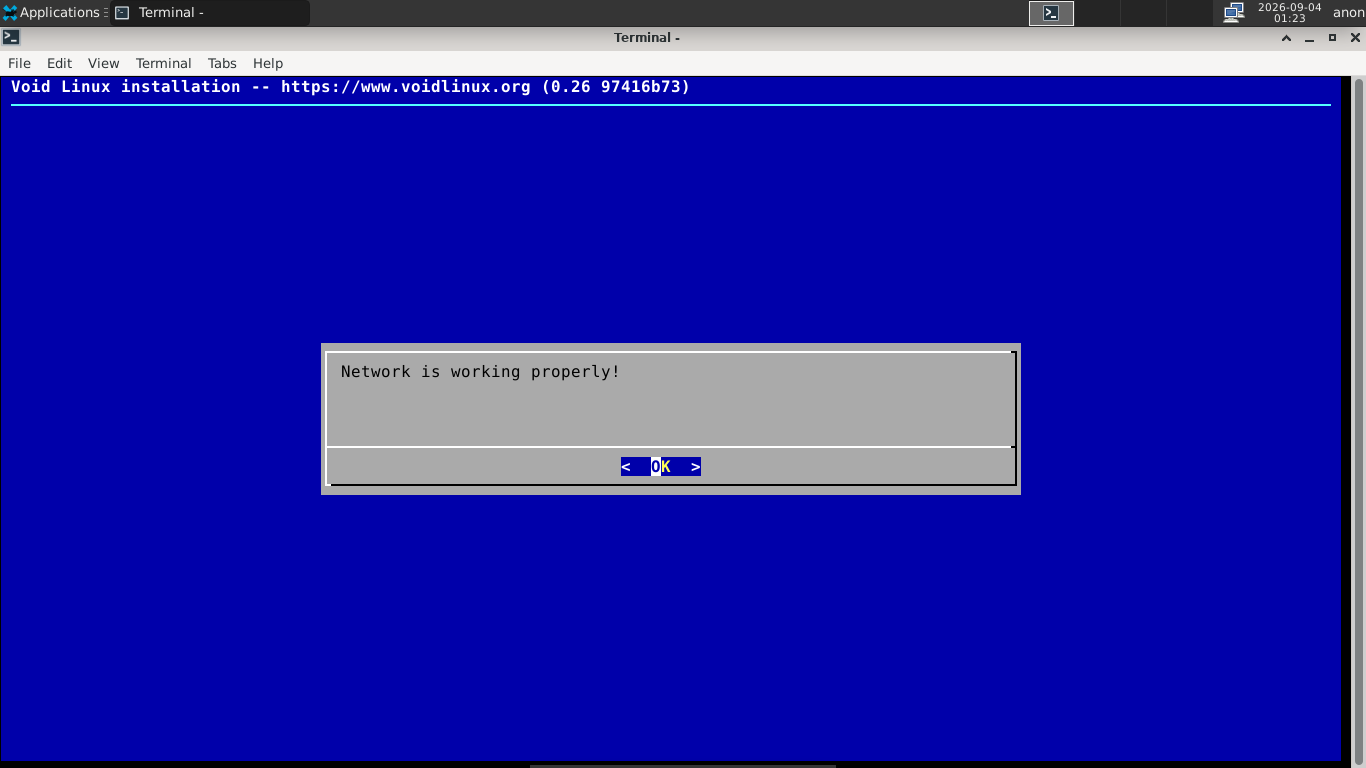
From here, press Enter, then scroll down to the Network option and press Enter to select it as our source
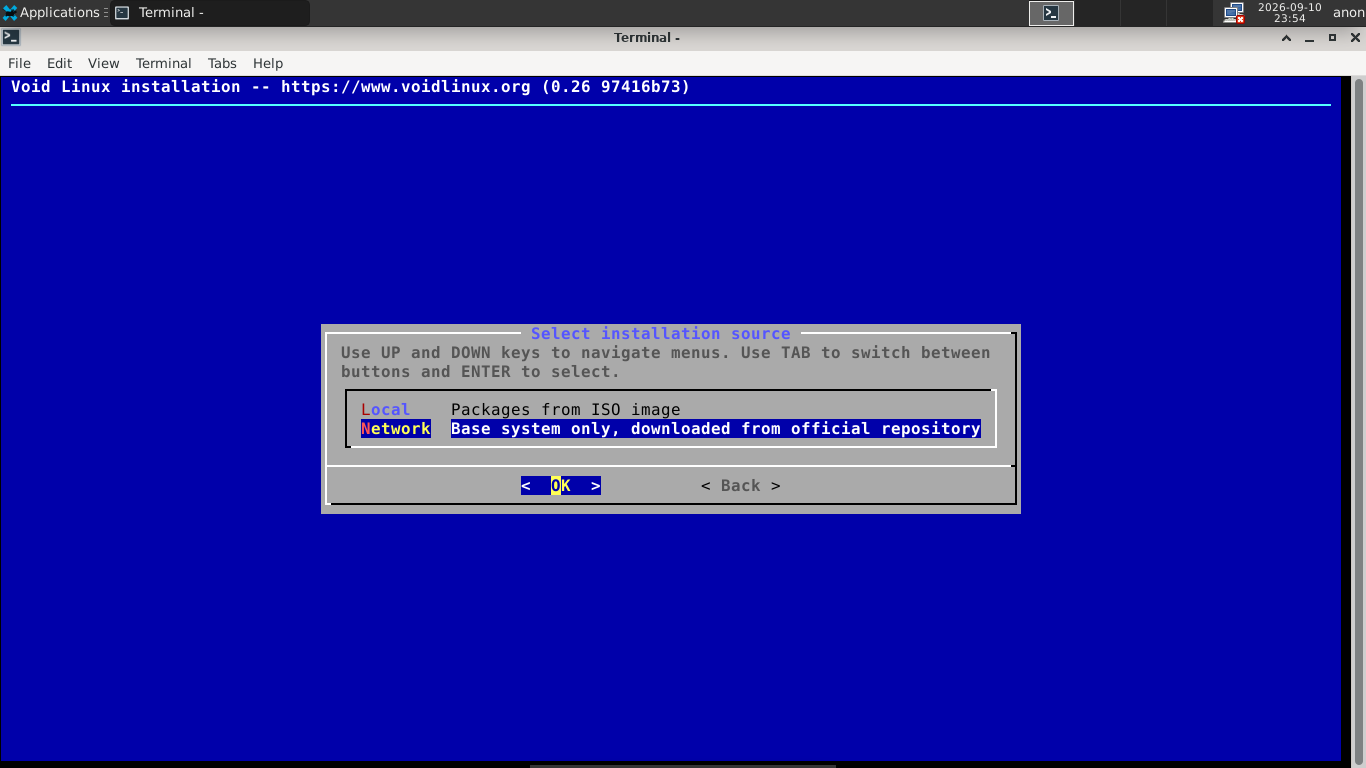
Scroll down to hostname and press Enter, then type out void as the hostname and hit Enter again to confirm
Next set the Locale to en_US-UTF-8 and the timezone to America > Your city in the same manner using the UI
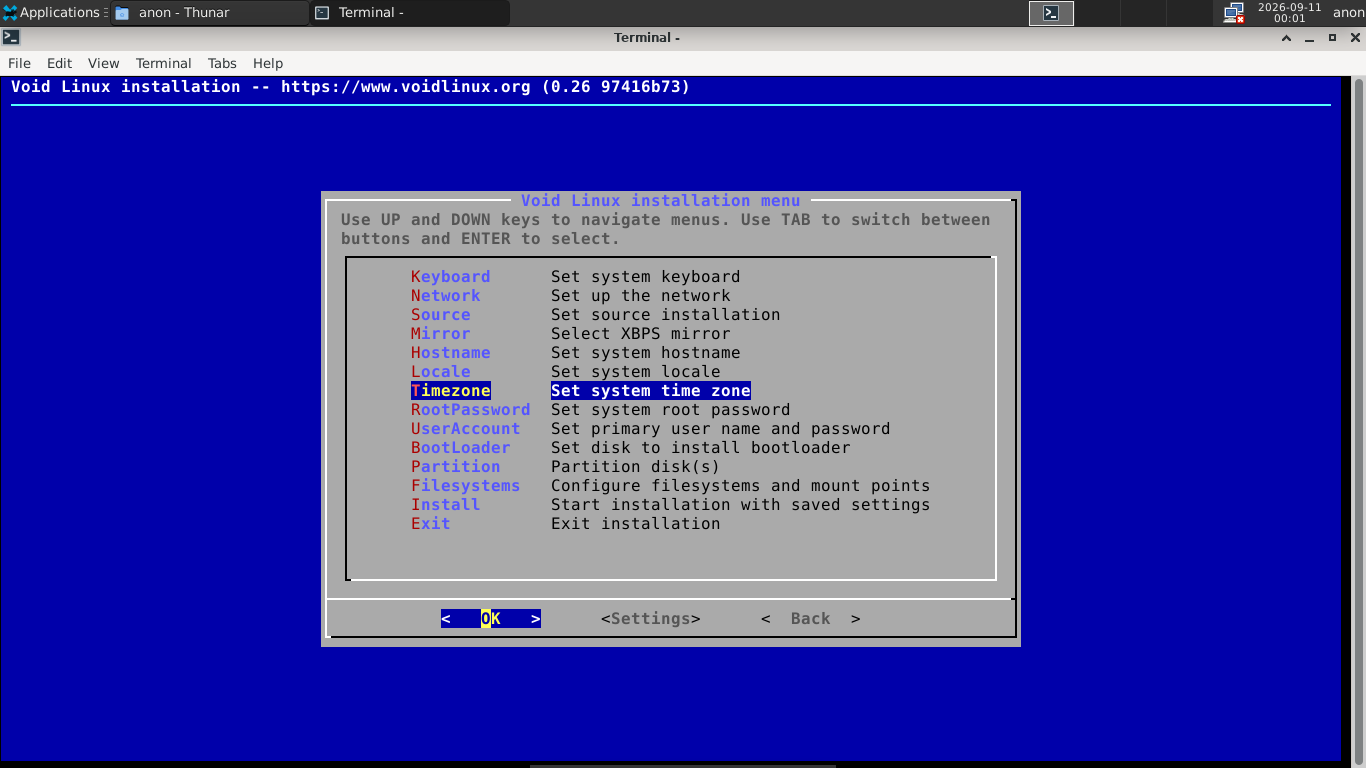
The rest of the guided intsallation is fairly straightforward. Set a Root Password > Create a local user
named itlabcenter > set a geographically nearby XBPS mirror. Then it's time to partition your storage disk
Navigate to the partition option from the main installation menu and select the option to use fdisk utility
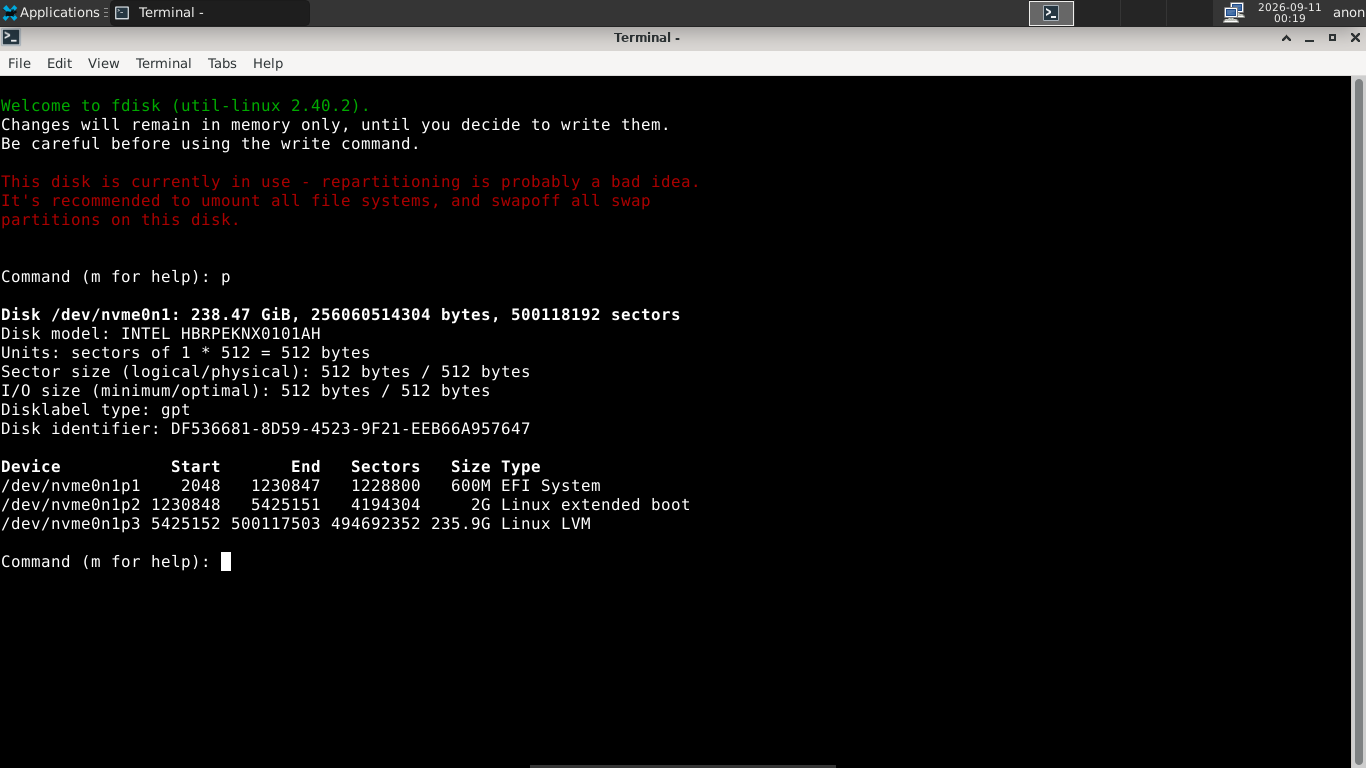
The fdisk tool can be used to create a disk partitioning format that our operating system will follow:
• Press d to delete an existing partition
• Press Enter to confirm deletion of last partition
• Repeat this process until each parition is deleted
• Press n to create a new partition
• Enter 1 as the partition number
• Press Enter to accept the default first sector
• Set the last sector to +1G for a 1GB partition
• Enter y to remove the vfat signature
• Change to EFI System type by pressing t and selecting parition 1 and option 1
• Press n to create another partition
• Enter 2 as the partition number
• Press Enter to accept the default first sector
• Set the last sector to +16G for a 16GB partition
• Change to Linux Swap type by pressing t and selecting partition 2 and option 19
• Press n to create another partition
• Enter 3 as the partition number
• Press Enter to accept the default first sector
• Press Enter to accept the default last sector
• Change to Linux x86-64 Root type by pressing t and selecting parition 3 and option 23
• Press p and confirm you see all three paritions
• Press w to write changes to disk and q to exit
Now to add our moint points, navigate to Filesystem and select the EFI partition, adding a vfat filesystem
and /boot/efi as the mountpoint, then the swap creating a swap filesystem, and finally the root partition
we will add an ext4 filesystem and / as the mountpoint. Once completed we can initiate the installation:
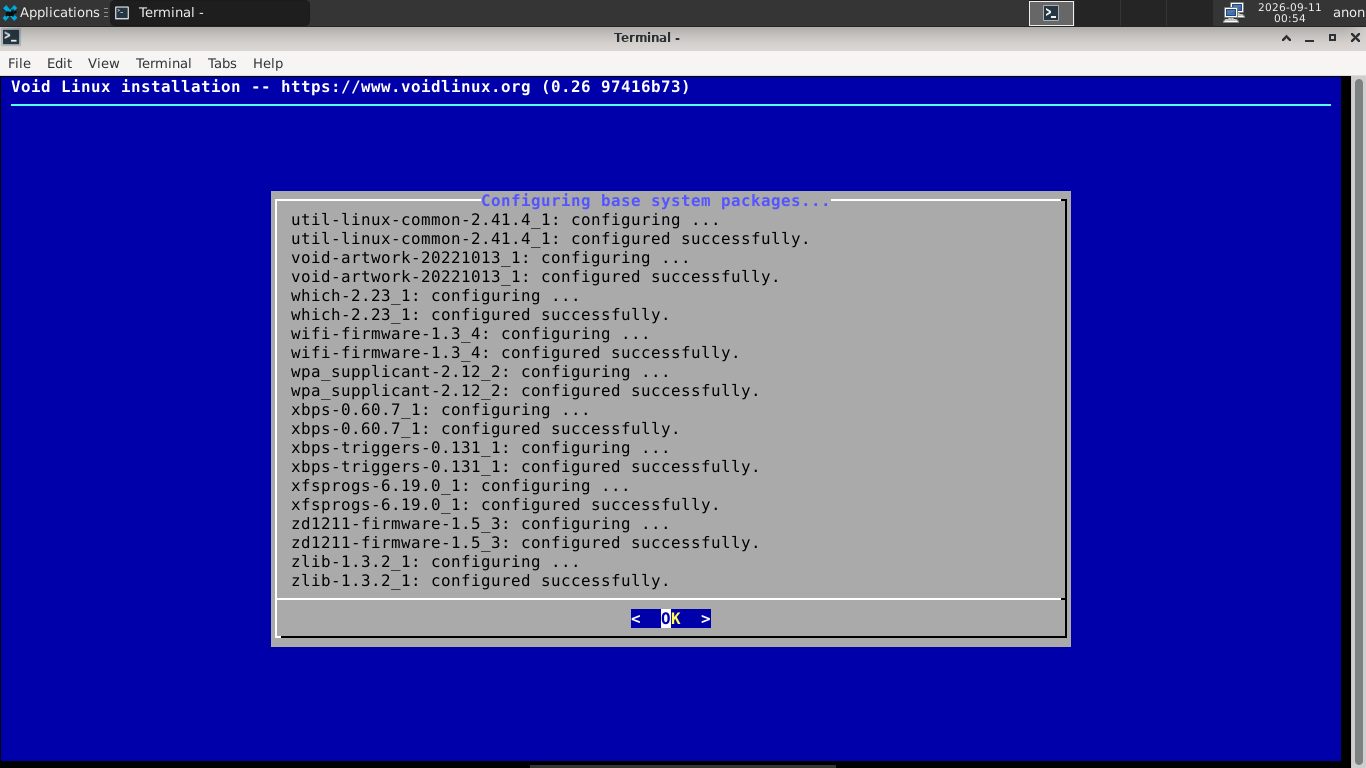
You may be prompted to select services to enable, select dhcpcd and continue to reboot into the new system
3. Install Lab Tools
Here we will configure the newly installed system and download all of the programs we need to get Wazuh
configured. Once your system boots up you will be presented with a CLI interface without any graphics

Let's start by getting the desktop environment installed. The XFCE environment is handled through a package
named XORG, which is widely available amongst Linux distributions. Login to the terminal as itlabcenter
Packages are installed on Void Linux using the custom X Binary Package Manager (XBPS). Let's try it out
Run the following commands from the Void Linux Terminal to update the package list and install the desktop
[itlabcenter@void ~]$ sudo xbps-install -Su -y
[itlabcenter@void ~]$ sudo xbps-install -u xbps -y
[itlabcenter@void ~]$ sudo xbps-install xorg -y
[itlabcenter@void ~]$ sudo xbps-install xfce4 xfce4-plugins dbus -y
[itlabcenter@void ~]$ sudo xbps-install lightdm lightdm-gtk3-greeter -y
[itlabcenter@void ~]$ sudo ln -s /etc/sv/dbus /var/service
[itlabcenter@void ~]$ sudo ln -s /etc/sv/lightdm /var/service
[itlabcenter@void ~]$ sudo reboot
The system will reboot an launch the login manager. Login as itlabcenter to arrive at our new desktop
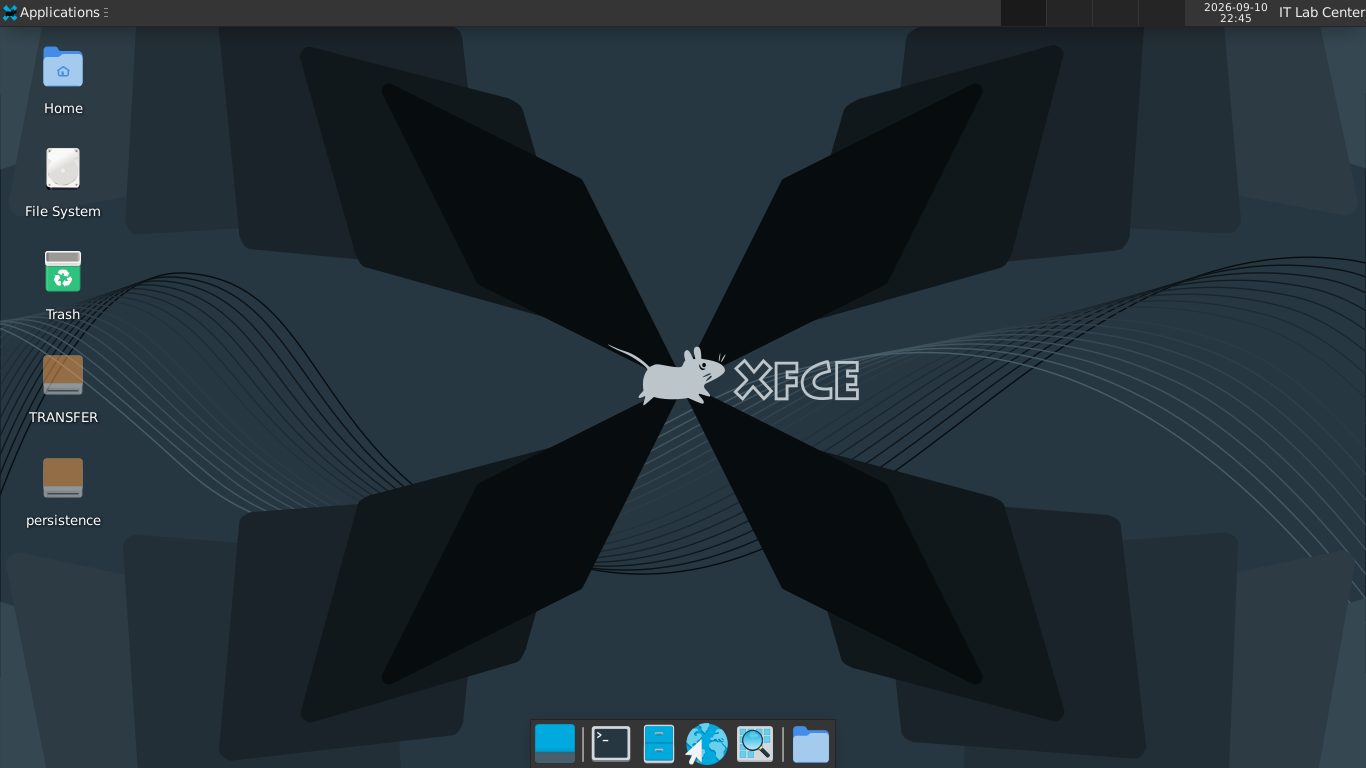
Excellent, now that we have a fully functional desktop environment, let's move on to installing some of
the tools we will be using in this lab. We will be creating a local area network with multiple endpoints
for our Wazuh SIEM to collect telemetry from. We will emulate the enterprise environment using multiple
Virtual Machines (VMs) which will act end our endpoints. For this we will be using the VMWare Hypervisor
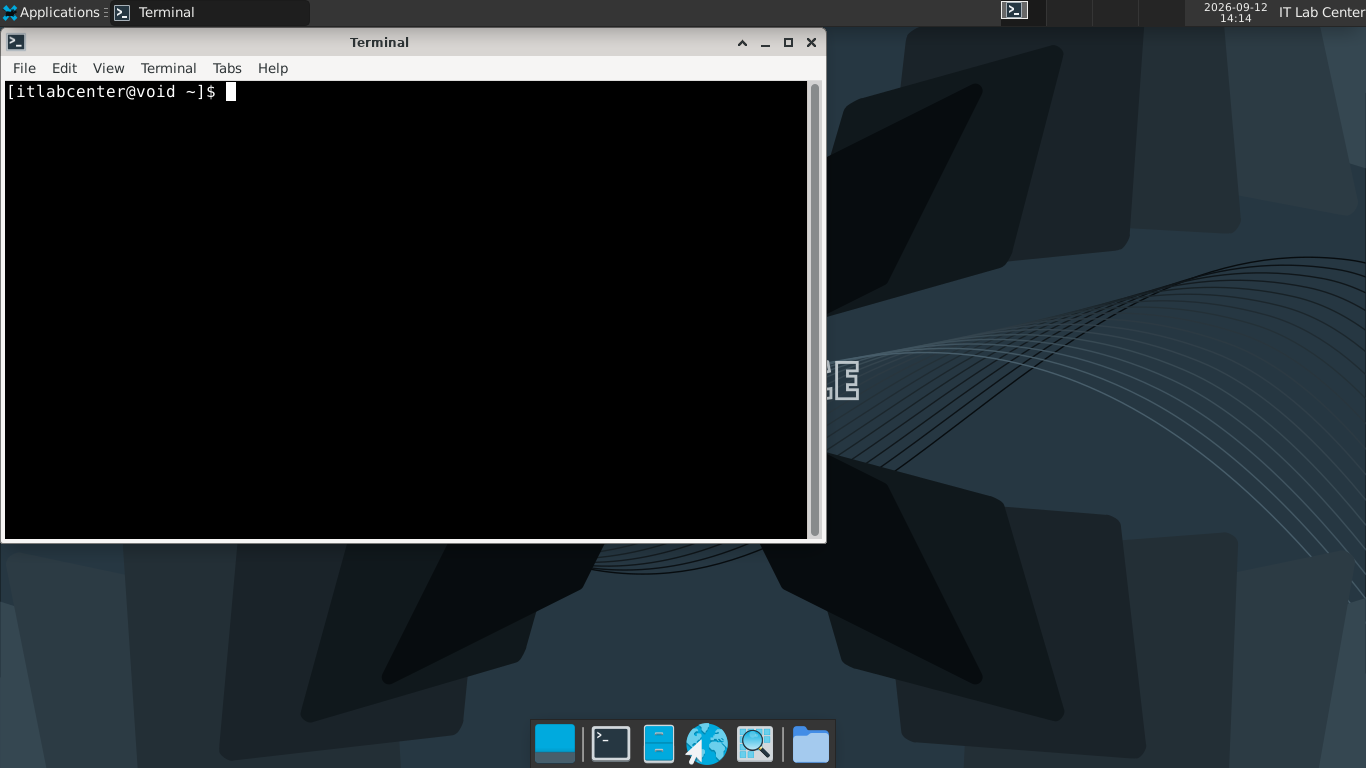
From the bottom of the desktop you can find a terminal icon. Click on it to launch a terminal instance
VMWare Workstation Pro 17 is free, however you will need to create a broadcom support account in order
to download the application. The basic Void Linux build does not have a web browser so we need that too
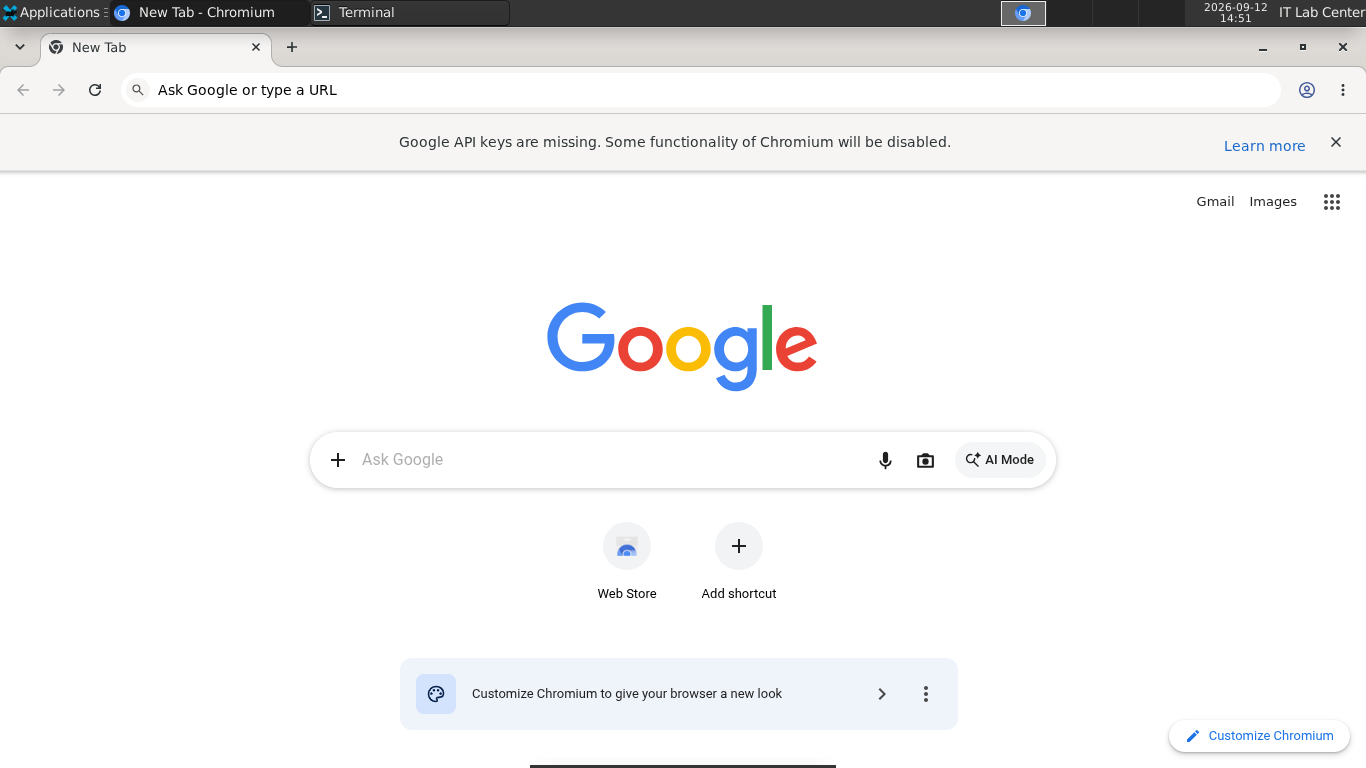
Run the following commands from the Void Linux Terminal to install the Chromium web browser to the system
[itlabcenter@void ~]$ sudo xbps-install -Su
[itlabcenter@void ~]$ sudo xbps-install chromium -y
[itlabcenter@void ~]$ chromium
Resulting Output:
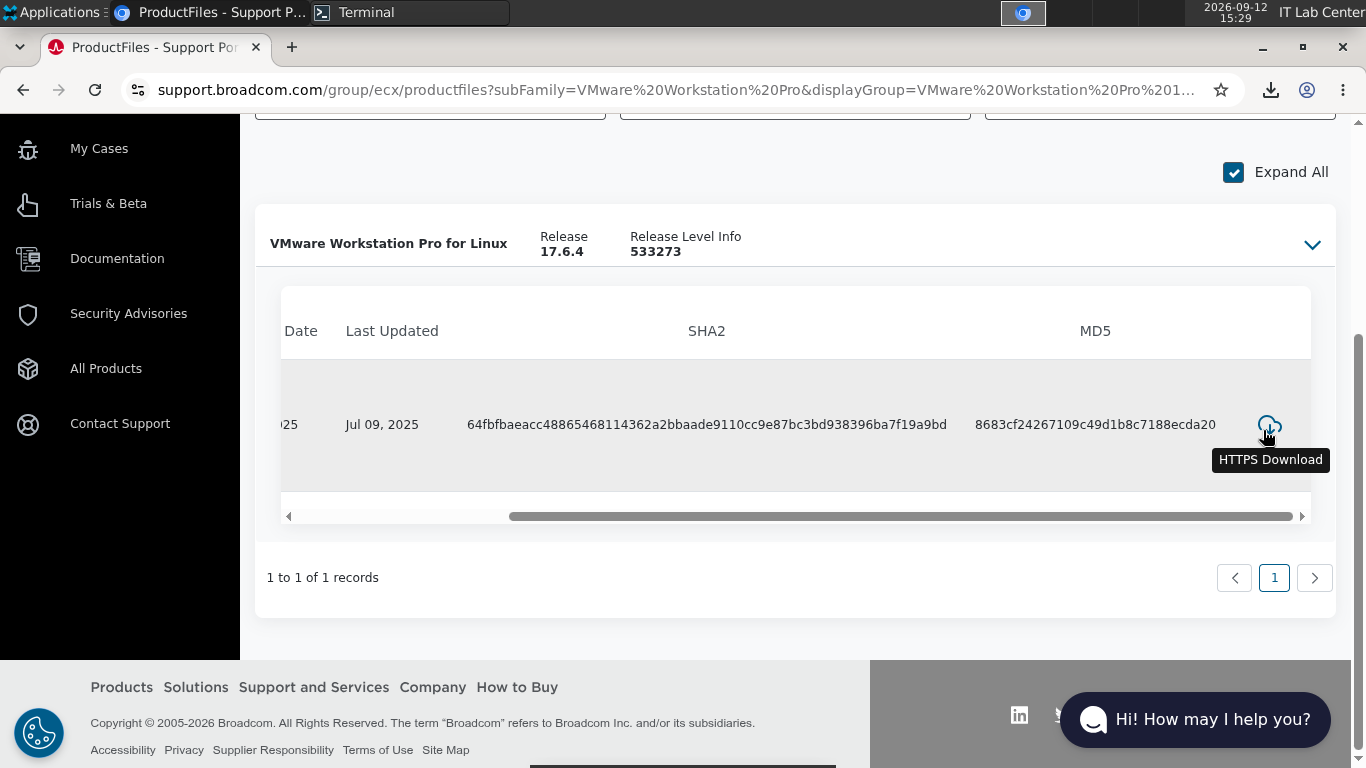
Navigate to https://support.broadcom.com and register a new support account. Then navigate to the download
page for free software: https://support.broadcom.com/group/ecx/free-downloads > VMWare Workstation Pro >
VMWare Workstation Pro 17.0 for Linux and select the 17.5.2 release. From here, you'll need to click on
the Terms & Conditions link, then navigate back to the downloads page and accept, then download the bundle
Run the following command from the Void Linux Terminal to install VMWare Workstation Pro and dependencies
[itlabcenter@void ~]$ sudo xbps-install -S base-devel linux-headers libcanberra-gtk3 polkit -y
[itlabcenter@void ~]$ sudo chmod +x ~/Downloads/VMware*
[itlabcenter@void ~]$ cd Downloads
[itlabcenter@void Downloads]$ sudo ./VMware* --console --ignore-errors
Resulting Output:
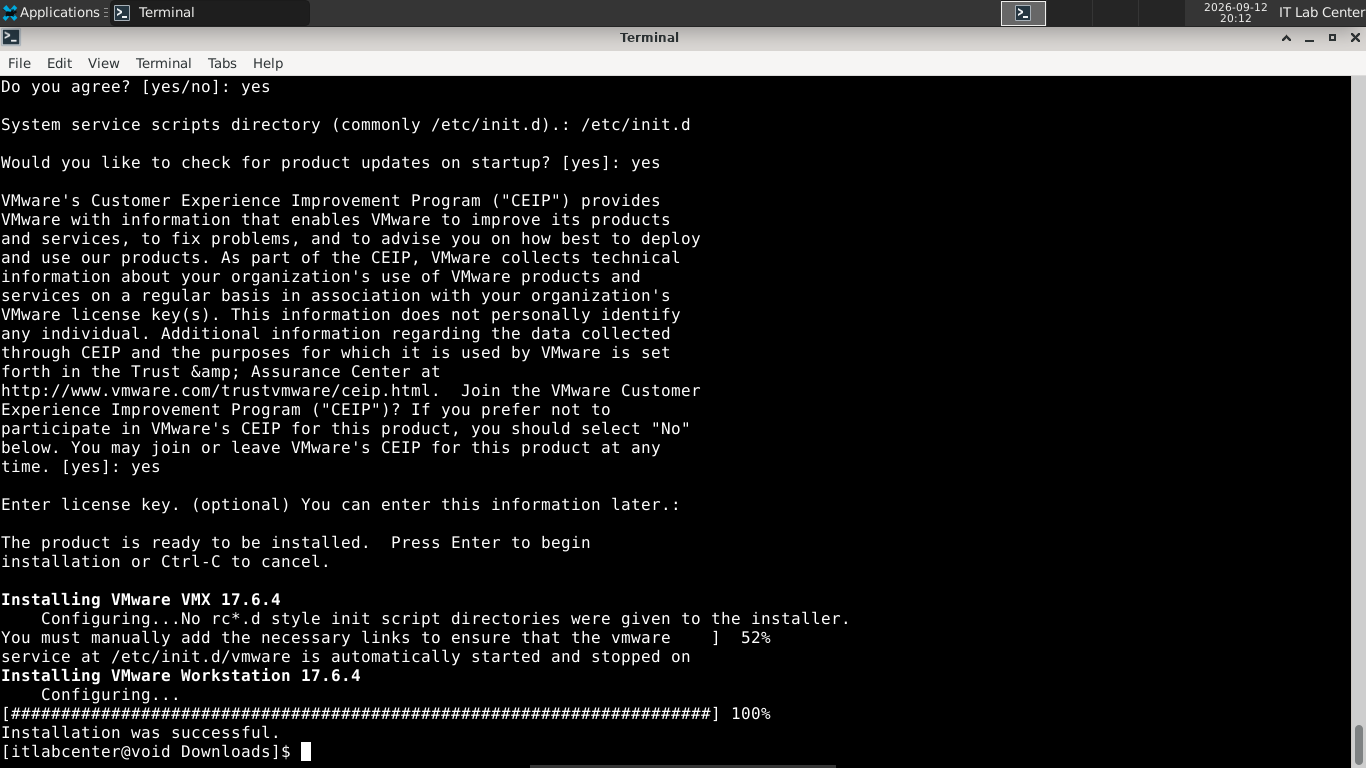
On standard distributions of Linux, VMWare triggers an automated compilation script. On rolling Void Linux
kernels however, modern kernal API changes frequently break upstream VMWare module source files. Luckily,
there is a communicty patch available for us to download through github which we can match to our kernel
Run the following commands from the Void Linux Terminal to intsall git and clone the patches to our host
[itlabcenter@void Downloads]$ cd ~
[itlabcenter@void ~]$ sudo xbps-install git -y
[itlabcenter@void ~]$ git clone https://github.com/mkubecek/vmware-host-modules.git
[itlabcenter@void ~]$ cd vmware-host-modules
[itlabcenter@void vmware-host-modules]$ git checkout workstation-17.5.1
Run the following commands from the Void Linux Terminal to manually patch the repositories source code
[itlabcenter@void vmware-host-modules]$ find . -name "Makefile*" -exec sed -i 's/EXTRA_CFLAGS/ccflags-y/g' {} +
[itlabcenter@void vmware-host-modules]$ find . -type f \( -name "*.c" -o -name "*.h" \) -exec sed -i 's/del_timer_sync/timer_delete_sync/g' {} +
[itlabcenter@void vmware-host-modules]$ find . -type f -name "*.c" -exec sed -i 's/rdmsrl_safe/rdmsrq_safe/g' {} +
[itlabcenter@void vmware-host-modules]$ find . -type f -name "*.c" -exec sed -i 's/strlcpy/strscpy/g' {} +
[itlabcenter@void vmware-host-modules]$ find . -type f \( -name "*.c" -o -name "*.h" \) -exec sed -i 's/read_lock(&dev_base_lock)/rcu_read_lock()/g' {} +
[itlabcenter@void vmware-host-modules]$ find . -type f \( -name "*.c" -o -name "*.h" \) -exec sed -i 's/read_unlock(&dev_base_lock)/rcu_read_unlock()/g' {} +
[itlabcenter@void vmware-host-modules]$ make
[itlabcenter@void vmware-host-modules]$ sudo make install
Run the following commands from the Void Linux Terminal to load the modules and verify they are activated
[itlabcenter@void vmware-host-modules]$ sudo modprobe vmmon
[itlabcenter@void vmware-host-modules]$ sudo modprobe vmnet
[itlabcenter@void vmware-host-modules]$ lsmod | grep -E "vmmon|vmnet"
Resulting Output:
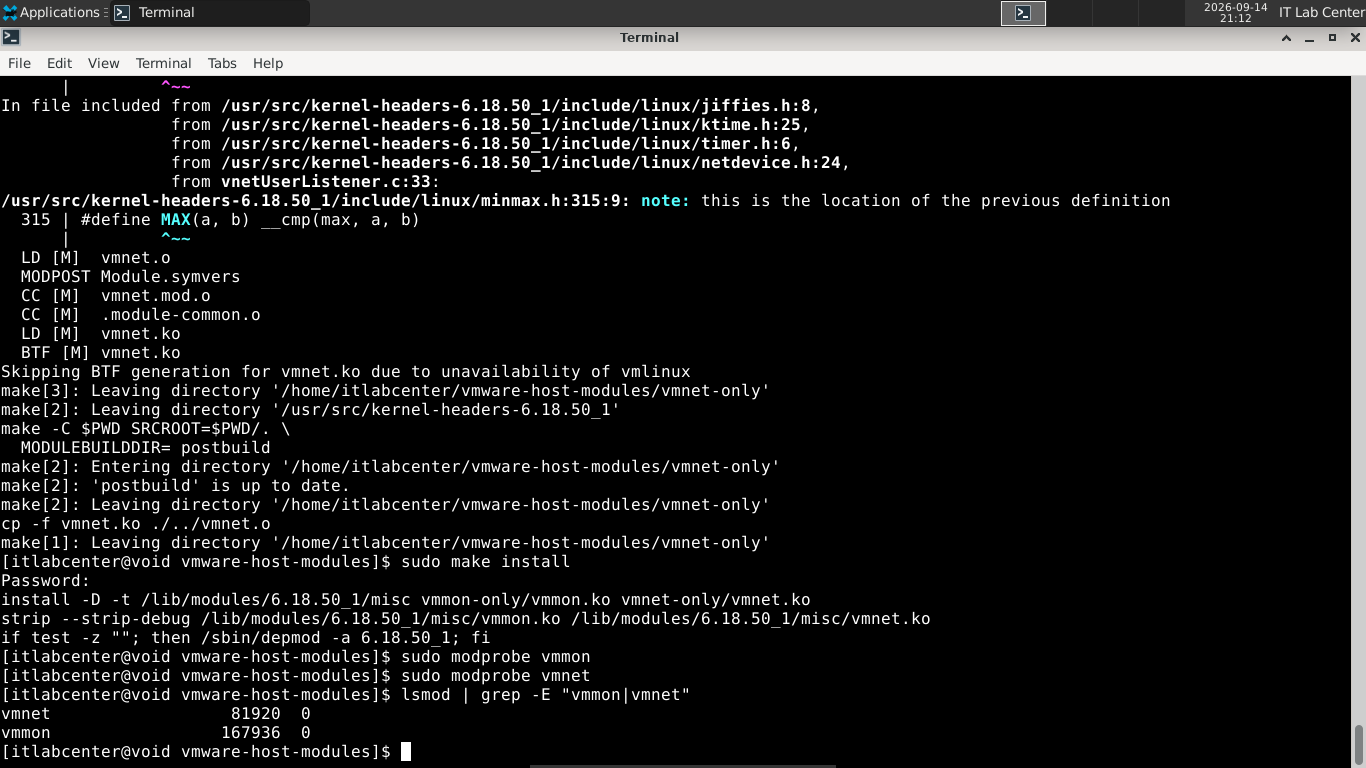
Run the following commands from the Void Linux Terminal to manually configure the networks default settings
[itlabcenter@void vmware-host-modules]$ sudo mknod -m 600 /dev/vmnet0 c 119 0
[itlabcenter@void vmware-host-modules]$ sudo mknod -m 600 /dev/vmnet1 c 119 1
[itlabcenter@void vmware-host-modules]$ sudo mknod -m 600 /dev/vmnet8 c 119 8
[itlabcenter@void vmware-host-modules]$ sudo chmod a+rw /dev/vmnet*
[itlabcenter@void vmware-host-modules]$ sudo vmnet-netifup -d /var/run/vmnet-netifup-vmnet0.pid /dev/vmnet1 vmnet0
[itlabcenter@void vmware-host-modules]$ sudo vmnet-netifup -d /var/run/vmnet-netifup-vmnet1.pid /dev/vmnet1 vmnet1
[itlabcenter@void vmware-host-modules]$ sudo vmnet-netifup -d /var/run/vmnet-netifup-vmnet8.pid /dev/vmnet8 vmnet8
[itlabcenter@void vmware-host-modules]$ sudo vmware-networks --postinstall vmware-workstation,1,1
[itlabcenter@void vmware-host-modules]$ sudo vmware-networks --stop
[itlabcenter@void vmware-host-modules]$ sudo vmware-networks --start
Now we need to create a dedicated runit service for our VMWare hypervisor so we can control it's functions
Run the following commands from the Void Linux Terminal to create a dedicate runit service for VMWare Pro
[itlabcenter@void vmware-host-modules]$ cd ~
[itlabcenter@void ~]$ sudo mkdir -p /etc/sv/vmware
[itlabcenter@void ~]$ sudo tee /etc/sv/vmware/run << 'EOF'
> #!/bin/sh
> exec 2>&1
> /etc/init.d/vmware start
> pause
EOF
[itlabcenter@void ~]$ sudo chmod +x /etc/sv/vmware/run
Run the following commands from the Void Linux Terminal to enable the service and launch the application
[itlabcenter@void ~]$ sudo ln -s /etx/sv/vmware /var/service
[itlabcenter@void ~]$ sudo sv status vmware
[itlabcenter@void ~]$ vmware &
Resulting Output:
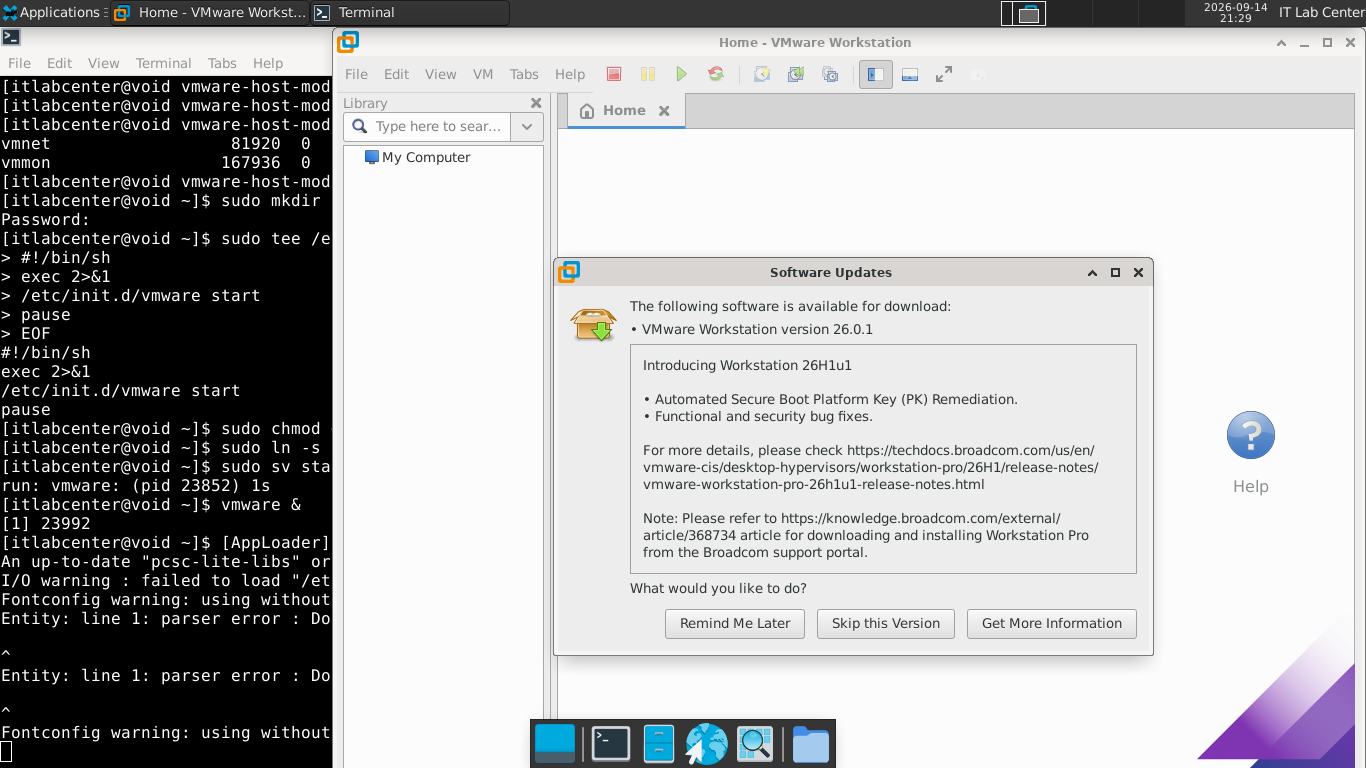
These are the primary tools for this lab. The rest we will be configuring within the virtual machine setup
4. Deploy Virtual Network
VMWare Workstation Pro is an industry standard Type-2 hypervisor that enabled the deployment of complex,
isolated virtual machine clusters directly on a host operating system. Utilizing advanced hardware level
virtualization, it provides the robust performance, resource management, and deep network customization
required to design, build, and test highly accurate replicas of production environments, which we'll make

We will be using this powerful tool to simulate the network environment for a small company that will be
deploying the Wazuh SIEM to correlate logs. Our setup will consist of three endpoints and a Wazuh server




HYPERVISOR
Setting up virtual machines is similar to provisioning physical workstations. We will need to download
the installation images for each of the operating systems that we plan to use. The downloads are below
Download Windows 11 Disk Image (ISO): Microsoft Windows 11 ISO
Download Windows Server 2025 Disk Image (ISO): Windows Server 2025 ISO
Download Debian Installer Image (ISO): Debian 13 Complete Installation Image
Now that we have our images, we can begin provisioning the virtual machines. We will start with Windows
11 first. Return to your VMWare Workstation Pro window and close the firmware update notification panel
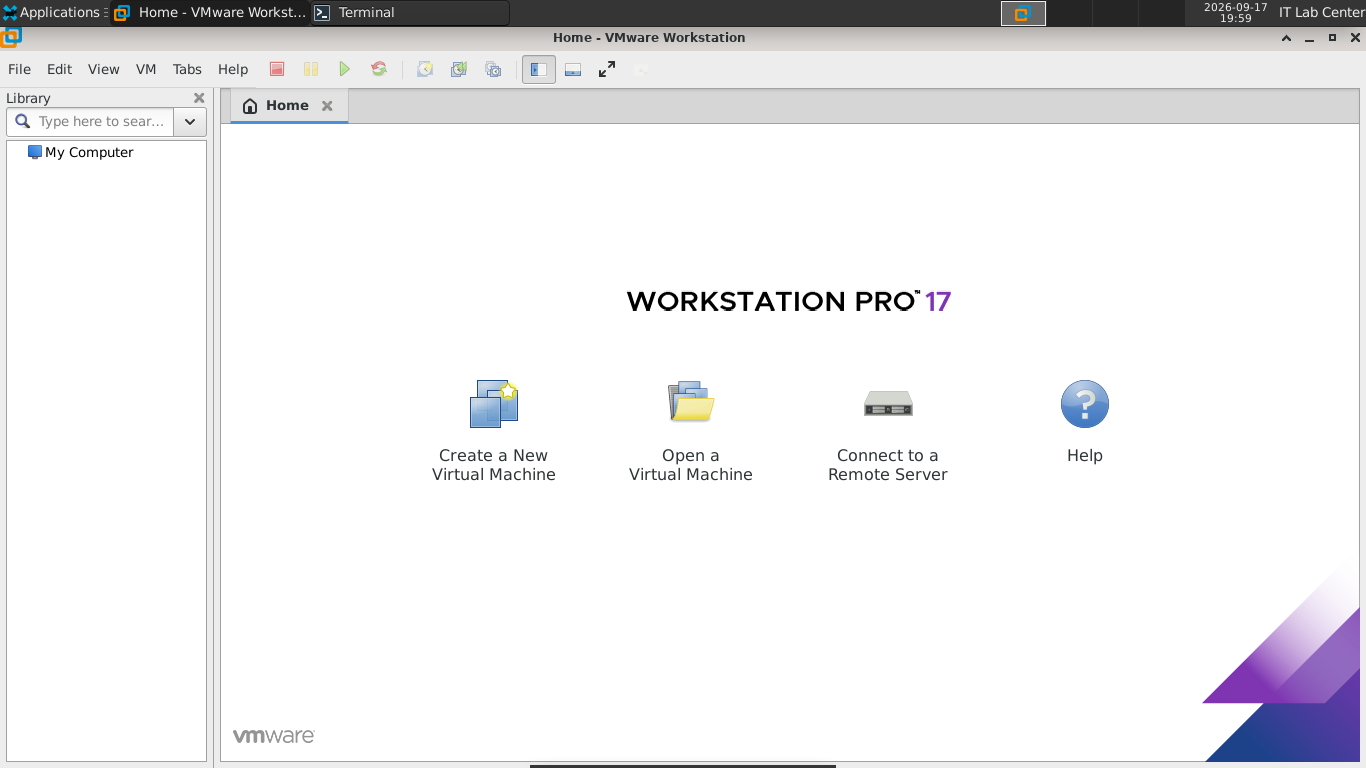
Select the option for Create a New Virtual Machine > Next > User ISO image, and browse to our installer
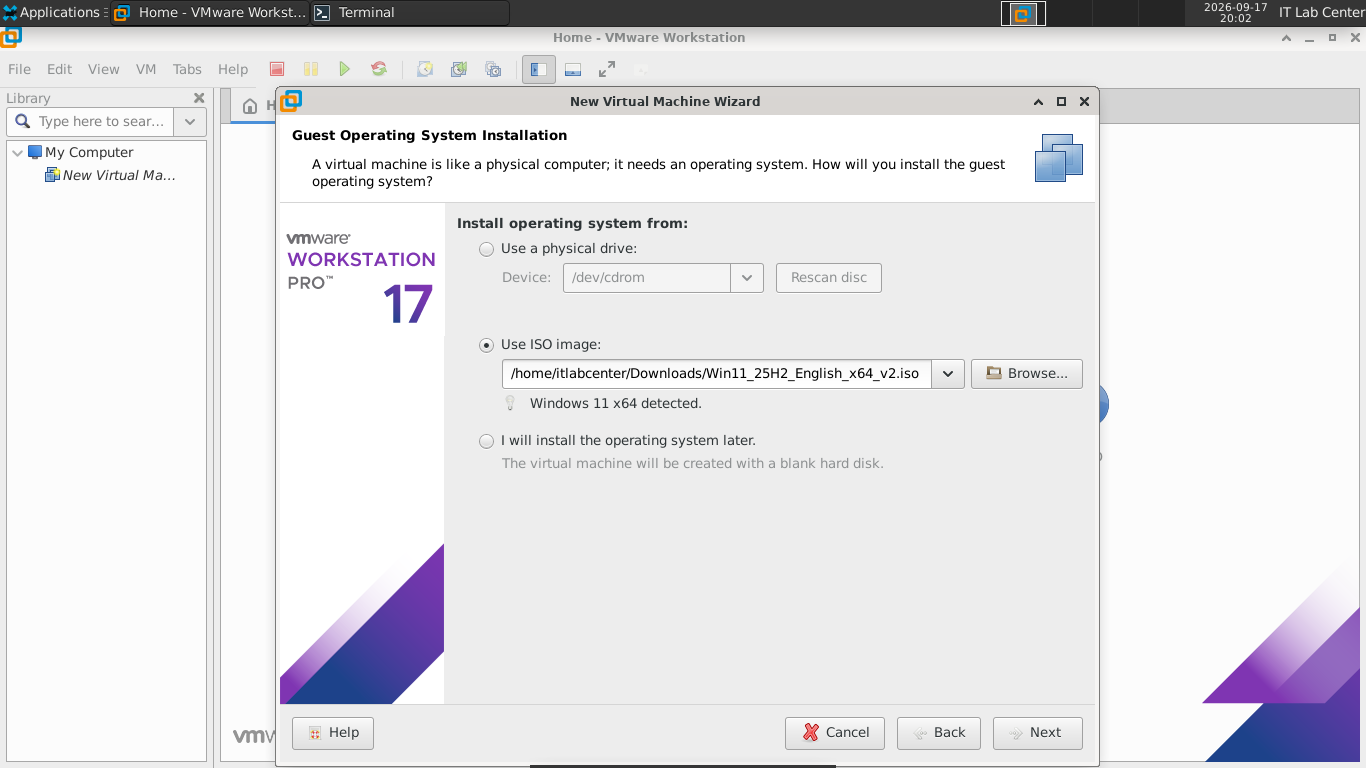
Now hit Next, and name the virtual machine DESKTOP1, then hit Next, and enter in a password for encryption
Now hit Next > Next > Finish to finalize the creation of the virtual machine. It will automatically boot up
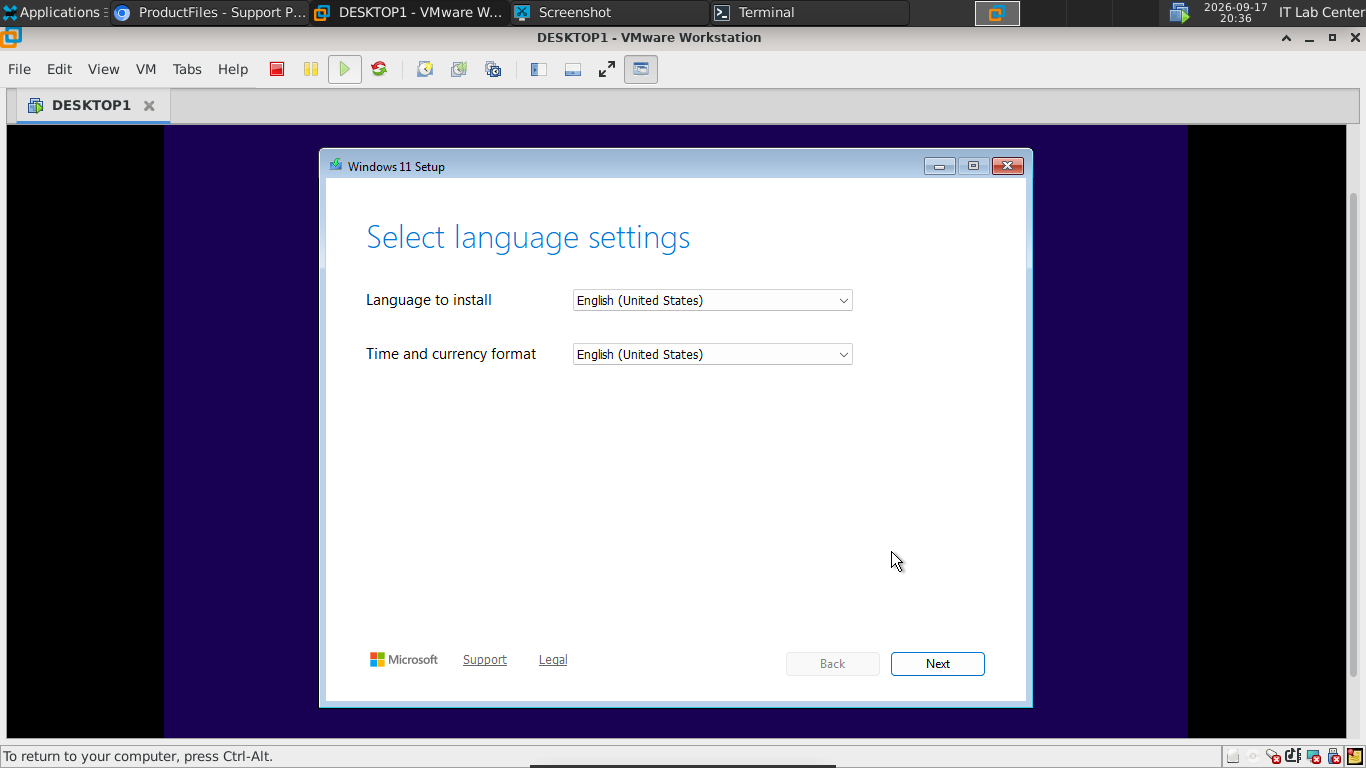
Continue through the Windows 11 Installer as normal and be sure to select the Windows 11 Pro version to
install. After some time the installation will complete and we will be taken to the initial setup screen
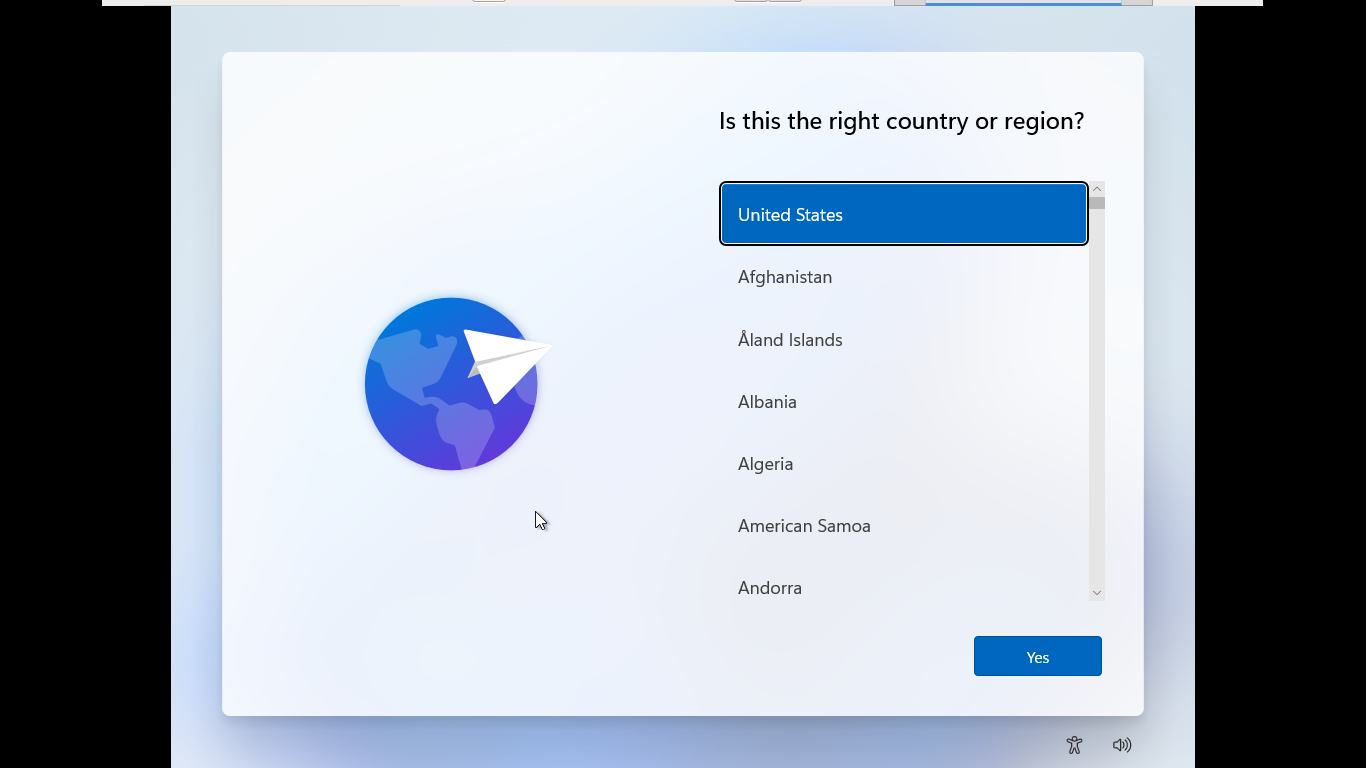
Once you reach the Is this the right country or region screen, hit SHIFT+F10 to open up a command prompt
Run the following command from the initial setup command prompt to bypass network and microsoft account
C:\Windows\System32> oobe\BypassNRO
The system will reboot and allow you to proceed through the initial setup with a local account. Be sure
to select "I don't have internet" when the option presents itself. For this lab we use itlabcenter as the
local user account. Once the setup is completed, we will be taken to the desktop, and our work here is done
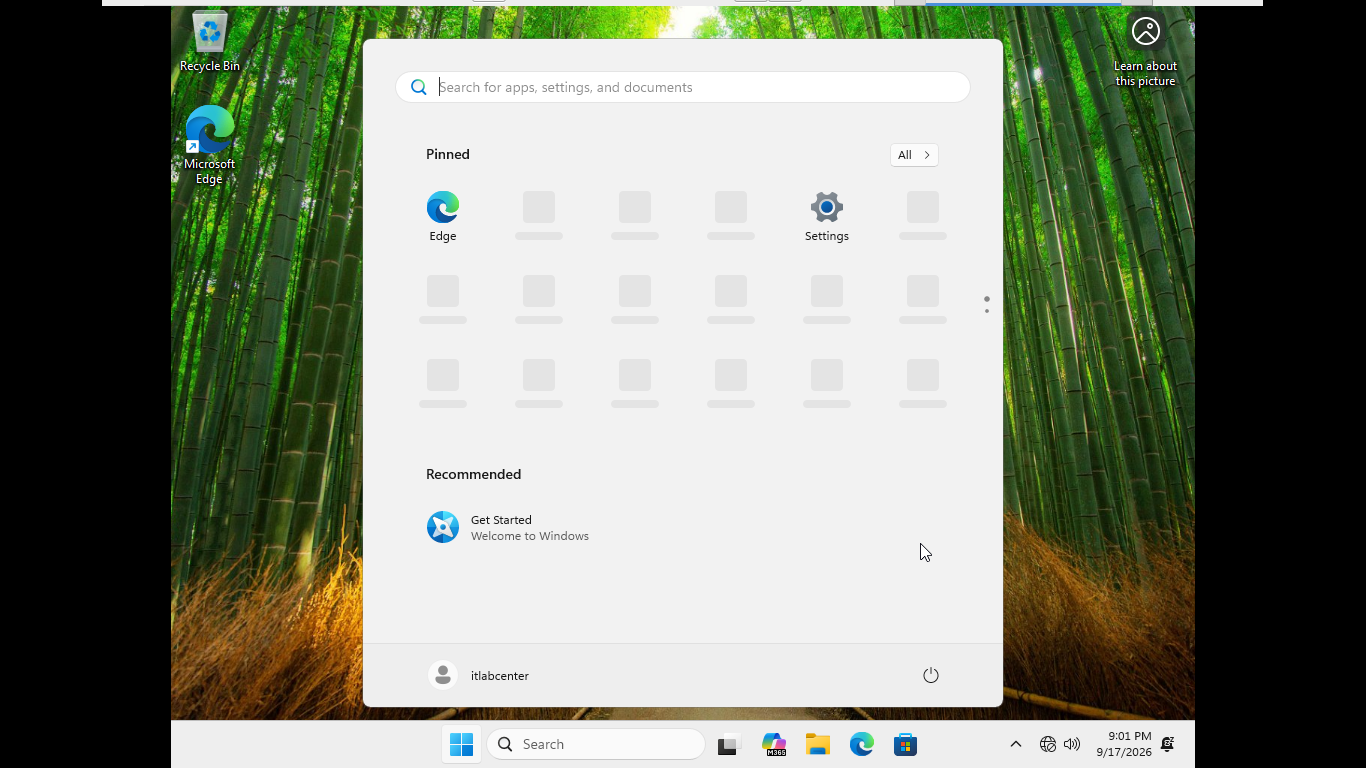
Now let's continue to provision the Domain Controller which will run Windows Server 2025. Click on the
Home tab in VMWare and select Create a New Virtual Machine. Click Next > Use ISO image, and select our
Windows Server image. Hit Next > Version > Windows Server 2022 > Next, and name this virtual machine DC1
Now hit Next > Next > Customize Hardware > and set the memory to 8GB > Close > Finish and the vm launches
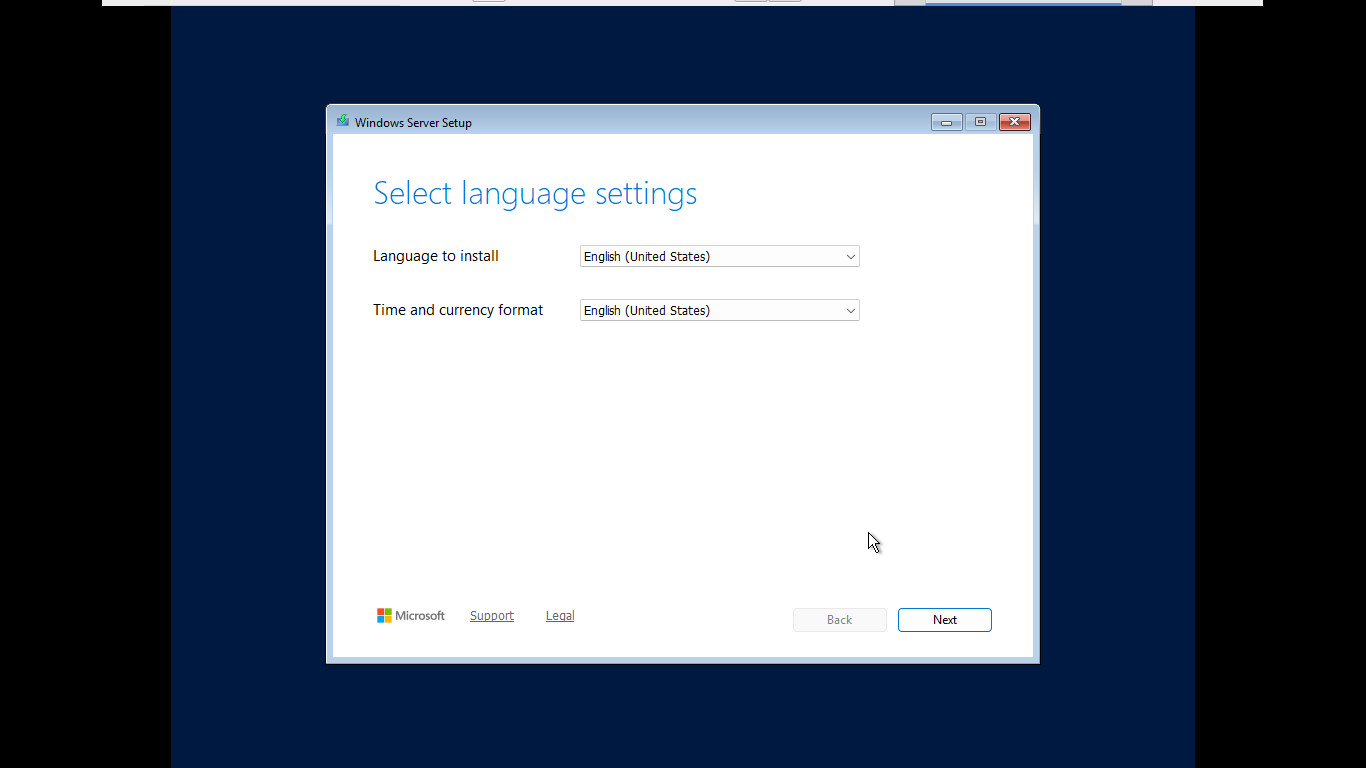
Continue through the Windows Server installation as normal, selecting the Desktop Experience evaluation
when the option presents itself. Once complete you will be prompted to set the Administrator password
Once the Administrator account password is set, log into the server to reach the windows server desktop

Next let's move on to provisioning the Web Server which will run Debian 13, a distribution of Linux. Head
back to the home tab in VMWare and select Create a New Virtual Machine. Then click Next > Use ISO image >
and select our Debian installation image. Then click Next > Linux > Version > Debian 12.x > Next > and name
this machine WEBSRV1. Then click Next > Next > Finish. Our graphical installer will boot up automatically
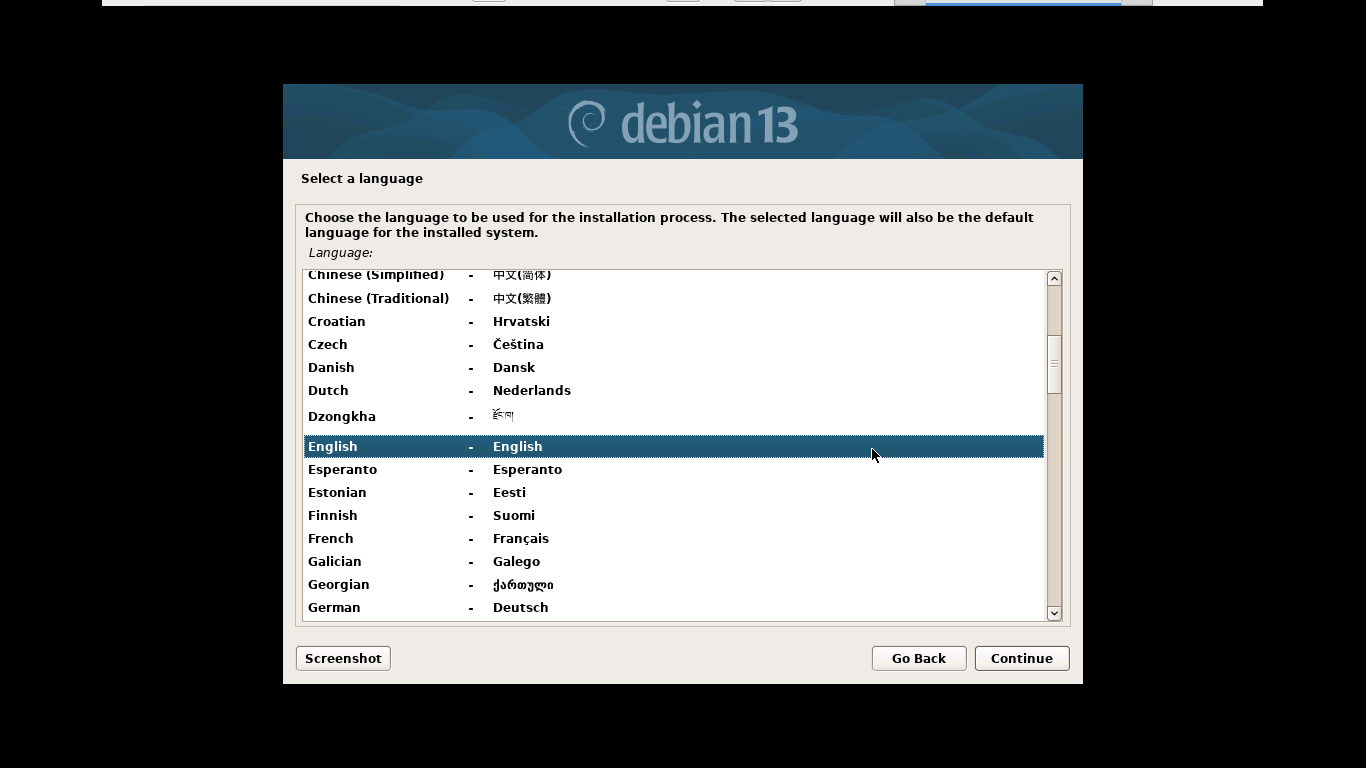
Continue through the graphical installer as normal, select the option to Not Configure the Network at this
time when the option presents itself. You will be asked to create a root account password, along with a
standard user account. Once the installation has completed, the system will reboot into the command line
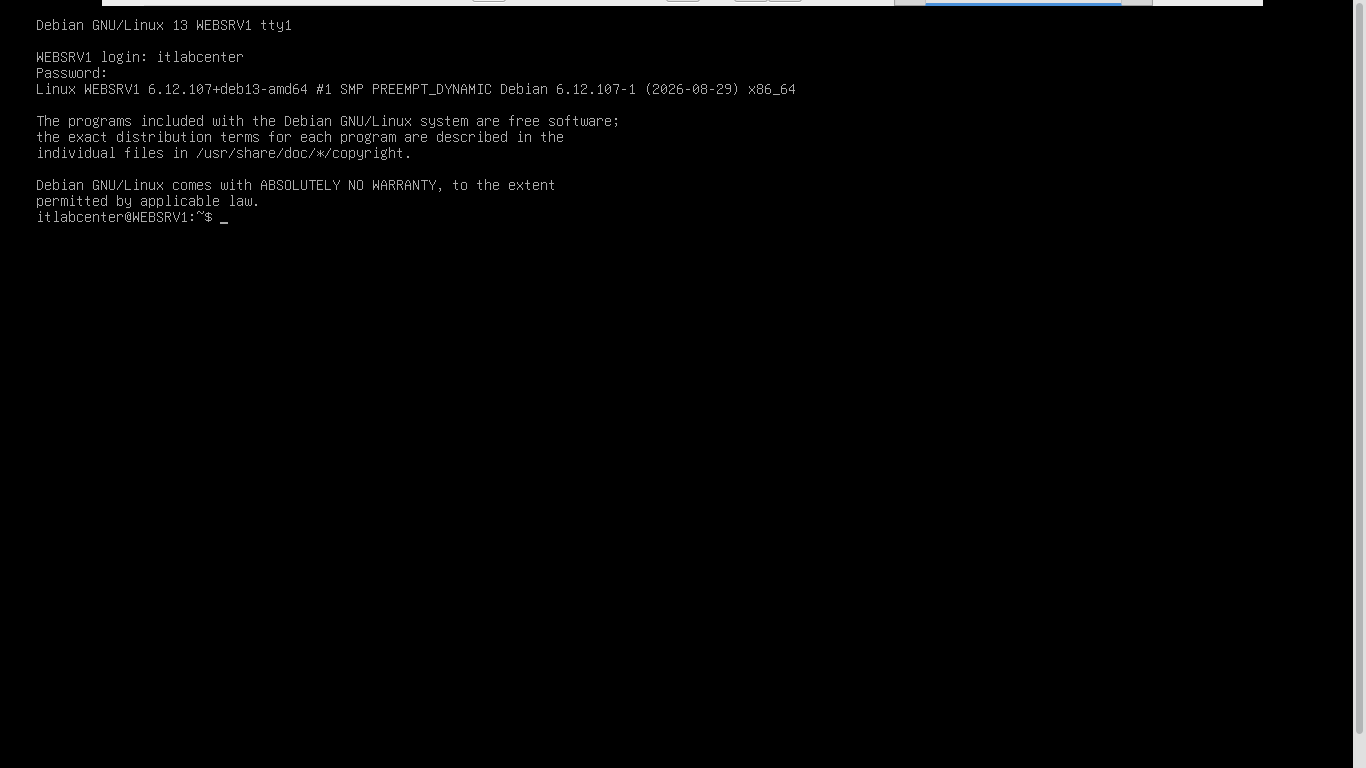
Lastly, we will provision the Wazuh Server which will also be running Debian 13. In VMWare, navigate back
to the home tab and select Create a New Virtual Machine. Then click Next > Use ISO Image > and select our
Debian installation image. Then click Next > Linux > Version > Debian 12.x > Next > and name this machine
WAZUHSRV1. Then click Next > and set the maximum disk size to 100GB > Next > Customize Hardware > and set
the memory to 8GB > Close > Finish. Once again, the graphical installer will boot automatically. Continue
through the graphical installer as normal select the option to Not Configure the Network at this time when
the option presents itself. You will be asked to create a root account password, along with a standard user
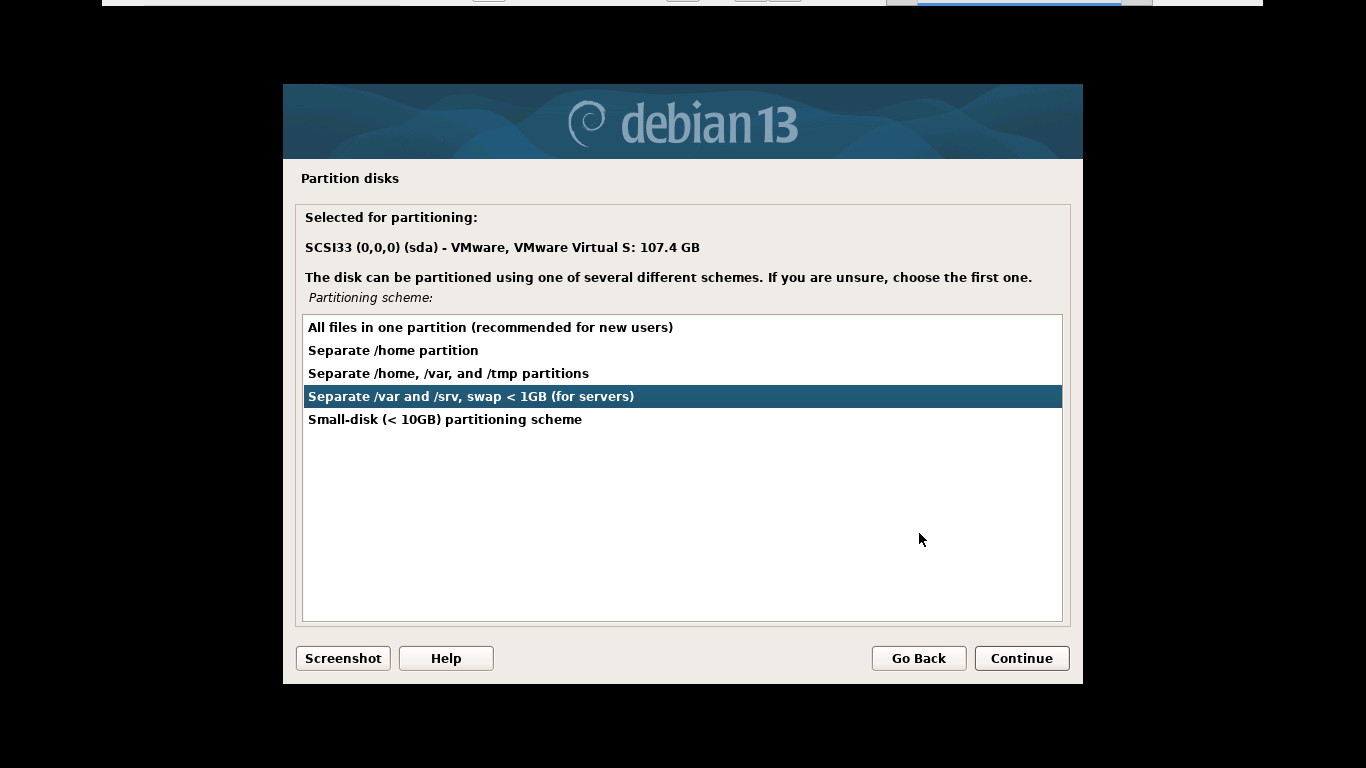
account. The one difference we will have here is when partitioning, select the option to use encrypted LVM
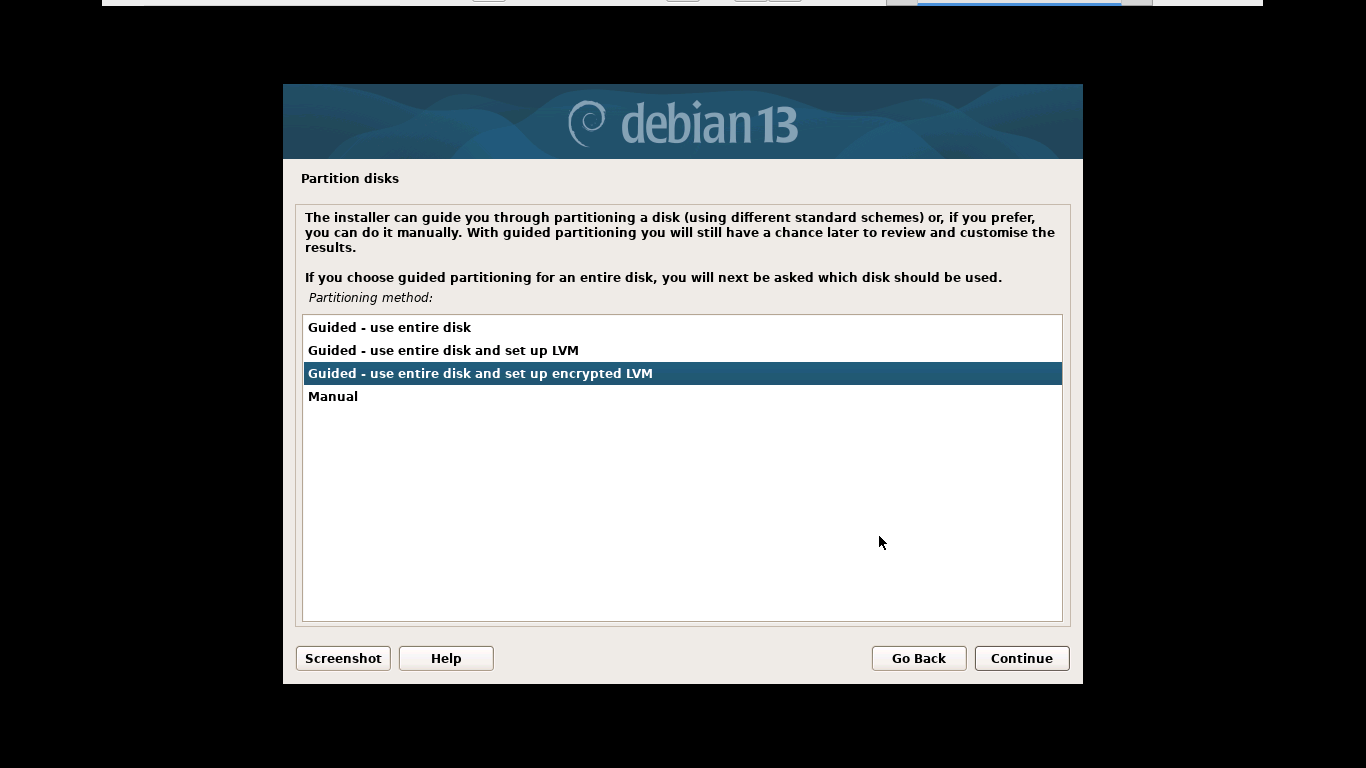
The Wazuh server is an extremely sensitive endpoint, since it contains detailed logs from every computer
on the network. We want to ensure that this information cannot be accessed in the event that the drive is
compromised. Additionally, select the option to configure separate /var and /srv partitions with swap space
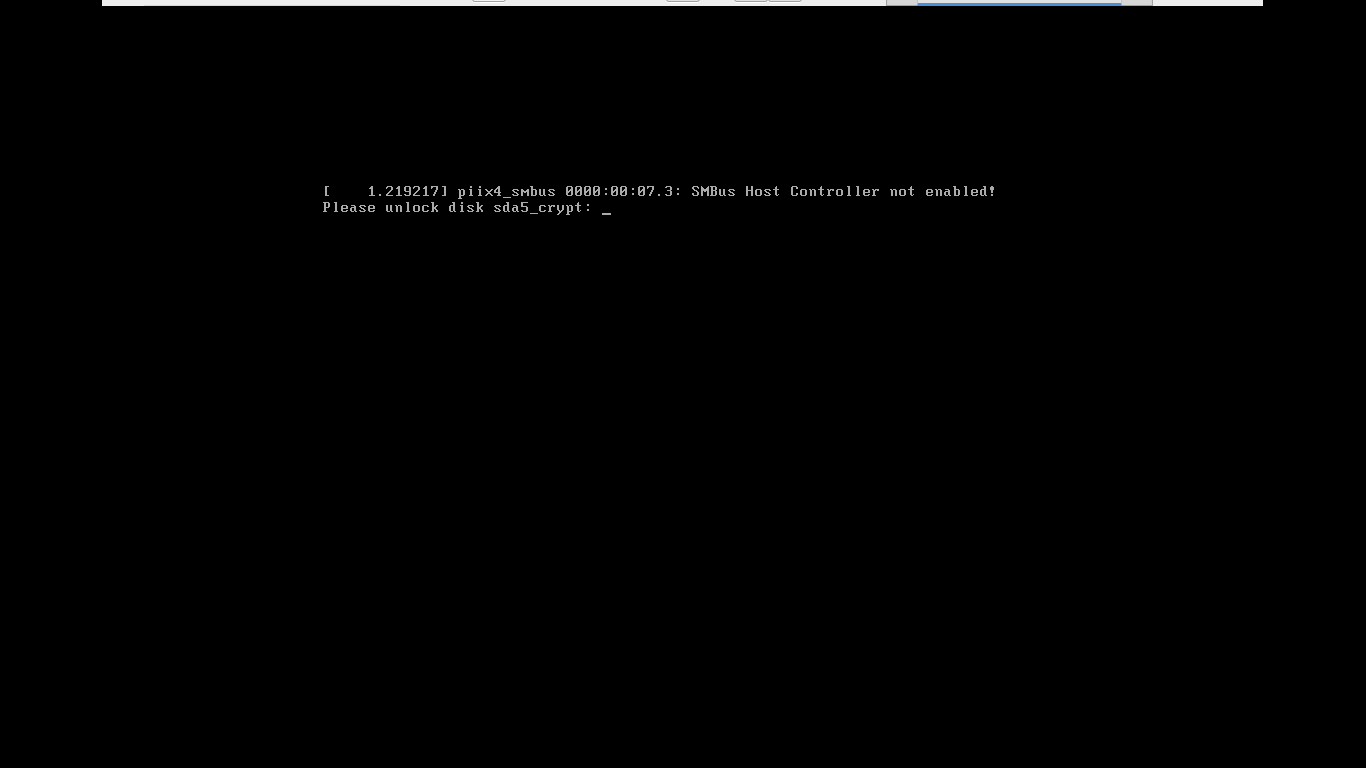
Once the installation has completed, our system will ask for an encryption password before loading desktop
5. Configure Production Environment
Now that we have our base systems, we must configure the systems to interact with each other as a domain
would. Swap back over to the DC1 virtual machine. Once logged in, open an Administrator PowerShell window
Run the following commands from the Administrator PowerShell to provision a local administrator account
PS C:\Windows> New-LocalUser -Name "itlabcenter" -Password $(ConvertTo-SecureString "password" -AsPlainText -Force)
PS C:\Windows> Add-LocalGroupMember -Group "Administrators" -Member "itlabcenter"
Now log out of the default Administrator account with the start icon and log into our new itlabcenter user
Run the following commands from the Administrator PowerShell Window to provision an Active Directory Domain
PS C:\Windows\System32> Install-WindowsFeature -Name AD-Domain-Services -IncludeManagementTools
PS C:\Windows\System32> Install-ADDSForest -DomainName "itlab.local" -CreateDnsDelegation:$false `
>> -DatabasePath "C:\Windows\NTDS" `
>> -DomainMode "7" `
>> -DomainNetbiosName "ITLAB" `
>> -ForestMode "7" `
>> -InstallDns:$true `
>> -LogPath "C:\Windows\NTDS" `
>> -NoRebootOnCompletion:$False `
>> -SysvolPath "C:\Windows\SYSVOL" `
>> -Force:$true
This may take some time to complete, and the endpoint may restart several times during this process. Once
complete, you will be returned to the Windows Server desktop. Open another Administrator PowerShell window
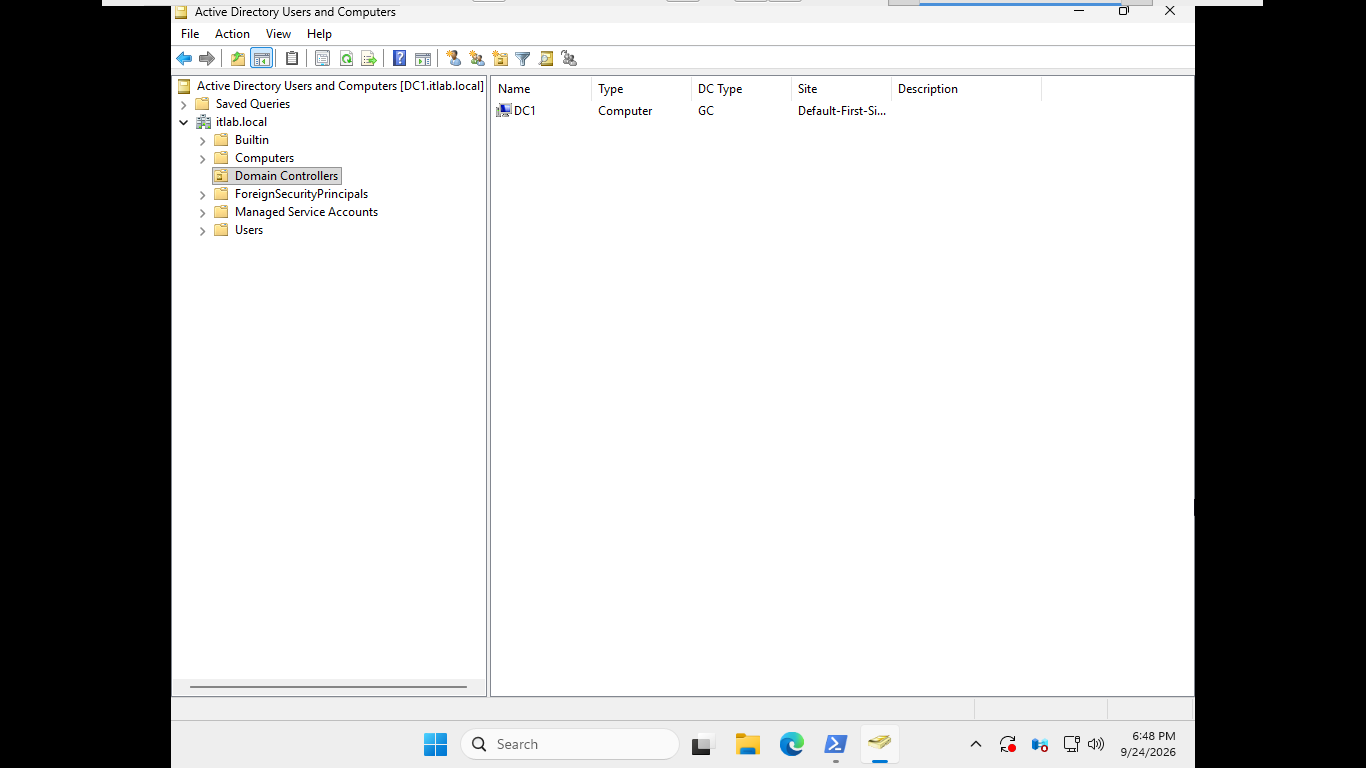
Run the following commands from the Administrator PowerShell window to display our Active Directory Domain
PS C:\Windows\System32> Rename-Computer -NewName "DC1" -DomainCredential (Get-Credential) -Force -Restart
PS C:\Windows\System32> dsa.msc
Resulting Output:
Ideally, we would want to transition this domain controller to a static IP address rather than using DHCP.
However, we want to retain the safe default gateway DHCP gave us, and reconfigure the DNS forwarding servers
From the search bar, search for PowerShell ISE and select the option to run as Administrator. Type this out
# Check Current Network Configuration
function Get-NetworkInfo {
$global:Interface = $(Get-NetAdapter).Name
$global:IpAddr = $(Get-NetIPAddress -AddressFamily IPv4 | Where-Object { $_.InterfaceAlias -eq $Interface }).IPAddress
$global:Mask = $(Get-NetIPAddress -AddressFamily IPv4 | Where-Object { $_.InterfaceAlias -eq $Interface }).PrefixLength
$global:Gateway = $(Get-NetRoute -DestinationPrefix "0.0.0.0/0" | Where-Object {$_.InterfaceAlias -eq $Interface }).NextHop
$global:DnsServers = $(Get-DnsClientServerAddress -AddressFamily IPv4 | Where-Object { $_.InterfaceAlias -eq $Interface }).ServerAddresses
}
Get-NetworkInfo
# Disabled Dynamic Host Configuration Protocol
Set-NetIPInterface -InterfaceAlias $Interface -Dhcp Disabled
# Set Identical Static IP Address w/ PowerShell Version Error Handling
try {
New-NetIPAddress -InterfaceAlias $Interface `
-IPAddress $IpAddr `
-PrefixLength $Mask `
-DefaultGateway $Gateway
} catch {
New-NetIPAddress -InterfaceAlias $Interface `
-IPAddress $IpAddr `
-PrefixLength $Mask
$StaleRoutes = Get-NetRoute -DestinationPrefix "0.0.0.0/0" `
-InterfaceAlias $Interface `
-ErrorAction SilentlyContinue
if ($StaleRoutes) {
$StaleRoutes | Remove-NetRoute -Confirm:$false
}
New-NetRoute -InterfaceAlias $Interface `
-DestinationPrefix "0.0.0.0/0" `
-NextHop $Gateway
}
# Configure DNS Forwarders
Add-DnsServerForwarder -IPAddress 8.8.8.8, 8.8.4.4 -PassThru
# Configure Local DNS Resolution
Set-DnsClientServerAddress -InterfaceAlias $Interface -ServerAddresses ($IpAddr, "127.0.0.1")
# Flush Cache & Restart Services
Clear-DnsServerCache
ipconfig /flushdns; ipconfig /registerdns
Restart-Service dns; Restart-Service netlogon
# Print Updated Configuration
Get-NetworkInfo
$NetworkTable = [PSCustomObject]@{
Interface = $Interface
IPv4 = $IpAddr
Gateway = $Gateway
DNSServers = $DnsServers
}
$NetworkTable | Write-Host | Format-Table Auto
This will properly configure the Domain Controllers DNS resolution and forwarding according to security
best practices, and allow local lookups first before forwarding. Run the script using the green arrow
At the top. Then run ncpa.cpl in ther terminal and navigate to Ethernet0 > Properties > IP Protocol V4
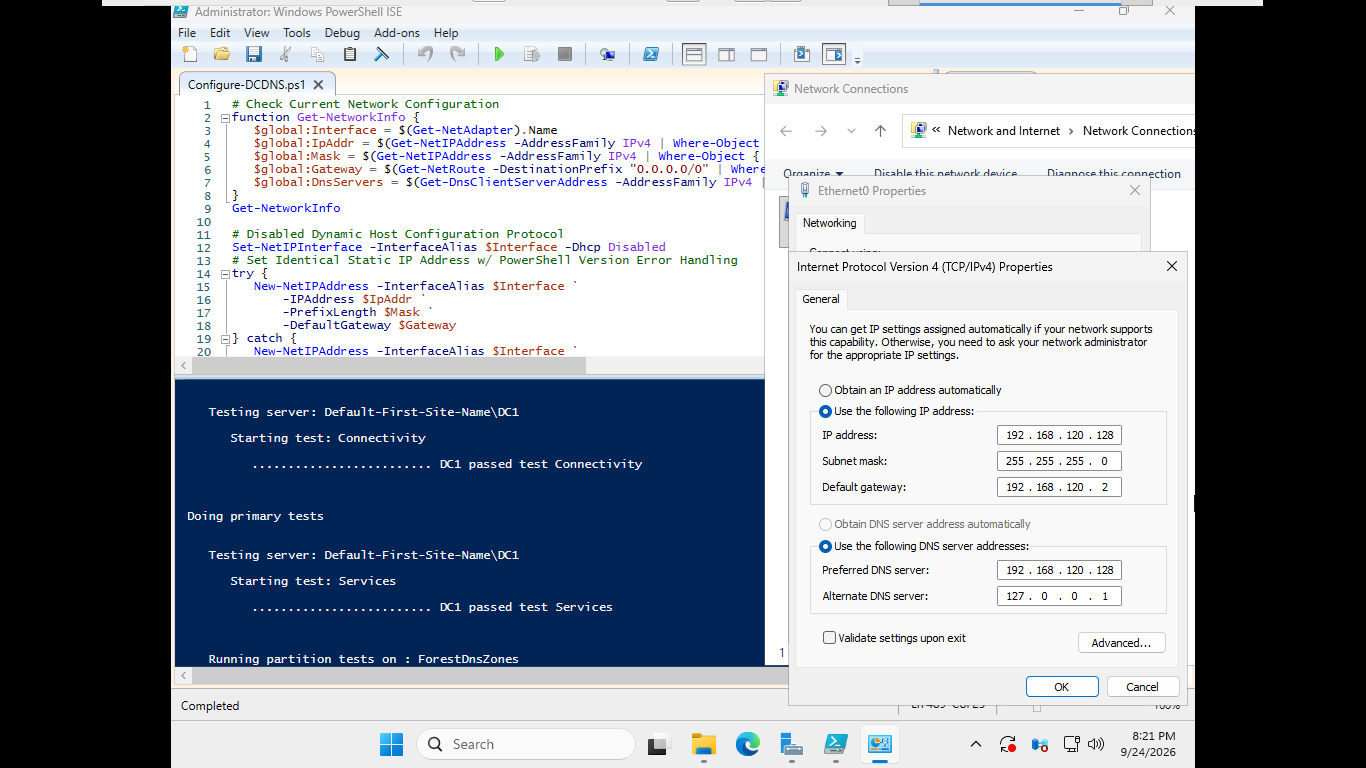
The Domain controller is now configured with a working static IP, and treats itself as the DNS Servers
Head back over to our Windows 11 workstation and open an administrator PowerShell using the search bar
Run the following commands from the Endpoints Administrator PowerShell to point set DC1 as the DNS Server
PS C:\WINDOWS\system32> Set-DnsClientServerAddress -InterfaceAlias $(Get-NetAdapater).Name -ServerAddresses "192.168.120.128"
PS C:\WINDOWS\system32> ping DC1
PS C:\WINDOWS\system32> ping itlab.local
Resulting Output:
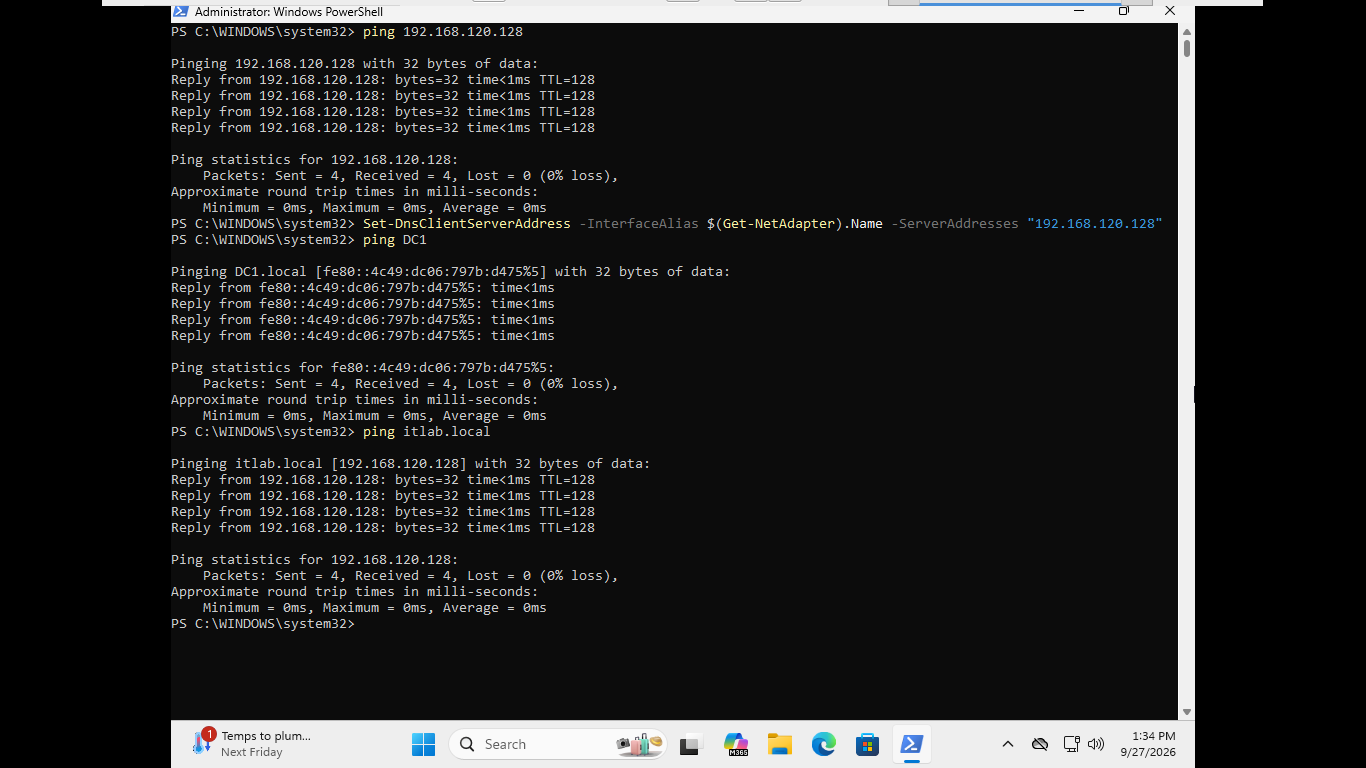
Run the following commands from the Endpoints Administrator PowerShell to join it to our itlab.local domain
PS C:\WINDOWS\system32> Rename-Computer -NewName "DESKTOP1" -Force
PS C:\WINDOWS\system32> New-NetFirewallRule -DisplayName "Allow ICMPv4-In (Domain)" `
>> -Direction Inbound `
>> -Action Allow `
>> -Protocol ICMPv4 `
>> -IcmpType 8 `
>> -Profile Domain
PS C:\WINDOWS\system32> Add-Computer -DomainName "itlab.local" -Credential $(Get-Credential) -Restart
A window will appear prompting for login credentials. Enter the domain and itlabcenter account credentials
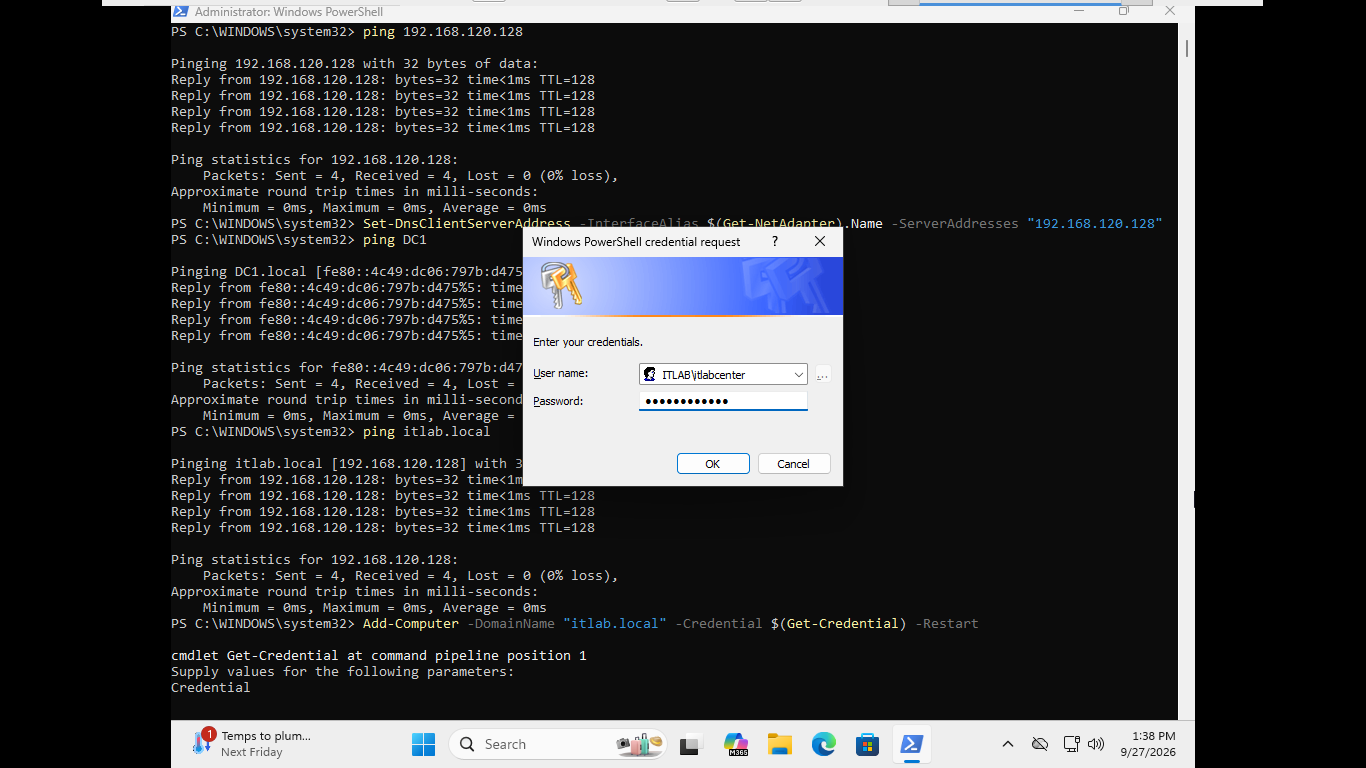
Once login credentials are provided, the virtual machine will restart. Select other user to login using
the ITLAB domain. Once the user profile is loaded we will arrive back at the desktop fully domain joined
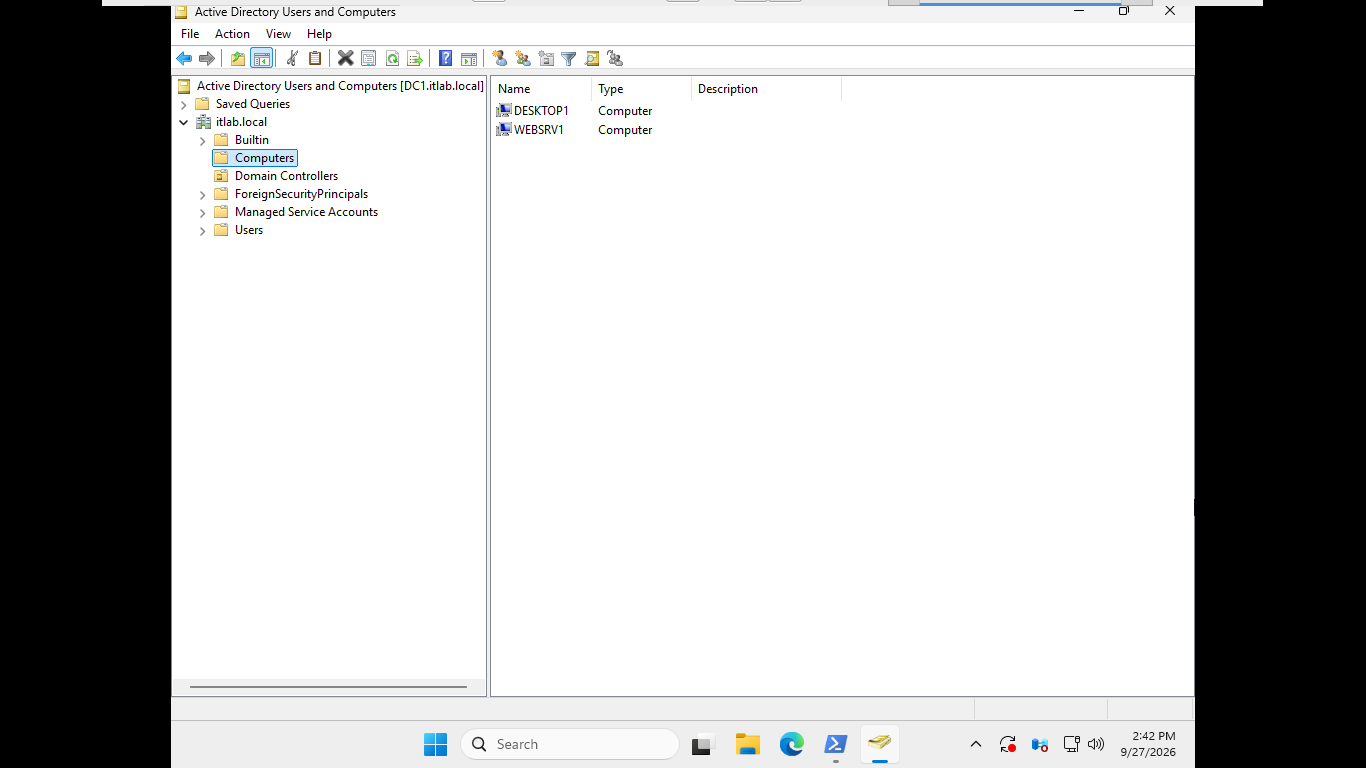
Head back over to DC1 and within the Active Directory Users and Computers program, head into Computers:
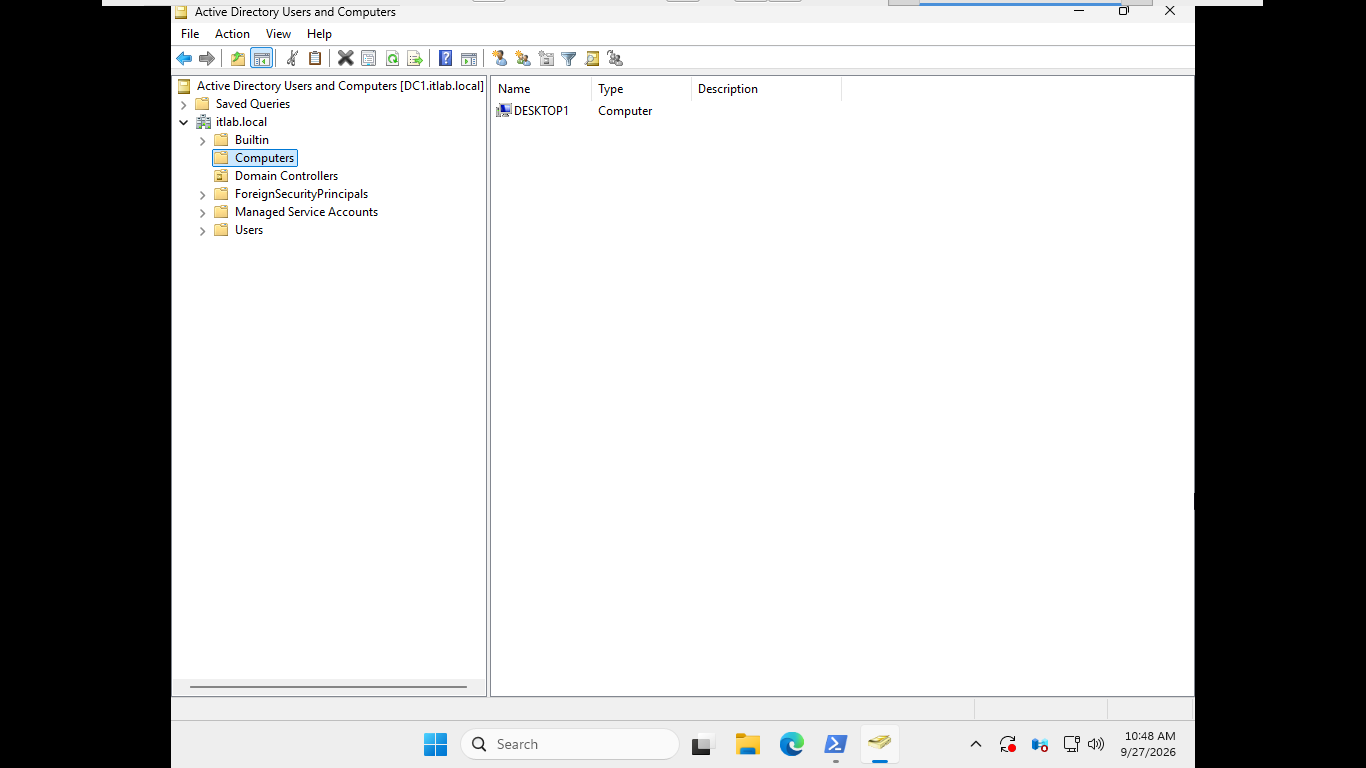
Now let's move on to provisioning the web server. For external facing web servers, you would want them
to reside on a seperate Demilitarized Zone (DMZ) Subnet for production environments. However, this server
will act as an internal only web applications server. A common scenario for organizations when they want
to host applications only employees should have access to, like an HR portal or a company wiki. For this
type of web server, hosting it on the same network as the other endpoints makes sense for the security.
Return the the web server and log in as the root user. Then run the following commands to set up networking
root@WEBSRV1:~# IFACE=$(ip link show | awk -F': ' '/state/ && !/lo/ {print $2; exit}')
root@WEBSRV1:~# tee /etc/network/interfaces > /dev/null << EOF
> source /etc/network/interfaces.d/*
> auto lo
> iface lo inet loopback
> allow-hotplug $IFACE
> iface $IFACE inet static
> address 192.168.120.100
> netmask 255.255.255.0
> gateway 192.168.120.2
> EOF
root@WEBSRV1:~# echo "nameserver 192.168.120.128" > /etc/resolv.conf
root@WEBSRV1:~# echo "search itlab.local" >> /etc/resolv.conf
root@WEBSRV1:~# systemctl restart networking
root@WEBSRV1:~# ping -c 3 8.8.8.8
root@WEBSRV1:~# ping -c 3 DC1
root@WEBSRV1:~# ping -c 3 DESKTOP1
root@WEBSRV1:~# ping -c 3 debian.org
Resulting Output:
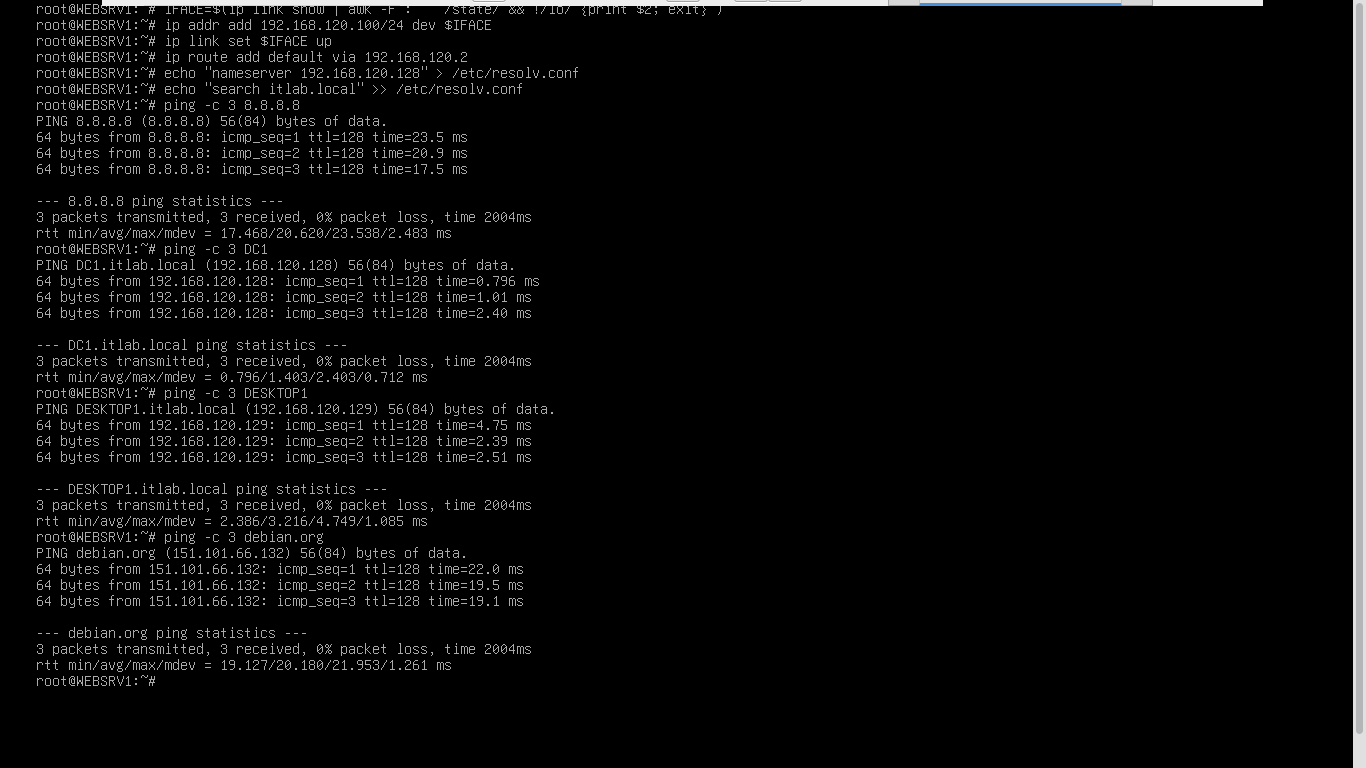
Our ping commands have demonstrated that the internet is reachable and internal + external name resolution
is fully functional. Now we will set up our package manager mirror and install basic networking utilities
Run the following commands from the WEBSRV1 Terminal to configure the mirrors and update the package list
root@WEBSRV1:~# cat << 'EOF' > /etc/apt/source.list
> deb https://deb.debian.org/debian/ stable main contrib non-free non-free-firmware
> deb https://security.debian.org/debian-security stable-security main contrib non-free non-free-firmware
> deb https://deb.debian.org/debian/ stable-updates main contrib non-free non-free-firmware
> EOF
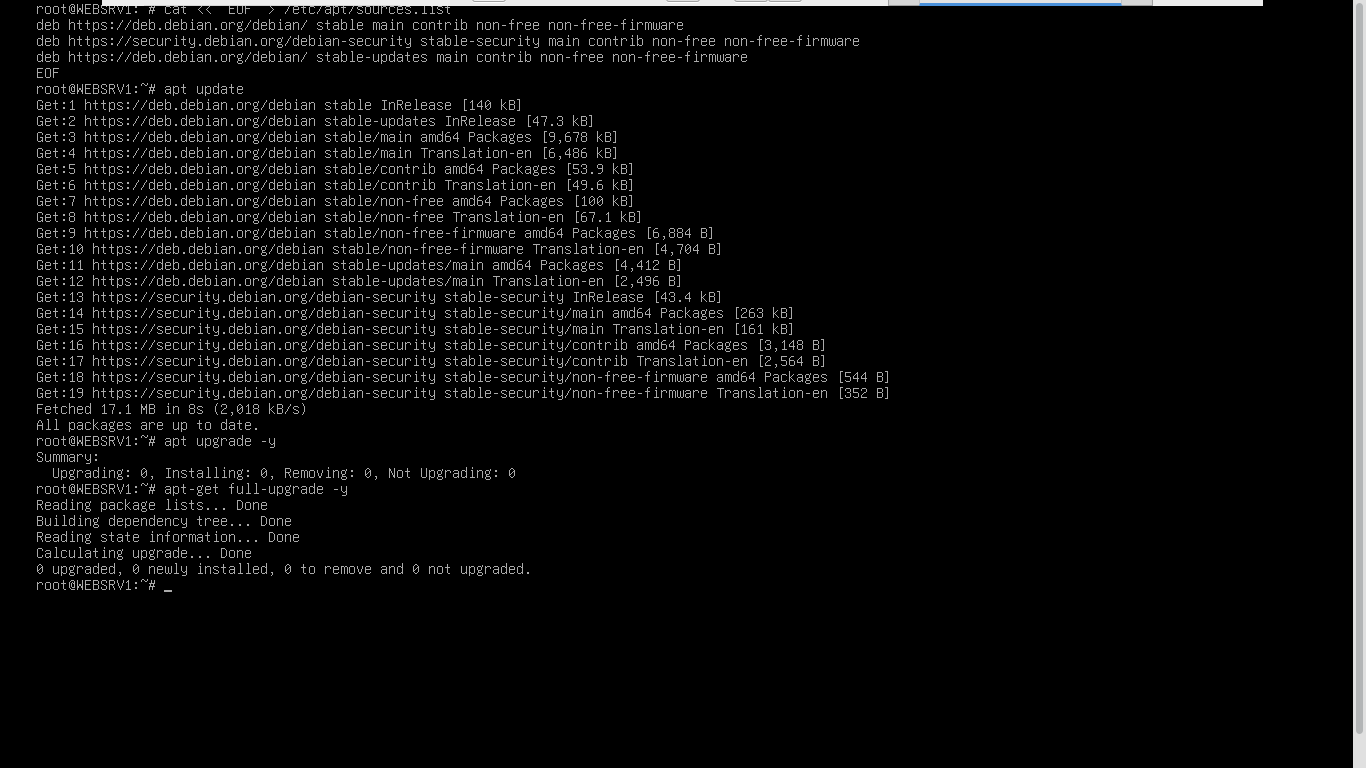
root@WEBSRV1:~# apt update
root@WEBSRV1:~# apt upgrade -y
root@WEBSRV1:~# apt-get full-upgrade -y
Resluting Output:
Security best practices dictate that the root user account should never be used except for strictly needed
administrative tasks. So our next goal is to setup up the sudo package and add the standard user to group
Run the following commands from the WEBSRV1 Terminal to install and configure the sudo package and group
root@WEBSRV1:~# apt-get install sudo -y
root@WEBSRV1:~# usermod -aG sudo itlabcenter
root@WEBSRV1:~# exit
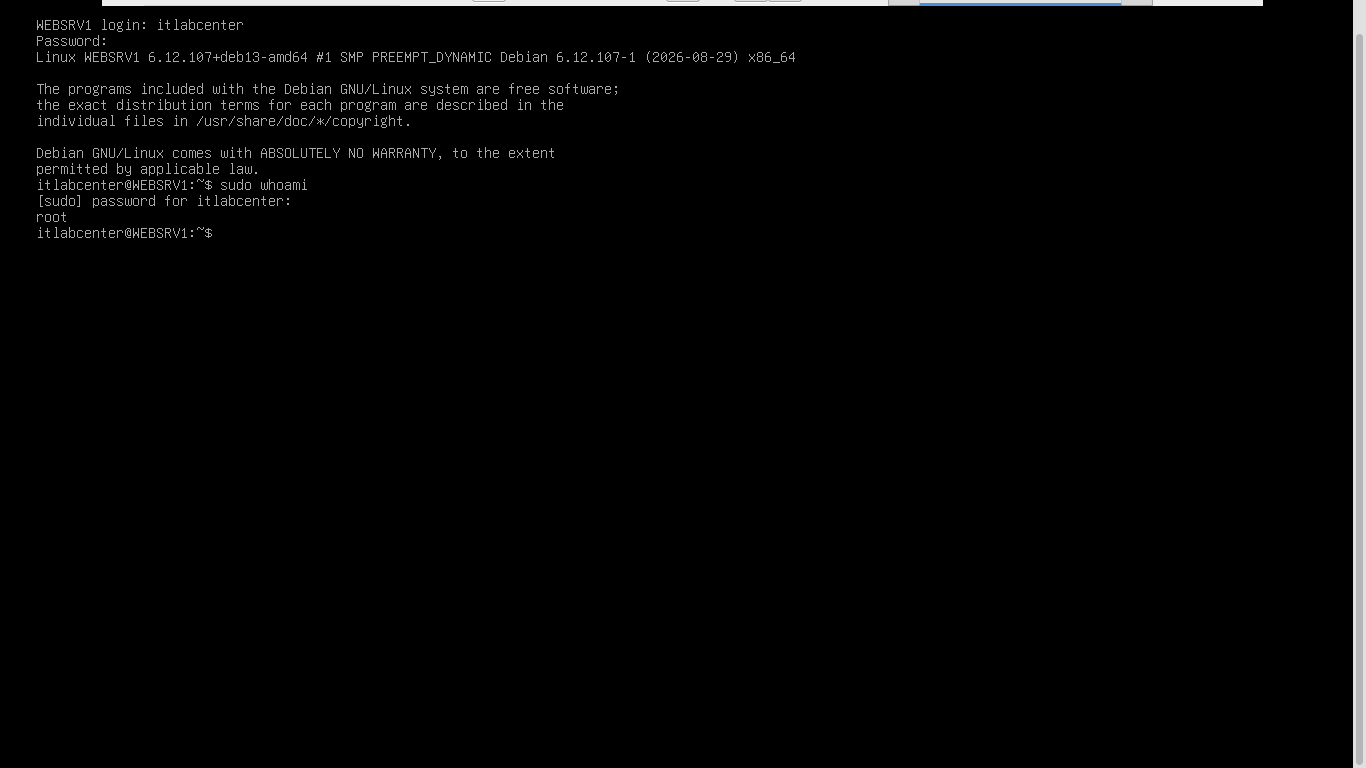
Log back in as the itlabcenter user account and run the following command to test our administrative rights
itlabcenter@WEBSRV1:~$ sudo whoami
Resulting Output:
Next, we will want to join this web server to the domain, that way other hosts are able to find it using
it's hostname through local DNS. The process of joining a linux endpoint to a domain is a bit more involved
Run the following commands from the WEBSRV1 Terminal to sync time, install packages, and join to the domain
itlabcenter@WEBSRV1:~$ sudo tee /etc/systemd/timesyncd.conf > /dev/null << 'EOF'
> [Time]
> NTP=DC1.itlab.local
> EOF
itlabcenter@WEBSRV1:~$ sudo systemctl restart systemd-timesyncd
itlabcenter@WEBSRV1:~$ sudo apt-get install realmd sssd sssd-tools adcli packagekit libnss-sss libpam-sss -y
itlabcenter@WEBSRV1:~$ sudo realm discover itlab.local
itlabcenter@WEBSRV1:~$ sudo realm join -U itlabcenter itlab.local
The last command will ask you for the domain account credentials, once entered our endpoint has joined
If you're interested in the specifics of how a linux endpoint is joined check out the Python Script Lab
Run the following command from the WEBSRV1 Terminal to configure our server to update it's dns dynamically
itlabcenter@WEBSRV1:~$ sudo tee -a /etc/sssd/sssd.conf > /dev/null << 'EOF'
> dyndns_update = True
> dyndns_update_ptr = True
> dyndns_refresh_interval = 43200
> dyndns_ttl = 3600
> ad_hostname = WEBSRV1.itlab.local
> EOF
itlabcenter@WEBSRV1:~$ sudo systemctl restart sssd
Head back over to DC1 and within the Active Directory Users and Computers program, refresh Computers:
Now that we have our web server up to speed, we are facing an interesting challenge. For an internal web
server, traditional certificate authorities will not sign SSL certificates for them without an externally
accessible domain to very against. The solution to this would be Active Directory Certificate Services
This utility allows us to configure our Domain Controller to act as the root certificate authority, that
way all domain joined endpoint implicitly trust the SSL certificate in use by our internal only web server
Run the following commands from the Administrator PowerShell to install the dependecies and reboot the DC
PS C:\WINDOWS\system32> Install-WindowsFeature -Name ADCS-Cert-Authority, RSAT-ADCS -IncludeManagementTools
PS C:\WINDOWS\system32> Install-WindowsFeature -Name AD-Certificate -IncludeManagementTools
PS C:\WINDOWS\system32> Restart-Computer -Force
Run the following commands from the Administrator PowerShell to securely install and configure our AD CS
PS C:\WINDOWS\system32> Install-AdcsCertificationAuthority `
>> -CAType EnterpriseRootCa `
>> -CACommonName "ITLAB-ROOT-CA" `
>> -KeyLength 4096 `
>> -HashAlgorithmName SHA256 `
>> -CryptoProviderName "RSA#Microsoft Software Key Storage Provider" `
>> -ValidityPeriod Years `
>> -ValidityPeriodUnits 1 `
>> -Force
PS C:\WINDOWS\system32> Restart-Computer -Force
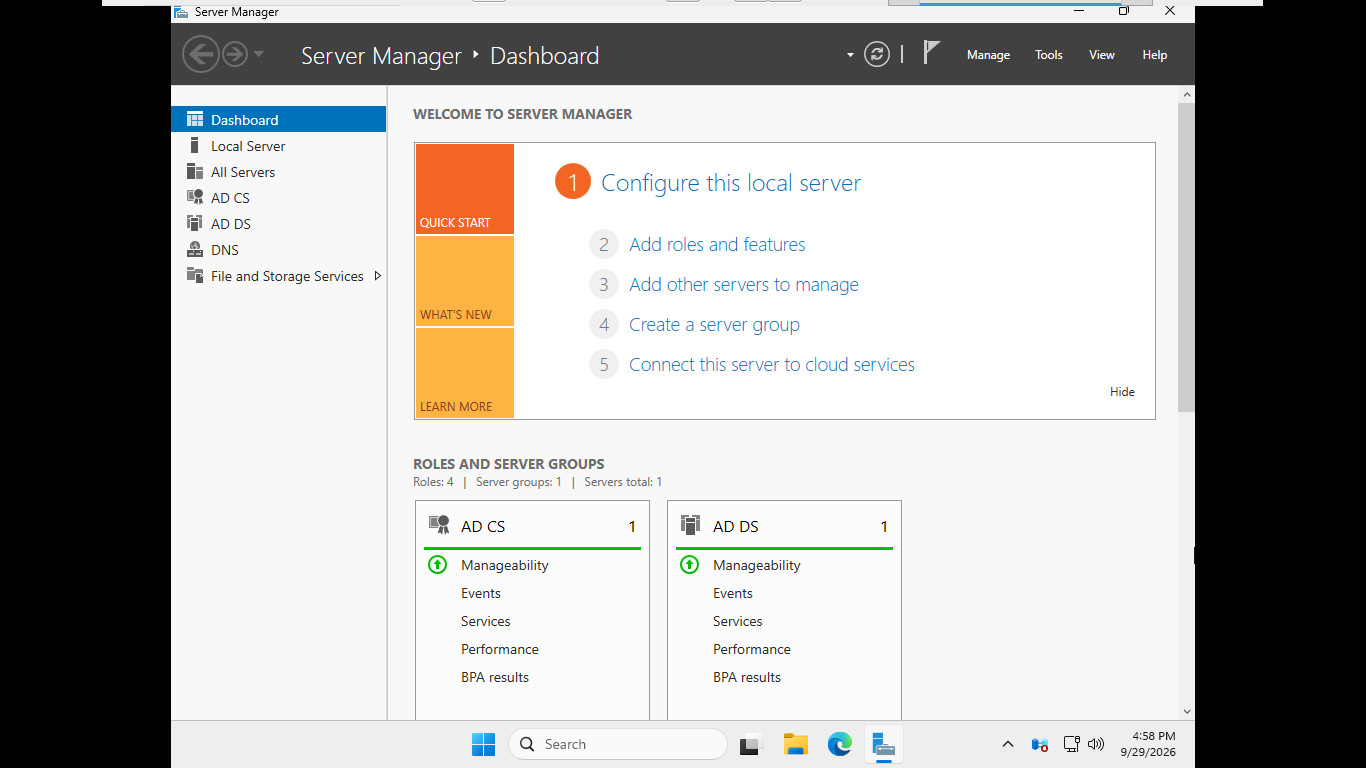
Once the Domain Controller reboots, you will be able to see a healthy AD CS instance in the server manager
We are going to request an SSL certificate from the CA authority for our web server in these next few steps
In order to perform this transaction is a secure manner, we will need to set up SFTP then remove them after
Run the following commands from the Administrator PowerShell to install, build and open the OpenSSH Server
PS C:\WINDOWS\system32> Add-WindowsCapability -Online -Name OpenSSH.Server~~~~0.0.1.0
PS C:\WINDOWS\system32> Start-Service sshd
PS C:\WINDOWS\system32> Set-NetFirewallRule -Name *OpenSSH-Server* -Profile Domain, Private -Enabled True
PS C:\WINDOWS\system32> certutil -setreg policy\EditFlags +EDITF_ATTRIBUTESUBJECTALTNAME2
PS C:\WINDOWS\system32> Restart-Service certsvc
Jump back over to the WEBSRV1 endpoint. We need to generate a certificate signing request and send it over
Run the following commands from the WEBSRV1 Terminal to generate a CSR and transfer it to DC1 using SFTP
itlabcenter@WEBSRV1:~$ openssl req -new -newkey rsa:4096 -nodes \
> -keyout websrv1.key \
> -out websrv1.csr \
> -subj "/CN=WEBSRV1.itlab.local/O=ITLab/C=US" \
> -addext "subjectAltName = DNS:WEBSRV1.itlab.local,DNS:WEBSRV1"
itlabcenter@WEBSRV1:~$ sftp Administrator@DC1
sftp> put websrv1.csr
Resulting Output:
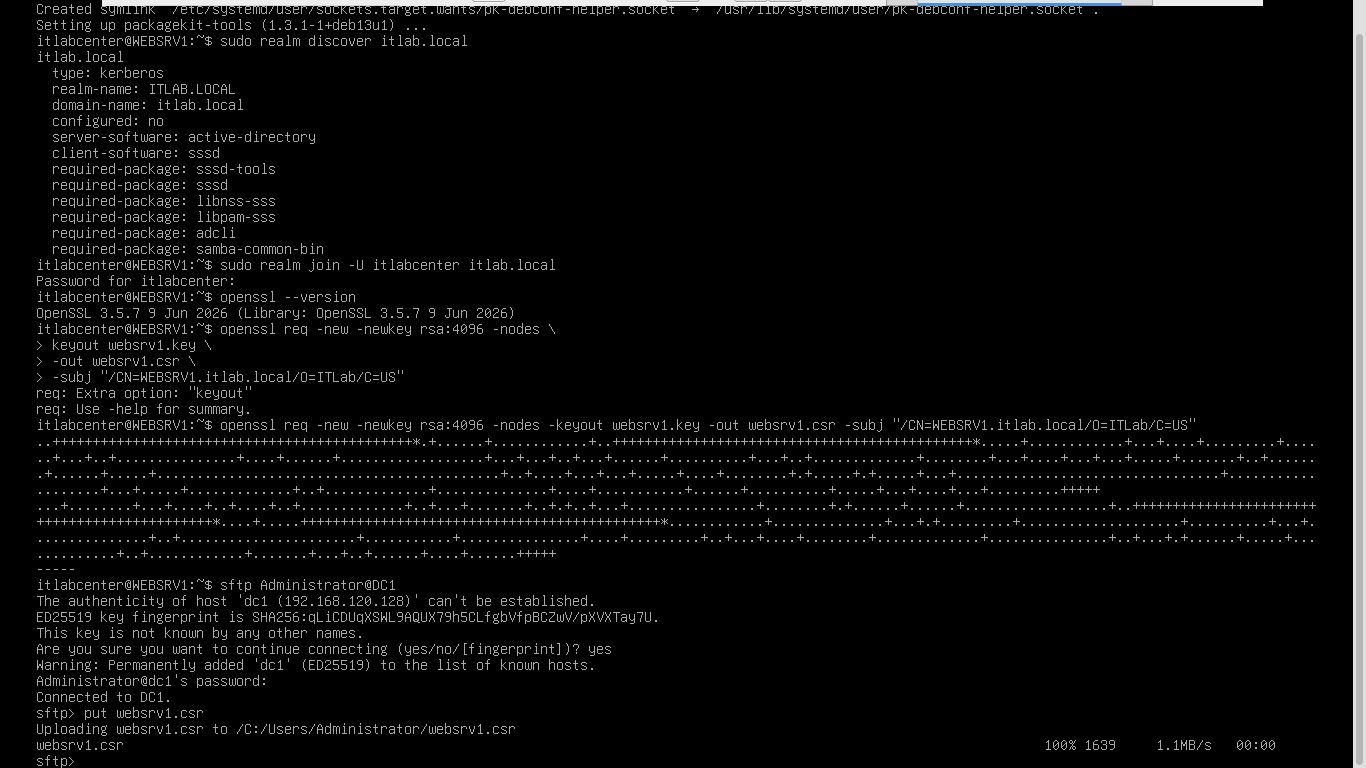
Run the following command from the DC1 Administrator PowerShell to process the CSR and provide an SSL cert
PS C:\WINDOWS\system32> sftp Administrator@DC1
sftp> get websrv1.csr
sftp> exit
PS C:\WINDOWS\system32> certreq -submit -attrib "CertificateTemplate:WebServer" .\websrv1.csr .\websrv1.cer
PS C:\WINDOWS\system32> sftp Administrator@DC1
sftp> rm websrv1.csr
sftp> put websrv1.cer
sftp> exit
You will be asked which CA Certificate to use. Select the ITLAB-ROOT-CA certificate we created earlier
Run the following commands from the WEBSRV1 Terminal to grab the certificate again and clean up the share
sftp> get websrv1.cer
sftp> rm websrv1.cer
sftp> exit
Run the following commands from the DC1 Administrator PowerShell to cleanup the SFTP fire sharing setup
PS C:\WINDOWS\system32> Set-NetFirewallRule -Name *OpenSSH-Server* -Profile Domain, Private -Enabled False
PS C:\WINDOWS\system32> Stop-Service sshd
PS C:\WINDOWS\system32> Remove-WindowsCapability -Online -Name OpenSSH.Server~~~~0.0.1.0
PS C:\WINDOWS\system32> certutil -setreg policy\EditFlags -EDITF_ATTRIBUTESUBJECTALTNAME2
PS C:\WINDOWS\system32> Restart-Service certsvc
Next we will install PHP to manage the web applications backend. This will allow for us to create a secure
log in page for our employees to enter their credentials, since PHP, unlike HTML, isn't sent to the browser
Run the following commands from the WEBSRV1 Terminal to install and enable the PHP FastCGI Process Manager
itlabcenter@WEBSRV1:~$ sudo apt-get install php8.4-fpm -y
itlabcenter@WEBSRV1:~$ sudo systemctl enable php8.4-fpm --now
Now for the final deployment. Let's put this certificate to use by deploying the company portal web app
For this we will be using the NGINX web server and configuring it to provide Strict-Transport-Security
This means that any attempt to connect to basic HTTP will be forced into an HTTPS session the first packet
This follows the principles of Zero-Trust and prevents common attcaks suck as ssl stripping as well as MITM
Run the following commands from the WEBSRV1 Terminal to install NGINX and configure the web application
itlabcenter@WEBSRV1:~$ sudo apt-get install nginx -y
itlabcenter@WEBSRV1:~$ sudo tee /etc/nginx/sites-available/default > /dev/null << 'EOF'
> server {
> listen 80;
> server_name WEBSRV1.itlab.local;
> return 301 https://WEBSRV1.itlab.local;
> }
> server {
> listen 443 ssl;
> server_name WEBSRV1.itlab.local;
> ssl_certificate /etc/nginx/ssl/websrv1.crt;
> ssl_certificate_key /etc/nginx/ssl/websrv1.key;
> ssl_protocols TLSv1.2 TLSv1.3;
> ssl_ciphers HIGH:!aNULL:!MD5;
> add_header Strict-Transport_Security "max-age=31536000; includeSubDomains" always;
> root /var/www/html;
> index index.php;
> location / {
> try_files $uri $uri/ =404;
> }
> location ~ \.php$ {
> include snippets/fastcgi-php.conf
> fastcgi_pass unix:/var/run/php/php8.4-fpm.sock;
> }
> }
> EOF
Run the following commands from the WEBSRV1 Terminal to import the certificate and key and test the config
itlabcenter@WEBSRV1:~$ sudo mkdir /etc/nginx/ssl
itlabcenter@WEBSRV1:~$ sudo cp websrv1.cer /etc/nginx/ssl/websrv1.crt
itlabcenter@WEBSRV1:~$ sudo cp websrv1.key /etc/nginx/ssl/websrv1.key
itlabcenter@WEBSRV1:~$ sudo chmod 600 /etc/nginx/ssl/websrv1.key
itlabcenter@WEBSRV1:~$ sudo rm web*
itlabcenter@WEBSRV1:~$ sudo nginx -t
Resulting Output:
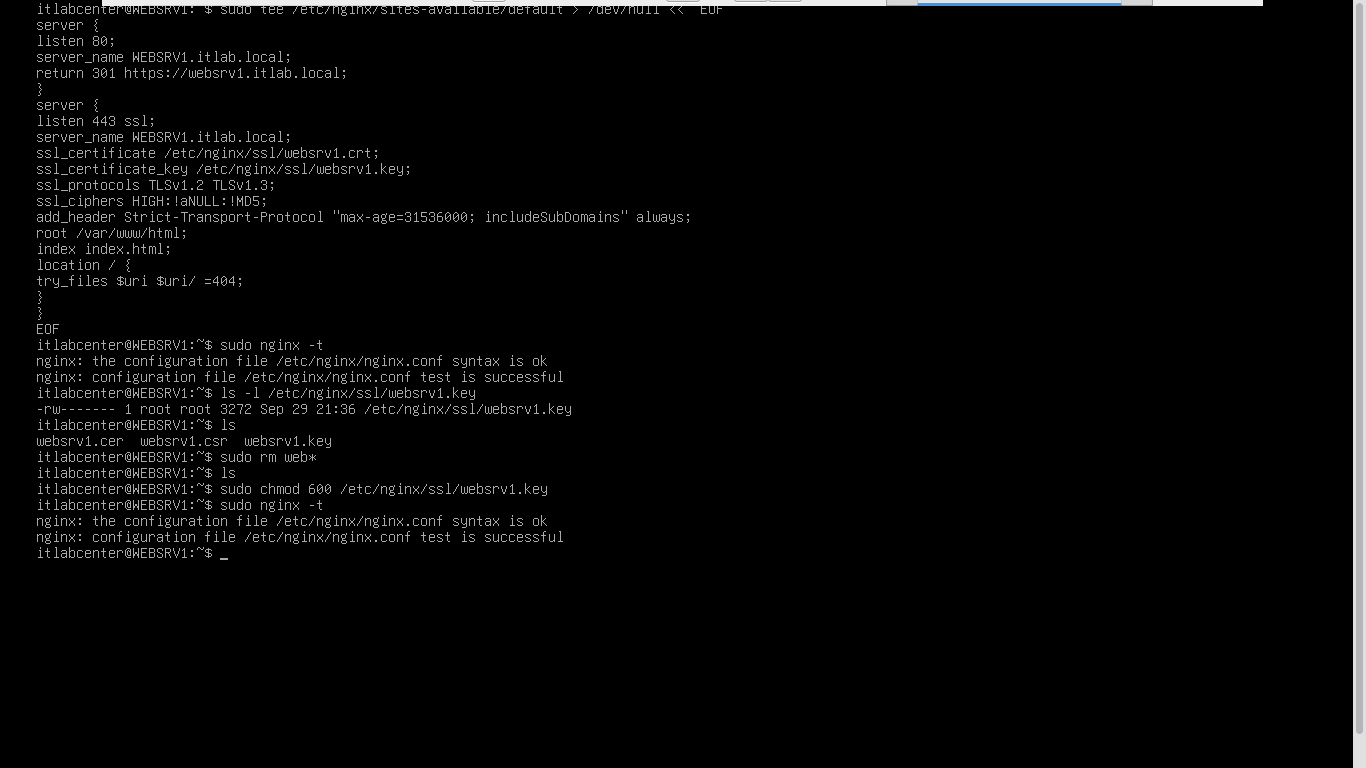
Run the following commands from the WEBSRV1 Terminal to create our internal company portal HTML web page
itlabcenter@WEBSRV1:~$ sudo tee /var/www/html/index.php > /dev/null << 'EOF'
> <!DOCTYPE html>
> <html lang="en">
> <head>
> <meta charset="UTF-8">
> <meta name="viewport" content="width=device-width, initial-scale=1.0">
> <title>ITLab.Center | Employee Portal</title>
> <style>
> body {
> margin: 0; font-family: system-ui, -apple-system, sans-serif;
> background: #0f172a; color: #f8fafc; display: flex;
> align-items: center; justify-content: center; height: 100vh;
> }
> .container {
> text-align: center; background: #1e293b; padding: 3rem;
> border-radius: 12px; box-shadow: 0 10px 25px rgba(0,0,0,0.5);
> width: 85%; max-width: 450px; border: 1px solid #334155;
> }
> h1 { margin: 0 0 0.5rem 0; color: #38bdf8; letter-spacing: 1px; }
> p { color: #94a3b8; margin-bottom: 2rem; font-size: 0.95rem; }
> .form-group { margin-bottom: 1.5rem; text-align: left; }
> label { display: block; margin-bottom: 0.5rem; color: #cbd5e1; font-size: 0.9rem; }
> input {
> width: 100%; padding: 0.75rem; border-radius: 6px;
> border-sizing: border-box; font-size: 1rem;
> }
> input:focus { outline: none; border-color: #38bdf8; }
> button {
> width: 100%; padding: 0.75rem; border-radius: 6px;
> border: none; background: #38bdf8; color: #0f172a;
> font-weight: bold; font-size: 1rem; cursor: pointer;
> transition: background 0.2s;
> }
> button:hover { background: #0ea5e9; }
> </style>
> </head>
> <body>
> <div class="container">
> <h1>ITLab.Center</h1>
> <p>Employee Portal</p>
> <form action="authenticate.php" method="POST">
> <div class="form-group">
> <label for="username">Username</label>
> <input type="text" id="username" name="username" required autocomplete="off">
> </div>
> <div class="form-group">
> <label for="password">Password</label>
> <input type="password" id="password" name="password" required>
> </div>
> <button type="submit">Secure Login</button>
> </form>
> </div>
> </body>
> </html>
> EOF
itlabcenter@WEBSRV1:~$ sudo tee /var/www/html/landing.php > /dev/null << 'EOF'
> <!DOCTYPE html>
> <html lang="en">
> <head>
> <meta charset="UTF-8">
> <meta name="viewport" content="width=device-width, initial-scale=1.0">
> <title>ITLab.Center | Employee Portal</title>
> <style>
> body {
> margin: 0; font-family: system-ui, -apple-system, sans-serif;
> background: #0f172a; color: #f8fafc; display: flex;
> align-items: center; justify-content: center; height: 100vh;
> }
> .container {
> text-align: center; background: #1e293b; padding: 3rem;
> border-radius: 12px; box-shadow: 0 10px 25px rgba(0,0,0,0.5);
> width: 85%; max-width: 450px; border: 1px solid #334155;
> }
> h1 { margin: 0 0 0.5rem 0; color: #38bdf8; letter-spacing: 1px; }
> p { color: #94a3b8; margin-bottom: 2rem; font-size: 0.95rem; }
> </style>
> </head>
> <body>
> <div class="container">
> <h1>ITLab.Center</h1>
> <p>Employee Portal</p>
> <p>Welcome PLACEHOLDER</p>
> </div>
> </body>
> </html>
itlabcenter@WEBSRV1:~$ sudo tee /var/www/html/authenticate.php > /dev/null << 'EOF'
> <?php
> $valid_credentials = [
> "admin" => "SuperSecretAdmin2026!",
> "jorkis" => "Password123!",
> "guest" => "GuestAccess"
> ];
> if ($_SERVER["REQUEST_METHOD"] == "POST") {
> $username = $_POST['username'];
> $password = $_POST['password'];
> $client_ip = $_SERVER['REMOTE_ADDR'];
> $time = date("M d H:i:s");
> $host = gethostname();
> if (array_key_exists($username, $valid_credentials) && $valid_credentials[$username] === $password) {
> $log_message = "$time $host custom-webapp: ITLAB ALERT: Success Web Application Login - Username: [$username] - IP Address: [$client_ip]\n";
> error_log($log_message, 3, "/var/log/nginx/webapp_auth.log");
> $contents = file_get_contents("landing.php");
> $redirect = str_replace("PLACEHOLDER", $username, $contents);
> echo $redirect;
> } else {
> $log_message = "$time $host custom-webapp: ITLAB ALERT: Failed Web Application Login - Username: [$username] - IP Address: [$client_ip]\n";
> error_log($log_message, 3, "/var/log/nginx/webapp_auth.log");
> echo "<script>alert('Invalid credentials.'); window.location.href='index.php';</script>";
> }
> } else {
> header("Location: index.php");
> exit();
> }
> ?>
> EOF
itlabcenter@WEBSRV1:~$ sudo nginx -t
itlabcenter@WEBSRV1:~$ sudo systemctl reload nginx
The web server is now deployed. Head back over to DESKTOP1 and navigate to https://websrv1 in the browser
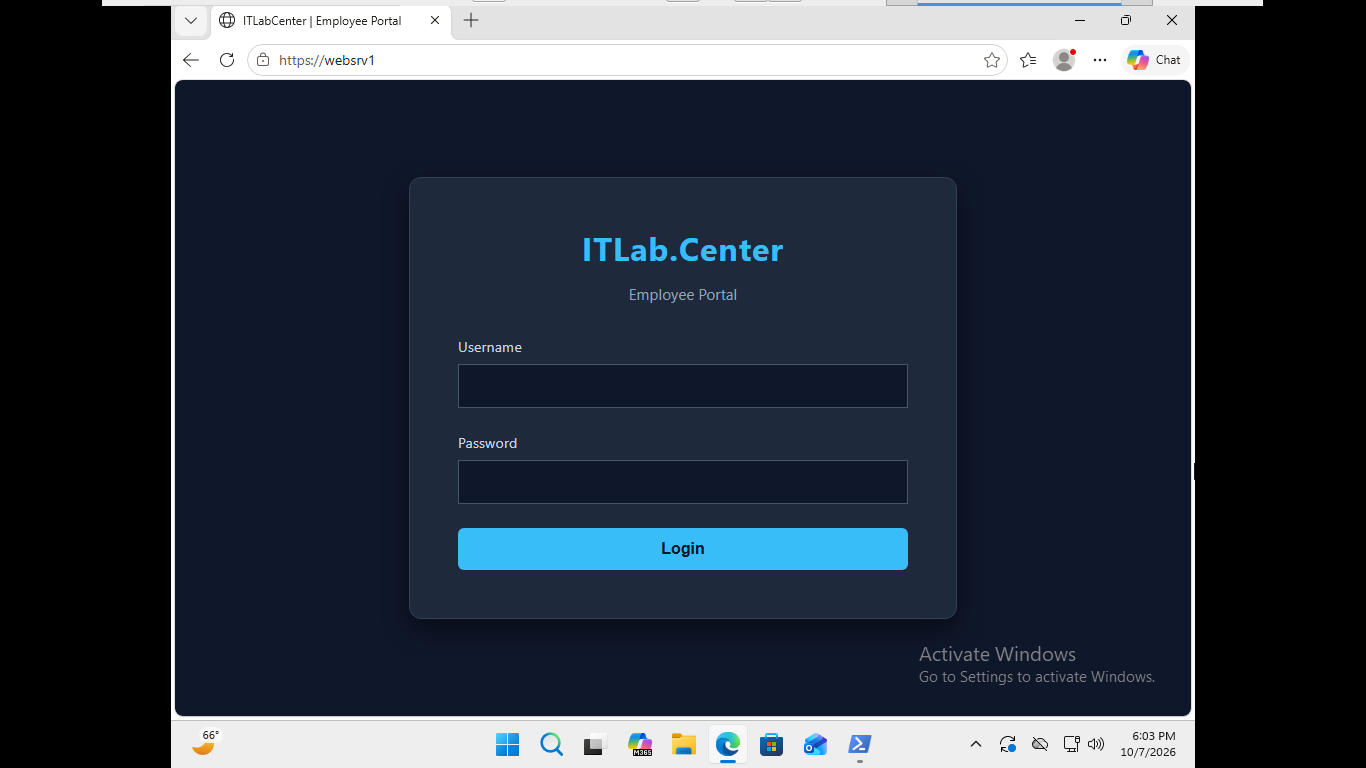
We can see that the connection is secured and the certificate is trusted. Now we can begin the SIEM config
6. Wazuh SIEM & EDR Deployment
Deploying a unified Wazuh infrastructure requires a central manager to ingest data, and individual agents
deployed across our endpoints to collect it. Because we are dedicating a seperate Debian Linux host to the
SIEM, we will use the all-in-one deployement model, which installs the Wazuh Indexer, Server and Dashboard

Within VMWare Workstation Pro, navigate to the WAZUHSRV1 virtual machine and boot it up for the first time
You will need to unlock the LVM encryption using the password you made earlier, once unlocked log into root
Run the following commands from the WAZUHSRV1 Terminal to configure the network using a static IP address
root@WAZUHSRV1:~# IFACE=$(ip link show | awk -F': ' '/state/ && !/lo/ {print $2; exit}')
root@WAZUHSRV1:~# tee /etc/network/interfaces > /dev/null << EOF
> source /etc/network/interfaces.d/*
> auto lo
> iface lo inet loopback
> allow-hotplug $IFACE
> iface $IFACE inet static
> address 192.168.120.150
> netmask 255.255.255.0
> gateway 192.168.120.2
> EOF
root@WAZUHSRV1:~# echo "nameserver 192.168.120.128" > /etc/resolv.conf
root@WAZUHSRV1:~# echo "search itlab.local" >> /etc/resolv.conf
root@WAZUHSRV1:~# systemctl restart networking
root@WAZUHSRV1:~# ping -c 3 8.8.8.8
root@WAZUHSRV1:~# ping -c 3 DC1
root@WAZUHSRV1:~# ping -c 3 DESKTOP1
root@WAZUHSRV1:~# ping -c 3 debian.org
Run the following commands from the WAZUHSRV1 Terminal to configure the mirrors and update the package list
root@WAZUHSRV1:~# cat << 'EOF' > /etc/apt/source.list
> deb https://deb.debian.org/debian/ stable main contrib non-free non-free-firmware
> deb https://security.debian.org/debian-security stable-security main contrib non-free non-free-firmware
> deb https://deb.debian.org/debian/ stable-updates main contrib non-free non-free-firmware
> EOF
root@WAZUHSRV1:~# apt update
root@WAZUHSRV1:~# apt upgrade -y
root@WAZUHSRV1:~# apt-get full-upgrade -y
Run the following commands from the WAZUHSRV1 Terminal to install and configure the sudo package and group
root@WAZUHSRV1:~# apt-get install sudo -y
root@WAZUHSRV1:~# usermod -aG sudo itlabcenter
root@WAZUHSRV1:~# exit
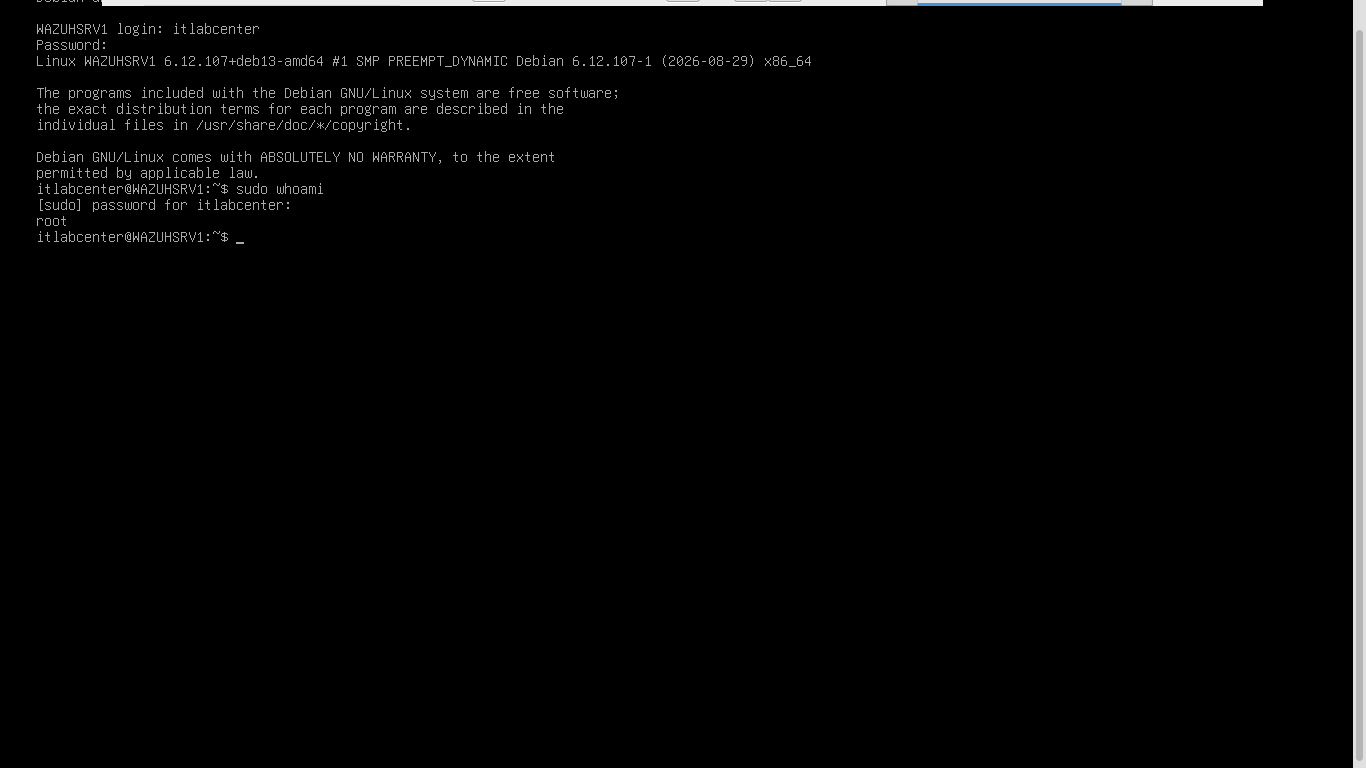
Log back in as the itlabcenter user account and run the following command to test our administrative rights
itlabcenter@WAZUHSRV1:~$ sudo whoami
Resulting Output:
Run the following commands from the WAZUHSRV1 Terminal to sync time, install packages, and join to the domain
itlabcenter@WEBSRV1:~$ sudo tee /etc/systemd/timesyncd.conf > /dev/null << 'EOF'
> [Time]
> NTP=DC1.itlab.local
> EOF
itlabcenter@WEBSRV1:~$ sudo systemctl restart systemd-timesyncd
itlabcenter@WEBSRV1:~$ sudo apt-get install realmd sssd sssd-tools adcli packagekit libnss-sss libpam-sss -y
itlabcenter@WEBSRV1:~$ sudo realm discover itlab.local
itlabcenter@WEBSRV1:~$ sudo realm join -U itlabcenter itlab.local
Run the following command from the WEBSRV1 Terminal to configure our server to update it's dns dynamically
itlabcenter@WEBSRV1:~$ sudo tee -a /etc/sssd/sssd.conf > /dev/null << 'EOF'
> dyndns_update = True
> dyndns_update_ptr = True
> dyndns_refresh_interval = 43200
> dyndns_ttl = 3600
> ad_hostname = WEBSRV1.itlab.local
> EOF
itlabcenter@WEBSRV1:~$ sudo systemctl restart sssd
Head back over to DC1 and within the Active Directory Users and Computers program, refresh Computers:
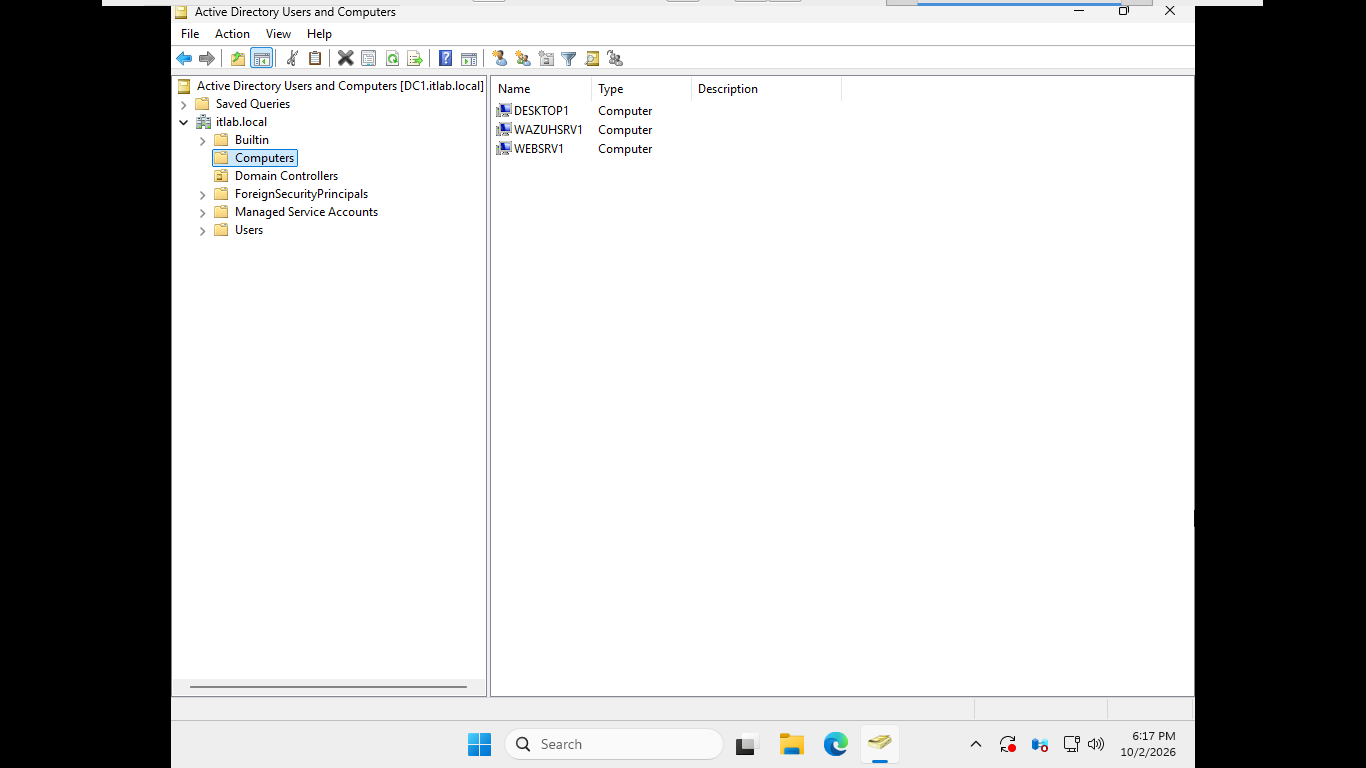
Since we intend to use this server to access the Wazuh dashboard in this lab, we will install the Gnome DE
Run the following commands from the WAZUHSRV1 Terminal to install and setup the Gnome desktop environment
itlabcenter@WAZUHSRV1:~$ sudo apt-get install gnome-core -y
itlabcenter@WAZUHSRV1:~$ sudo systemctl set-default graphical.target
itlabcenter@WAZUHSRV1:~$ sudo reboot
Our system will reboot and prompt you to re-enter the LUKS decryption key. Once completed we reach desktop

Wazuh provides an automated script that handles the repository configuration, dependency installation, and
certificate generation for the core SIEM components. This will make onboarding devices relatively pain free
Run the following commands from the WAZUHSRV1 Terminal to download and run the unattended installation tool
itlabcenter@WAZUHSRV1:~$ sudo apt-get install curl -y
itlabcenter@WAZUHSRV1:~$ curl -sO https://packages.wazuh.com/4.14/wazuh-install.sh
itlabcenter@WAZUHSRV1:~$ sudo mkdir -p /srv/wazuh/indexer-data
itlabcenter@WAZUHSRV1:~$ sudo mkdir -p /srv/wazuh/ossec-data
itlabcenter@WAZUHSRV1:~$ sudo mkdir -p /var/lib/wazuh-indexer
itlabcenter@WAZUHSRV1:~$ sudo mkdir -p /var/ossec
itlabcenter@WAZUHSRV1:~$ sudo tee -a /etc/fstab > /dev/null << 'EOF'
> /srv/wazuh/indexer-data /var/lib/wazuh-indexer none bind 0 0
> /srv/wazuh/ossec-data /var/ossec none bind 0 0
> EOF
itlabcenter@WAZUHSRV1:~$ sudo mount -a && sudo systemctl daemon-reload
itlabcenter@WAZUHSRV1:~$ sudo bash ./wazuh-install.sh -a
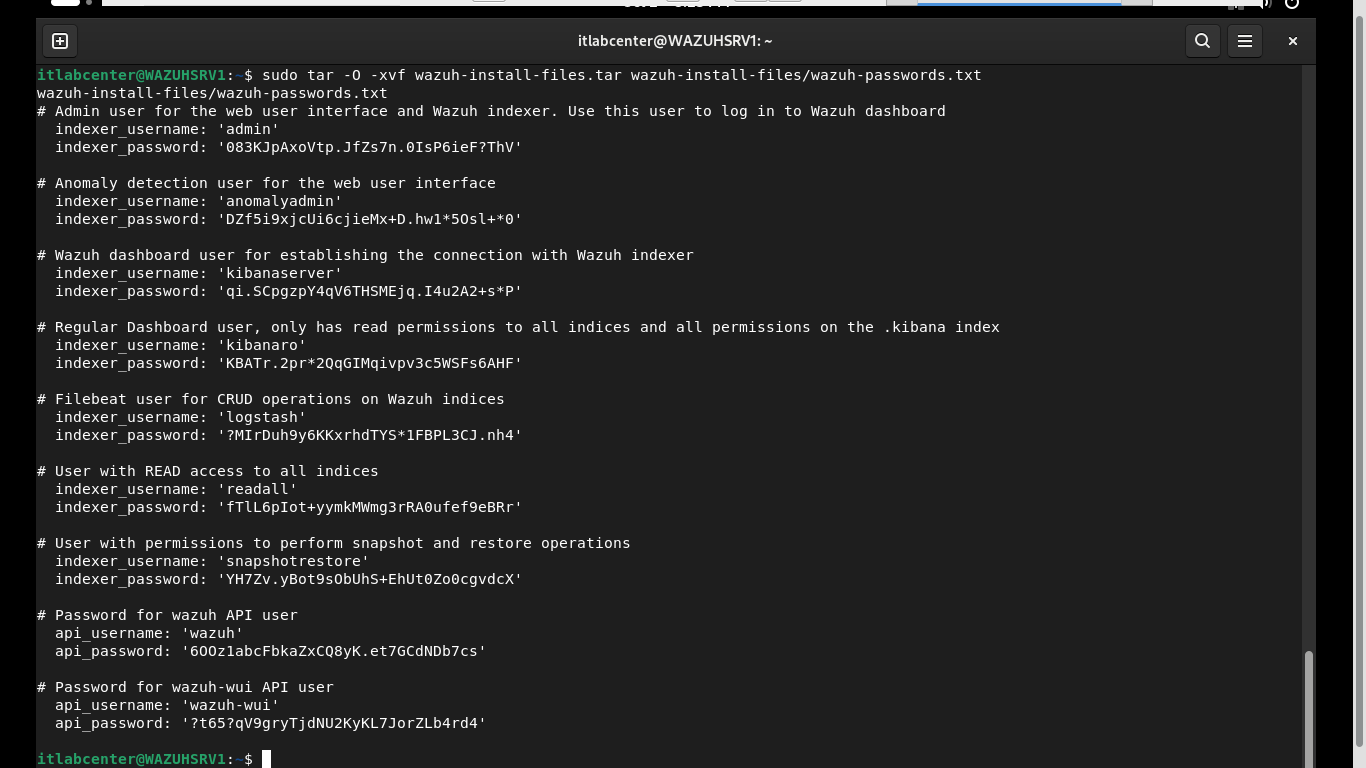
This may take some time to complete. Once the installation finishes, the script generates a small bundle
of randomized passwords. We mus extract them to secure our initial login to the Wazuh SIEM Web Dashboard
Run the following command from the WAZUHSRV1 Terminal to extract the install wizard generated passwords
itlabcenter@WAZUHSRV1:~$ sudo tar -O -xvf wazuh-install-files.tar wazuh-install-files/wazuh-passwords.txt
Resulting Output:
Run the following commands from the WAZUHSRV1 Terminal to install a browser and launch the Wazuh Dashabord
itlabcenter@WAZUHSRV1:~$ sudo apt-get install chromium -y
itlabcenter@WAZUHSRV1:~$ chromium https://localhost
Resulting Output:
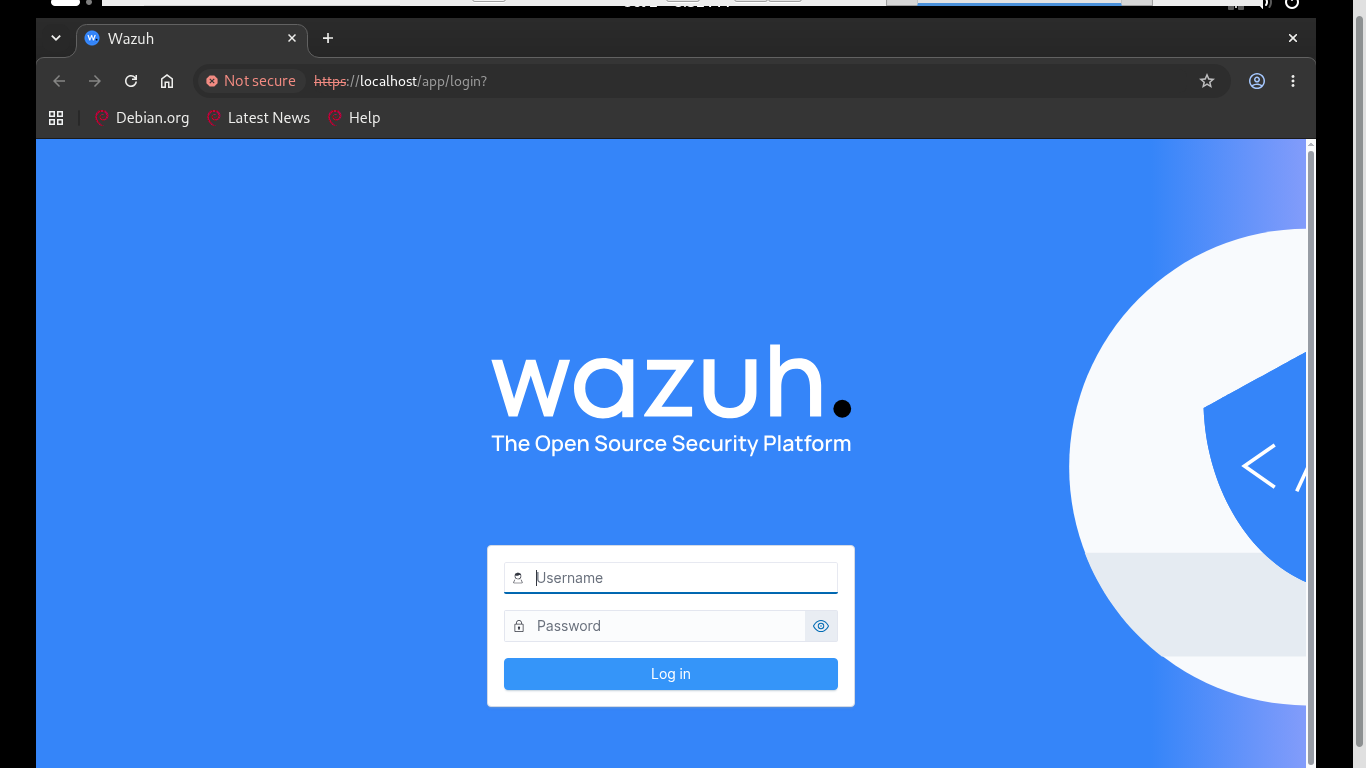
Now that the Wazuh Dashboard is functional, let's lock it down to just this workstation to localhost only
Run the following commands from the WAZUHSRV1 Terminal to configure a host based firewall onthe server
itlabcenter@WAZUHSRV1:~$ sudo apt-get install ufw -y
itlabcenter@WAZUHSRV1:~$ sudo ufw default deny incoming
itlabcenter@WAZUHSRV1:~$ sudo ufw default allow outgoing
itlabcenter@WAZUHSRV1:~$ sudo ufw allow 22/tcp
itlabcenter@WAZUHSRV1:~$ sudo ufw allow 1514/tcp
itlabcenter@WAZUHSRV1:~$ sudo ufw allow 1515/tcp
itlabcenter@WAZUHSRV1:~$ sudo ufw allow from 127.0.0.1 to any port 443
itlabcenter@WAZUHSRV1:~$ sudo ufw enable
itlabcenter@WAZUHSRV1:~$ sudo ufw status verbose
Resulting Output:
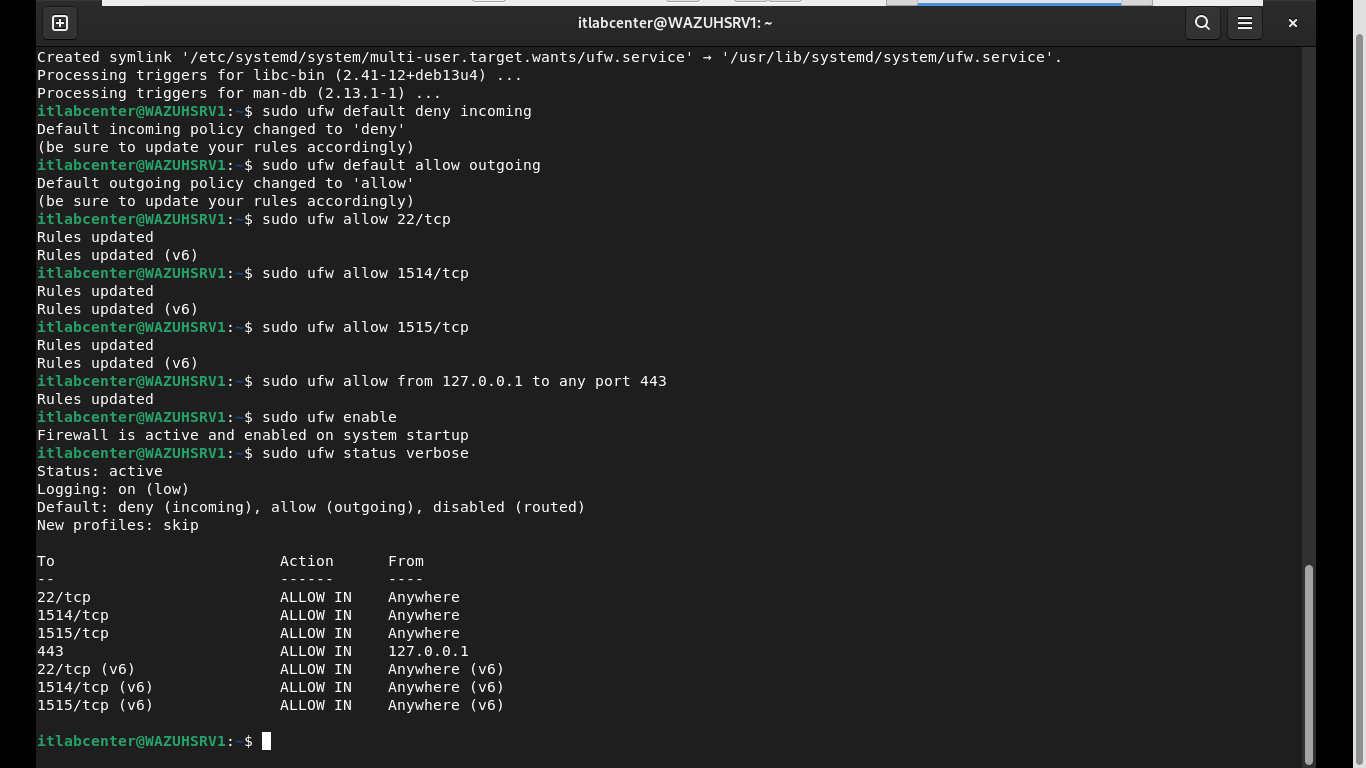
Now the Wazuh Dashboard interface can only be accessed from this server and is not available otherwise
Head back to the Wazuh login screen and sign in with the admin credentials we generated a bit earlier
Since this is our first time logging in, the platform will perform a few checks, then open the dashboard
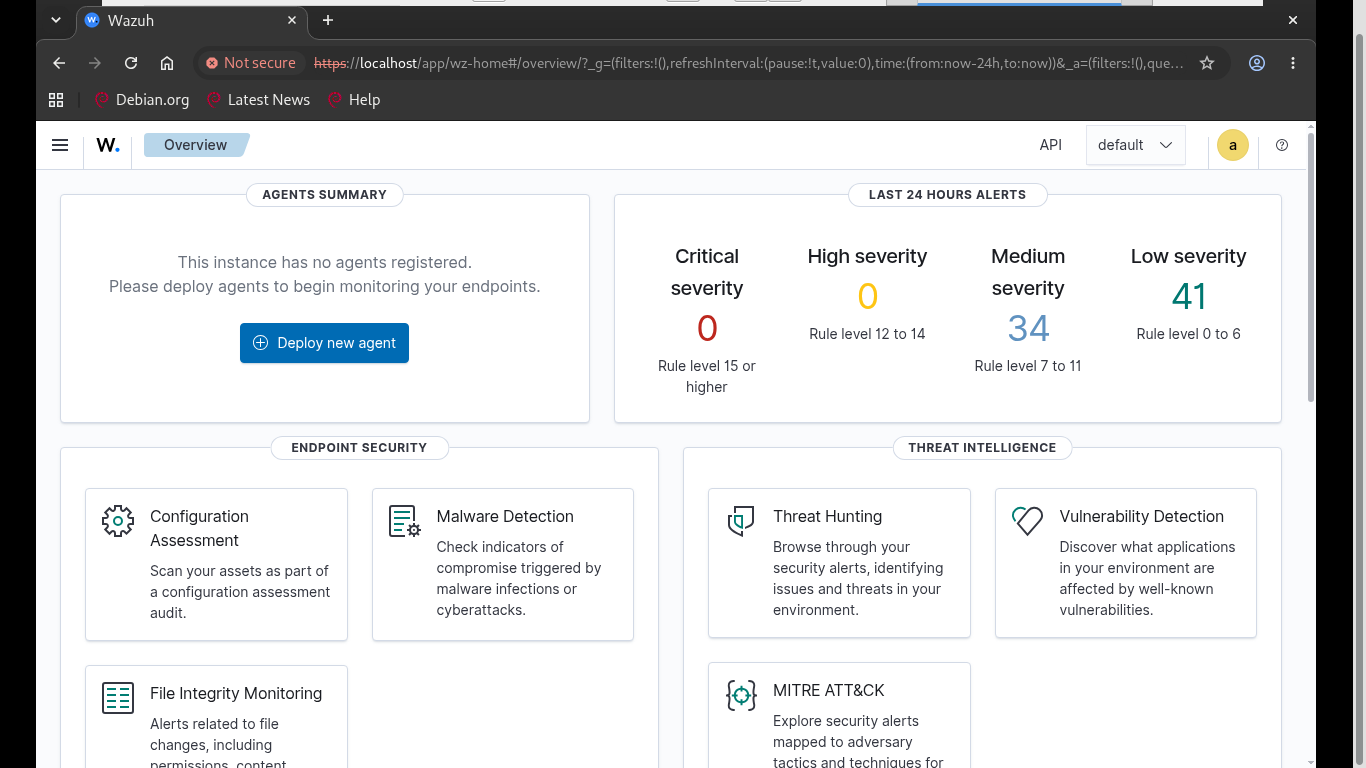
We can see that already we are receiving some alerts, which must be for the server itself since our other
devices are not yet onboarded into Wazuh. Click on the Medium alerts section to view the recorded alerts
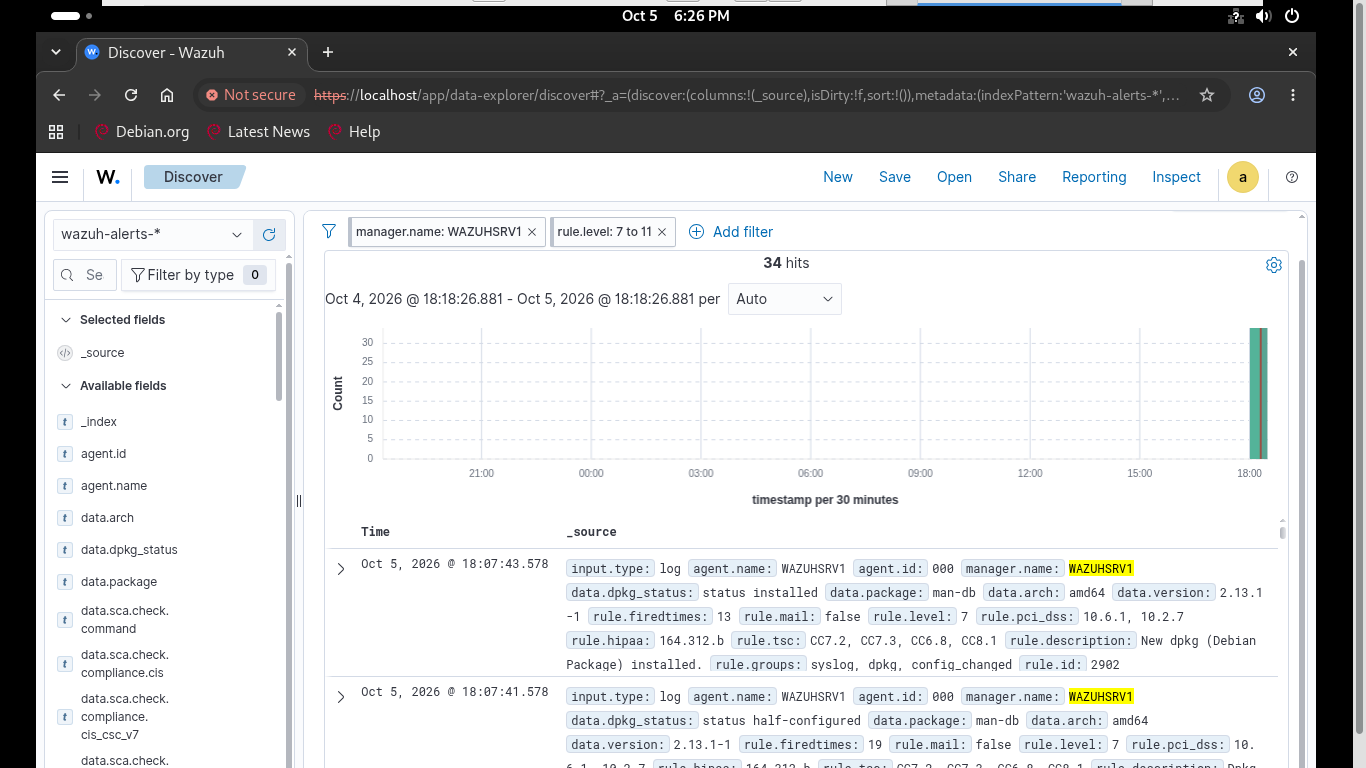
The SIEM is alerting that a new Debian package was installed. Which makes sense since we install the ufw.
Looking at the low alerts will show similar expected actions such as the use of sudo or session expiration
While we could tune these out, standard practice is to ignore expected actions and let them age out of view
Let's move onto onboarding our endpoints into the Wazuh SIEM. Head back over to the DESKTOP1 Windows 11 VM
Run the following commands from the DESKTOP1 Administrator PowerShell to onboard the endpoint to Wazuh SIEM
PS C:\WINDOWS\system32> Invoke-WebRequest -Uri "https://packages.wazuh.com/4.x/windows/wazuh-agent-4.14.8-1.msi" -OutFile "$env:TEMP\wazuh-agent.msi"
PS C:\WINDOWS\system32> msiexec.exe /i "$env:TEMP\wazuh-agent.msi" /q WAZUH_MANAGER="WAZUHSRV1" WAZUH_REGISTRATION_SERVER="WAZUHSRV1"
PS C:\WINDOWS\system32> Start-Service -Name "WazuhSvc"
Now head back to our WAZUHSRV1 and from the home page, navigate to Configuration Assessment > Inventory
and select the Select Agent option. The DESKTOP1 device may be listed as pending but will turn to active
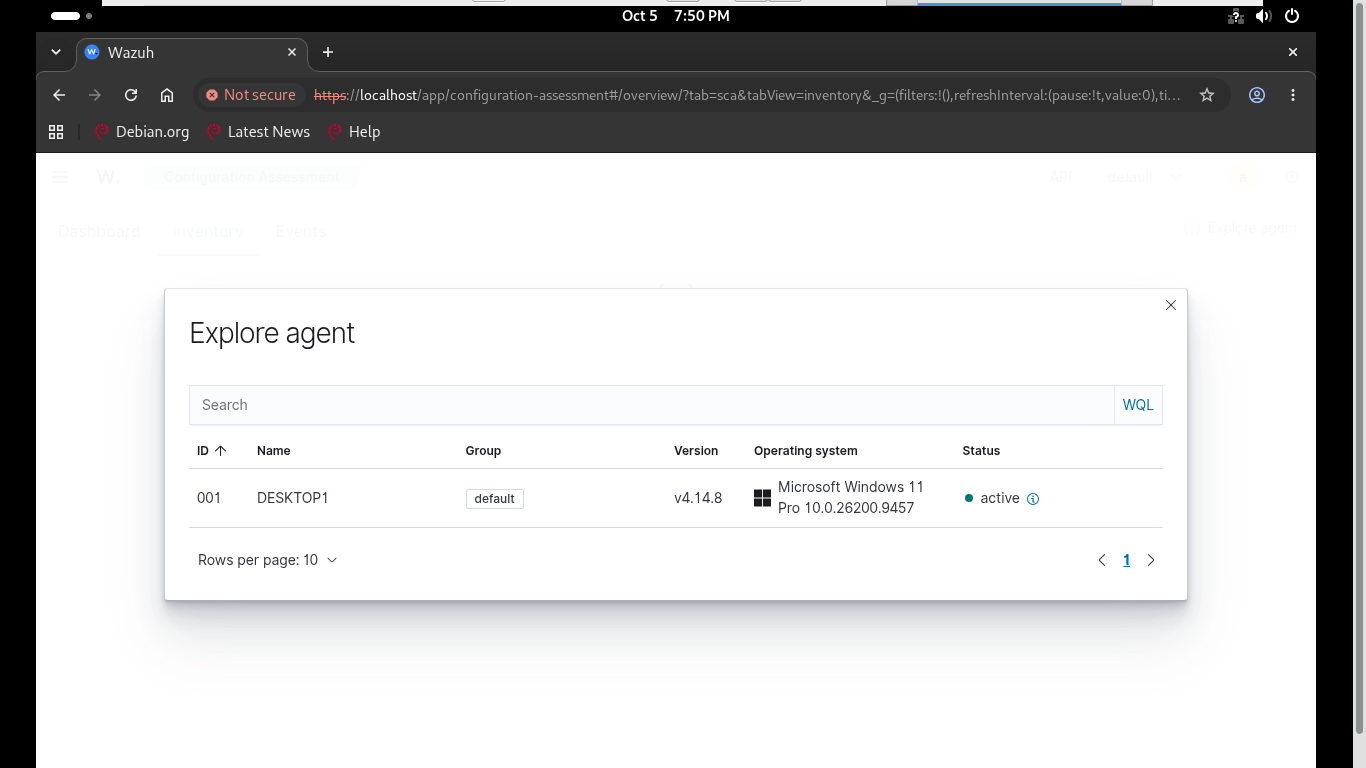
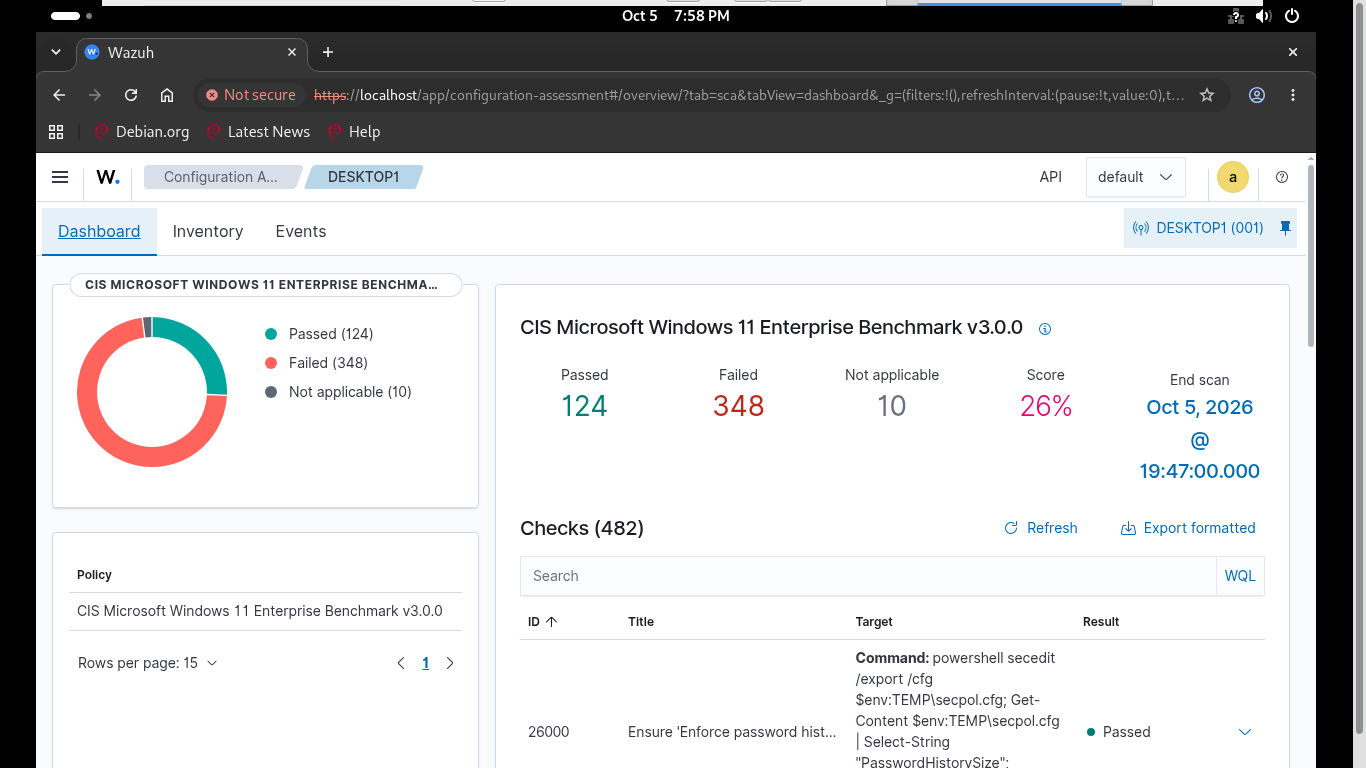
Click on the DESKTOP1 device name, then navigate back to Deashboard to view the endpoints CIS Benchmark
security assessment. The Center for Internet Security tests windows endpoints on a variety of security
controls to provide an overall security posture score and recommendations for reducing attack surface
Run the following commands from the DC1 Administrator PowerShell to onboard the server into the Wazuh SIEM
PS C:\WINDOWS\system32> Invoke-WebRequest -Uri "https://packages.wazuh.com/4.x/windows/wazuh-agent-4.14.8-1.msi" -OutFile "$env:TEMP\wazuh-agent.msi"
PS C:\WINDOWS\system32> msiexec.exe /i "$env:TEMP\wazuh-agent.msi" /q WAZUH_MANAGER="WAZUHSRV1" WAZUH_REGISTRATION_SERVER="WAZUHSRV1"
PS C:\WINDOWS\system32> Start-Service -Name "WazuhSvc"
Head back to our WAZUHSRV1 and unpin the DESKTOP1 from the upper-right hand corner. Then hit explore agent
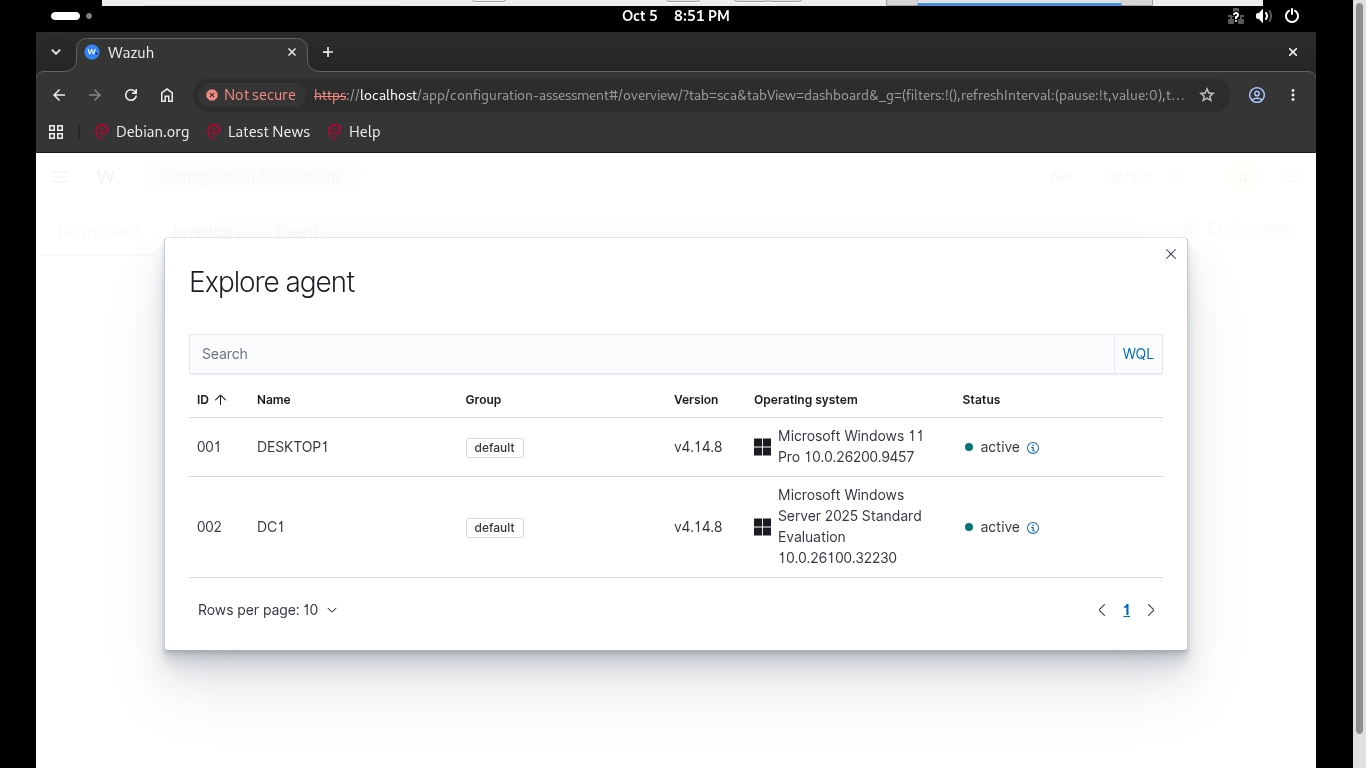
Now we will head back over to the web server to onboard it into the Wazuh SIEM as well using a repository
Run the following commands from the WEBSRV1 Terminal to onboard the Debian Linux endpoint into Wazuh SIEM
itlabcenter@WEBSRV1:~$ sudo apt-get install curl gpg -y
itlabcenter@WEBSRV1:~$ curl -s https://packages.wazuh.com/key/GPG-KEY-WAZUH | sudo gpg --no-default-keyring --keyring gnupg-ring:/usr/share/keyrings/wazuh.gpg --import
itlabcenter@WEBSRV1:~$ sudo chmod 644 /usr/share/keyrings/wazuh.gpg
itlabcenter@WEBSRV1:~$ echo "deb [signed-by=/usr/share/keyrings/wazuh.gpg] https://packages.wazuh.com/4.x/apt/ stable main" | sudo tee /etc/apt/sources.list.d/wazuh.list
itlabcenter@WEBSRV1:~$ sudo apt-get update
itlabcenter@WEBSRV1:~$ sudo WAZUH_MANAGER="WAZUHSRV1" apt-get install wazuh-agent
itlabcenter@WEBSRV1:~$ sudo systemctl daemon-reload
itlabcenter@WEBSRV1:~$ sudo systemctl enable wazuh-agent
itlabcenter@WEBSRV`:~$ sudo systemctl start wazuh-agent
Head back to our WAZUHSRV1 and refresh the available agents page to see all devices have been onboarded
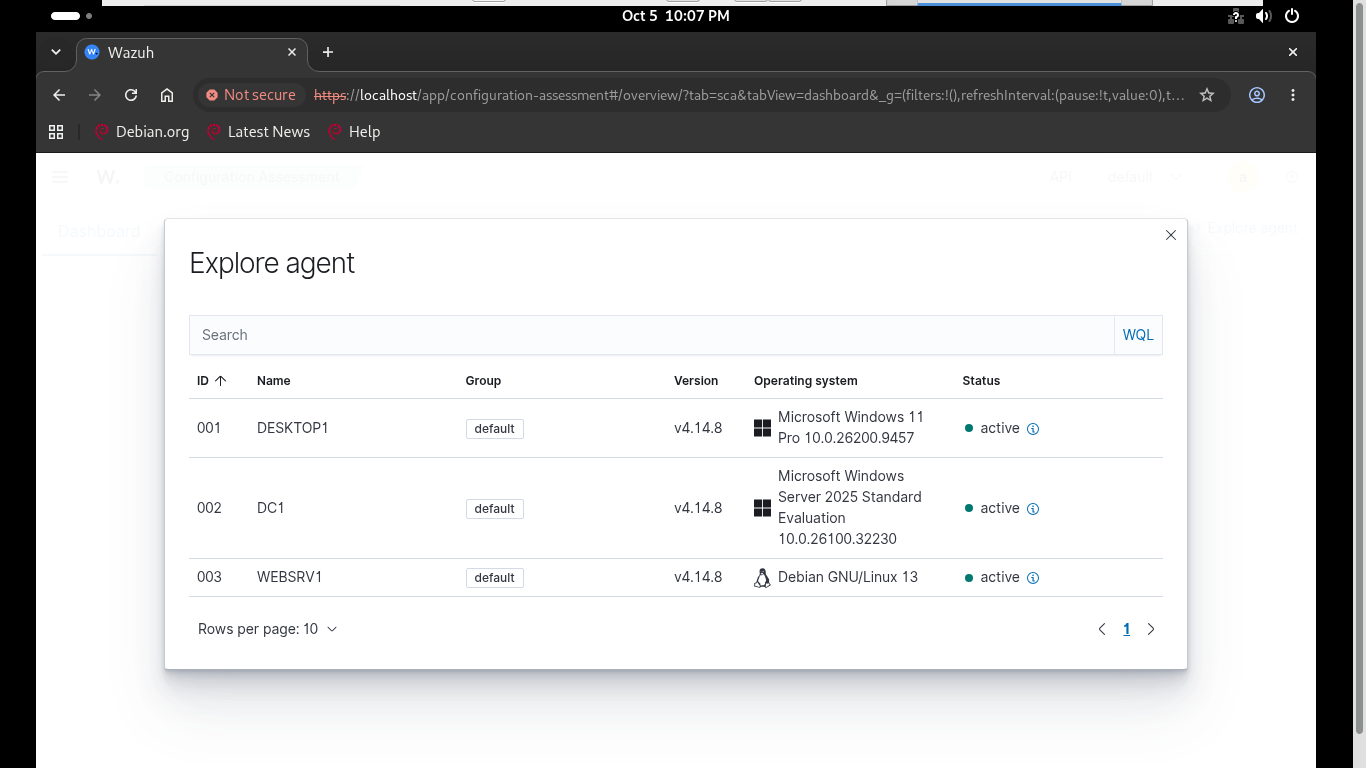
Now that we have both an enterprise network, and the Wazuh SIEM + EDR deployed, let's get hands on with it
7. Explore Wazuh SIEM
In this next lesson, you will apply what you have learned so far to explore the Wazuh SIEM, analyze log
events, and focus your analysis using search and filters. You will then simulate an attack and use Wazuh
to analyze the log events generated by the attack. Head back into the Wazuh Dashboard and ensure that you
are logged in with the admin account. Once logged in you will arrive at the updated homepage for Wazuh
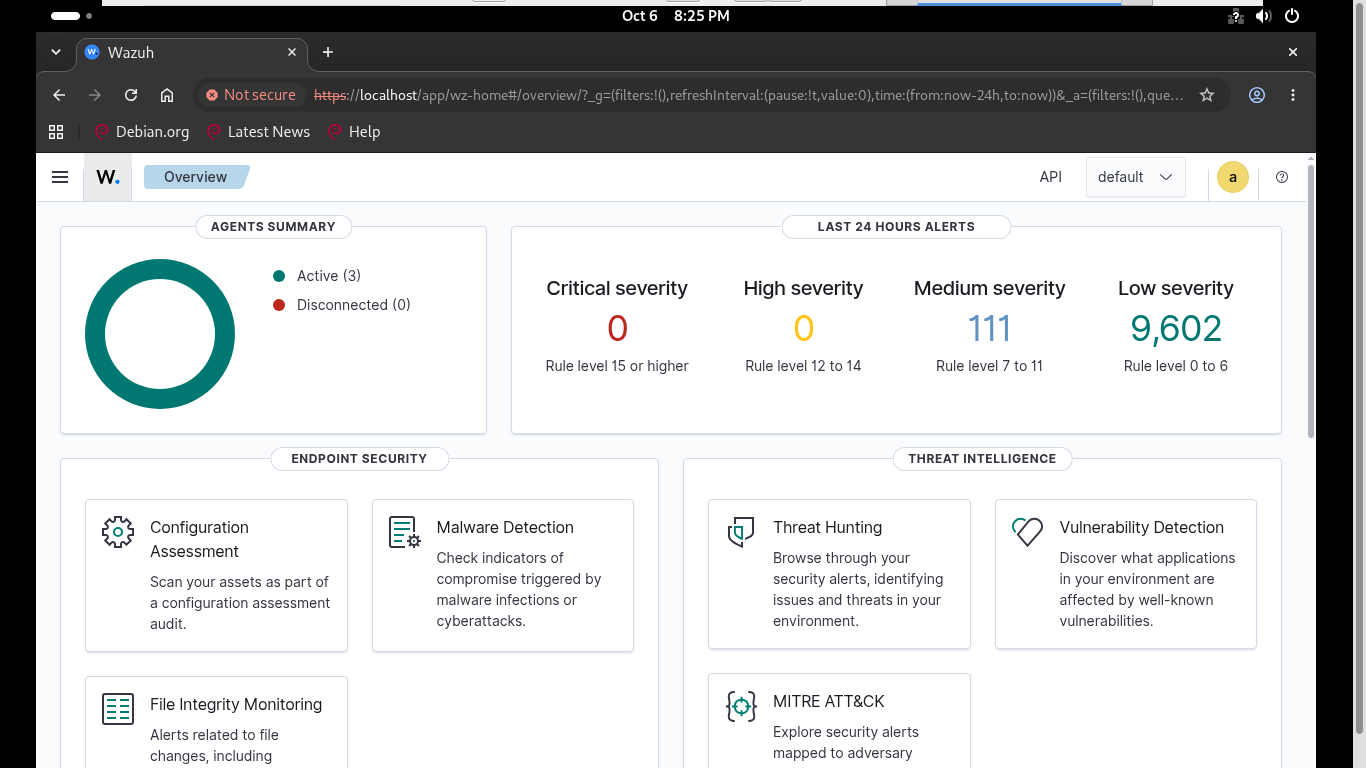
Here we can see again that all three of our devices are onboarded to Wazuh. There is actually a secret 4th
device onboarded, the server itself, which is automatically onboarded during installation to ensure that
the host system is monitored as well. Under the Threat Intelligence section, navigate to Threat Hunting:
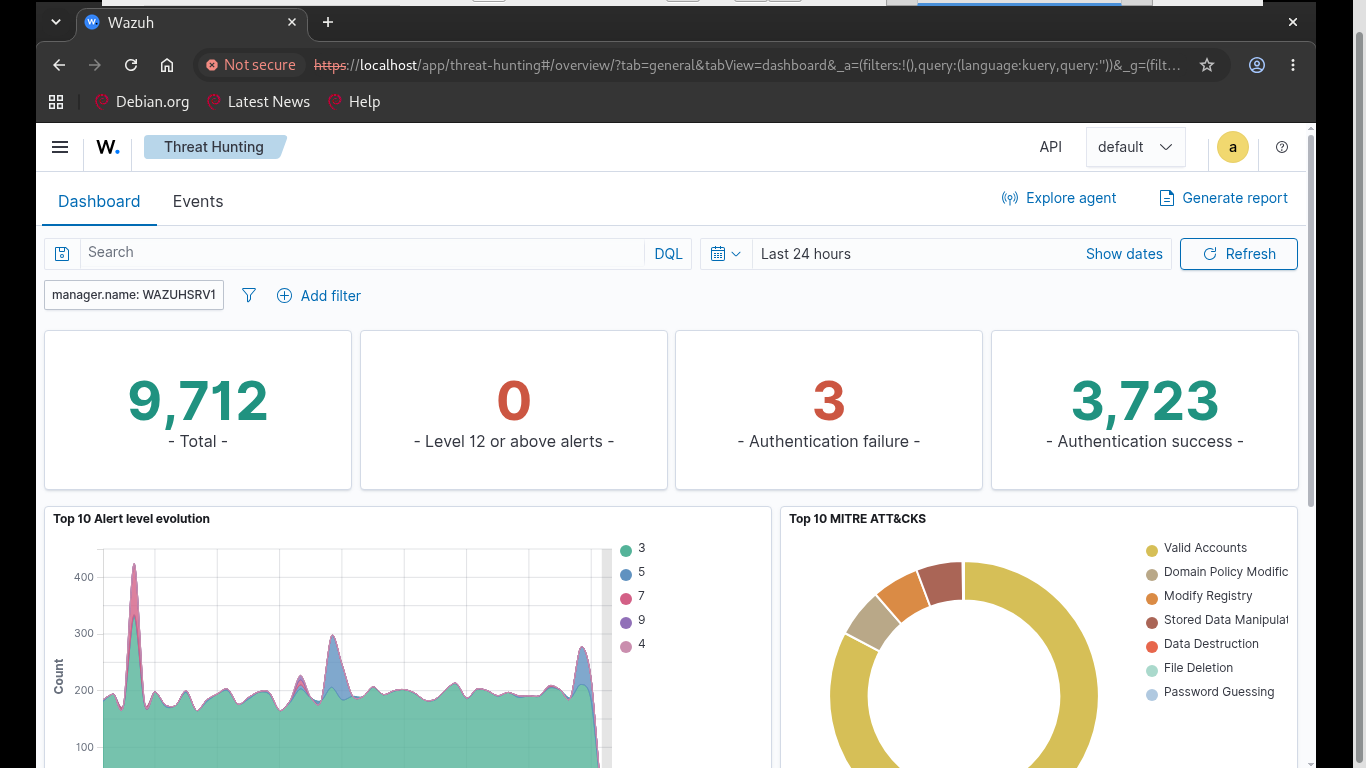
This brings us to the Threat Hunting Dashboard, were an overview of detected alerts is displayed. In the
date range section at the top-right hand corner of the screen, click Last 24 hours, converting it to ~ a
day ago -> now, then click ~ a day ago to oset the beginning of the date range filter. Click the Absolute
tab and set the Start Date to the earliest available. Then click Update to display the full view of alerts
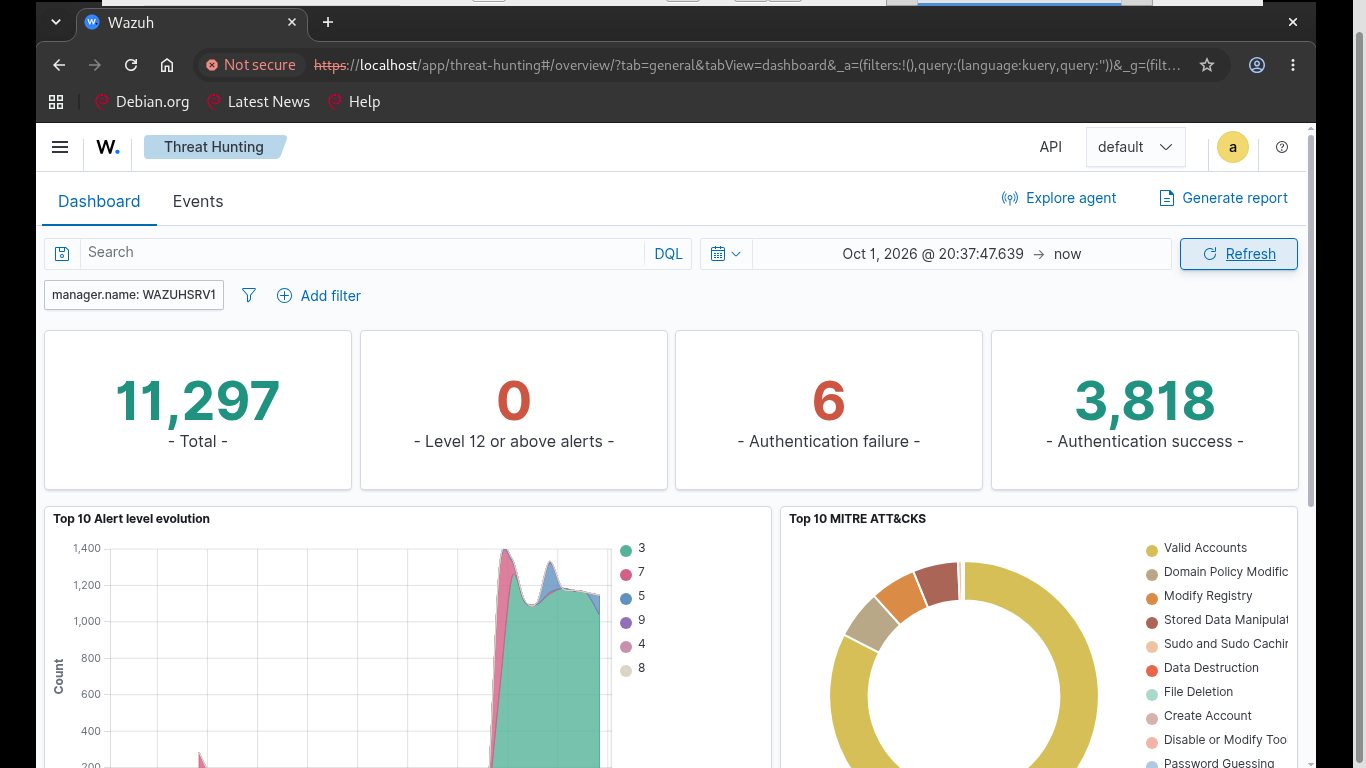
Since we just installed Wazuh, it has not yet been tuned. As you can see the detections can be extremely
sensitive, showing over 11,000 alerts for us. Review the Alert Level Ecolution chart in the data graphs
This chart shows that there are level 3 through level 9 events. Bu default, events are rated from 1 to 13
with 123 being the most serious. Notice that all the events are tightly clustered into a short timeframe
Navigate to the Events tab at the top-left hand corner of the screen and scroll to the bottom. Here the
security events are displayed in chronilogical order, newest first. Notice there are 667 pages of events
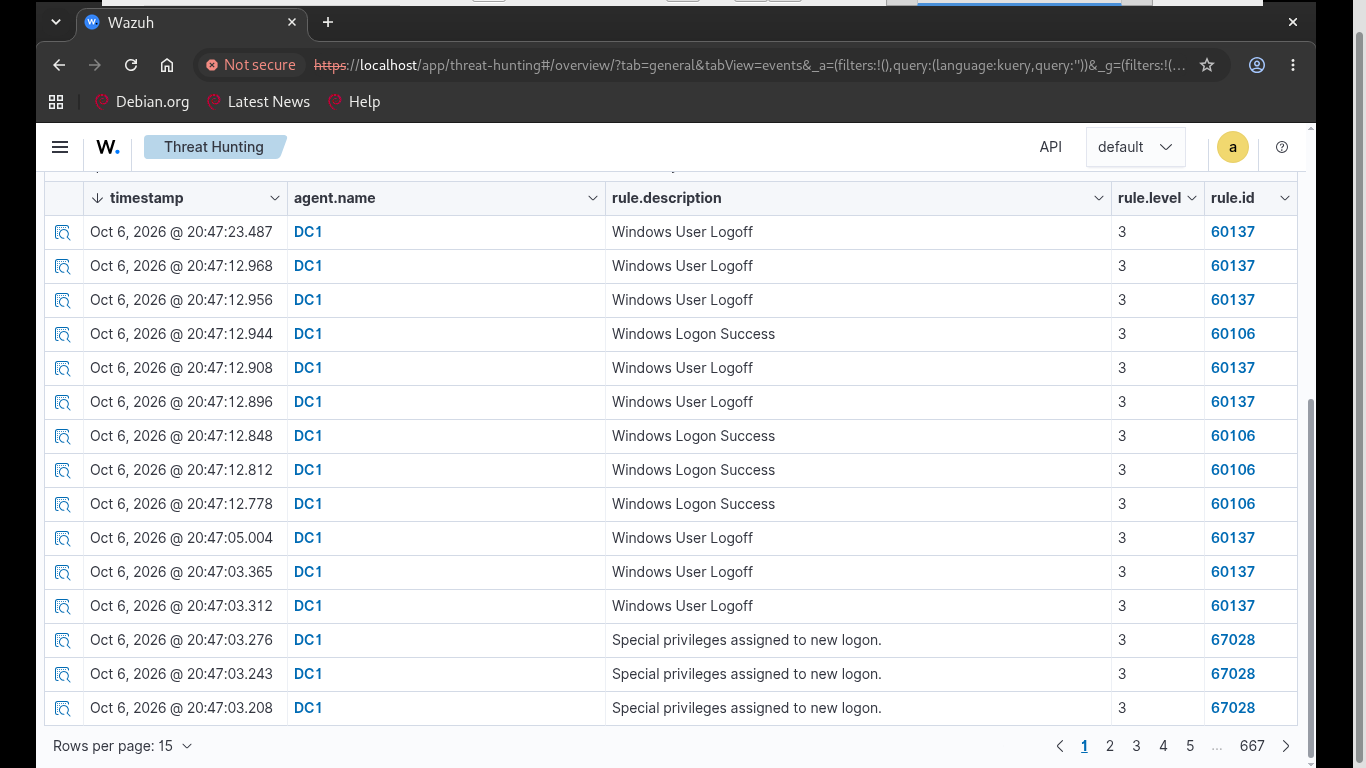
You should notice that manay of the security alerts are related to Windows authentication events from our
Domain Controller. But how could this be as we are sitting here not logging into it? Click on the hourglass
to the left of one of the logon successful alerts. This will display the full details, scroll to the user
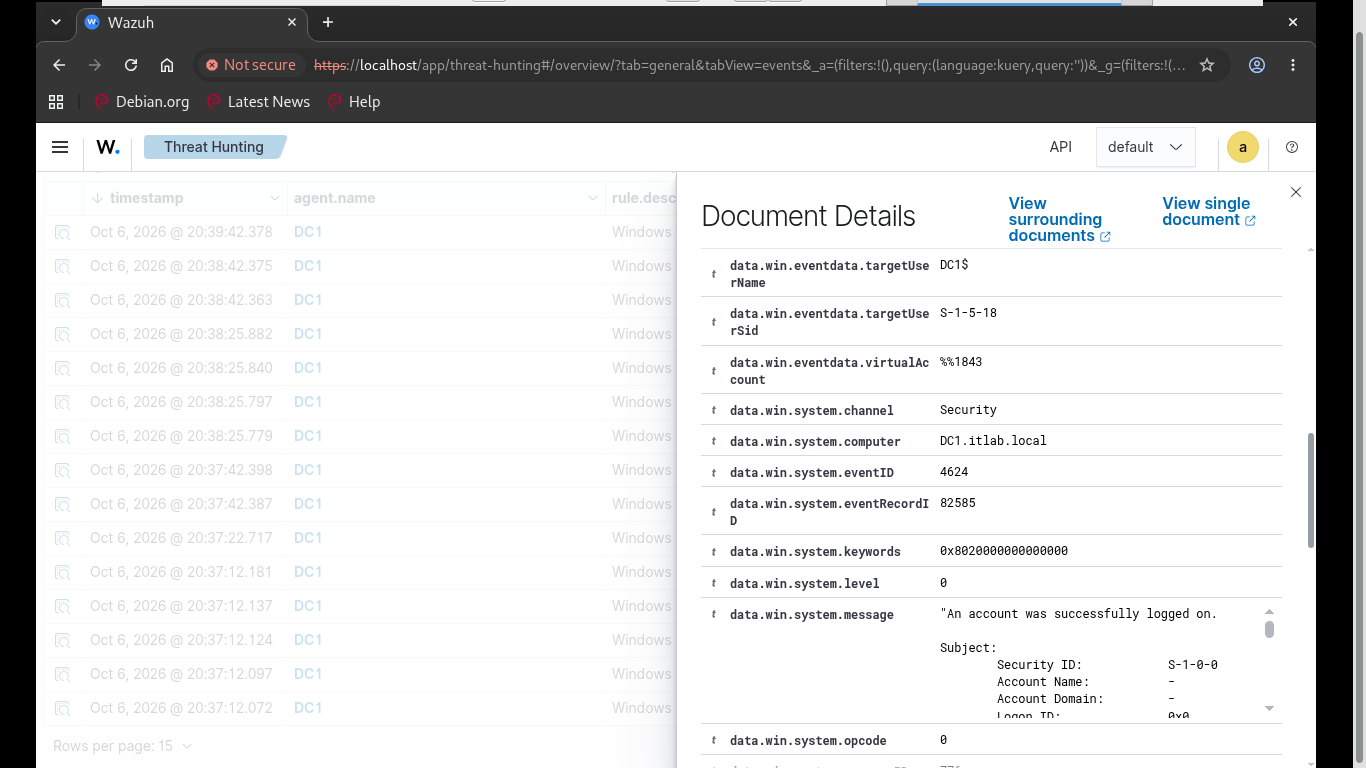
We can see that the username logging in is the hostname of the computer. This is completely benign activity
and represents standard internal Windows Server operations. When the logging user appears as the hostname
with a dollar sign, the operating systemis utilizing its internal machine account to authenticate locally
Domain Controllers inherently generate a massive volume of these successful logins and logoffs to perform
routine background tasks, including Active Directory replication, internal DNS synchronization, and Group
Policy processing. In the next step, we will clear out these alerts to see if there is something else to
focus on. In the Search field at the top of the dashboard, type out the following query to filter these out
not data.win.eventdata.targetUserName: DC1$
Press Enter to apply the query and scroll back down the the events. See the page count has dropped to 234
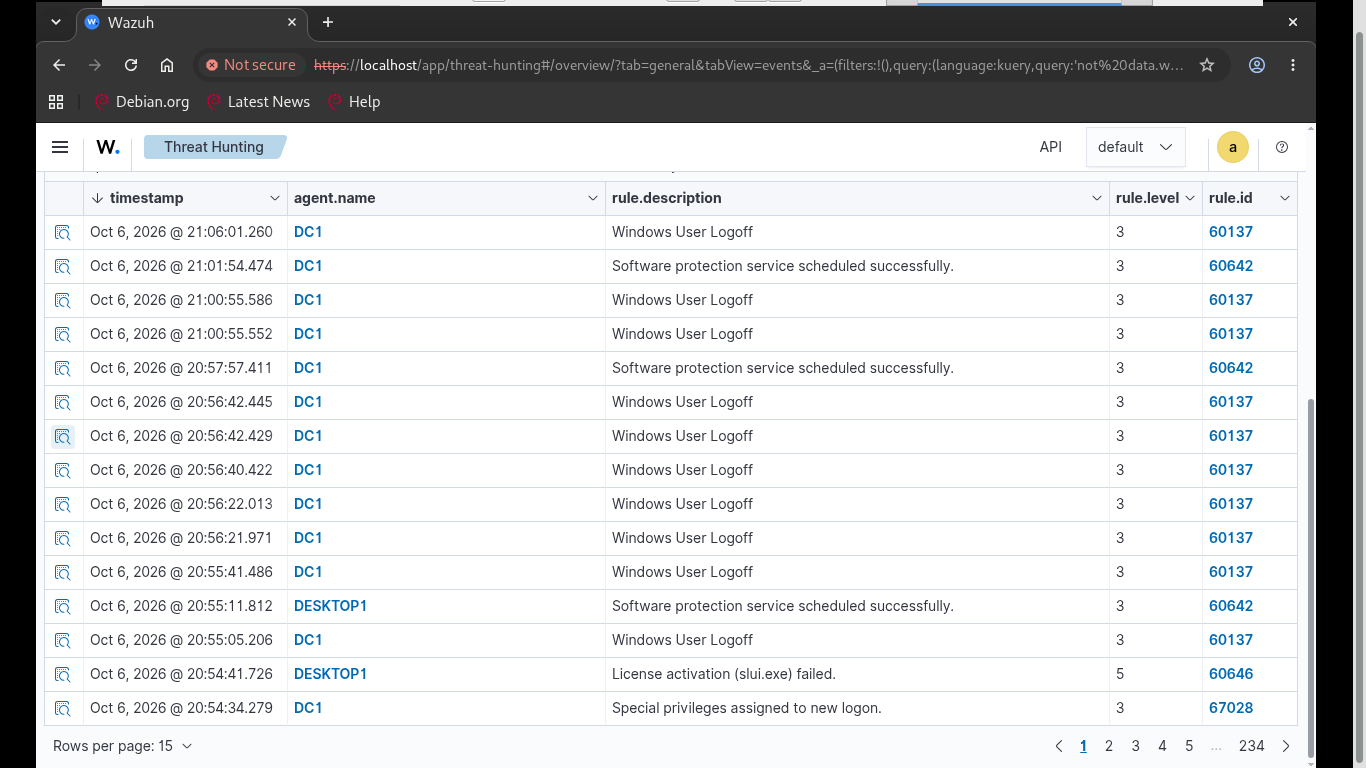
Although many events still remain after applying this search query, the "not" search is a good way to clear
out noise. Next, let's filter out the lower level events. Below the search field, click on the "Add filter"
to open the Edit Filter tool. In the Edit Filter tool, set the Field to rule.level, set the Operator to is
not, and set the Value to 3, then click Save to apply the filter. Scroll down and check out the improvement
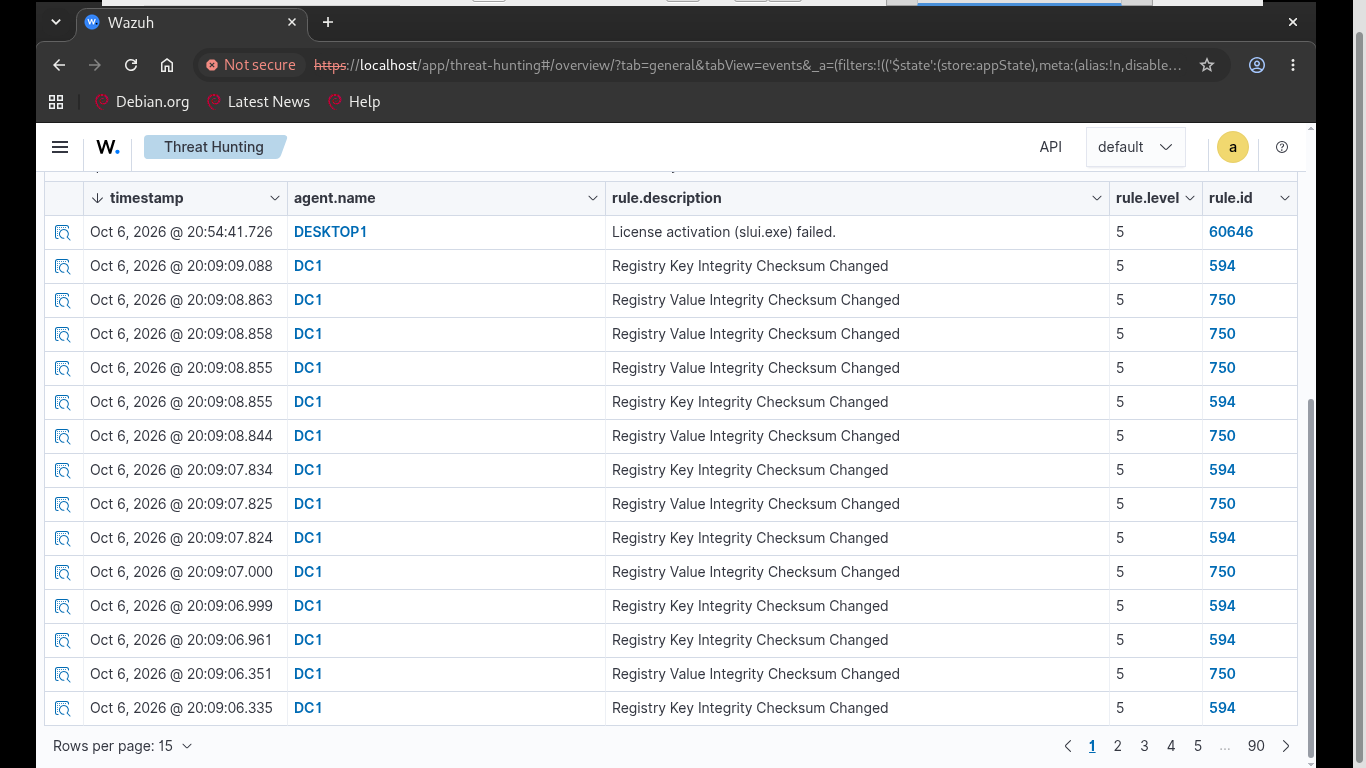
Now that you're familiar with adding filters, go ahead and add two more to filter out level 4, 5 and 7 logs
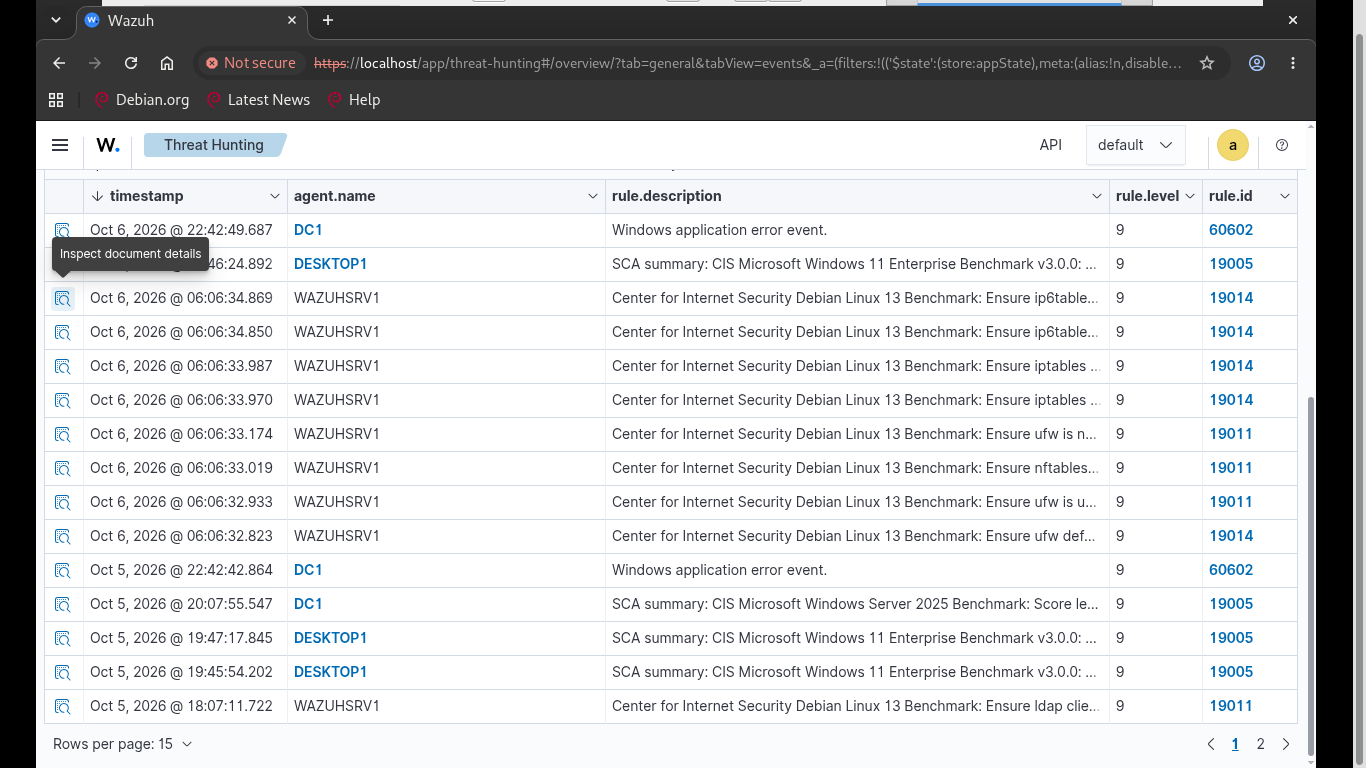
When a SIEM is first deployed, it will generate many events, most of which look scary, but are often not
critical issues. While there may be important level 3, 4, 5 and 7 events, it is good practice to review the
highest level threats first, and then work back. In the Security Alert list, the remaining events indicate
that the endpoint is failing to meet a CIS benchmark for configuration best practices, a common standard
8. Web Application Brute Force
Before we move on to simulating an attack, let's configure our Wazuh SIEM to monitor login attempts from
the internal web application we configured earlier. This will allow us to detect any password attacks on it
Run the following commands from the WEBSRV1 Terminal to add monitoring on the web applications log file
itlabcenter@WEBSRV1:~$ sudo tee -a /var/ossec/etc/ossec.conf > /dev/null << 'EOF'
> <ossec_config>
> <localfile>
> <log_format>syslog</log_format>
> <location>/var/log/nginx/webapp_auth.log</location>
> </localfile>
> </ossec_config>
> EOF
itlabcenter@WEBSRV1:~$ sudo systemctl restart wazuh-agent
itlabcenter@WEBSRV1:~$ sudo touch /var/log/nginx/webapp_auth.log
itlabcenter@WEBSRV1:~$ sudo chown www-data:www-data /var/log/nginx/webapp_auth.log
itlabcenter@WEBSRV1:~$ sudo chmod 644 /var/log/nginx/webapp_auth.log
The Wazuh Agent should now be forwarding SYSLOG entries from the web applications authentication log file
However the Wazuh Server does not yet know how to interpret these logs. We must define a custom decoder
Run the following commands from the WAZUHSRV1 Terminal to define custom decoders and alert creation rules
itlabcenter@WAZUHSRV1:~$ sudo tee -a /var/ossec/etc/decoders/local_decoder.xml > /dev/null << 'EOF'
> <!-- ITLAB Web App Authentication Decoders -->
> <decoder name="itlab-webapp-fail">
> <prematch type="pcre2">ITLAB ALERT: Failed Web Application Login</prematch>
> </decoder>
> <decoder name="itlab-webapp-fail-fields">
> <parent>itlab-webapp-fail</parent>
> <regex type="pcre2">Username: \[(\S+)\] - IP Address: \[(\S+)\]</regex>
> <order>user, srcip</order>
> </decoder>
> <decoder name="itlab-webapp-success">
> <prematch type="pcre2">ITLAB ALERT: Success Web Application Login</prematch>
> </decoder>
> <decoder name="itlab-webapp-success-fields">
> <parent>itlab-webapp-success</parent>
> <regex type="pcre2">Username: \[(\S+)\] - IP Address: \[(\S+)\]</regex>
> <order>user, srcip</order>
> </decoder>
> EOF
itlabcenter@WAZUHSRV1:~$ sudo tee -a /var/ossec/etc/rules/local_rules.xml > /dev/null << 'EOF'
> <!-- ITLAB Web App Authentication Rules -->
> <group name="itlab, webapp, authentication,">
> <rule id="100050" level="7">
> <decoded_as>itlab-webapp-fail</decoded_as>
> <description>ITLAB Web App: Failed login attempt for user $(user)</description>
> <mitre>
> <id>T1110</id>
> </mitre>
> </rule>
> <rule id="100051" level="3">
> <decoded_as>itlab-webapp-success</decoded_as>
> <description>ITLAB Web App: Successful login for user $(user)</description>
> <mitre>
> <id>T1078</id>
> </mitre>
> </rule>
> </group>
> EOF
itlabcenter@WAZUHSRV1:~$ sudo systemctl restart wazuh-manager
Now the SIEM known explicitly how to categorize these custom auth log entries for our web application
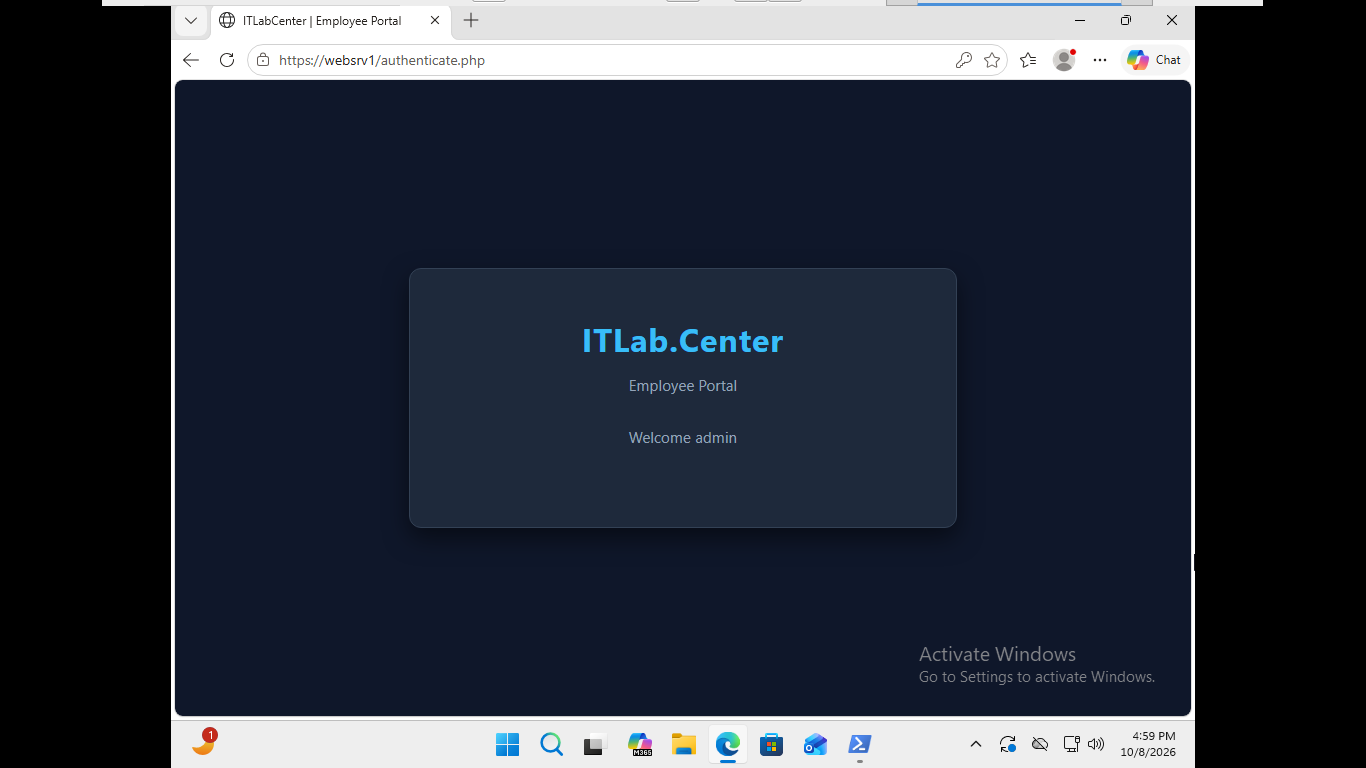
Let's confirm this first, head back over to the DESKTOP1 endpoint and navigate to https://websrv1 and log
in one time with the admin password 'SuperSecretAdmin2026!, you will be forwarded to the auth success page
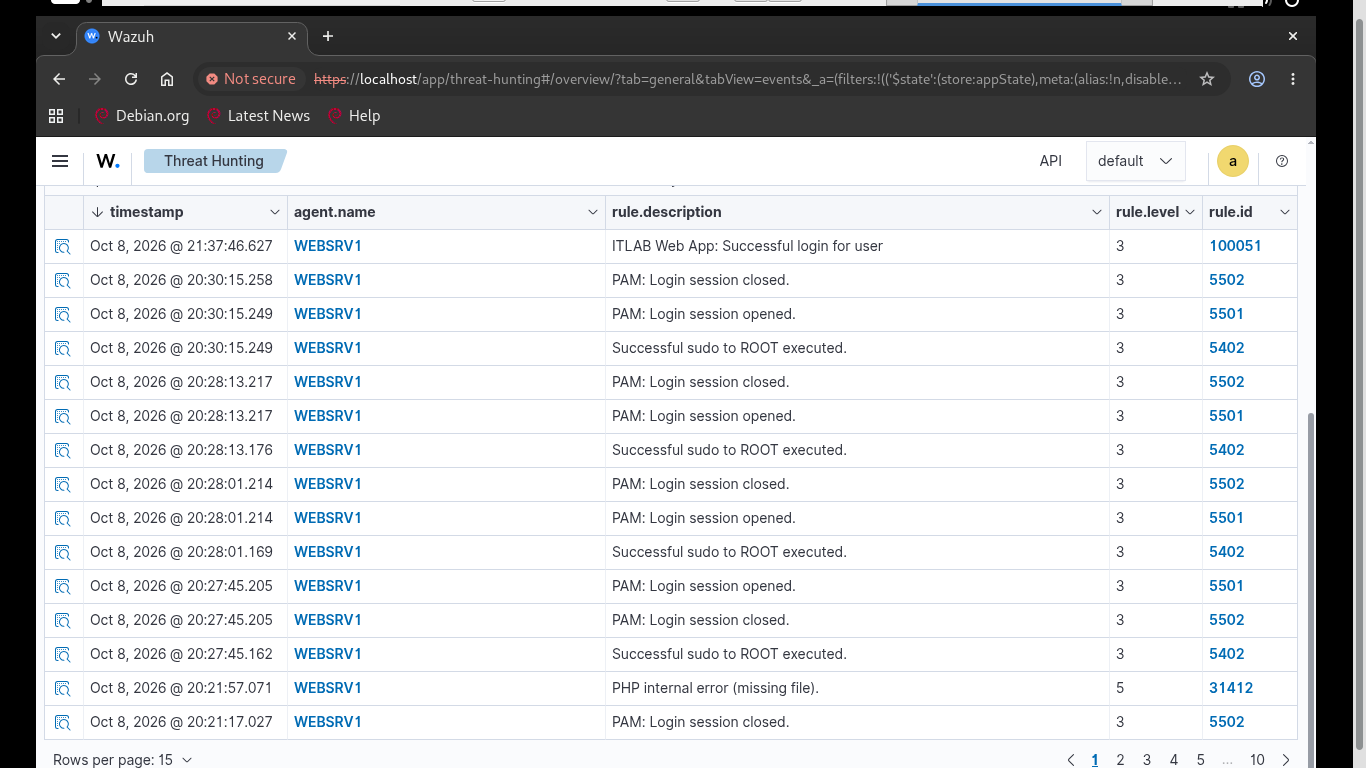
Head back over to the Wazuh Dashboard and filter for events where the agent.name is WEBSRV1. Scroll down
to the bottom of the page and you should be able to see the authentication event as a custom alert type
Now that our web applications authentication events are being recorded by Wazuh, we can perform an attack
The OWASP ZAP application is an open source web application scanner and penetration testing application
At it's core, ZAP is what is known as a "manipulator-in-the-middle proxy". It stands between the tester's
browser and the web application so that it can intercept and inspect messages sent between browser and web
application, modify the contents if needed, and then forward those packets on to the destination server

We will be using this application to perform a brute force attack against the internal web application
Switch back over the the DESKTOP1 endpoint and run the following commands to install the OWASP ZAP tool
PS C:\WINDOWS\system32> winget install --id EclipseAdoptium.Temurin.21.JRE --exact --silent --accept-package-agreements --accept-source-agreements
PS C:\WINDOWS\system32> winget install --id ZAP.ZAP --exact --silent --accept-package-agreements --accept-source-agreements
Let's switch into the mindset of an attacker who knows nothing about the existing environment. This would
known as black box testing, since we are essentially sending commands into an unknown black box. First, we
need to locate a suitable target for attack on the network. We can do this using the nmap command line tool
Run the following command from the DESKTOP1 Administrator PowerShell to scan the network for web servers
PS C:\WINDOWS\system32> winget install --id Insecure.Nmap --exact --silent --accept-package-agreements --accept-source-agreements
PS C:\WINDOWS\system32> $env:PATH += ";C:\Program Files (x86)\Nmap"
PS C:\WINDOWS\system32> nmap -p 80,443 192.168.120.0/24
Resulting Output:
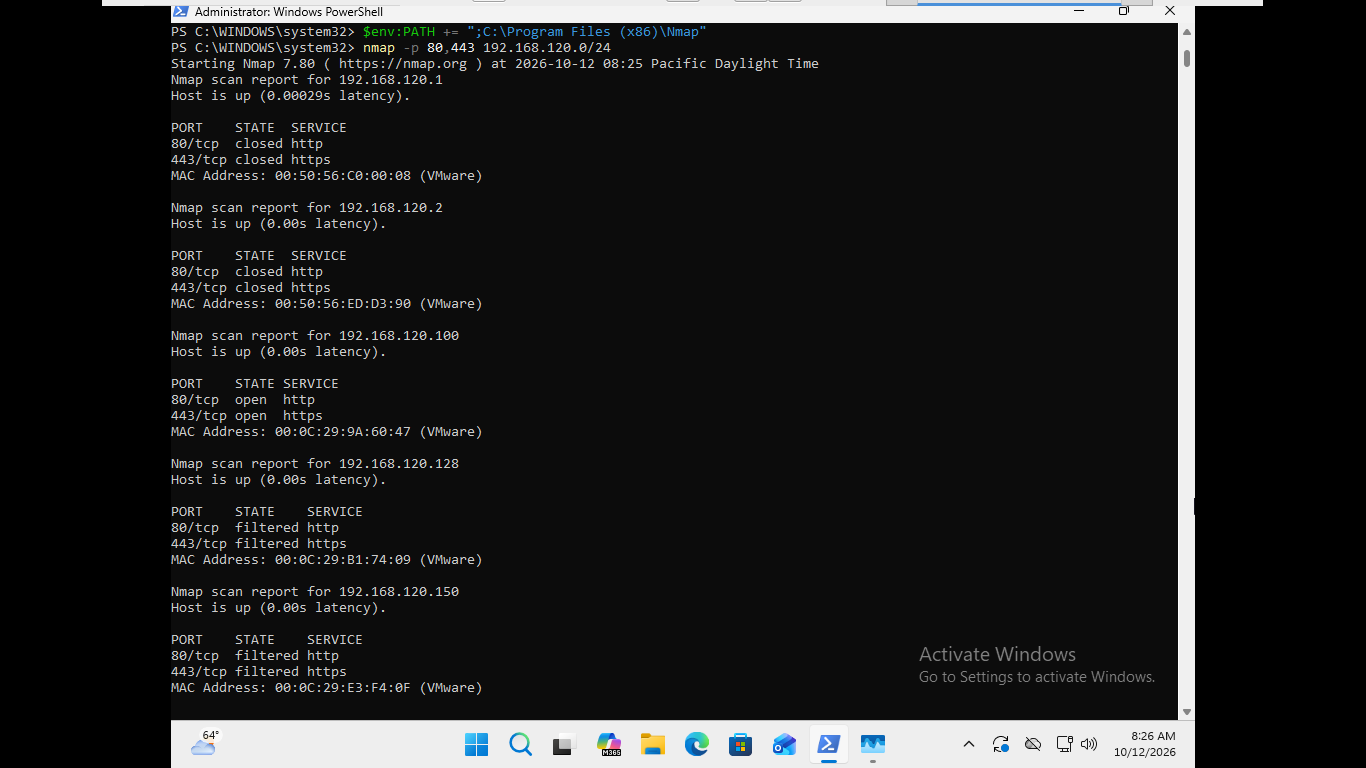
We have identified that host 192.168.120.100 is listening on both ports, indicating a running web server
Run the following command from the Windows Search bar, search for ZAP and open the ZAP 2.17.0 application
You will be prompted for firewall permissions by Java Runtime, click allow. The ZAP application will open
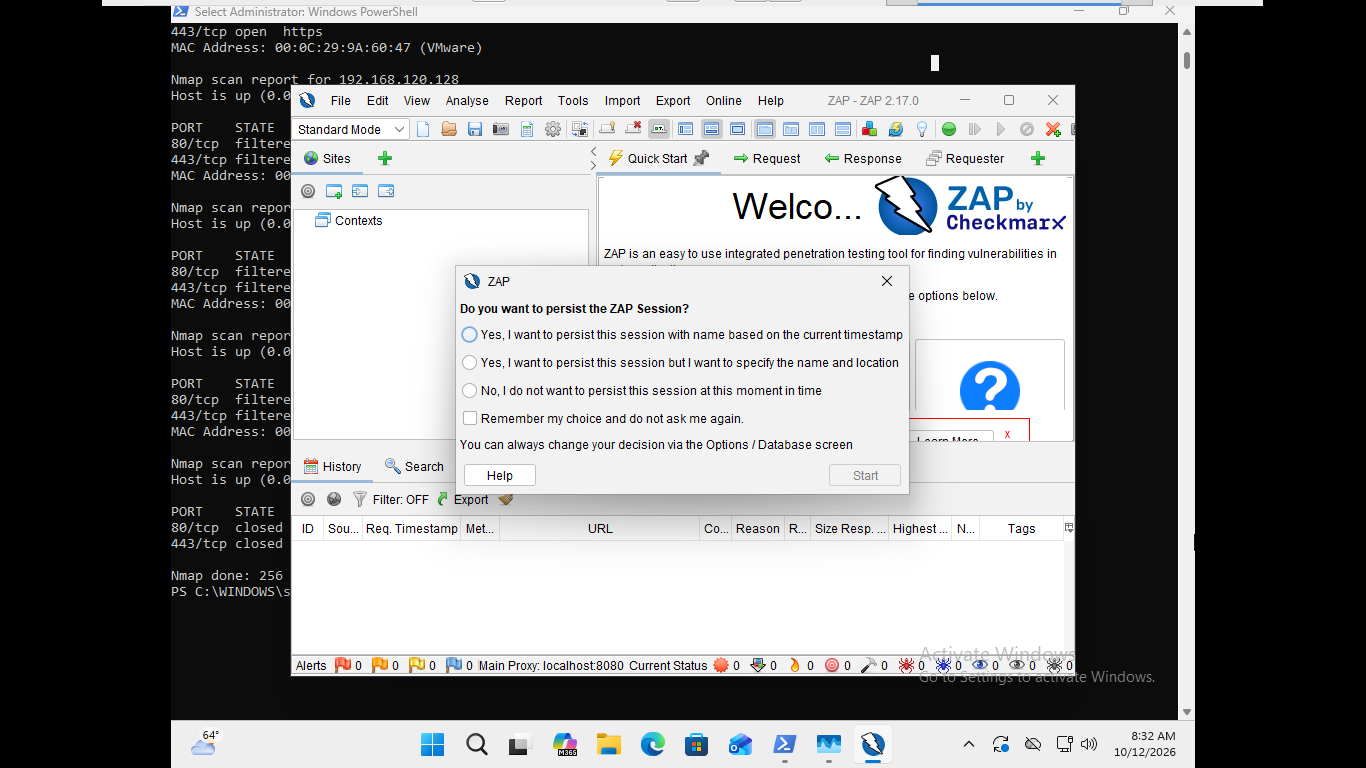
You can select the option to not to persist this session. As an attacker we want to avoid leaving evidence
Before we can conduct any attacks, we must configure our web browser to use OWASP ZAP as its proxy. Open
Microsoft Edge and navigate to edge://settings/system/manageSystem#ProxySettings&1 and click Open settings
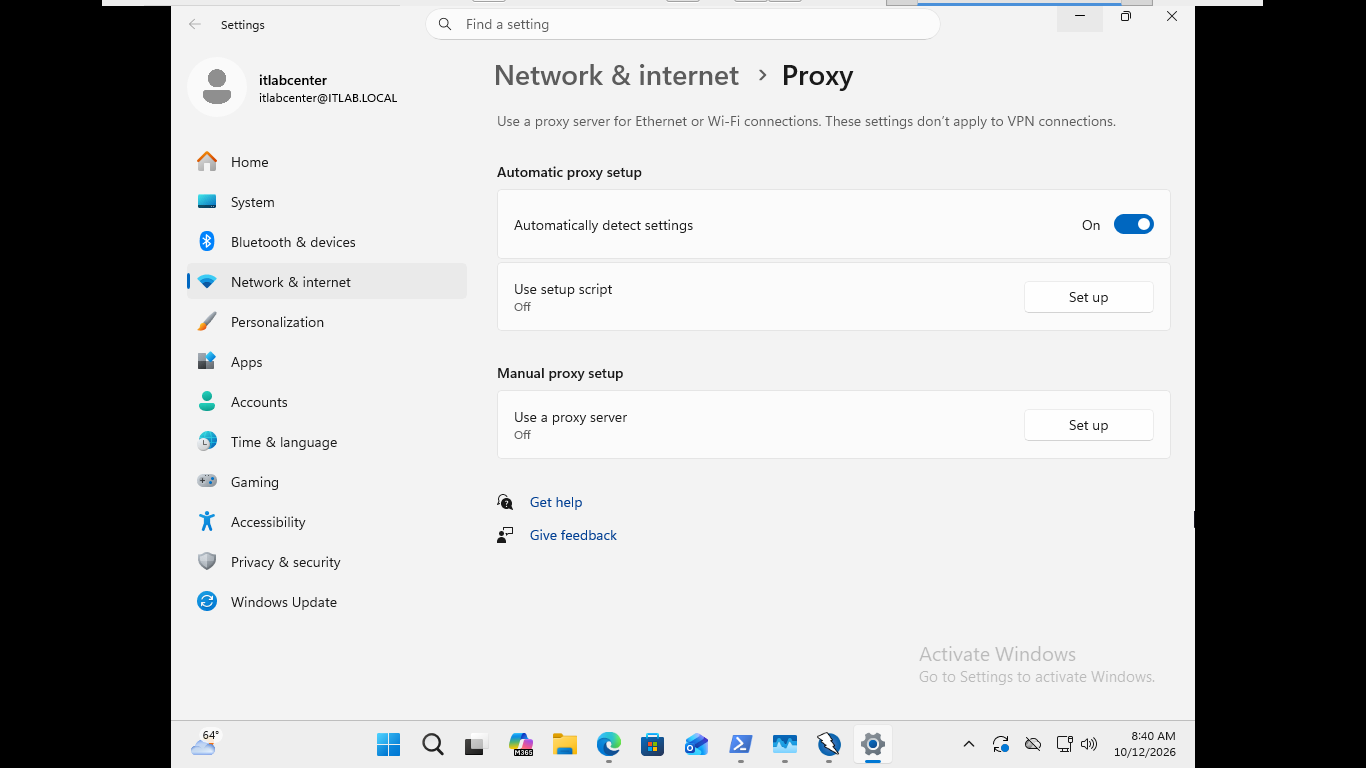
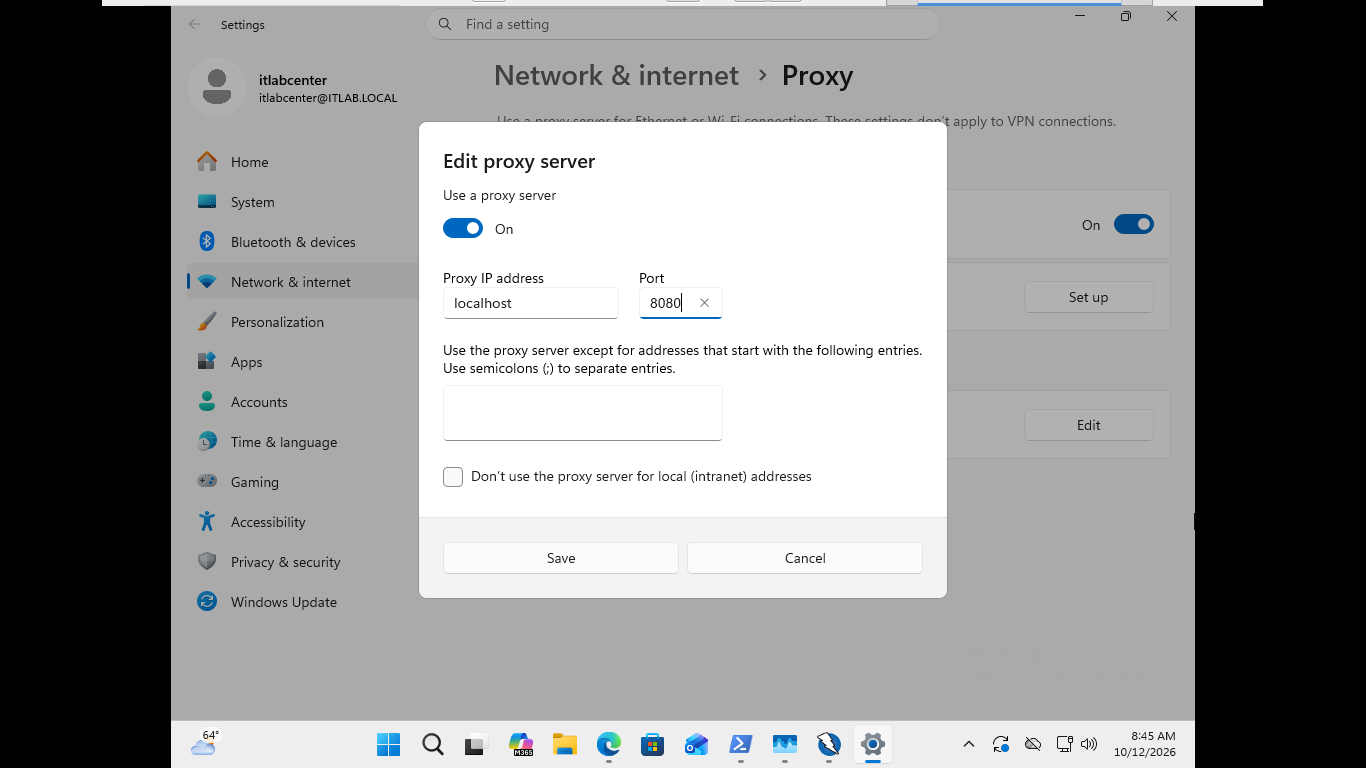
This brings up the Windows Proxy Settings. Under Manual proxy setup, hit Set up > Turn the proxy on and
enter 'localhost' and the Proxy IP Address and '8080' as the Port. Then click Save to apply our changes
Head back to Microsoft Edge and navigate to https://websrv1, this time we will get a certificate error
This is because while the workstation inherently trusts the certificate, our proxy does not, and this is
an indicator that our proxy is functional. Head back into ZAP and you will notice the website is listed
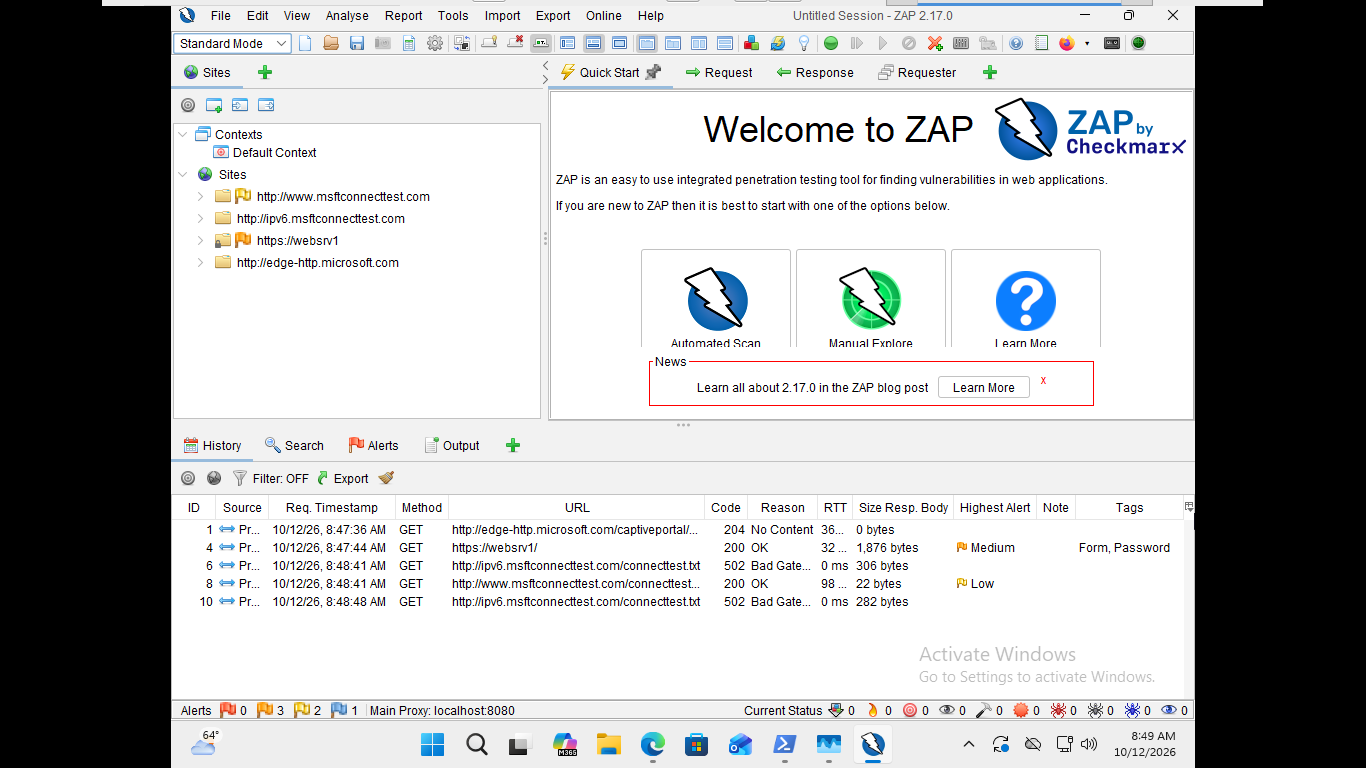
To perform a brute-force attack, we need to locate the login form and its parameters. ZAP provides several
ways to interact with web pages and identify potential login forms. The first step is to use ZAP's Spider
tool to crawl the website and identify all pages, including the login page. Right-click on the target site
in the sites tab and select Attack > Spider > Start Scan to intiate a page discovery scan using OWASP ZAP
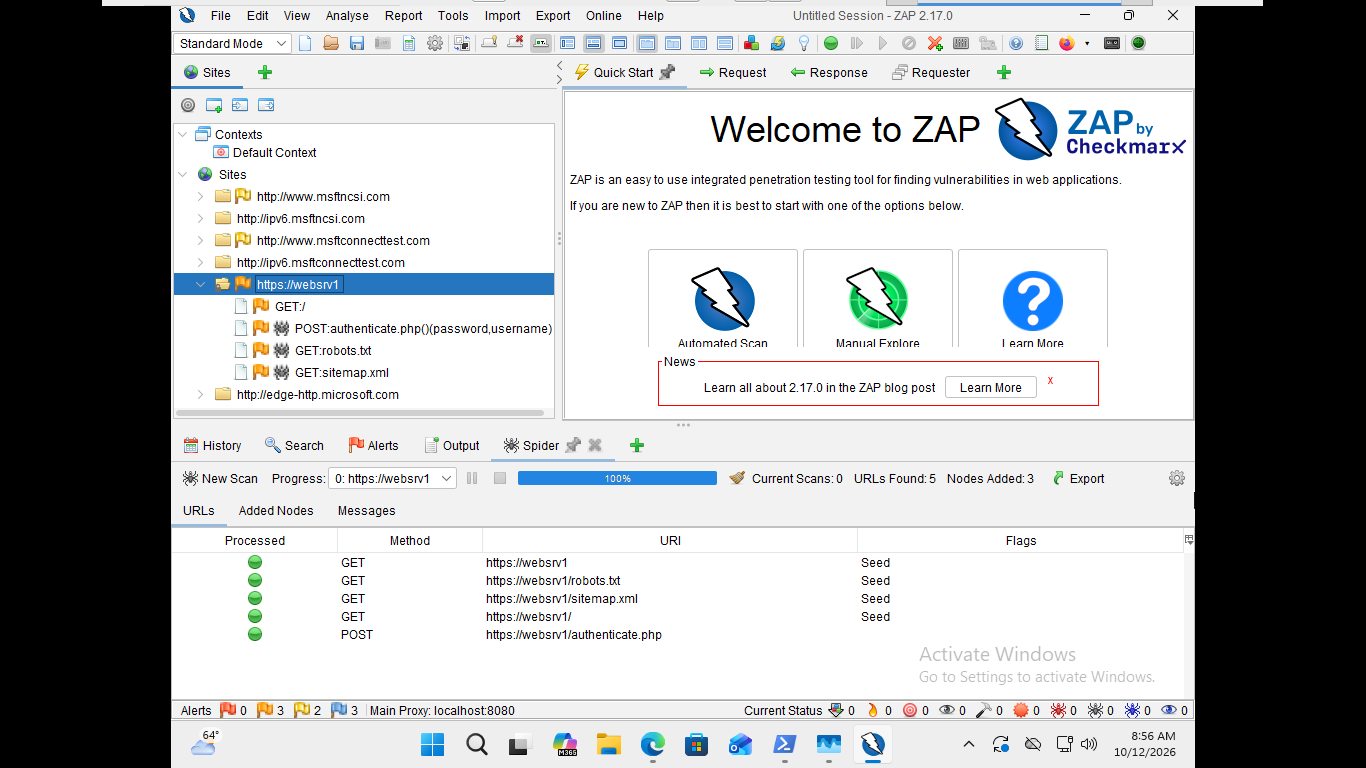
We can see that the authenticate.php page was found to acccept POST requests for the fields password and
username, indicating that this is the backend authentication page. We know from visiting the website using
our browser that the actual login form exists at the root index page, accessible through https://websrv1
Navigate back to our browser and attempt to login to the web application using bogus credentials. Then
navigate back to ZAP and notice that index.php has appeared. Left-Click authenticate.php and hit Request
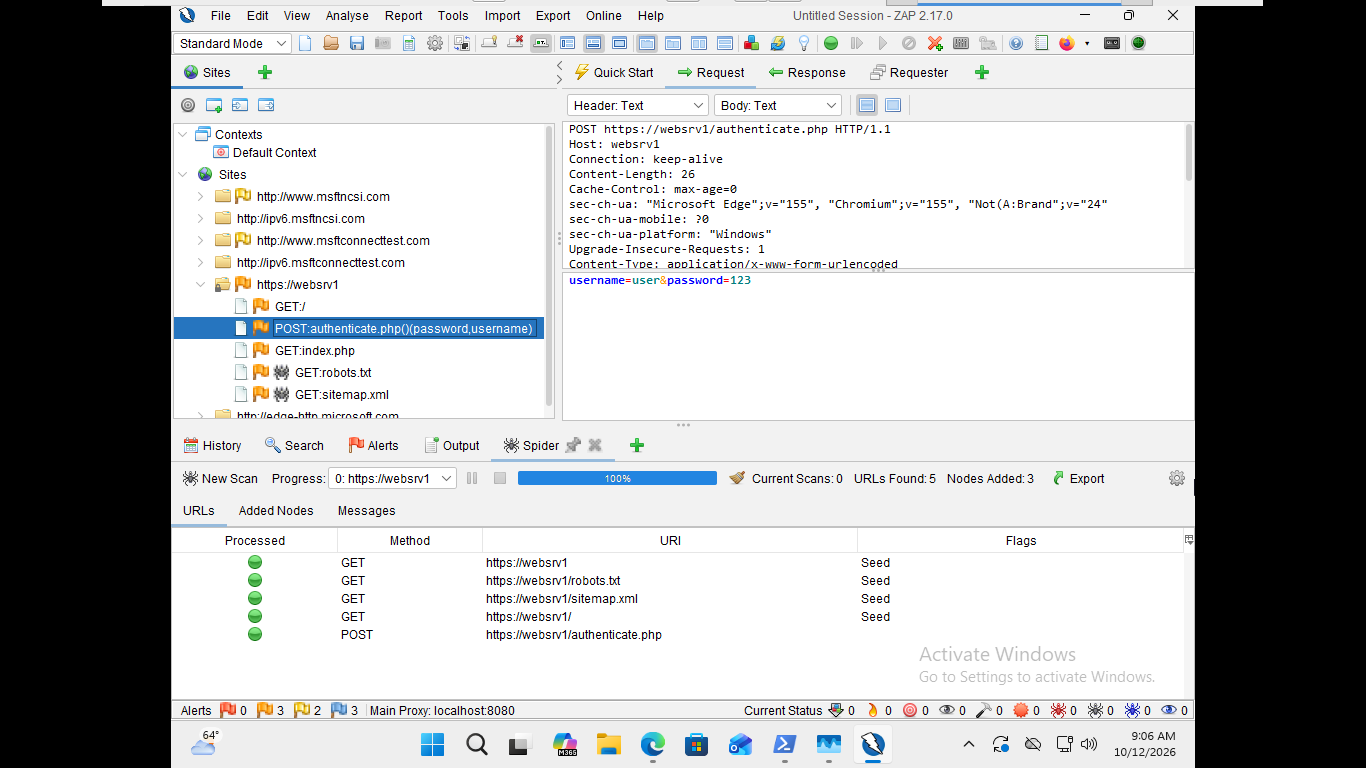
With the login form identified, we can now configure ZAP to attempt a brute-force attack. ZAP supports the
brute-forcing of login forms using its Forced Browser and Fuzzer tools. Below, we will show you how to set
up a brute-force attack using ZAP's Fuzzer. In the Request tab, right-click on the HTTP request used to
submit the login form and sellect Fuzz. This will open the Fuzzer wizard where we can design our attack
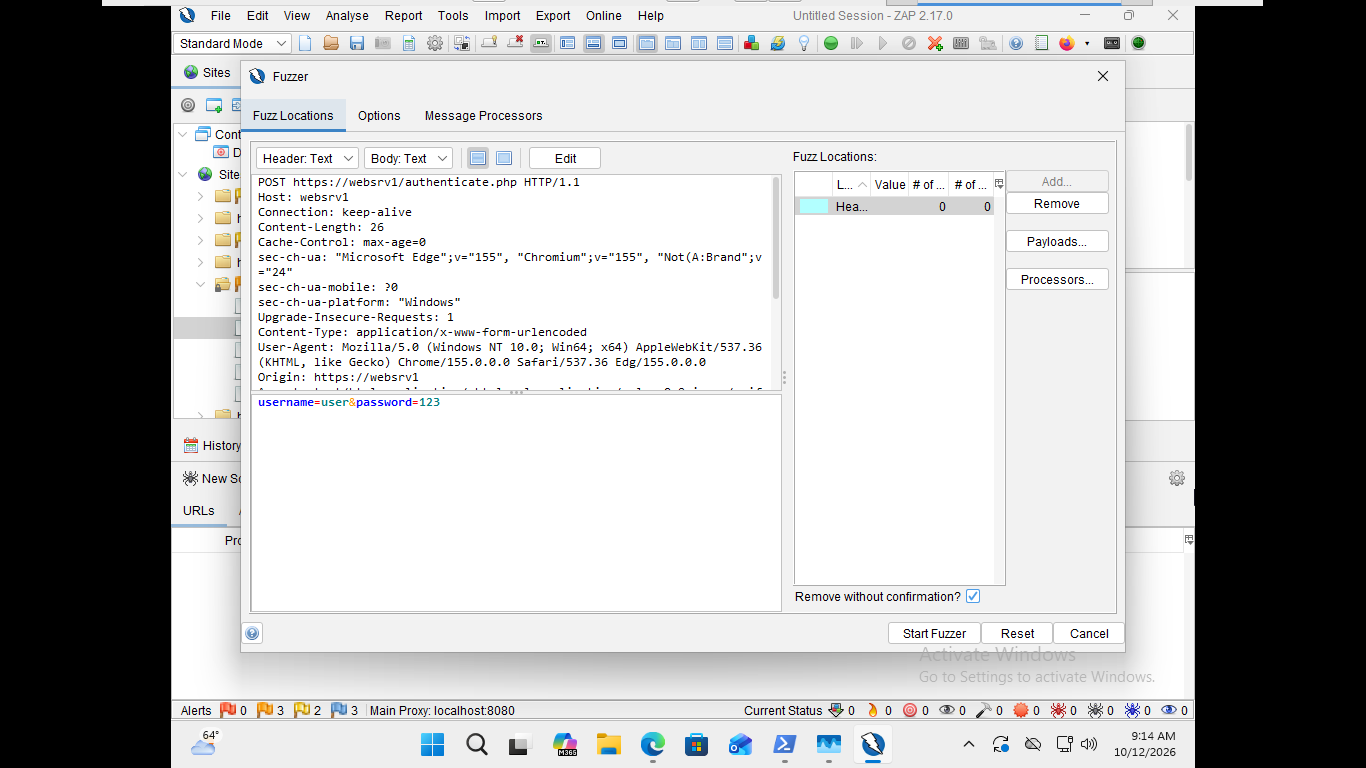
In the Fuzzer window, we need to define the parts of the HTTP request that will be fuzzed (the username
and password fields). Highlight the submitted username (user in out case) and click Add at the right-hand
side. You will receive a prompt to select the payloads to be used. These are the values Zap will submit
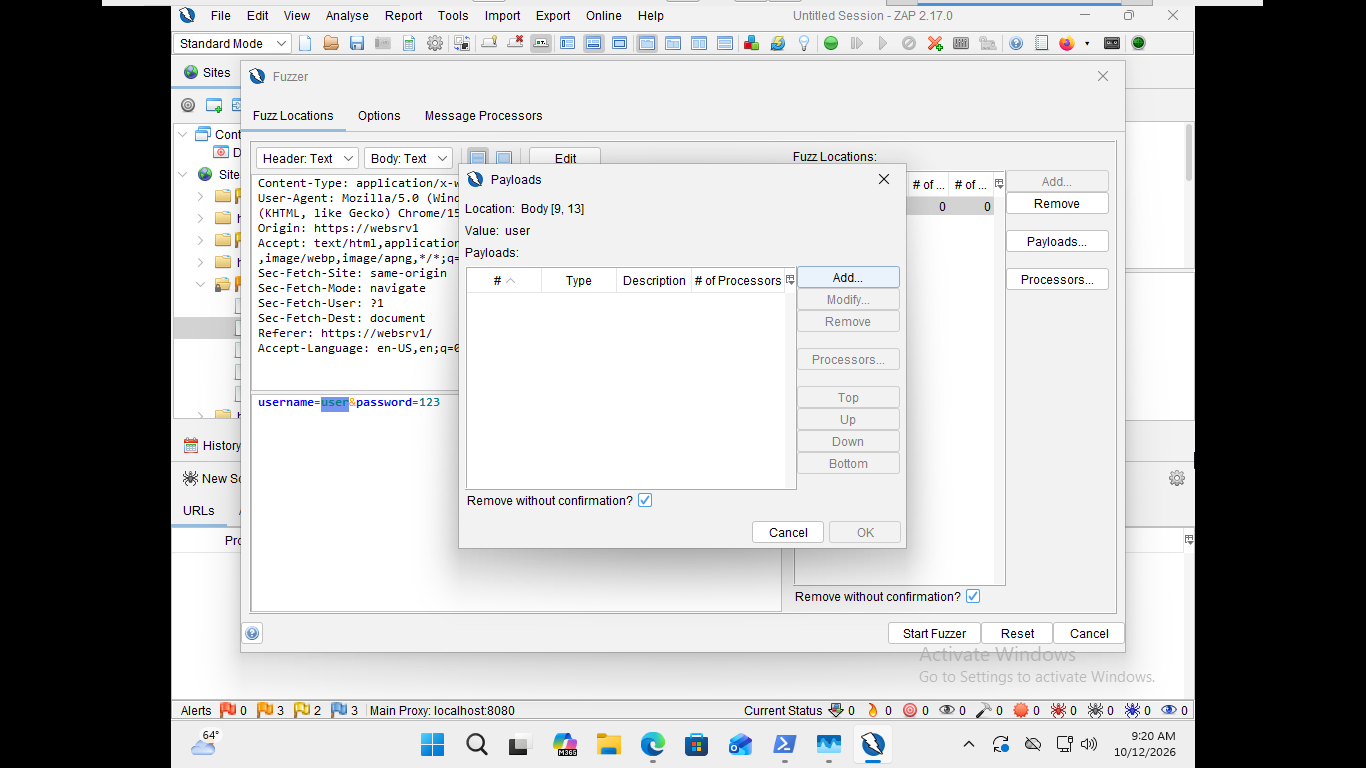
Let's keep things simple for this attack and target the admin account for the web application. Click Add
then while the Strings type option is selected, type out the following common administrator usernames:
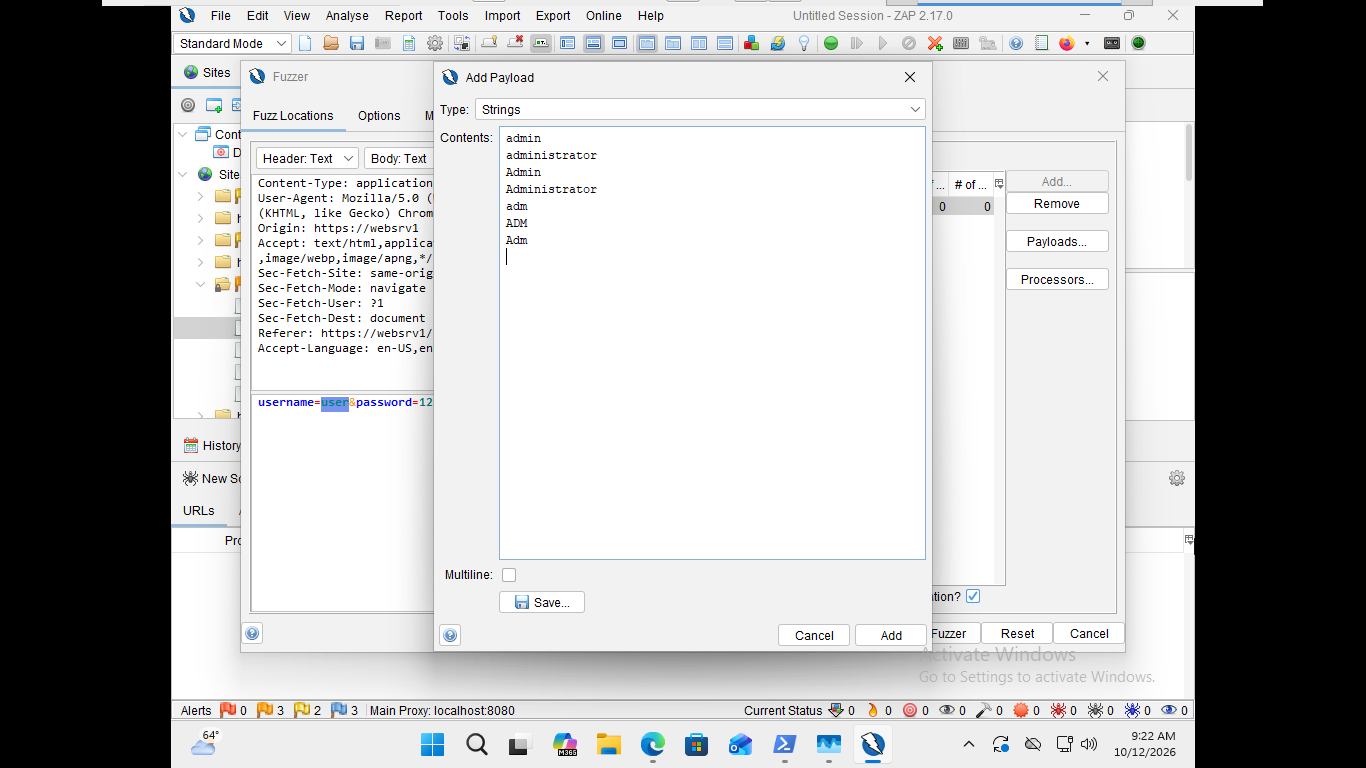
Now click Add > OK to add the payload to the username field. Now we need a good wordlist to use for the
password field. Many options are available online, but we will elect to use the 10K-most-common passwords
Run the following command from the DESKTOP1 Administrator PowerShell to download a copy of the wordlist
PS C:\WINDOWS\system32> $Wordlist = "https://raw.githubusercontent.com/danielmiessler/SecLists/master/Passwords/Common-Credentials/10k-most-common.txt"
PS C:\WINDOWS\system32> $OutFile = "C:\Wordlist.txt"
PS C:\WINDOWS\system32> curl.exe --insecure --proxy "http://127.0.0.1:8080" -o $OutFile $Wordlist
Head back into ZAP and highlight the submitted password (123 in our case) and click Add at the right-hand
corner. Click Add in the Payloads window and this time click the Type dropdown to select the File option
Click the Select... button and navigate to This Computer, and select the wordlist.txt file from within C:\
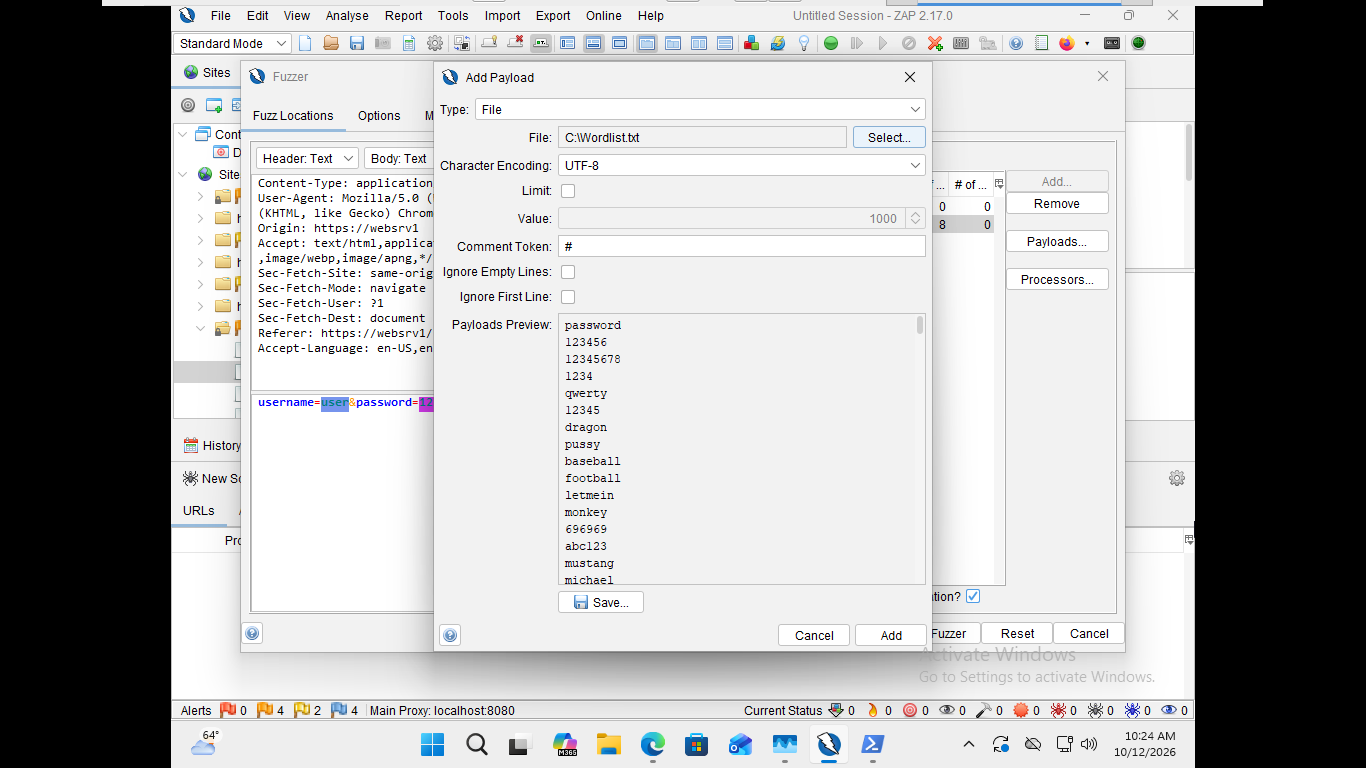
Click Add, then OK to add the custom payload to the Fuzzer Attack. Lastly, remove the default payload at
the right-hand side of the window, under the Fuzz Locations text. Now that our payloads are selected, hit
the Options tab at the top of the window to reveal additional attacking options. You can set various attack
options, such as the number of threads to use, the delay between requests, and the maximum number of tries
Uncheck Limit maximum errors, set the Delay when Fuzzing (milliseconds) to 50, and check Follow Redirects
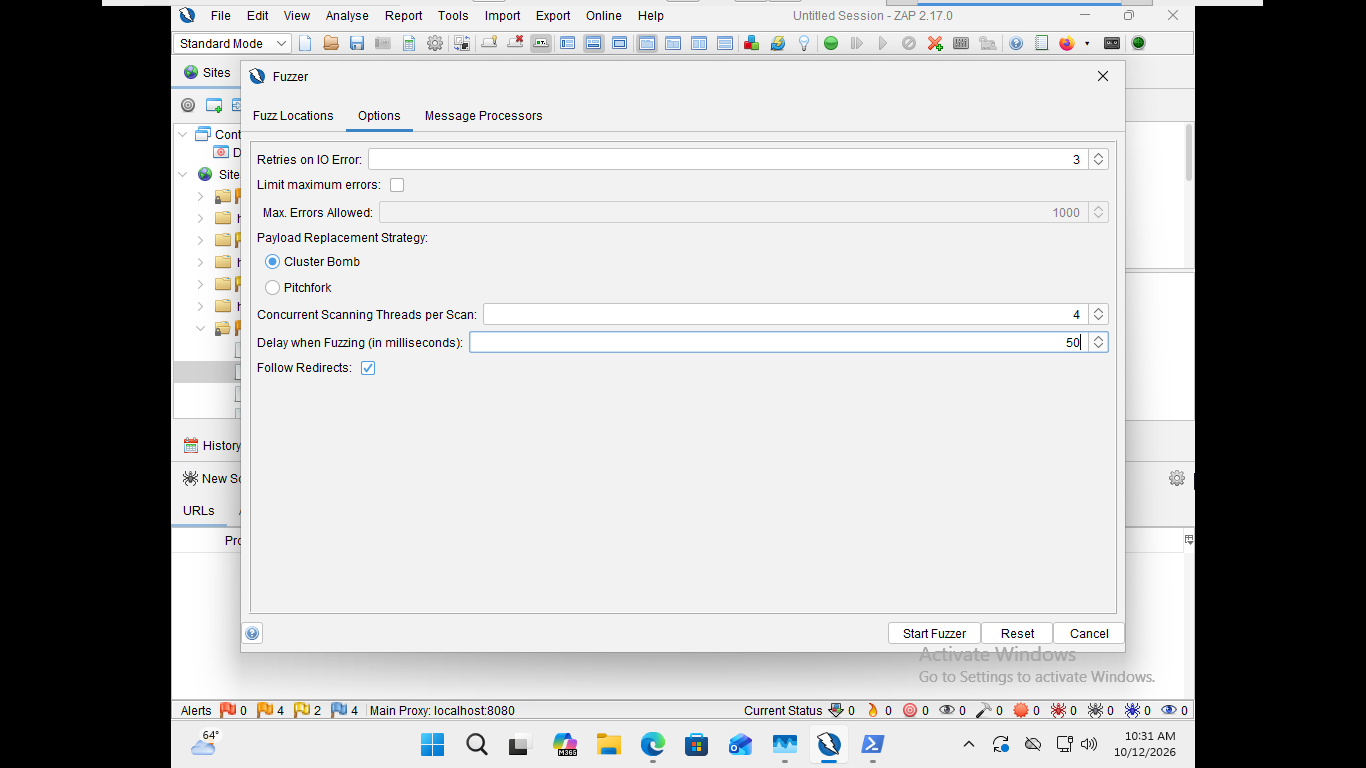
Now that our attack is staged, hit Start Fuzzer to begin the brute force attack. You will see many requests
begin to fly across the lower portion of the ZAP window. These indicate each of the brute force attempts
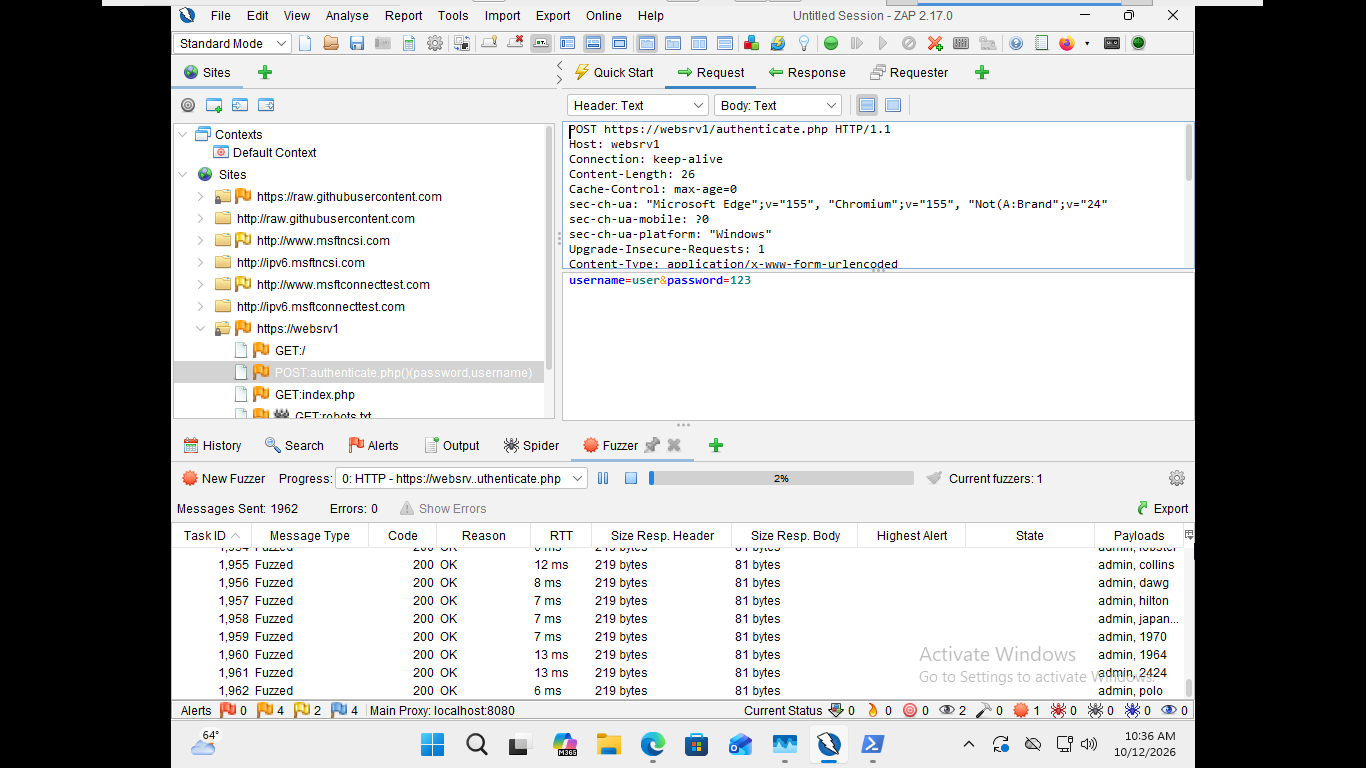
Now that our attack is underway, let's switch back into the seat of a Security Analyst and put a stop to it
9. Threat Detection & Remediation
As a Security Analyst, one of our core duties is to monitor the alerts produced by the organizations SIEM
and investigate them to determine if any threats need a response. Navigate back to our WAZUHSRV1 and log in
to the Wazuh portal as the admin user. From the home page, navigate to the Threat Hunting Wazuh dashboard
Use the time frame option in the upper-right hand corner to set the time frame to the last 15 minutes:
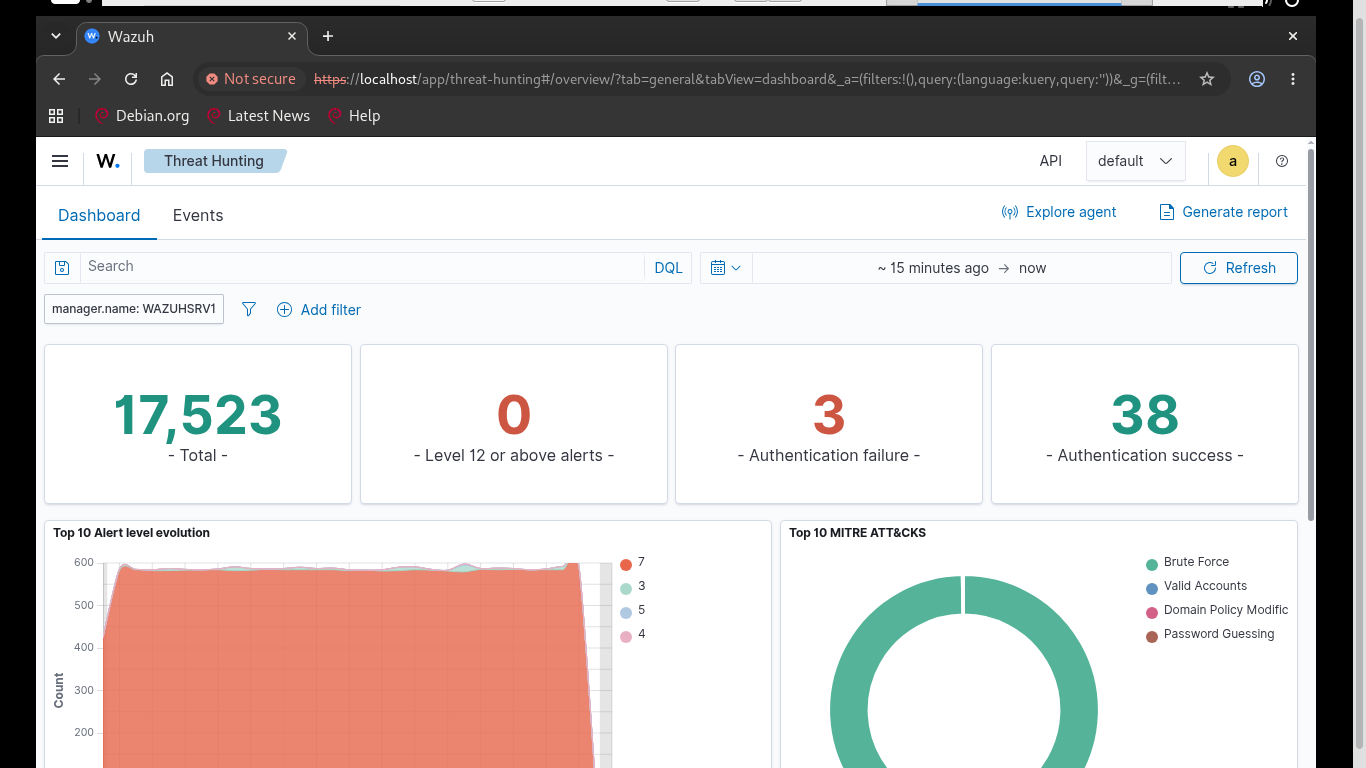
Notice that there are many new recent events. In the Top 10 MITRE ATT&CKS visulization on the right, you
will see that most events relate to Brute Force. Click on the Green Brute Force ring to apply a filter
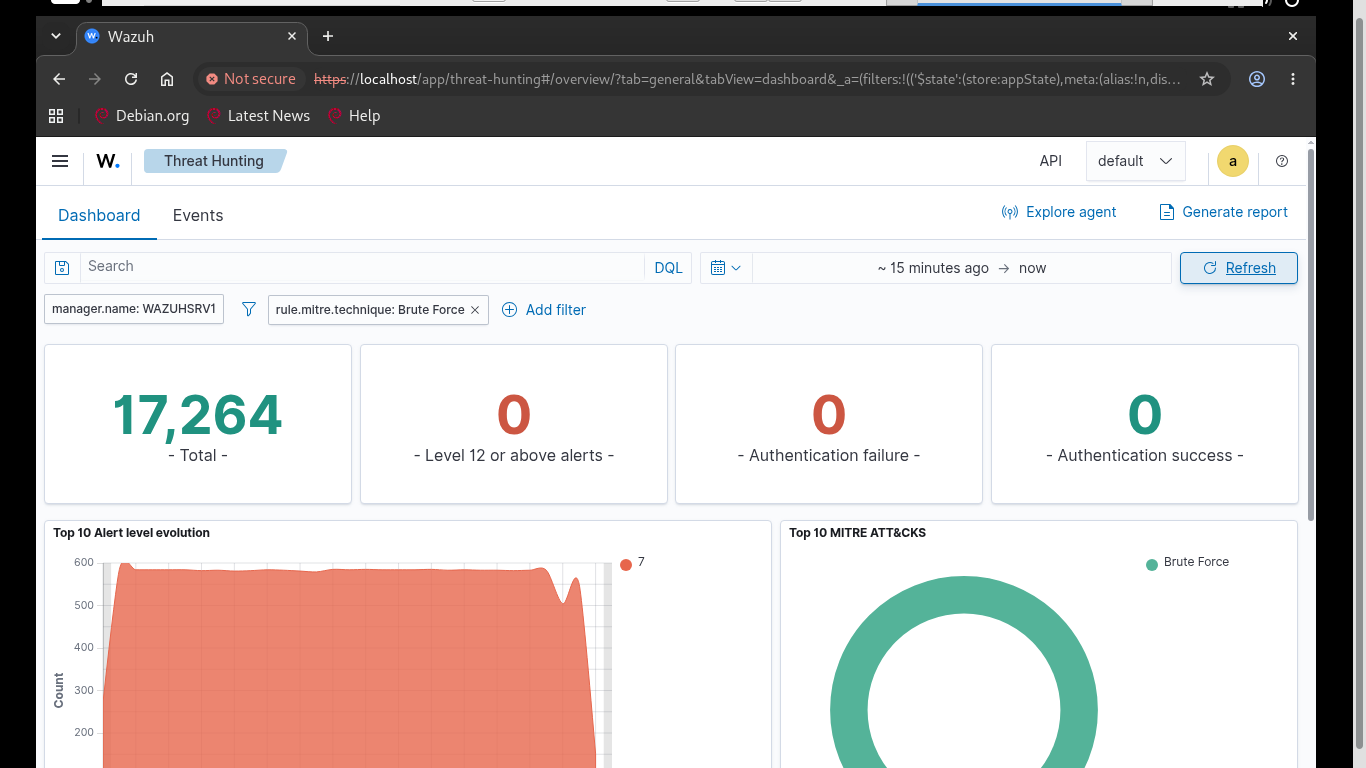
This will apply the rule.mitre.technique: Brute Force filter. We can see that there have been over 17K
recent alerts, which indicates that there is most certainly an attack underway. Navigate to the Events
and click the magnifying glass to the left of an ITLAB Web App: Failed login attempt for user alert entry
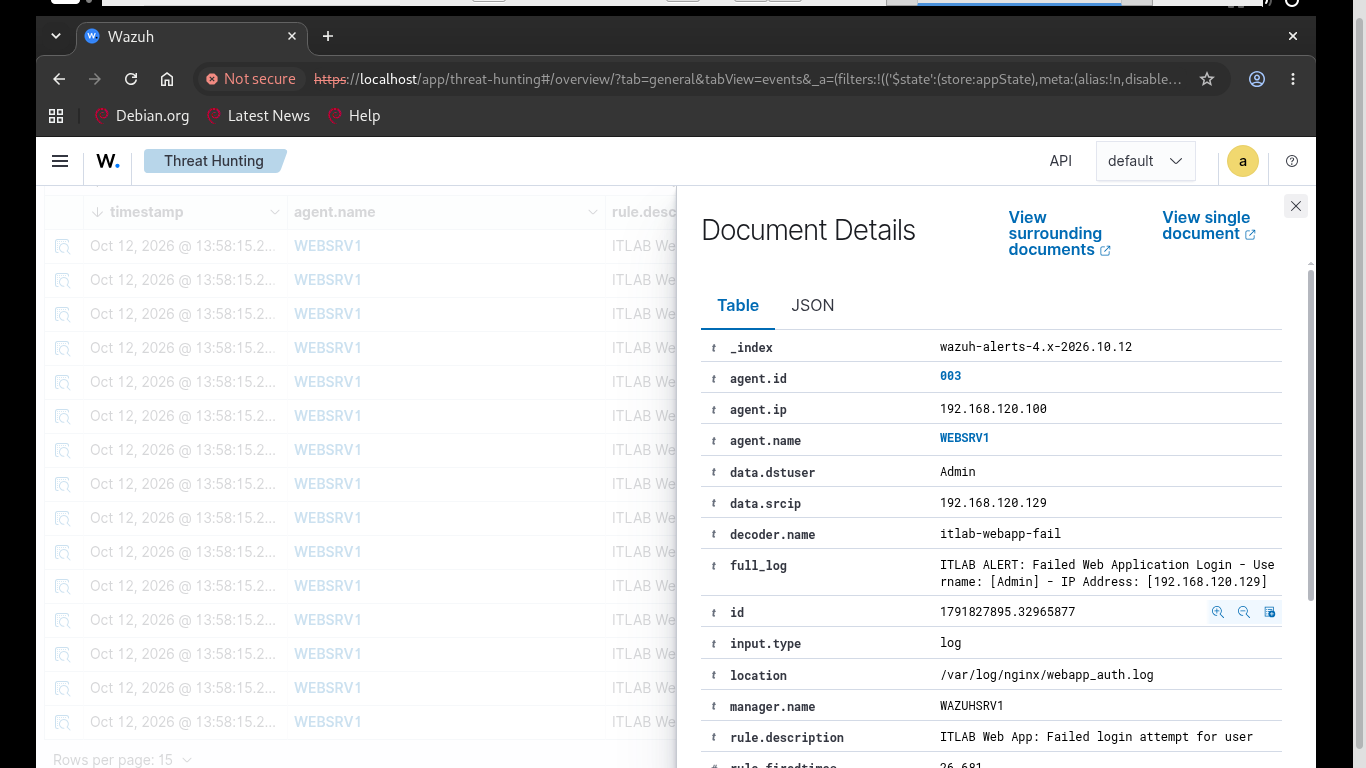
Now we have confirmed that there is an ongoing brute force attack originating from the 192.168.120.100 PC
We could, in theory, respond to this by isolating that host and re-imaging that workstation. But in a SOC
you won't always have access to every workstation in the network. Not to mention this does nothing to stop
this same attack from occurring on another host. A more effective way to remediate this is to implement
additional security controls on the server which is being attacked. Navigate back to the WEBSRV1 Terminal
Run the following command from the WEBSRV1 Terminal to stop the attack by taking the web app server offline
itlabcenter@WEBSRV1:~$ sudo systemctl stop nginx
To mitigate the brute-force traffic being generated with ZAP, we can deploy Fail2Ban directly onto our web
application server. Fail2Ban is an intrusion prevention software framework. Written in the programming
language Python, it is designed to prevent Brute-Force Attacks. Fail2Ban operates by monitoring log files
and blocking IP addresses that attempt to breach the system's security through excessive failed logins
Because modern Debian utilizes nftables as its default firewall framework, we will configure Fail2Ban to
drop the attacker's connection at the network layer using an nftables ban action on excessive failed logins
Run the following commands from the WEBSRV1 Terminal to install the Fail2Ban Package and setup the filter
itlabcenter@WEBSRV1:~$ sudo apt-get install fail2ban -y
itlabcenter@WEBSRV1:~$ sudo tee /etc/fail2ban/filter.d/itlab-webapp.conf > /dev/null << 'EOF'
> [Definition]
> failregex = ^.*ITLAB ALERT: Failed Web Application Login - Username: \[\S+\] - IP Address: \[<HOST>\]
> ignoreregex =
> EOF
Fail2Ban needs to know how to extract the attacker's IP from our custom log string. The <HOST> variable
natively captures IPv4 and IPv6 addresses. Now we must configure the jail. This configuration activates the
filter and defines the punishment. If an IP fails 5 times within a 60 second window. Fail2Ban will instruct
the nftables firewall to immediately drop all HTTP and HTTPS traffic from that IP address for the next 15m
Run the following commands from the WEBSRV1 Terminal to configure the jail to apply the filter and ban time
itlabcenter@WEBSRV1:~$ sudo tee /etc/fail2ban/jail.d/itlab-webapp.conf > /dev/null << 'EOF'
> [itlab-webapp]
> enabled = true
> backend = auto
> port = http,https
> filter = itlab-webapp
> logpath = /var/log/nginx/webapp_auth.log
> banaction = nftables
> maxretry = 5
> bantime = 15m
> findtime = 1m
> EOF
Now when the server is restored, the attacker should only be able to get 5 attempts in before they're axed
Run the following commands from the WEBSRV1 Terminal to clear the logs, start Fail2Ban, and restart NGINX
itlabcenter@WEBSRV1:~$ sudo cp /var/log/nginx/webapp_auth.log /var/log/nginx/incident_evidence.log
itlabcenter@WEBSRV1:~$ sudo tee /var/log/nginx/webapp_auth.log > /dev/null << 'EOF'
> EOF
itlabcenter@WEBSRV1:~$ sudo systemctl enable fail2ban --now
itlabcenter@WEBSRV1:~$ sudo systemctl reload nginx
itlabcenter@WEBSRV1:~$ sudo systemctl status fail2ban
itlabcenter@WEBSRV1:~$ sudo systemctl status nginx
Resulting Output:
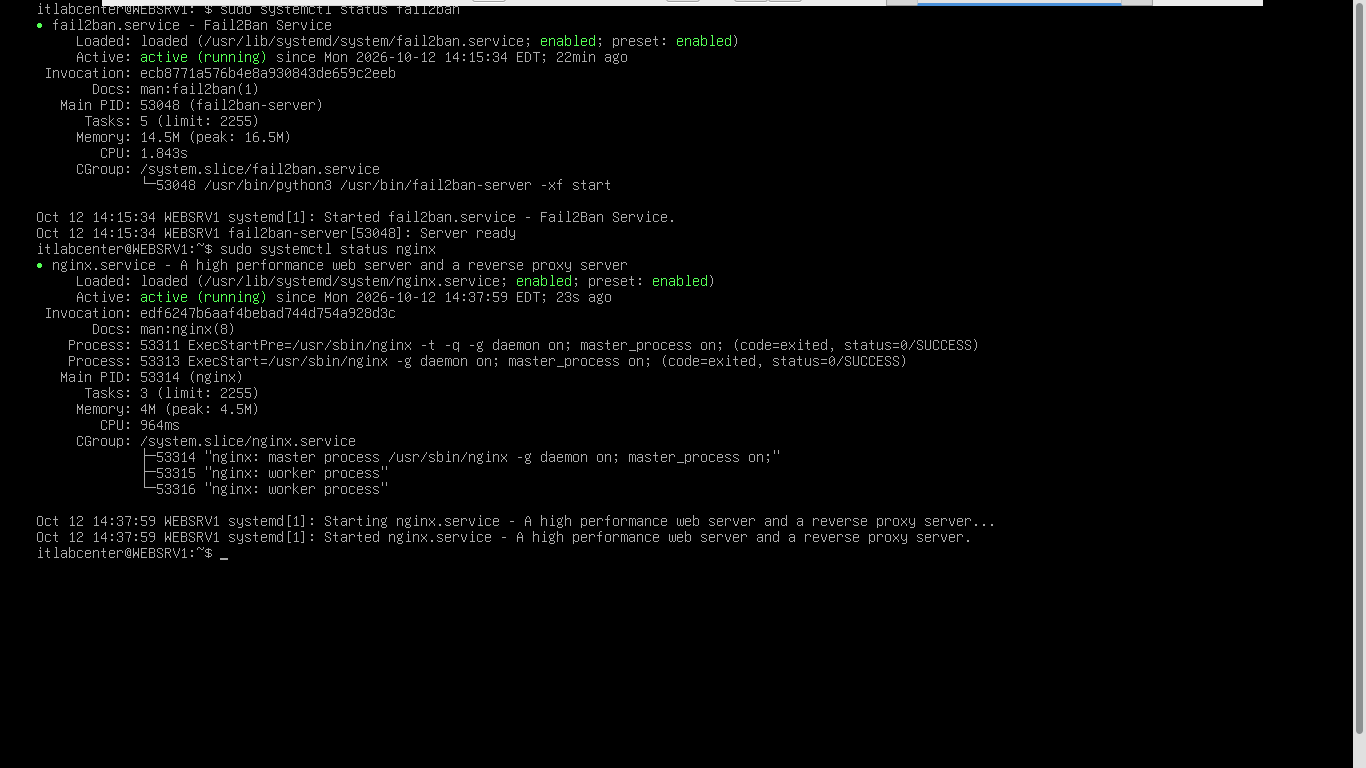
Navigate back to the DESKTOP1 attacker endpoint. If the fuzzer attack has stopped, go ahead and restart it
Run the following command from the WEBSRV1 Terminal to view the Fail2Ban live feed and witness the IP bans
itlabcenter@WEBSRV1:~$ sudo fail2ban-client status itlab-webapp
Resulting Output:
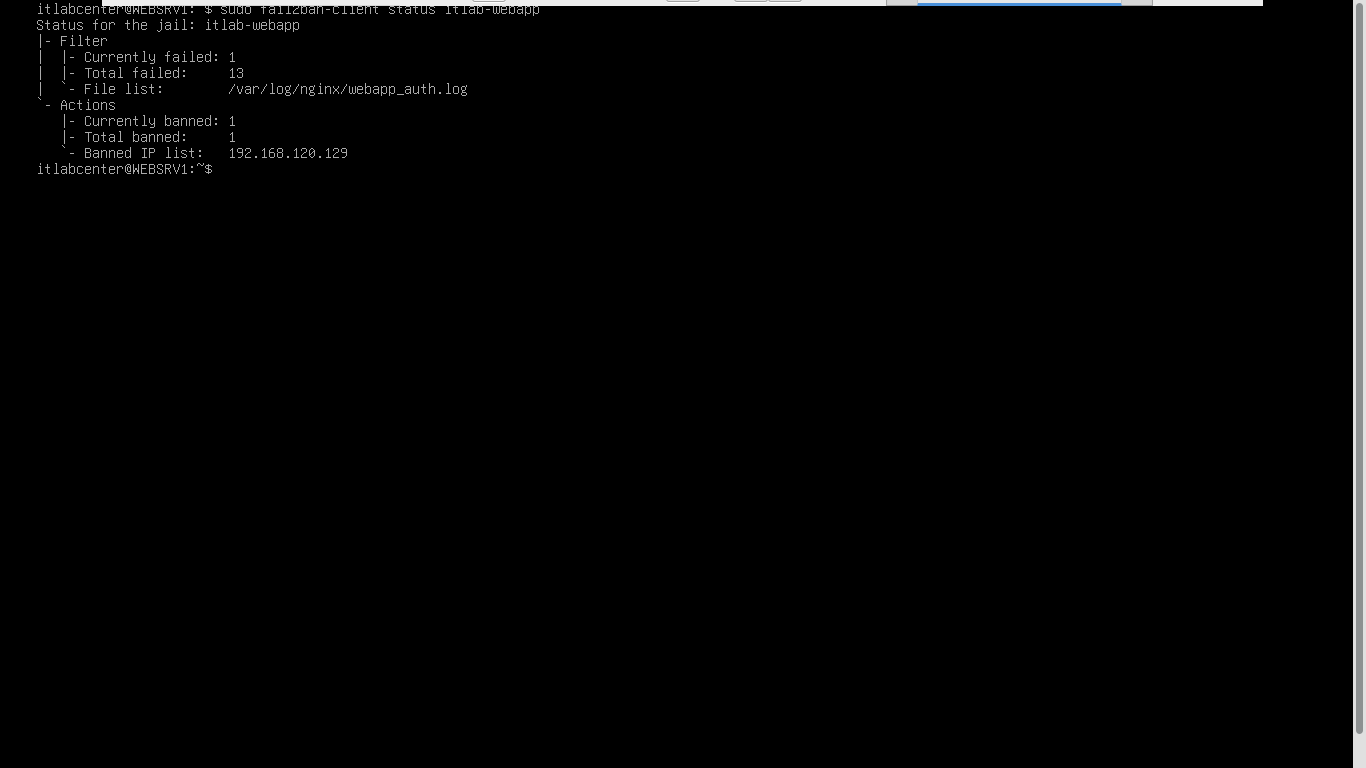
We can see that Fail2Ban has successfully caught our attacking host and banned the IP Address for fifteen
minutes. If you navigate back to the DESKTOP1 host, you'll see that the Fuzzer attack has been stopped dead
it's tracks. Now let's give this 15 minutes to clear up the Wazuh Dashboard. Afterwards, head back over to
the WAZUHSRV1 endpoint and log back into the Wazuh Dashboard as admin. Navigate to Threat Hunting and set
a filter to view the last 15 minutes of alerts. We can see that the attack has been effectively mitigated
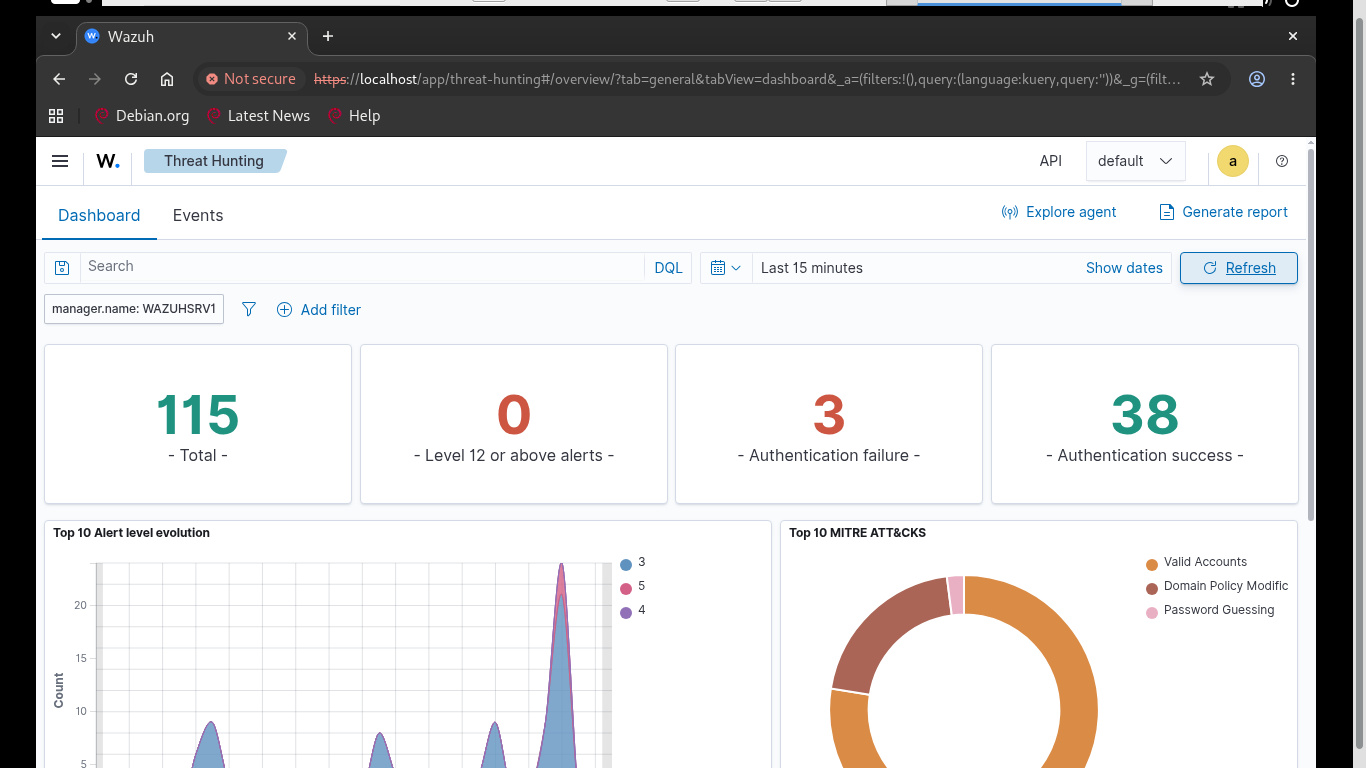
Congratulations! In this lab, you learned to navigate the primary features of the Wazuh SIEM to analyze
log events, create custom detections, and detect threats in production environments + threat remediation