This lab demonstrates ability to configure, troubleshoot, and support Windows Remote Desktop connections in a business environment. I walk through the setup of Remote Desktop Protocol (RDP) on Windows machines, including enabling remote access, configuring firewall rules, and verifying network connectivity. The lab also covers common support scenarios such as resolving driver errors, deploying updates, and optimizing performance.
Windows is the dominant personal and business workstation operating system and is used in every industry
Understanding how the system functions and how to troubleshooting common issues is critical to IT careers
Nearly every PC is sold to the user with some version of Windows pre-installed out of the box on the device
Because of this the majority of individuals are familiar with the OS but not how it functions on some level
Non-technical users can often break things or cause performance issue by tinkering with the configurations
Quick Links:
Requirements:
• Windows PC w/ Internet Connection
• USB Flash Drive w/ at least 64GB Capacity
• Unused PC w/ at least 4GB of Memory
1. Create Windows 11 Live USB
Here we will simulate the end user through a USB live version of Windows 11 which won't save on the PCs disk
This type of installation was referred to as Windows On-the-Go in the past but is now possible with rufus.exe
Make sure that when downloading the Windows 11 ISO file you select the Windows Pro edition which includes RDP
Download Windows 11 Disk Image (ISO): Microsoft Windows 11 ISO
Download Rufus Disk Imaging Software: Rufus Official Download
Insert USB Flash Drive, run rufus.exe, select target drive as your USB Flash Drive, select Windows 11 ISO file
From the 'Image option' dropdown menu, select the 'Windows To Go' image option to create a live usb, hit start:

Use the rufus popup menu to customize the Windows 11 Live installation and disable data collection for this lab:

Remove USB Flash Drive and Insert into unused PC. Start PC and press hot boot key on startup:

Select UEFI USB Flash Boot. Allow Windows 11 Live to load and move through the setup to reach the desktop:
We now have our basic workstation that will simulate the end user PC for us to troubleshoot later
Be sure to connect this system to the internet with WI-FI or a wired connection for the next steps
2. Setup Remote Desktop Protocol Server
The Remote Desktop Protocol (RDP) allows you to connect to a graphical interface on a Windows System
RDP utilizes port 3389 and allows you to connect remotely which is perfect for IT Support troubleshooting
In or for us to perform remote troubleshooting later in this lab we must enable the server on the desktop
From the start menu head to Settings > System > Remote Desktop and set Remote Desktop to on and Confirm:

We will now be able to troubleshoot and address issues remotely later in this lab, take note of the PC name
3. Open Port 3389 (RDP) on your Firewall
In order for the Remote Connection to be successful port 3389 must be allowed to pass on the firewall
Firewalls operate on the security principle of implicit deny, so unless expected traffic is blocked by default
Let's set this expectation by configuring some rules in the firewall. Head to 192.168.0.1 in Windows browser:

If your firewall hasn't been configured previously then the login credentials are admin pfsense
If you have not previously configured pfSense you will be prompted to enter the setup wizard to do so
Once configured use the top menu to head to Firewall > Rules > LAN interface then click the green Add
From here you will be presented with a large menu of configuration options, we will walk through each:
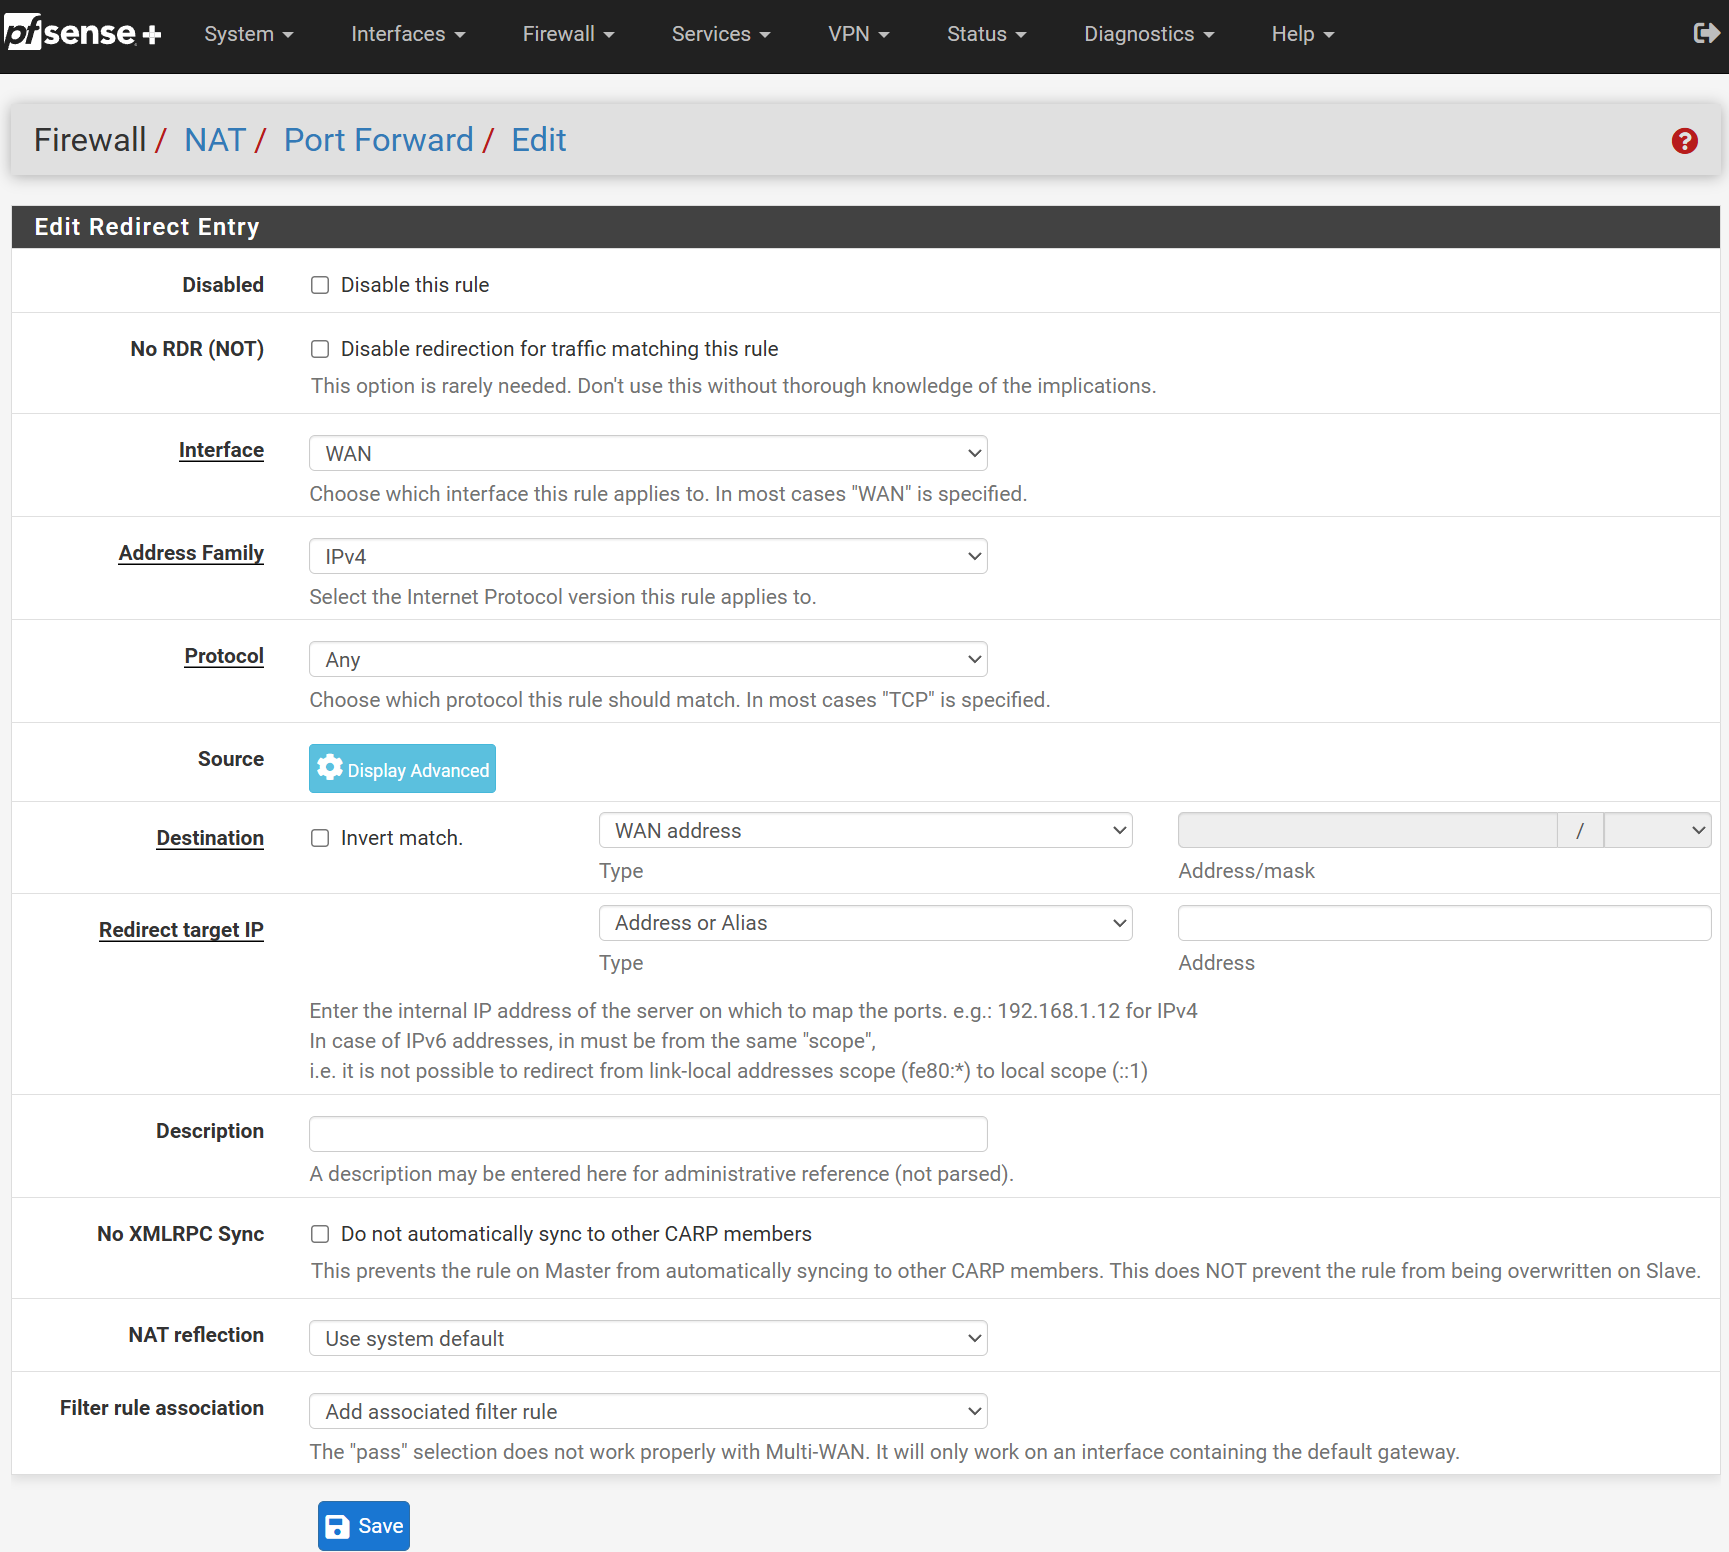
• Action: Pass
• Disabled: Leave Unchecked
• Interface: LAN
• Address Family: IPv4
• Protocol: TCP
• Source: LAN Subnets
• Destination: LAN Subnets
• Destination Port Range: MS RDP (3389) & MS RDP (3389)
• Log: Leave Unchecked
• Description: Local RDP
We now have the ability to perform a Remote Desktop connection to the users PC from our IT Support PC
4. Simulate System Errors & Poor Performance
For us to begin to troubleshoot this system we first need to create some issues for us to correct
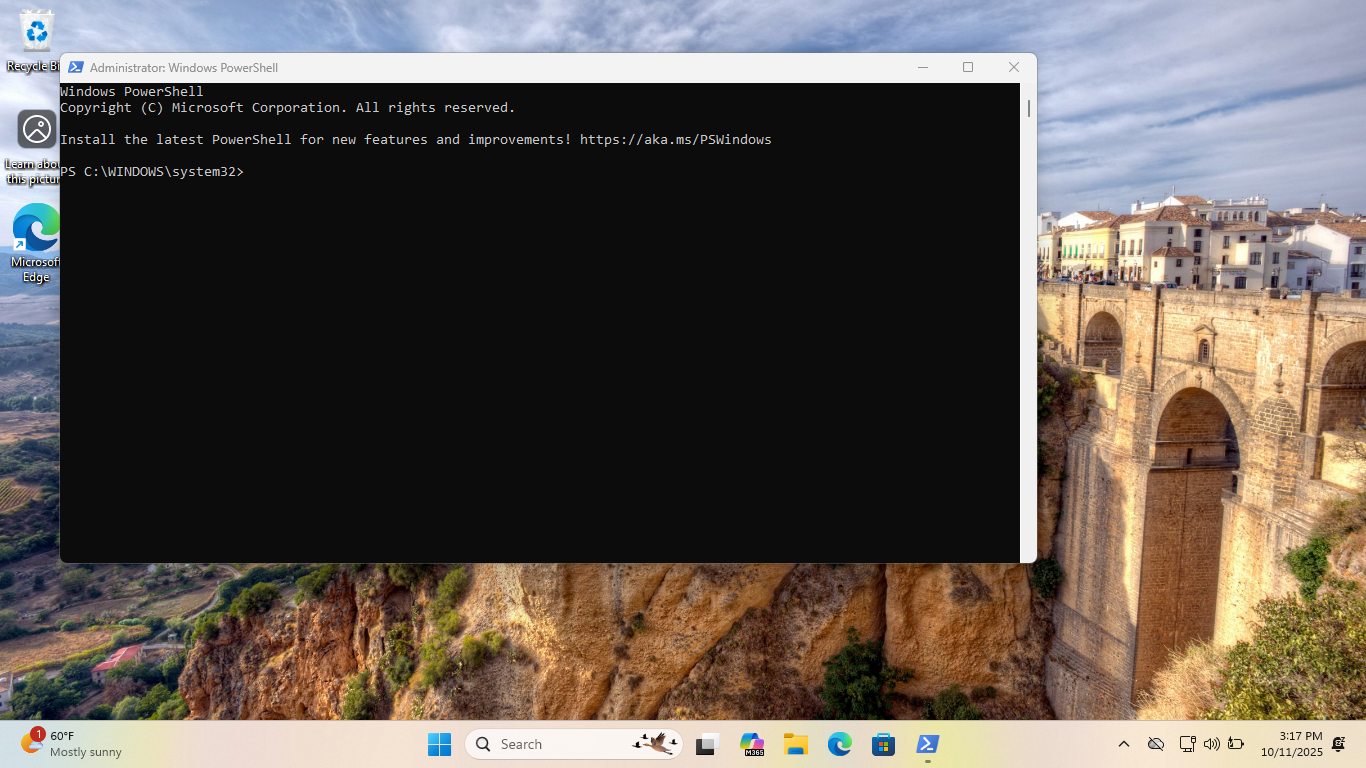
Head to the search bar at the bottom and type in powershell, right click and run as administrator
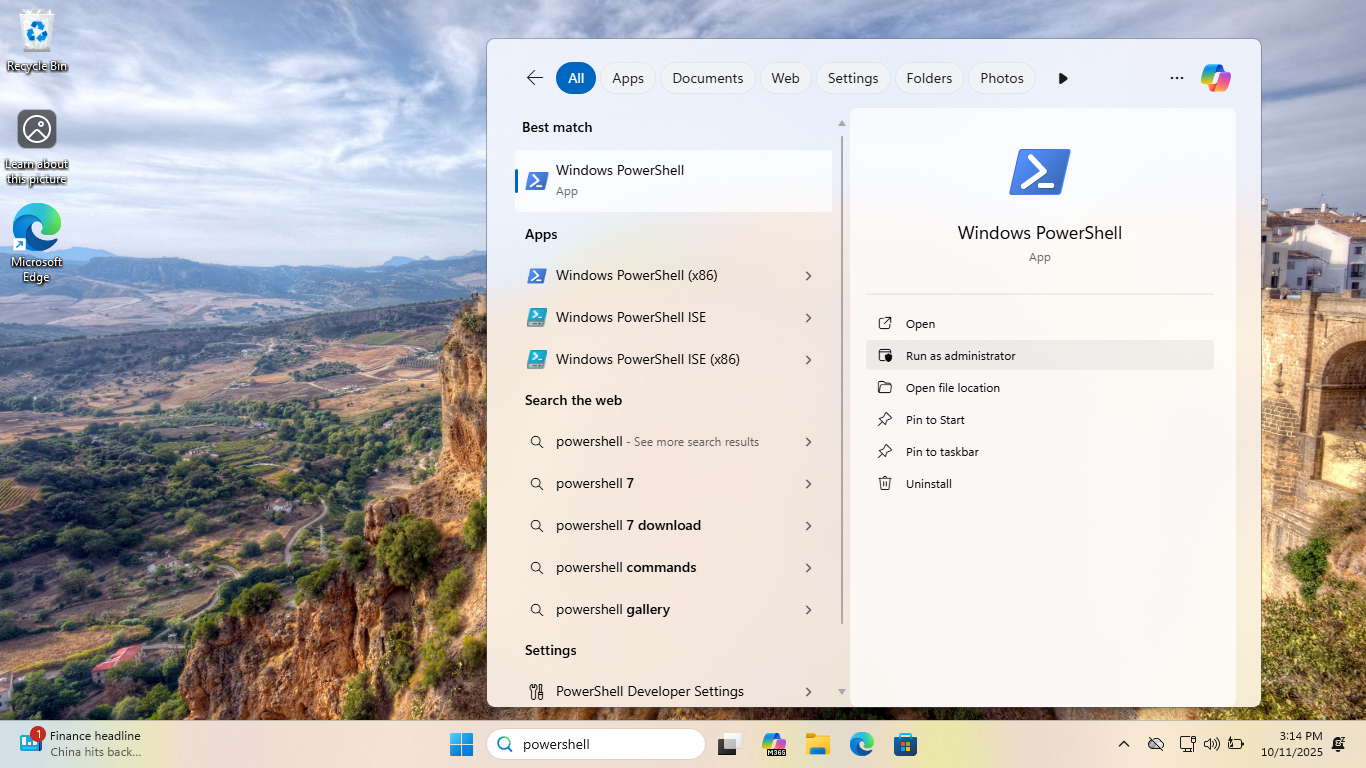
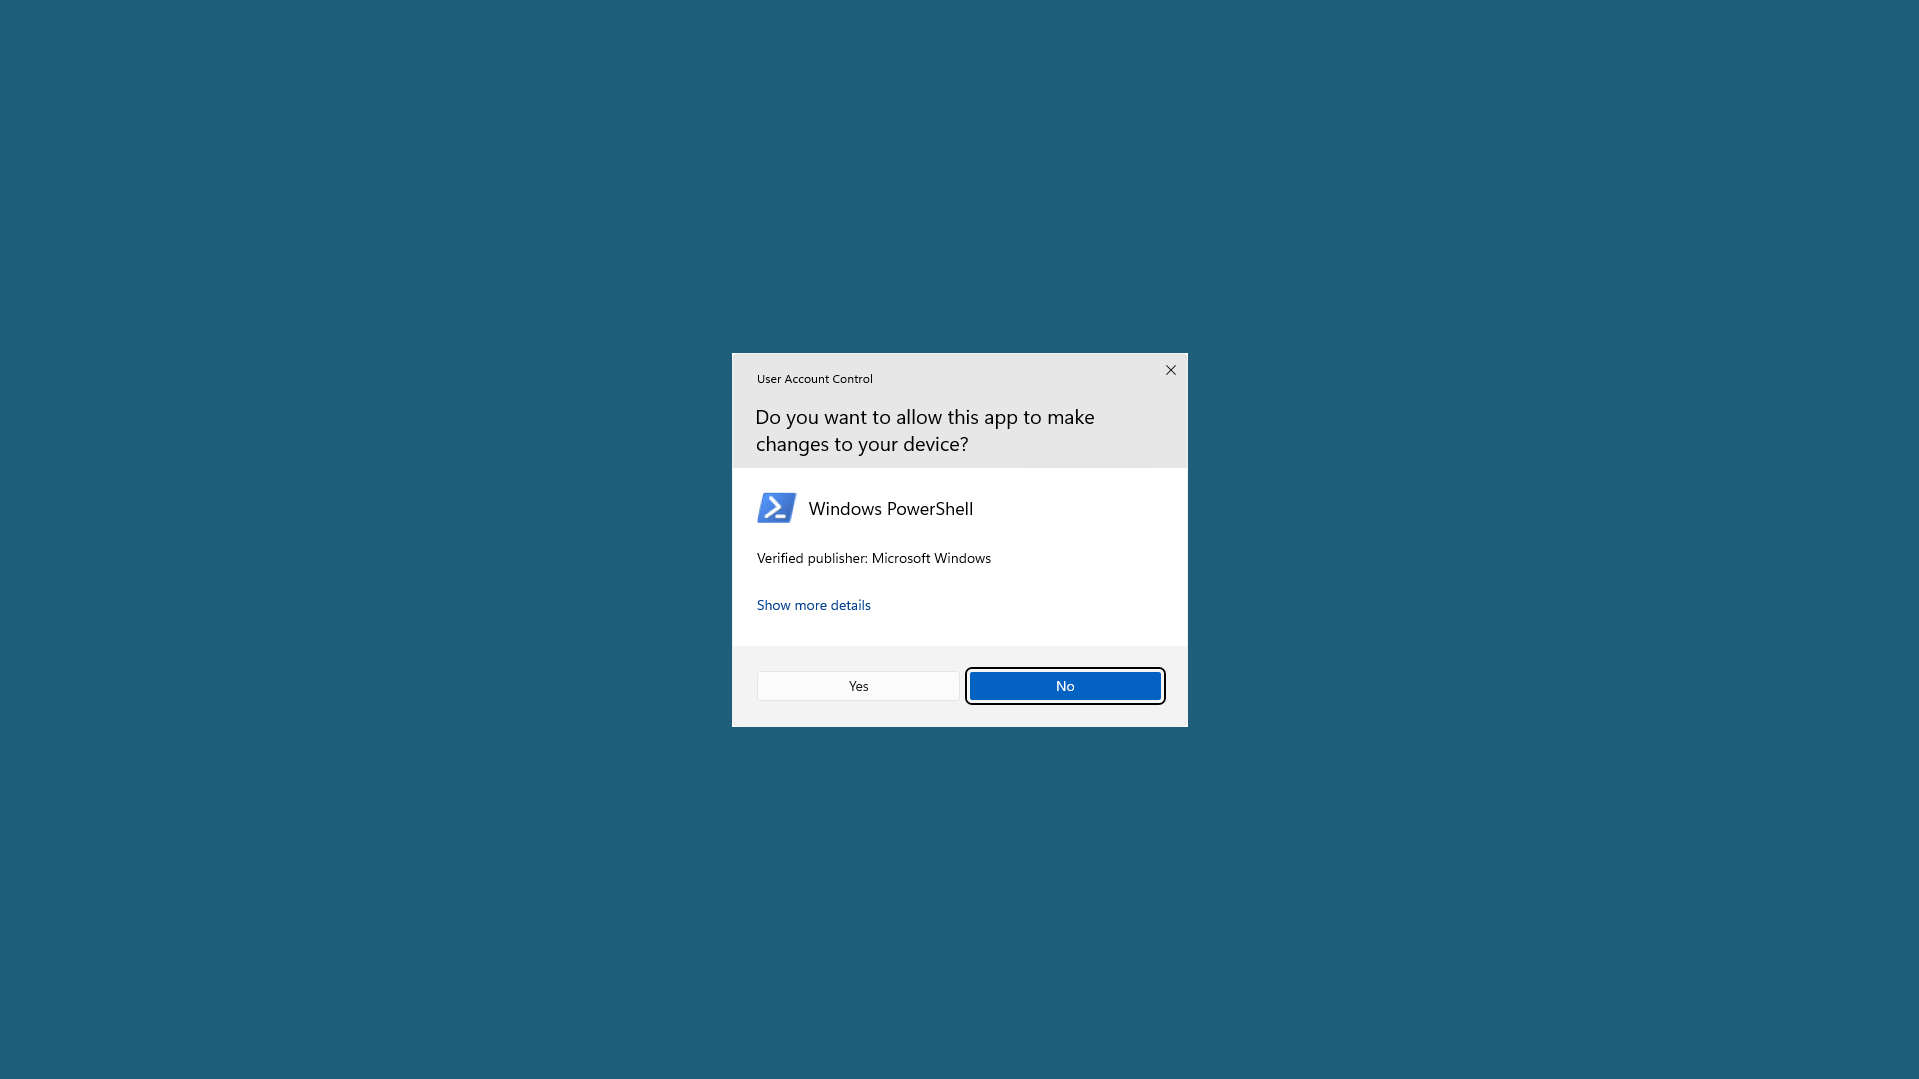
When prompted for administrative permission click yes:
We are now presented with a PowerShell terminal which will function as our command line interface
PowerShell is a cross-platform task automation and configuration management framework for Windows
It consists of a command-line shell and an associated scripting language, for this lab we use both
Powershell is the modern and newly improved successor of the old-fashioned Windows Command Prompt
Unlike with our terminal used in Linux based labs, PowerShell command are case sensitive be advised
Head to https://itlab.center/labsimrogueprocess.zip to download the pre-made throttling scripts
Run the following commands from the PowerShell terminal to unzip and place the scripts in the C drive:
PS C:\Windows\system32> New-Item -Path "C:\" -Name "LabSupportScripts" -ItemType Directory
PS C:\Windows\system32> Expand-Archive -Path "~\Downloads\labsimrogueprocess.zip" -DestinationPath "C:\LabSupportScripts\" -Force
Run the following command from the PowerShell terminal to simulate slow performance with throttling:
PS C:\Windows\system32> Start-Process "C:\LabSupportScripts\LabSimRogueProcess.exe" -ArgumentList "-WindowStyle Hidden -ExecutionPolicy Bypass -File C:\LabSupportScripts\launcher.ps1"
The system will now begin to throttle the system resources and perform simple actions very slowly
We now have our initial environment for us to perform remote troubleshooting as the support specialist
Run the following command from the PowerShell terminal and take note of the IPv4 Address for Ethernet:
PS C:\Windows\system32> ipconfig
Go ahead and close the PowerShell terminal so we have a blank desktop environment when we remote in
5. Perform Remote Troubleshooting for Poor Performance
Switch to your main Windows PC that we will use to simulate the support agent who received this ticket
To initiate a remote connection to the target PC head to Search > Remote Desktop Connection application:
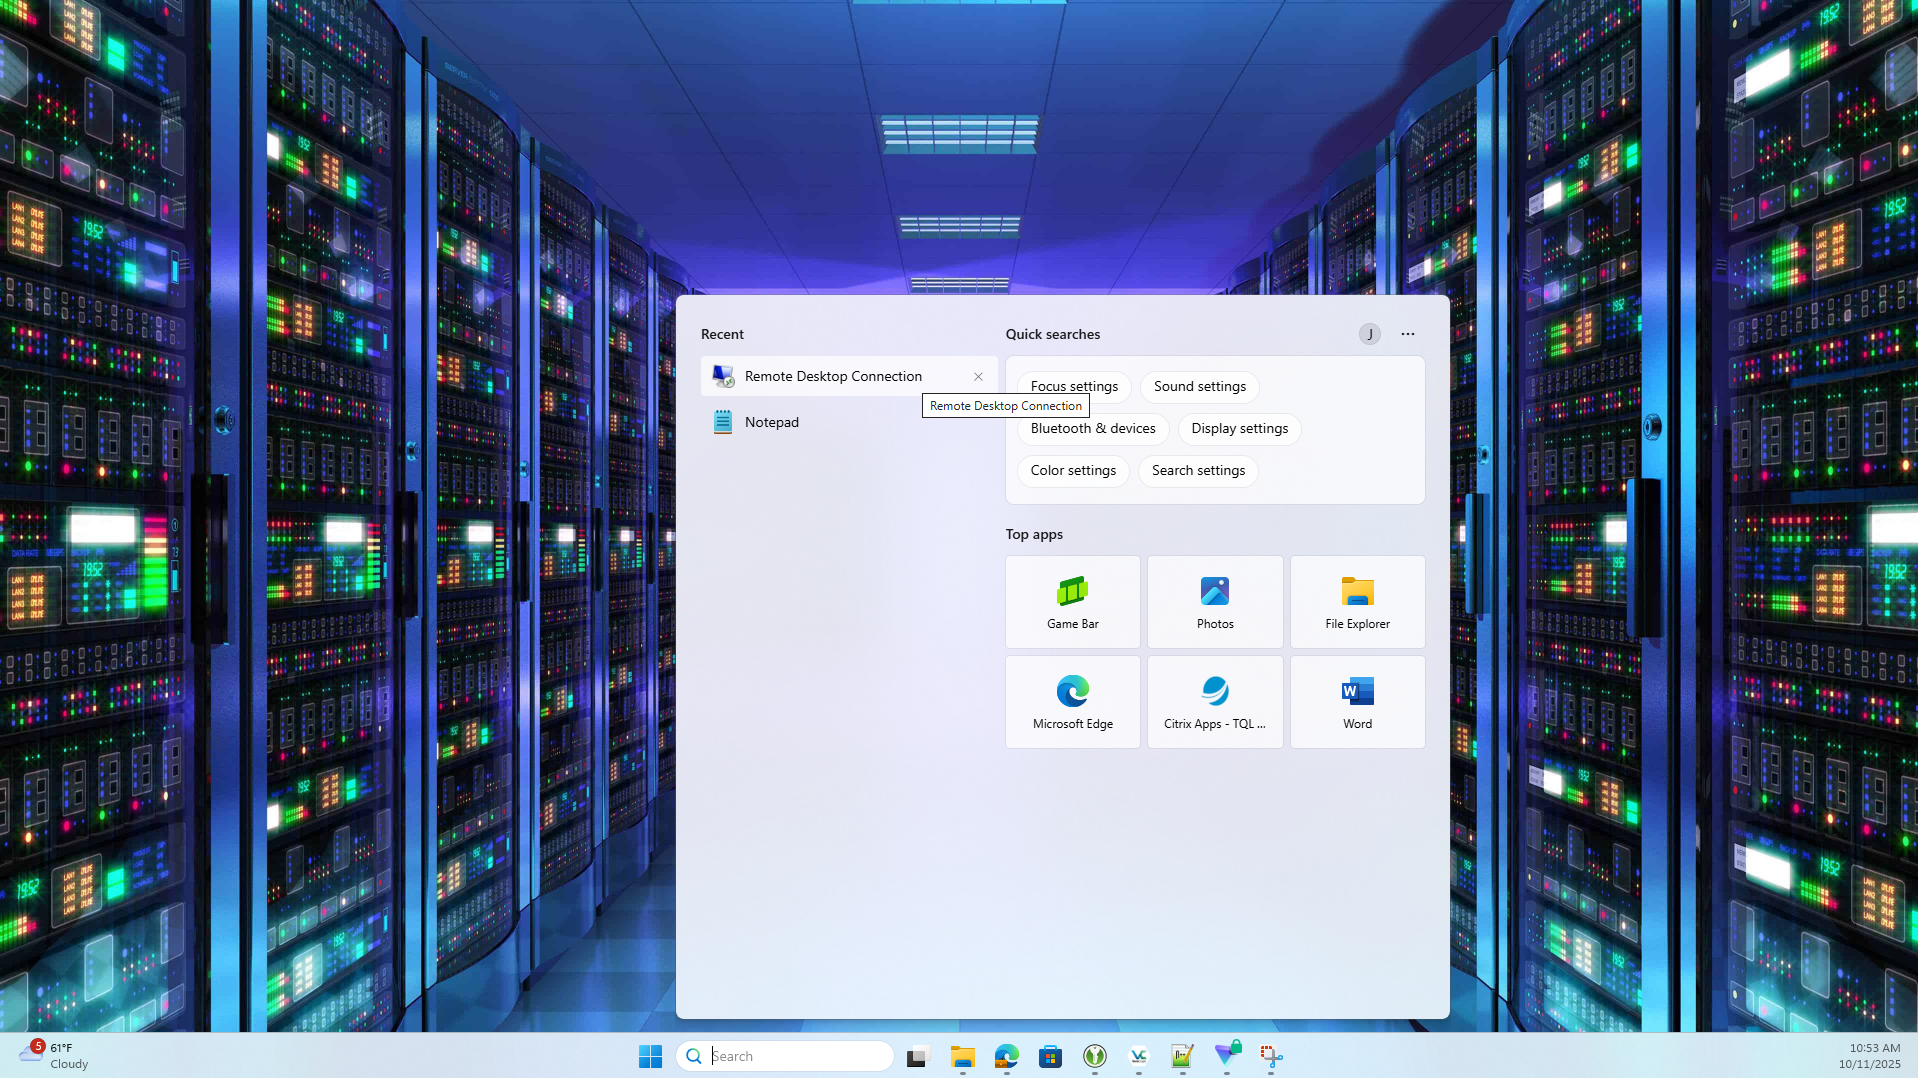
A prompt will appear. To initiate the connection enter the private IPv4 or PC Name of the Users system:

You will then be asked for credentials. Enter the username and password of the user and select confirm
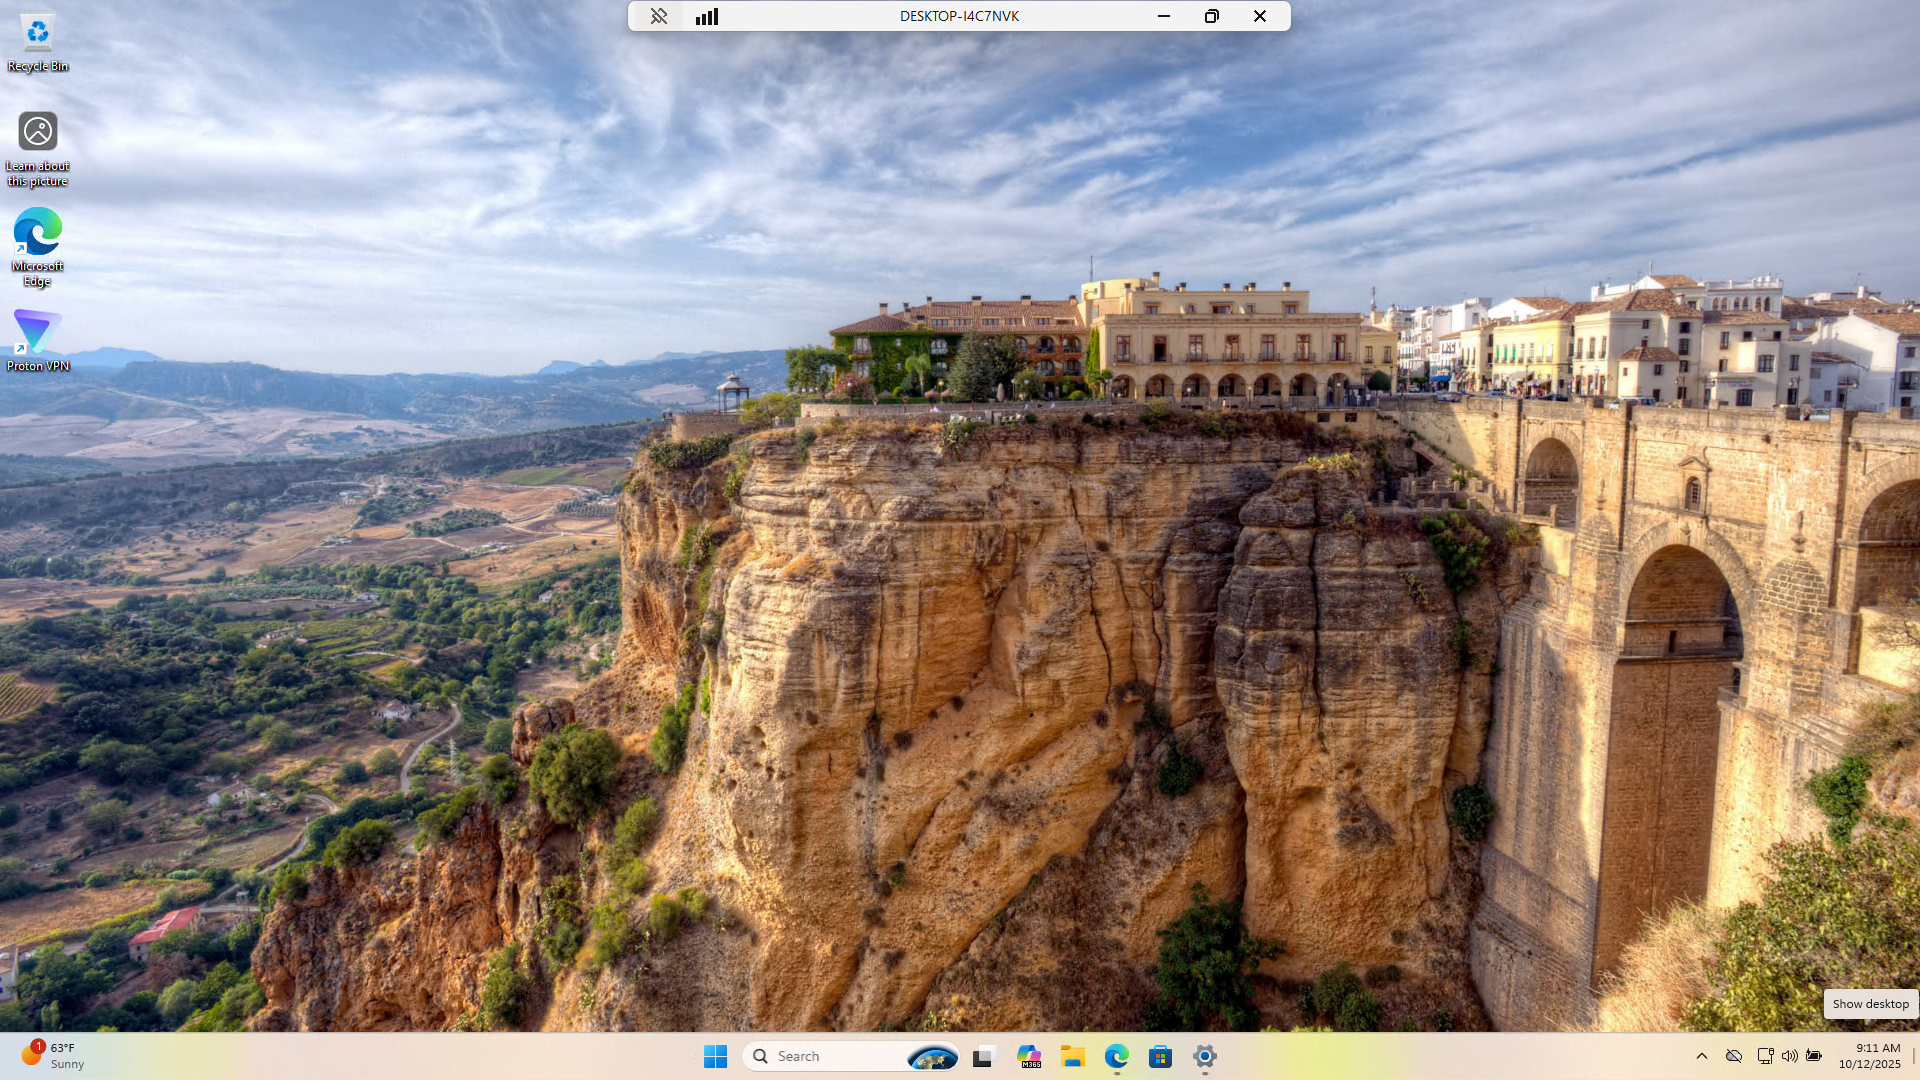
This may take some time to load but once completed if done properly we will be presented with the GUI:
Let's walk through several steps you can take to troubleshoot slow performance before the real solution
These steps can be done in any order but it's good practice to start with the easiest and work from there
Let's start by first checking for available updates to the operating system and the associated drivers
From the remote desktop window head to the start menu > Settings > Windows Update > Check for Updates:
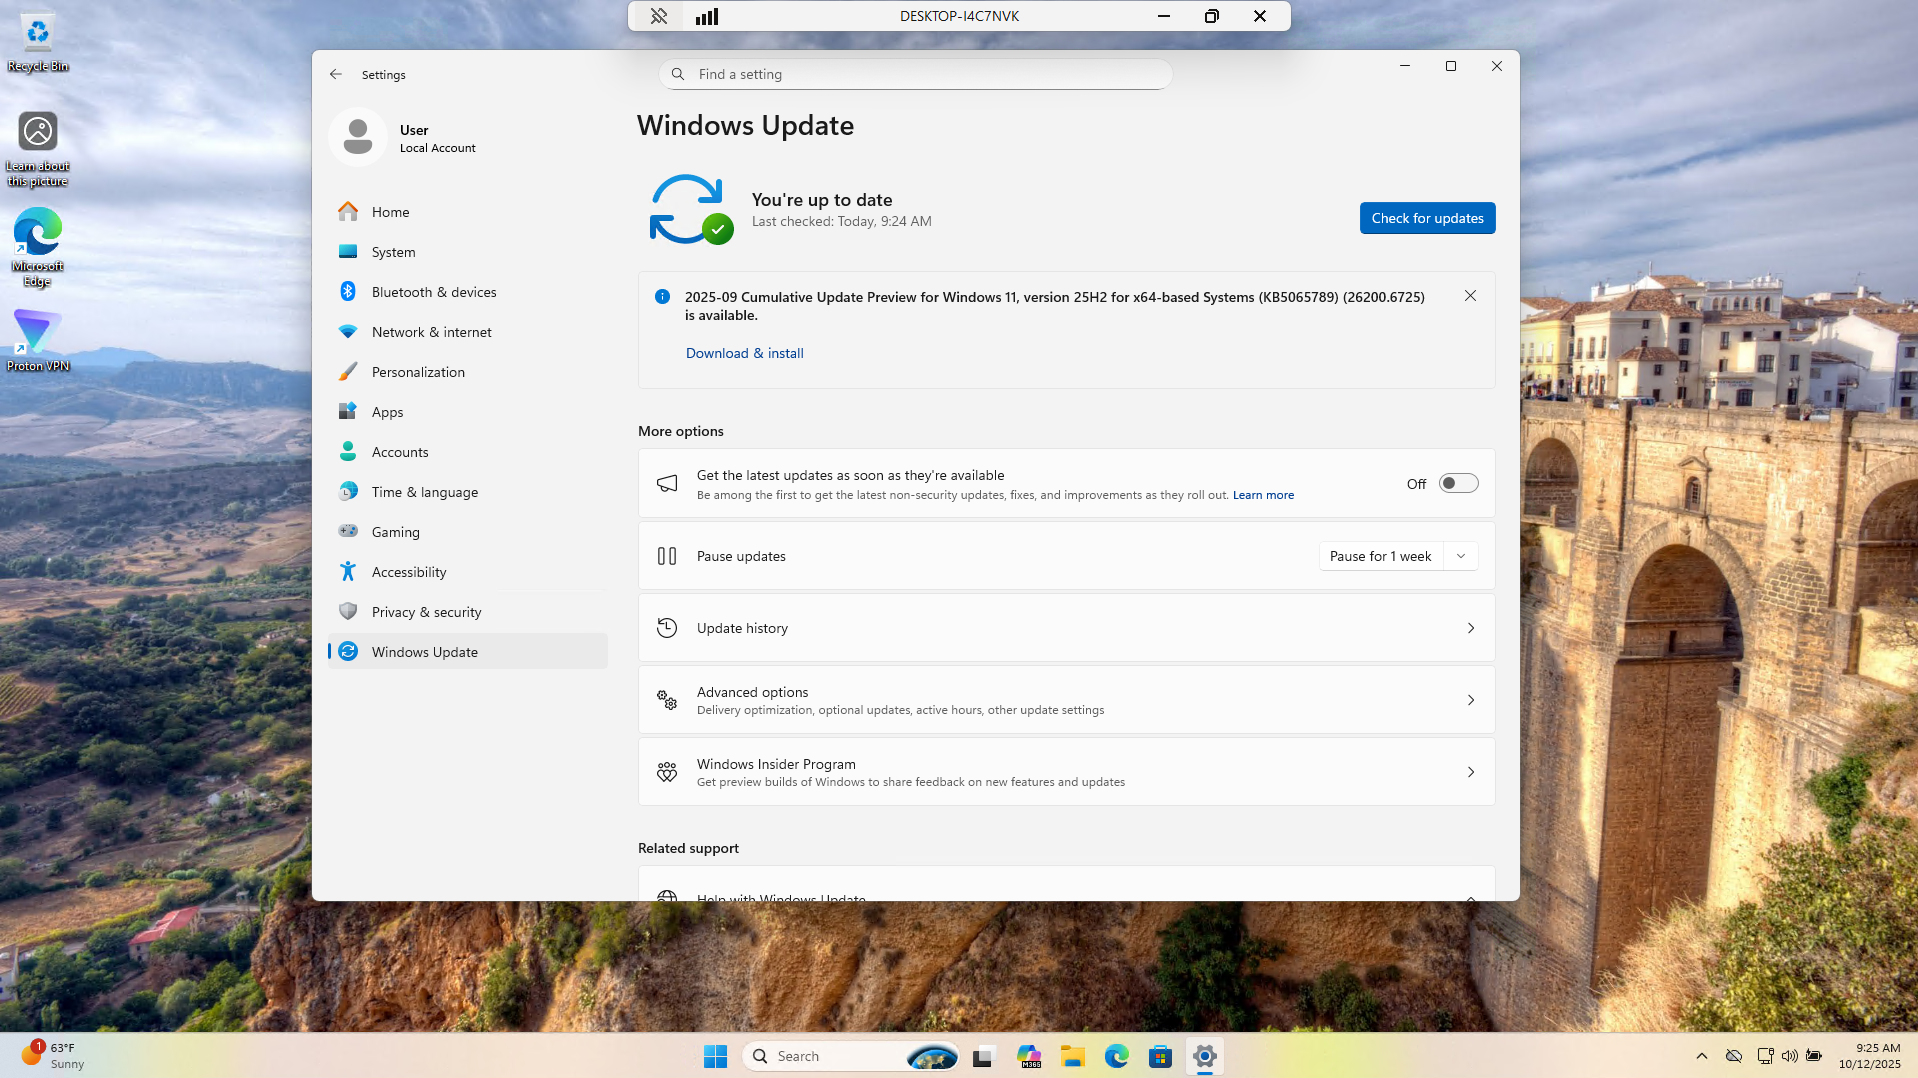
We can see from this that the system is up to date. Out of date software can cause slow PC performance
Next let's scan for malware by heading to Windows Security > Virus & Threat Protection > Quick Scan:
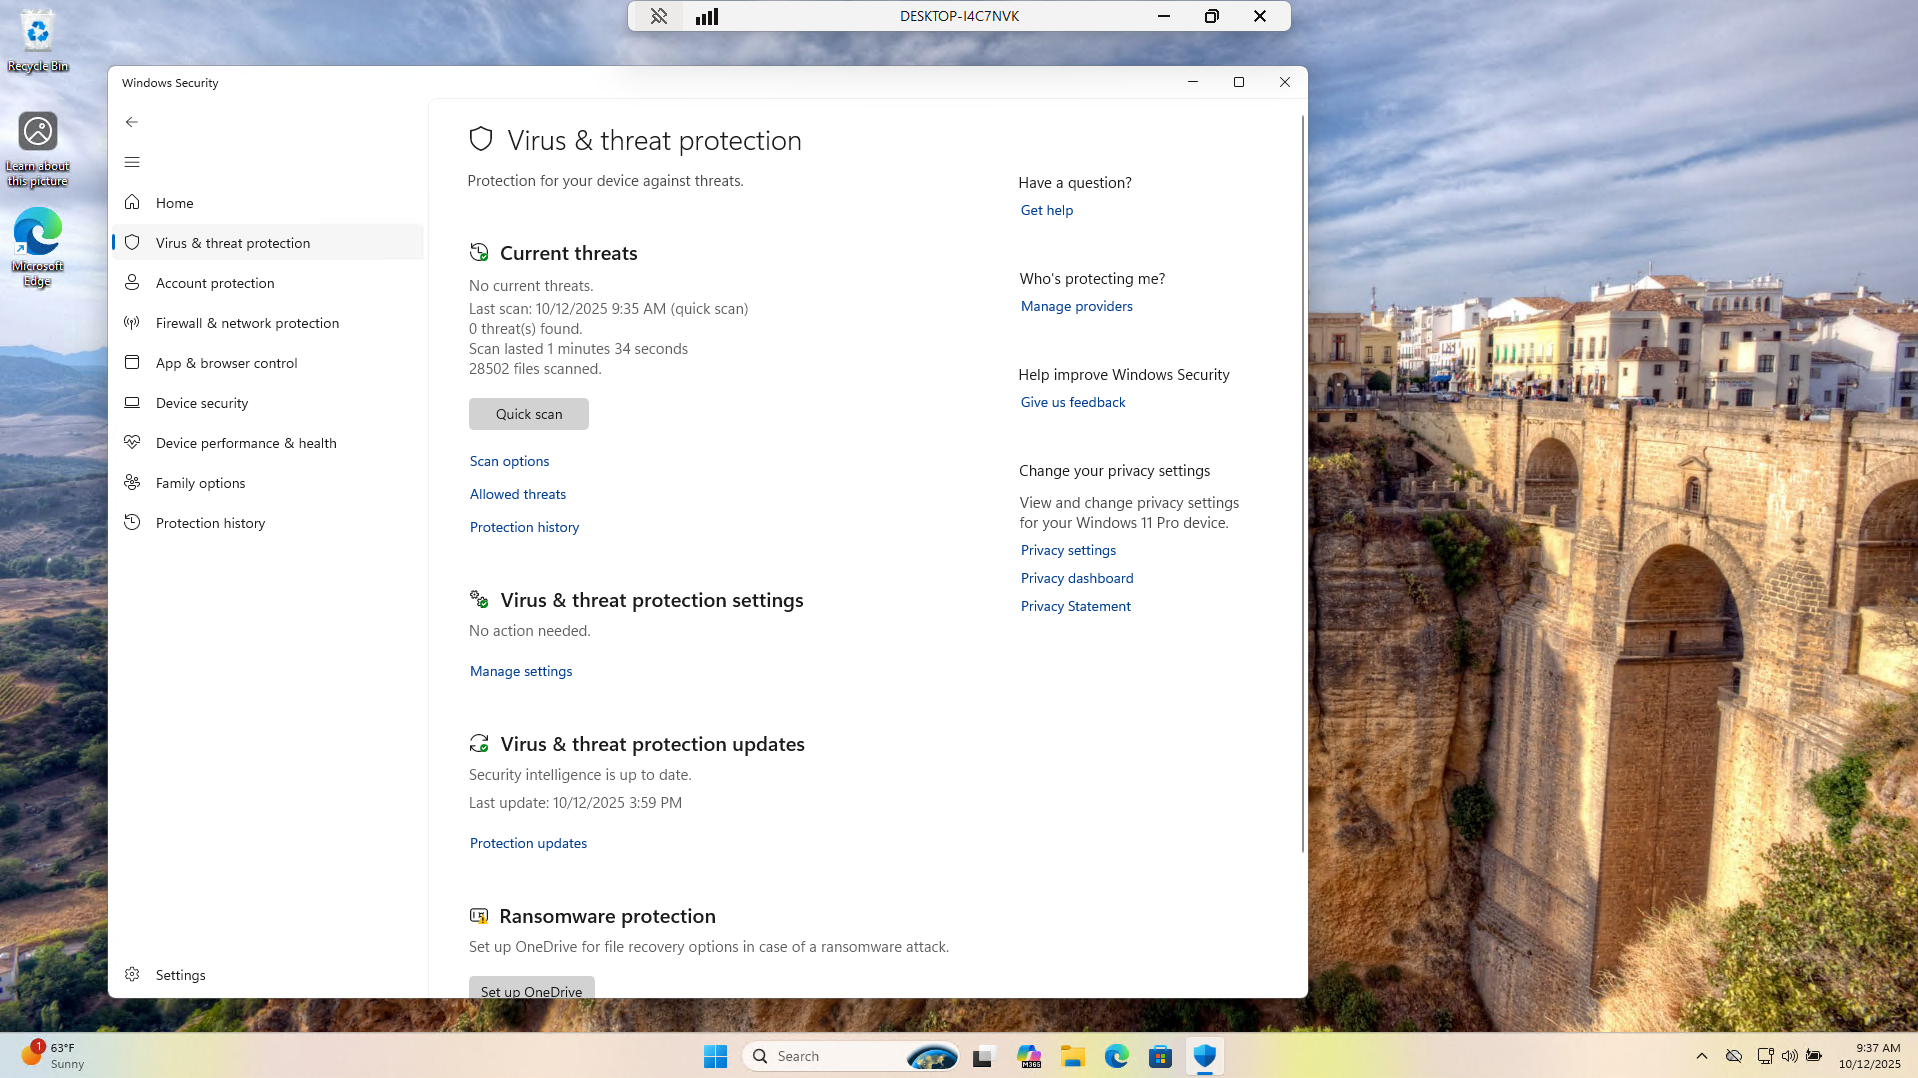
We can see from this that there was no malware detected. Malware is a major cause of slow performance
Next let's adjust the performance settings to optimize the visual effects available within Windows 11
First visual settings heading to Settings > System > About > Advanced System Settings > Performance:
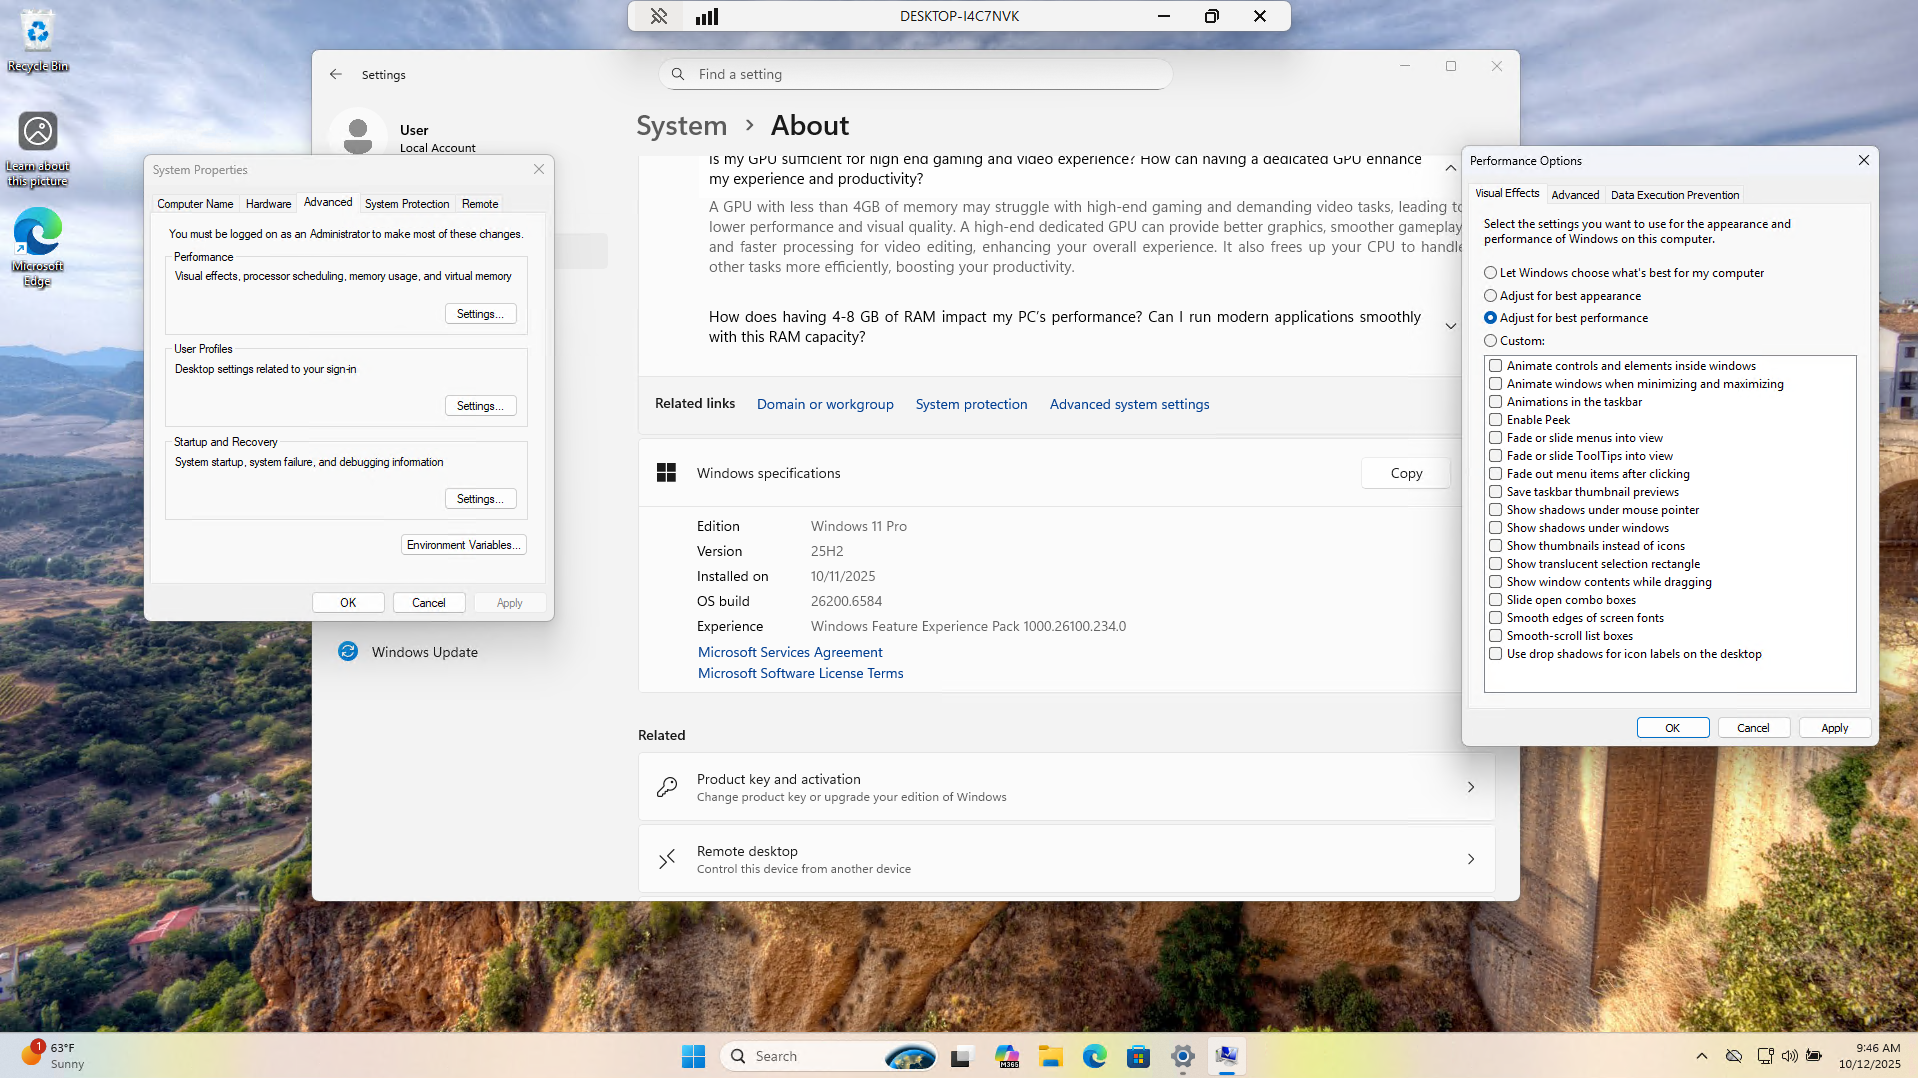
Apply the configuration and we have the most optimal settings for performance available in Windows 11
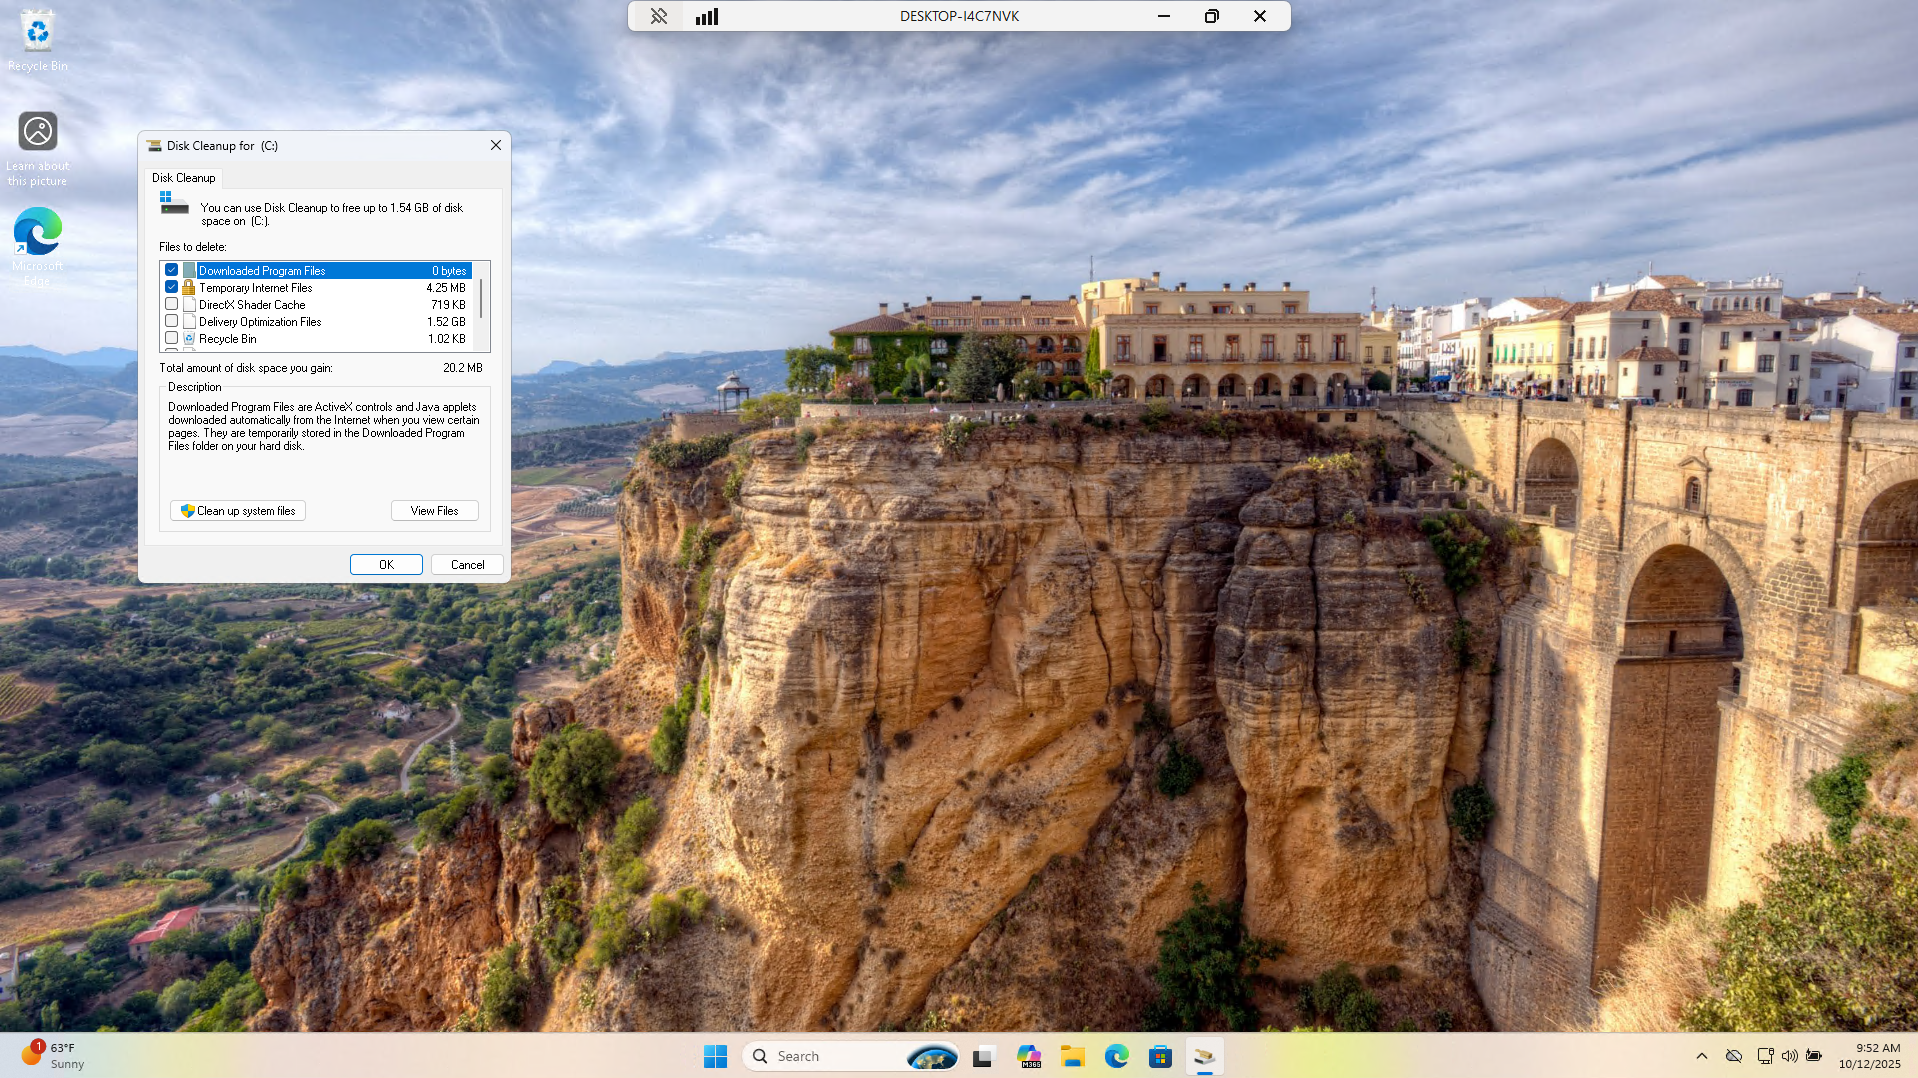
This has still not completely solved our issue so we will next move on to Freeing up spare Disk Space
From the search menu head to the Disk Cleanup Utility which we can utilize to remove Temporary Files:
If we are still experiencing issues at this point we can move on to the solution for this specific lab
One of the best ways to isolate the issues of poor system performance is by monitoring resource usage
Windows includes a built in tool known as Task Manager to perform this. Open Task Manager from search:
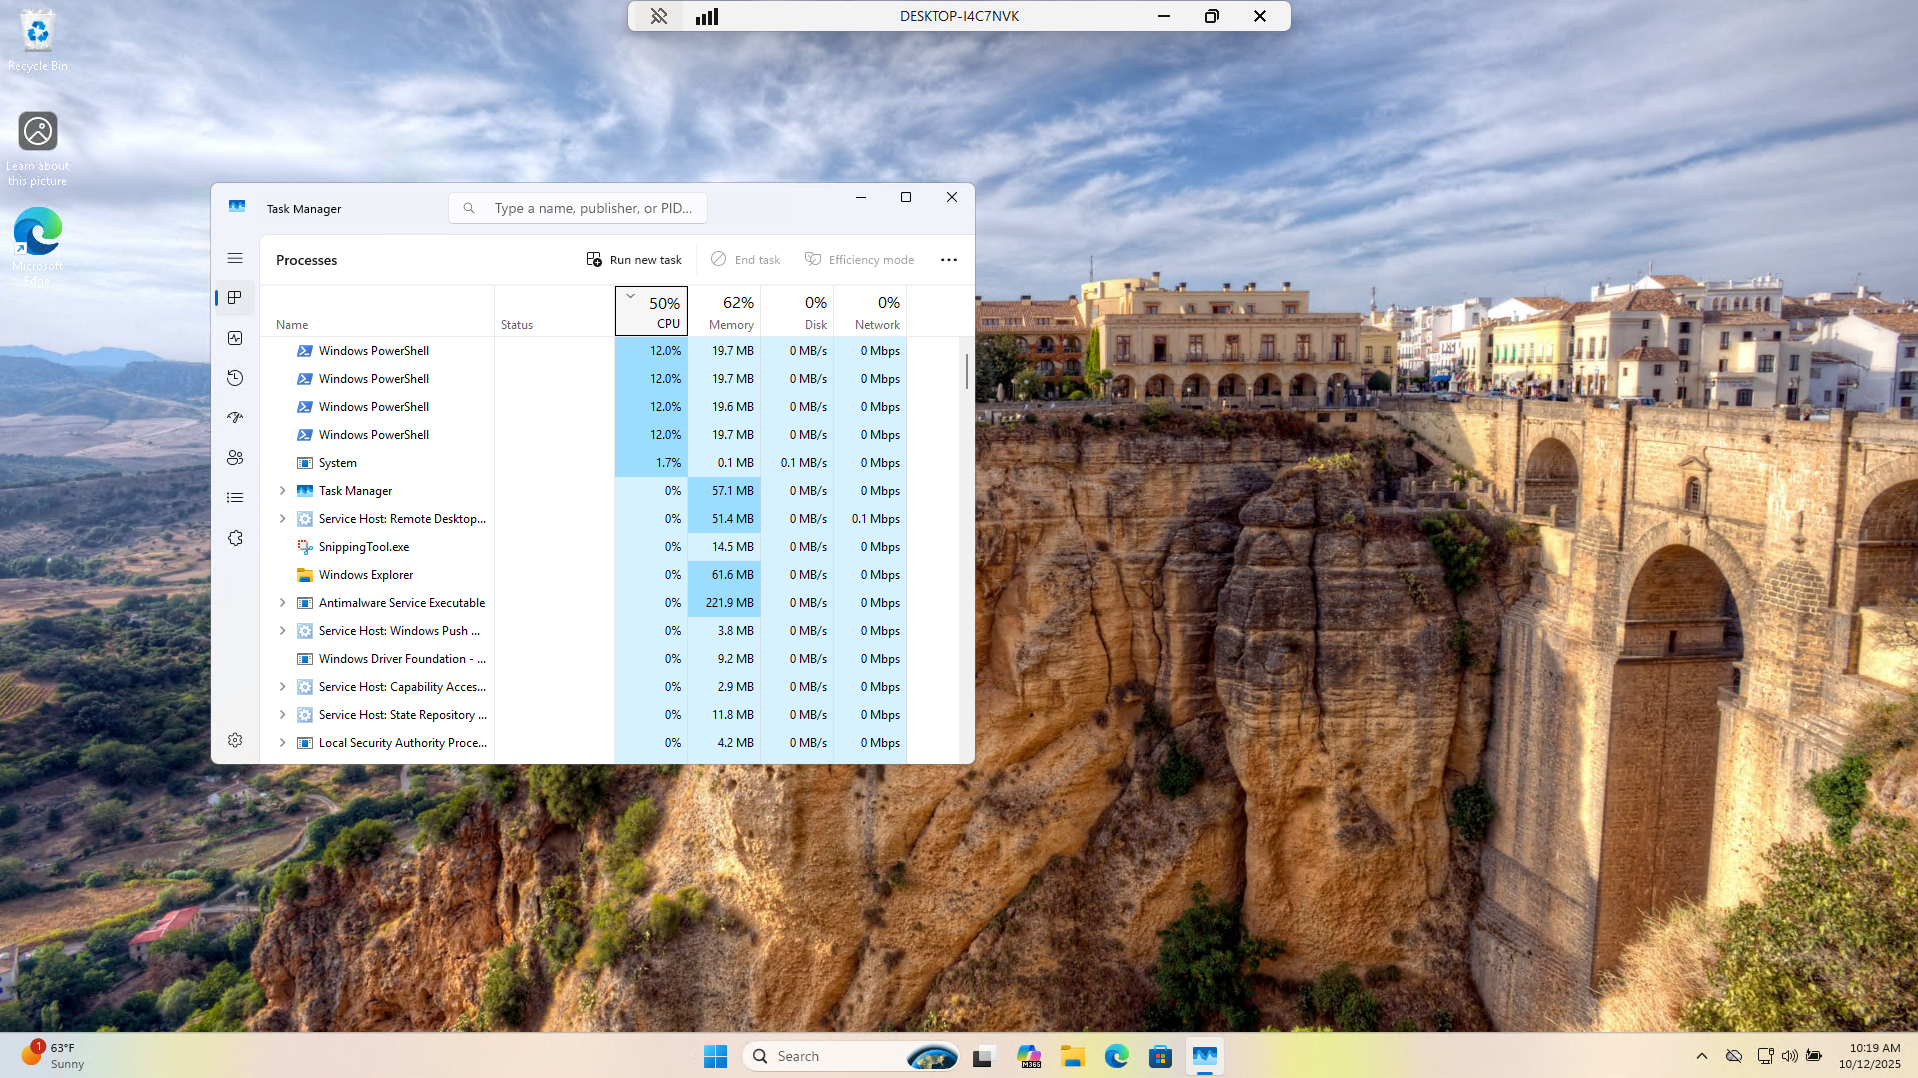
This gives us a view of the resource consumption of each program. Filter for high CPU usage by clicking CPU
We can now see clearly that there are several PowerShell instances throttling the CPU, bogging things down
Programs which consume high amounts of resources unchecked such as this case are known as Rogue Processes
Remediate the root cause of the slow performance by clicking on each process and manually ending the task:
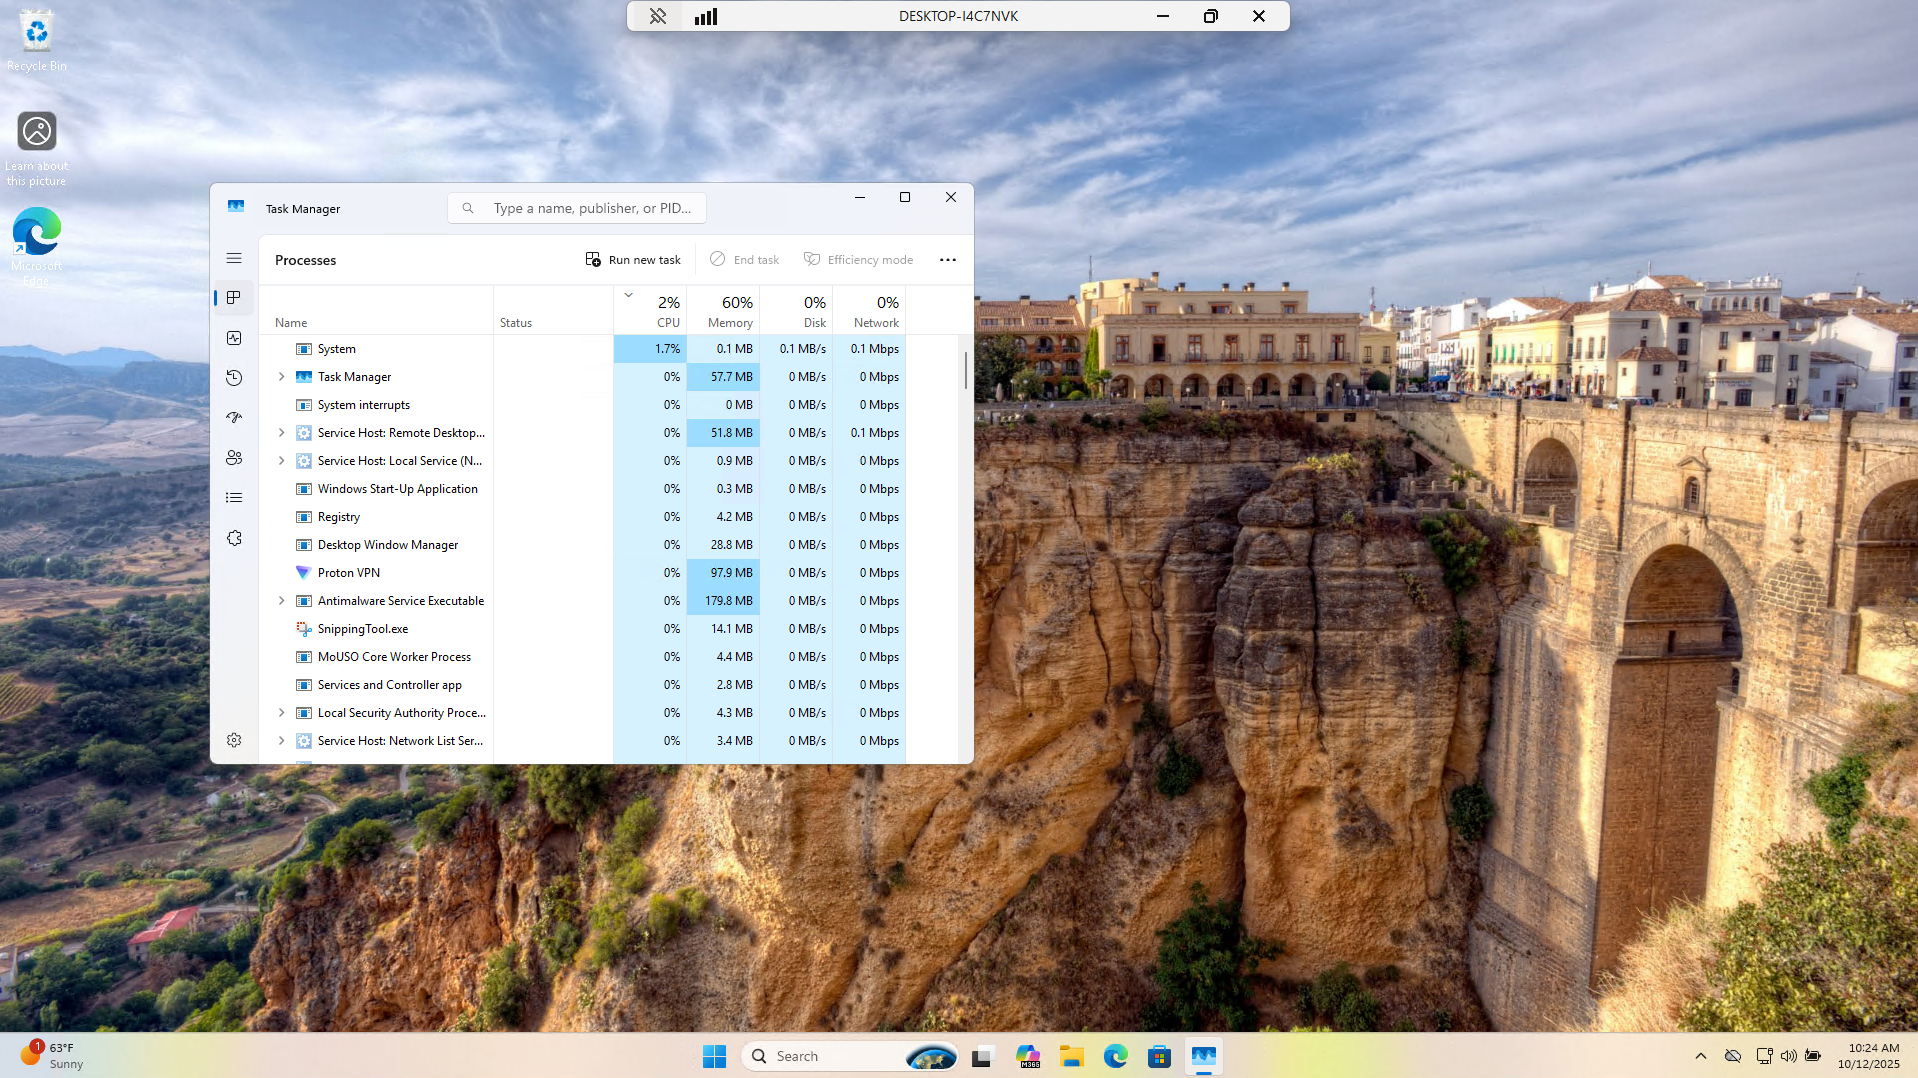
We can see that this has resolved the issue and returned the system resource utilization to a baseline
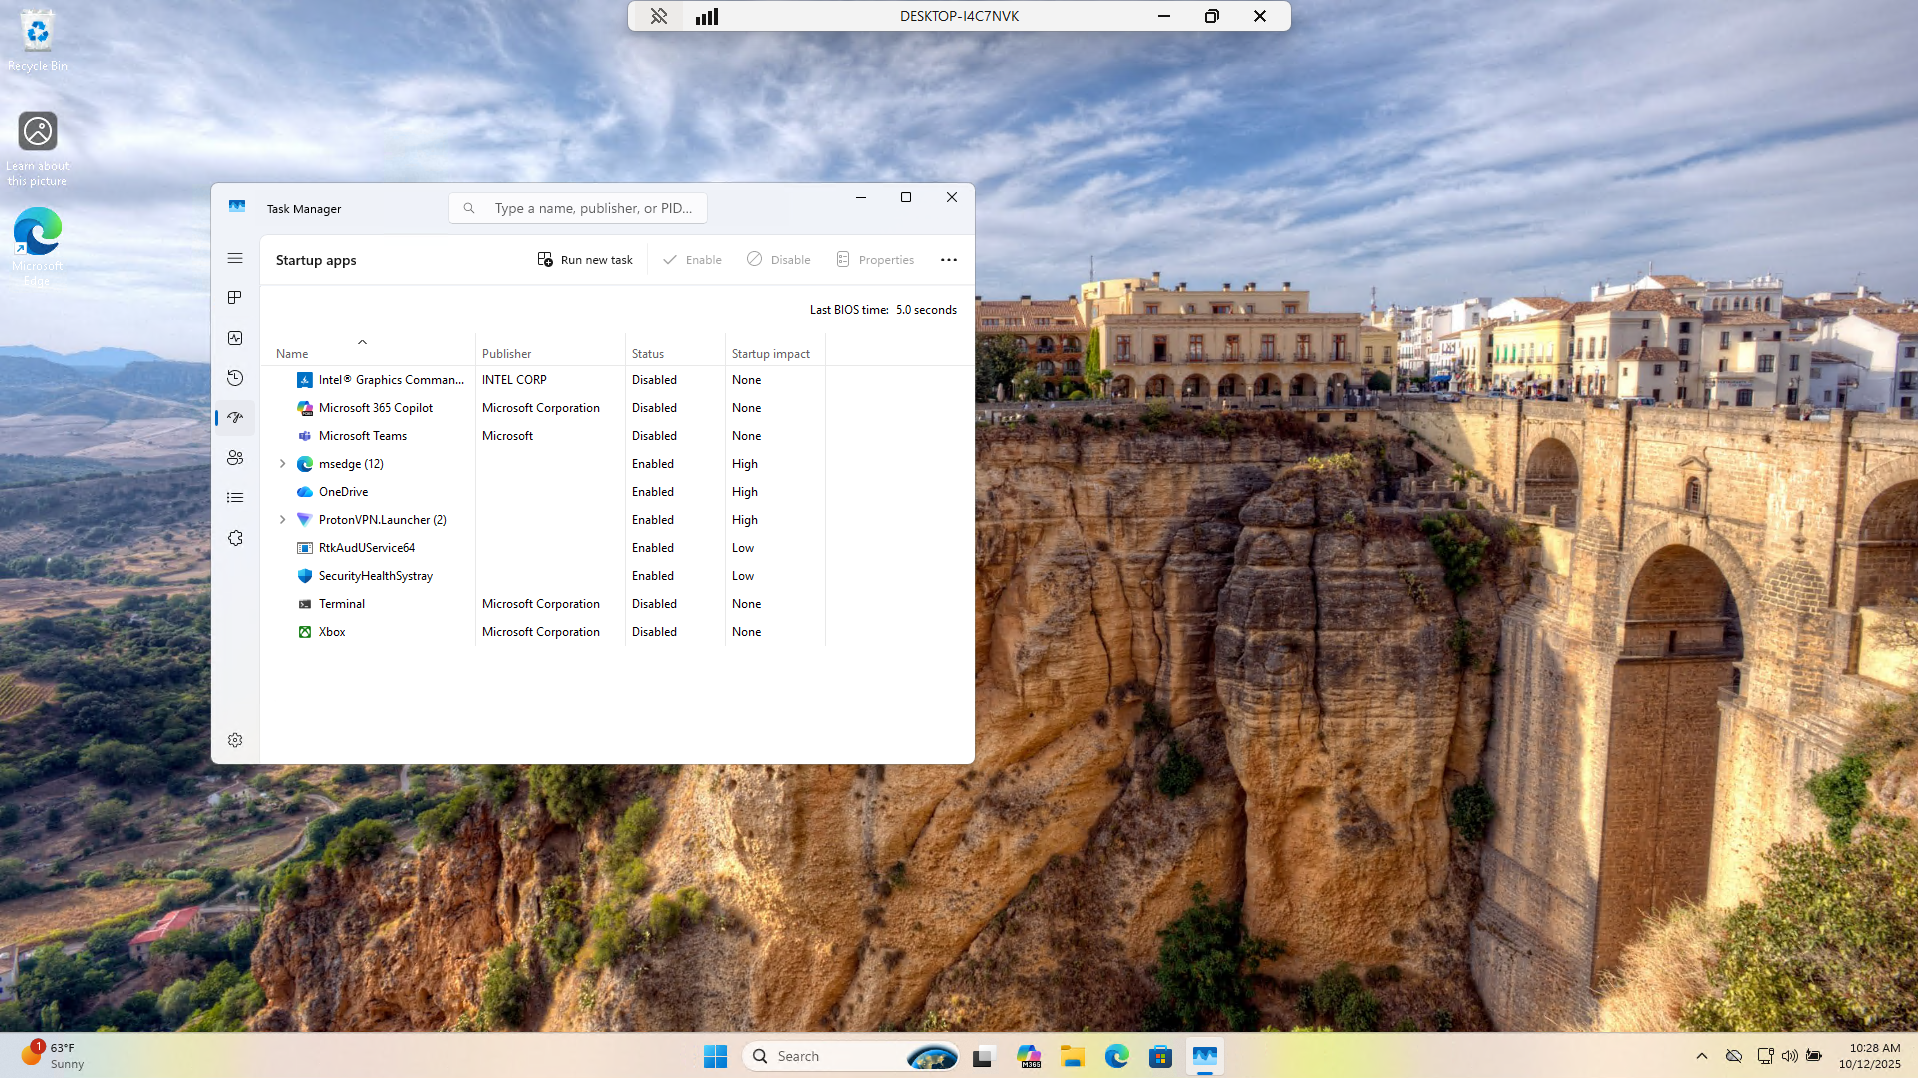
Sometimes these rogue processes can start automatically on system boot or are prepackaged with the PC
To ensure the issue stays fixed head to the startup tab in Task Manager and remove unnecessary programs:
In a real world setting if the system continues to chug you may recommend hardware upgrades to leadership
Ensuring that the hardware on a system meets the recommended requirements of running software is essential
Log out of the remote session and return the the users PC for the next section of this lab simulation
6. Simulate Missing / Incorrect Driver Errors
We will now simulate another type of issue for us to later in this lab troubleshoot as an IT Support Tech
Drivers are a type of software used to allow the system to communicate with external cards and peripherals
Head back to the search bar at the bottom and type in powershell, right click and run as administrator:
When prompted for administrative permissions click yes:
Run the following command from the PowerShell terminal to simulate missing/incorrect device drivers:
PS C:\Windows\system32> Start-Process "C:\LabSupportScripts\LabSimRogueProcess.exe" -ArgumentList "-WindowStyle Hidden -ExecutionPolicy Bypass -File C:\LabSupportScripts\driver.ps1"
After execution you should have no ability to control the system with either the mouse nor the keyboard
We now have our proper setup for the next section of this lab where we will remote in to solve the issue
7. Perform Remote Troubleshooting for Driver Errors
Switch to your main Windows PC that we will use to simulate the support agent who received this ticket
To initiate a remote connection to the target PC head to Search > Remote Desktop Connection application:
A prompt will appear. To initiate the connection enter the private IPv4 or PC Name of the Users system:
You will then be asked for credentials. Enter the username and password of the user and select confirm
This may take some time to load but once completed if done properly we will be presented with the GUI:

Let's walk through several steps you can take to troubleshoot driver issues before the real solution
These steps can be done in any order but it's good practice to start with the easiest and work from there
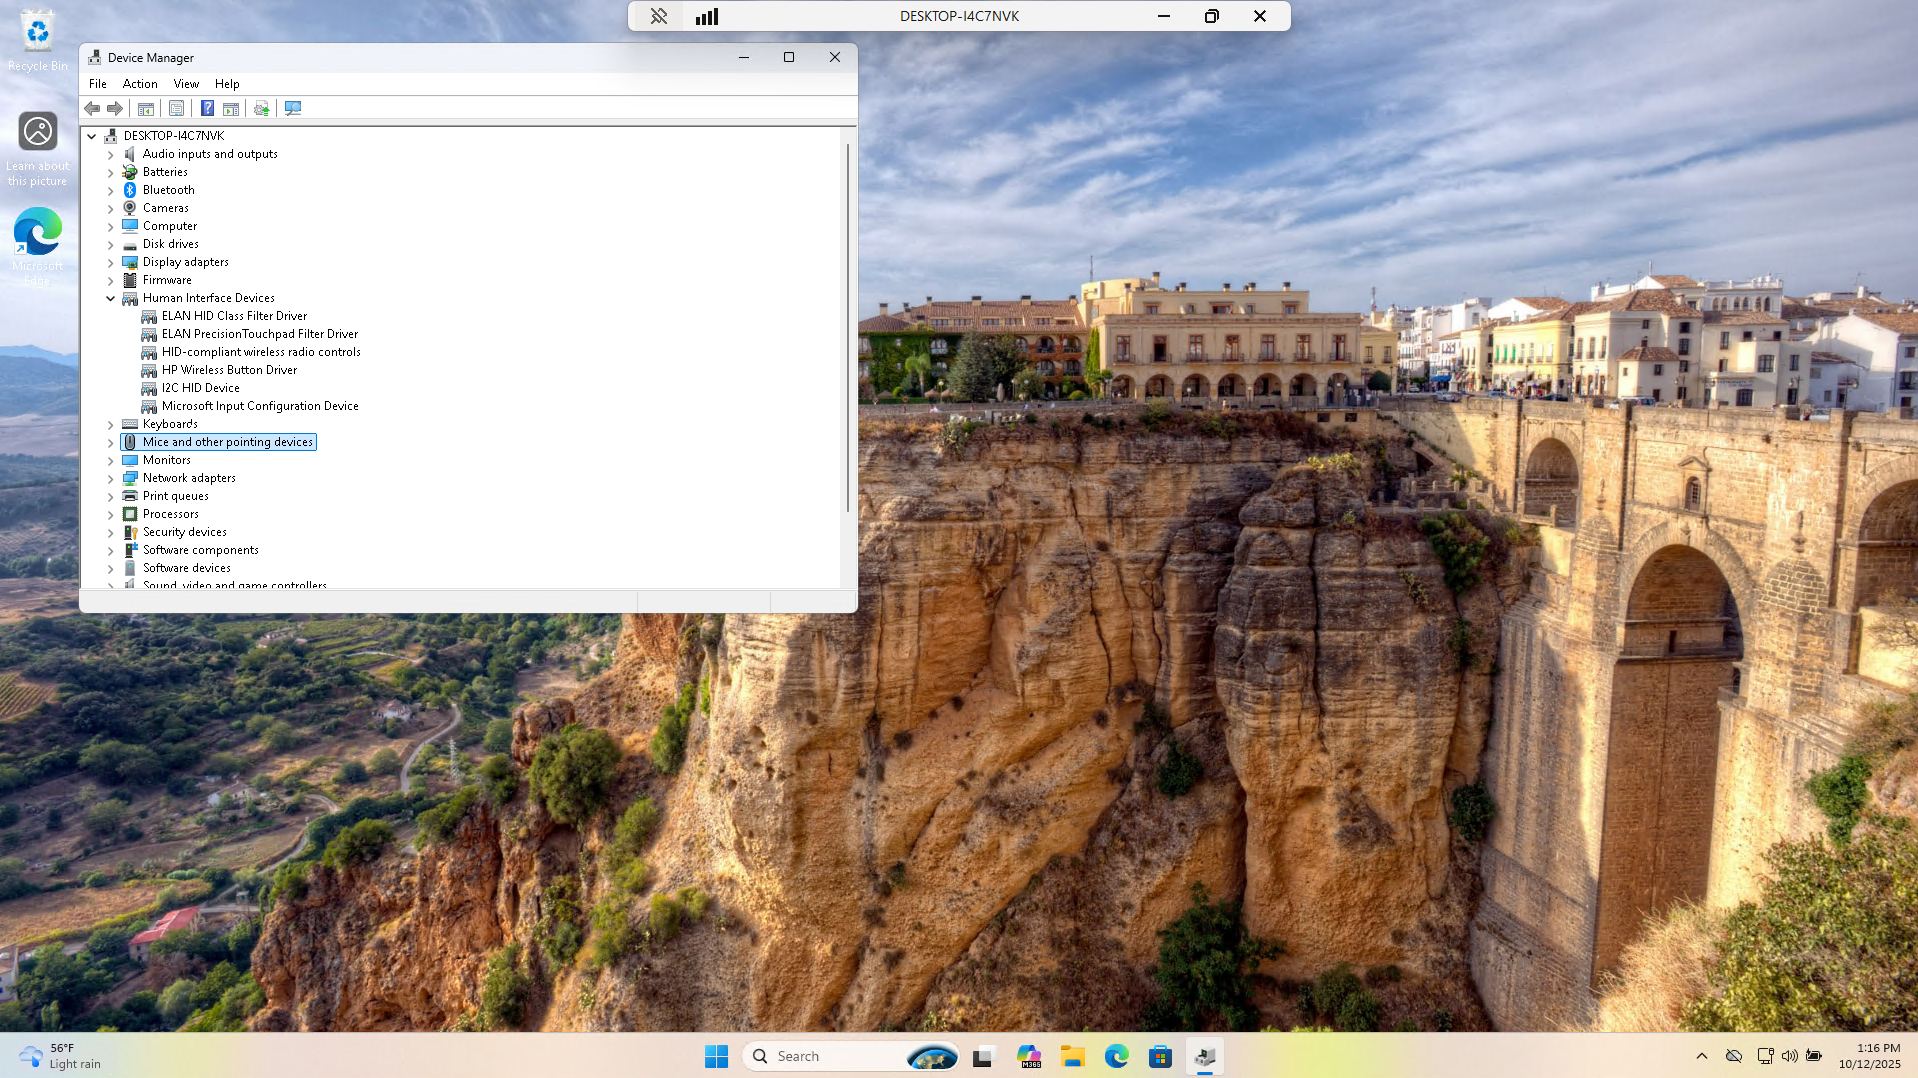
From the search menu head to the Device Manager application. This will show us all devices and drivers:

Each driver with an error will be displayed with a yellow caution symbol beside it. None are show here
Next let's start by checking for available updates to the operating system and the associated drivers
From the remote desktop window head to the start menu > Settings > Windows Update > Check for Updates:
We can see from this that the system is up to date. Out of date drivers can cause peripheral issues
For this lab the script we ran removed all of the Human Interface Device Drivers which causes the issue
Head back into the Device Manager and click the menu option at the top labelled Scan for Hardware Changes:
We can see this has corrected the issue by detecting the devices and installing the associated drivers
There are many more issues that can result from incorrect drivers and additional solutions to match
In a real world scenario you can also use the Device Manager to Update, Rollback, and Install drivers
Log out of the remote session and return the the users PC for the next section of this lab simulation
8. Simulate a Windows Update Failure
Here we will go through the process of simulating an update failure for the Windows 11 Operating System
Blocking a real update could have serious consequences on a device so we will only simulated the logging
Head back to the search bar at the bottom and type in powershell, right click and run as administrator:
When prompted for administrative permissions click yes:
Run the following command from the PowerShell terminal to simulate a failed Windows 11 update:
PS C:\Windows\system32> Start-Process "C:\LabSupportScripts\LabSimRogueProcess.exe" -ArgumentList "-NoExit -ExecutionPolicy Bypass -File C:\LabSupportScripts\update.ps1"
We should now have two open PowerShell terminal instances with one displaying the update error code:
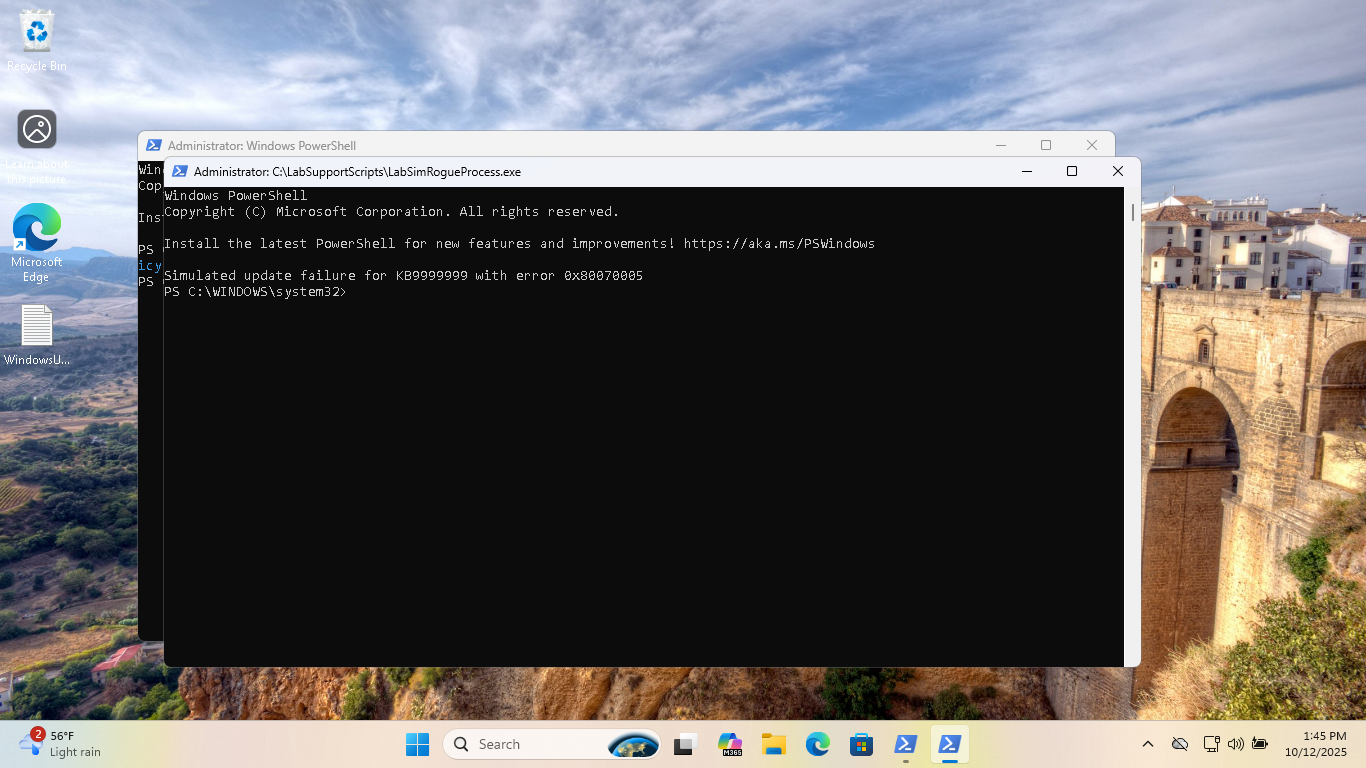
We now have our failed update environment ready to remote in and troubleshoot as the IT Support Analyst
9. Perform Remote Troubleshooting for Failed Update
Switch to your main Windows PC that we will use to simulate the support agent who received this ticket
To initiate a remote connection to the target PC head to Search > Remote Desktop Connection application:
A prompt will appear. To initiate the connection enter the private IPv4 or PC Name of the Users system:
You will then be asked for credentials. Enter the username and password of the user and select confirm
This may take some time to load but once completed if done properly we will be presented with the GUI:

Let's walk through several steps you can take to troubleshoot a failed update before the real solution
These steps can be done in any order but it's good practice to start with the easiest and work from there
The first and most obvious steps you would take would be to restart the PC and check the Network Connection
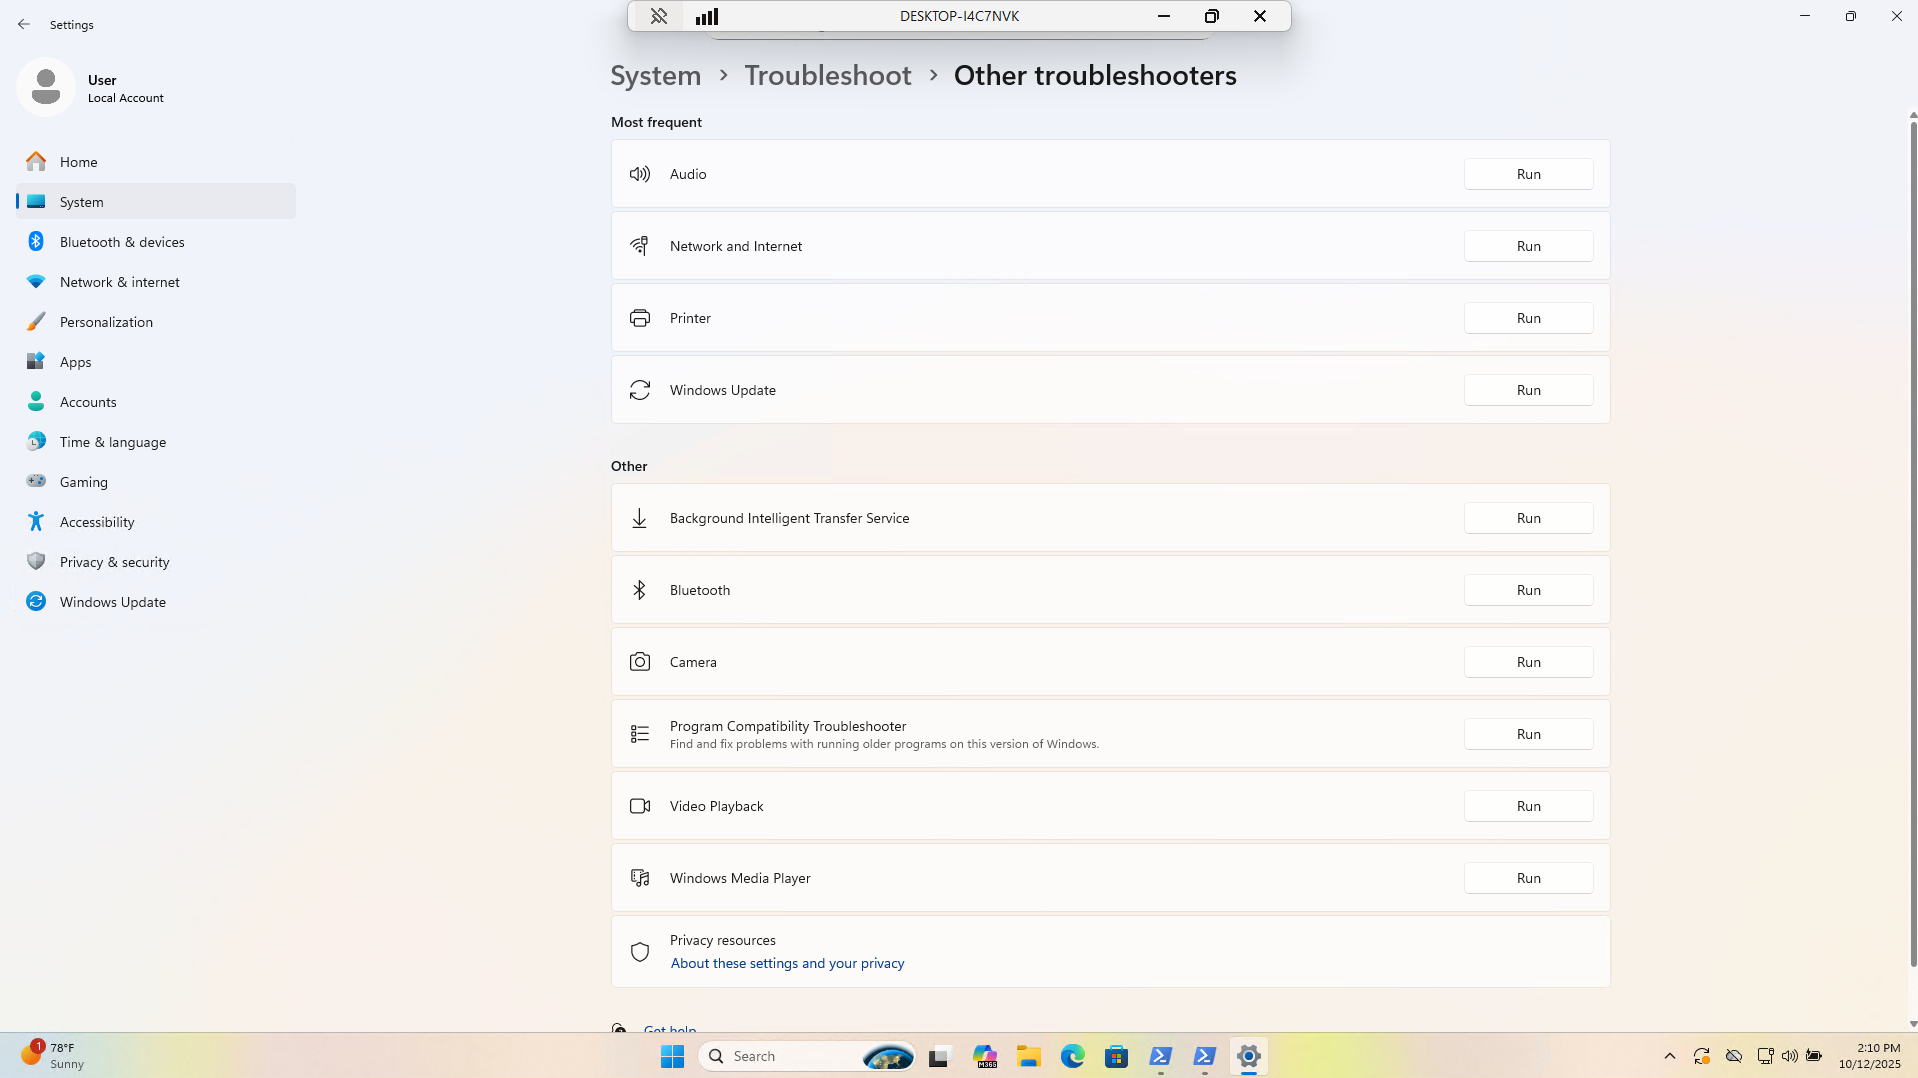
Run the Troubleshooter from Settings > System > Troubleshoot > Other Troubleshooters > Windows Update > Run:
Once finished running let's move on to restarting the Windows Update Service manually to troubleshoot
From either of the PowerShell terminals run the following commands to stop the Windows Update service:
PS C:\Windows\system32> net stop wuauserv
PS C:\Windows\system32> net stop cryptSvc
PS C:\Windows\system32> net stop bits
PS C:\Windows\system32> net stop msiserver
Now from the PowerShell terminal run the following commands to rename SoftwareDistribution and catroot2:
PS C:\Windows\system32> ren C:\Windows\SoftwareDistribution SoftwareDistribution.old
PS C:\Windows\system32> ren C:\Windows\System32\catroot2 catroot2.old
Now from the PowerShell terminal run the following commands to restart the Windows Update Services:
PS C:\Windows\system32> net start wuauserv
PS C:\Windows\system32> net start cryptSvc
PS C:\Windows\system32> net start bits
PS C:\Windows\system32> net start msiserver
Windows will recreate the folder Software Distribution and catroot2. You can now retrigger Windows Update
This concludes the standard troubleshooting model. Let's move to resolving our simulated update failure
Run the following command from the PowerShell terminal to check the log files for our update failure:
PS C:\Windows\system32> Get-Content "$env:SystemDrive\Windows\Logs\WindowsUpdate\SimulatedUpdateFailure.log"
Resulting Output:
2025-10-12 13:00:00:000 Update failed: KB9999999 Error: 0x80070005
2025-10-12 13:00:01:000 Update installation failed due to permissions issue.
As we can see the system is giving us a clear path to resolution in the form of a permissions error code
Run the following command from the PowerShell terminal to check the Registry flag for Update Permissions:
PS C:\Windows\system32> Get-ItemProperty -Path "HKLM:\SOFTWARE\FakeUpdateLab"
Resulting Output:
PendingUpdate : KB9999999
ErrorCode : 0x80070005
PSPath : Microsoft.PowerShell.Core\Registry::HKEY_LOCAL_MACHINE\SOFTWARE\FakeUpdateLab
PSParentPath : Microsoft.PowerShell.Core\Registry::HKEY_LOCAL_MACHINE\SOFTWARE
PSChildName : FakeUpdateLab
PSDrive : HKLM
PSProvider : Microsoft.PowerShell.Core\Registry
We can see that this issue stemmed from a permissions error, to perform the fix run the update as admin:

Run the following commands to perform the post-fix by removing the permission error registry entry:
PS C:\Windows\system32> Remove-Item -Path "HKLM:\SOFTWARE\FakeUpdateLab" -Recurse
PS C:\Windows\system32> Add-Content "$customLog" "`n2025-10-12 13:30:00:000 Technician cleared simulated update failure."
Congratulations on completing this multi-stage lab on performing remote troubleshooting on Windows Systems
You are now equipped to troubleshoot system issues such as Slow Performance, Driver Errors and Failed Updates
You are also now capable of setting up and maintaining a remote connection with windows systems using RDP