This project demonstrates a foundational yet comprehensive mastery of BASH (Bourne Again Shell), the industry-standard command-line interface for Linux system administration and automation. Through a series of hands-on exercises, develop scripts that move beyond simple command execution into a fully functional programming environment tailored for system operations.
Cybrary is a well established and free IT training platform with several intuitive labs to explore
A paid subscription with more advanced labs is available as well outside the scope of this platform
Head to https://www.cybrary.it to create a free account for learning available on their platform
Head to BASH Scripting Basics to complete it yourself or you can perform it on your homelab below
Quick Links:
Requirements:
• Windows PC w/ Internet Connection
• USB Flash Drives w/ at least 64GB Capacity
• 2 Unused PCs w/ at least 4GB of Memory
1. BASH Overview
The Bourne Again Shell (BASH) is a powerful command-line interface that serves as the default shell for
most Linux distributions. As a direct descendant of the original Bourne Shell (sh), BASH does extend this
predecessor's capabilities by incorporating modern enhancements such as command-line editing, job control
and improved scripting functionality. BASH is not merely a means of executing commands interactively; it
is a fully-fledged programming environment designed for automation, system administration and streamlining
repetitive tasks. Whether a user is navigating the filesystem, managing processes, or constructing complex
automation scripts, BASH provides an intuitive yet robust platform for controlling the Linux OS efficiently

At its core, BASH operates as a command interpreter, translating user inputs into system-level actions.
Each command entered into the shell is parsed and executed in real-time, enabling users to interact with
the system dynamically. This real-time execution allows for on-the-fly troubleshooting and experimentation
making BASH an invaluable tool for developers, system administrators, and power users alike. Beyond basic
command execution, BASH supports scripting, which allows users to string together sequences of commands
into executable scripts that can automate complex workflows. These scripts can incorporate logic, loops,
conditionals, and functions, effectively transforming BASH into a fully functional programming language
The elegance of BASH scripting lies in its simplicity and accessibility. A basic script can actually be
as straightforward as a sequence of commands saved in a text file, while more advanced scripts can rival
traditional programming languages in complexity and capability. By leveraging variables, conditionals,
and loops, users can create highly dynamic and responsive scripts that adapt to both varying inputs and
conditions. Furthermore, BASH seamlessly integrates with other system utilities and external programs,
enabling scripts to interact with databases, manage networking tasks, and even orchestrate system-wide
configurations. This level of flexibility makes BASH an indispensable tool for Linux professionals who
are seeking to optimize and automate their workflows in a way that is native to the core operating system
Despite its many advantages, mastering BASH requires a strong understanding of Linux fundamentals, file
permissions, process management, and command-line utilities. Unlike graphical interfaces, which provide
visual cues and intuitive interactions, BASH demands precision in syntax and command structure. Errors
in scripts can lead to unintended consequences, ranging from minor inconveniences to critical failures
in systems. However, with consistent practice and a methodical approach, users can develop proficiency
in BASH scripting, allowing them to write many efficient, maintainable, and scalable automation solutions
Learning BASH is not merely about memorizing commands, it is about developing comprehension of structure
BASH scripts support several programming-related features like brace expansion, error handling, conditions
looping, arrays, string operators, and file handling. While exhaustive review of programming fundamentals
is outside the scope of this lab, let's quickly review each of these concepts as it pertains to scripting
• Brace Expansion - a mechanism for creating arbitrary strings. For example. {1..5} would create a string
consisting of 1 2 3 4 5.
• Error Handling - a mechanism for responding to and recovering from errors in a program or script. For
example, instructing BASH to exit if a command returns a non-zero exit status
• Conditionals - a combination of a statement and one or more operators that allow a script to perform
different tasks based on the outcome of a test. For example, if two variables are equal, we can print
statement "the variables are the same"
• Looping - a type of statement that repeats a task until a condition is met. For example, until a variable
is equal to 7, print the statement "the variable is not 7".
• Arrays - a data structure consisting of a collection of sequenced elements, stored in contiguous memory,
and accessed by an index number
• String Operators - a mechanism for testing and manipulating strings.
• File Handling - a mechanism for managing file operations like opening, reading, writing, and closing
The primary benefits of using BASH scripts are reliability and repeatability. Once a script is developed
it can be used repeatedly to simplify repetitive tasks. Some common use cases for scripts are listed below
• Automating Repetitive Tasks
• Collecting Data Across Many Systems
• Creating Backups
• Parsing and Editing Files
• Creating Custom Tools for your Specific Needs
A side note, though not required, using the .sh extension for BASH scripts is common. For a script to run
it must be made into an executable (by running chmod +x on the file using the Linux Terminal command line)
In the next lesson, we will learn BASH scripting using a series of hands-on exercises. Note that this lab
assumes you are already familiar with the Linux command line and that you understand piping. For more on
the Linux command line, check out the Linux CLI Basics. For more on piping, check out PowerShell Scripting
2. Install Slackware Linux
Slackware is the oldest surviving Linux distribution and is arguably the best for mastering BASH. Unlike
modern distros that use complex init systems like systemd, Slackware uses a BSD-style init system composed
of simple, readable BASH scripts which are found in the /etc/rc.d/ directory. But why use this for BASH?
You will find yourself editing and writing shell scripts just to manage services, networking, and system
startup. There is no automated dependency resolution, meaning you'll likely script your own build processes
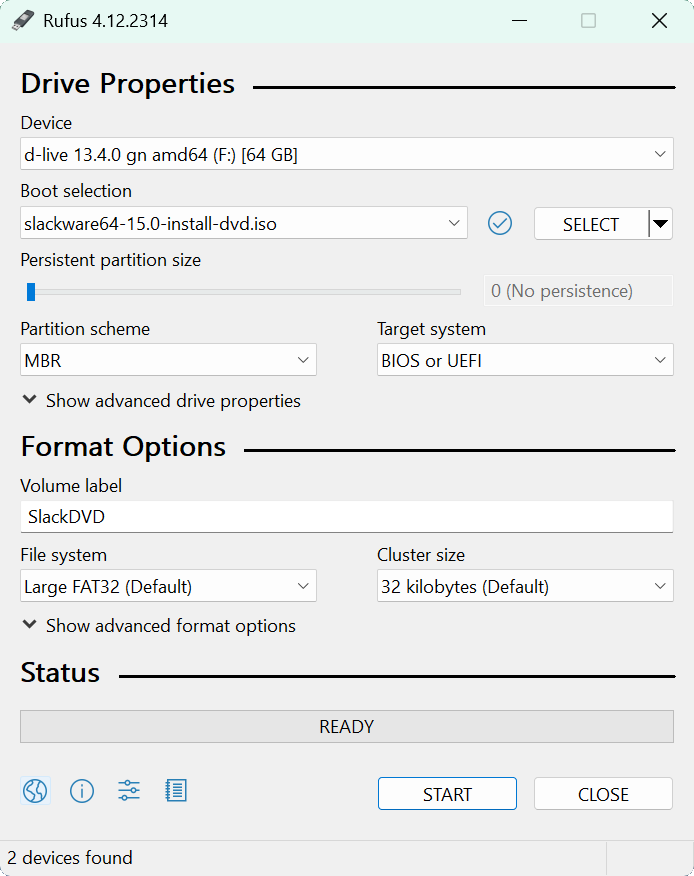
Download Slackware Linux: slackware64-15.0-install-dvd.iso
Download Rufus Disk Imaging Software: Rufus Official Download
Insert USB Flash Drive, run rufus.exe, select target drive, select the Slackware Image, then click start:
Remove the USB Flash Drive and Insert into unused PC. Start PC and press the hot boot key at the startup:

Once our live operating system boots, press 1 > Enter > Enter > 1 > Enter > Enter to log in as root user
Here we are presented with a terminal prompt for the installation image. Similar to bare-bones distros like
Arch or Gentoo, we must configure the from the CLI, however unlike these distros there is a setup utility
Run the following command from the Slackware Installation Terminal to display available disks to install:
root@slackware:/# lsblk
The drives will be listed and you should tell your target based on the size and being listed as disk type
Run the following command from the Slackware Installation Terminal to begin partitioning with fdisk tools
root@slackware:/# fdisk /dev/nvme0n1
The fdisk tool can be used to create a disk partitioning format that our operating system will follow:
• Press d to delete an existing partition
• Press Enter to confirm deletion of last partition
• Repeat this process until each partition is deleted
• Press n to create a new partition
• Enter 1 as the partition number
• Press Enter to accept the default first sector
• Set the last sector to +1G for a 1GB partition
• Enter y to remove the vfat signature
• Change to EFI System type by pressing t and selecting partition 1 and option 1
• Press n to create another partition
• Enter 2 as the partition number
• Press Enter to accept the default first sector
• Set the last sector to +8G for a 8GB partition
• Change to Linux Swap type by pressing t and selecting partition 2 and option 19
• Press n to create another partition
• Enter 3 as the partition number
• Press Enter to accept the default first sector
• Press Enter to accept the default last sector
• Change to Linux x86-64 Root type by pressing t and selecting partition 3 and option 20
• Press p and confirm you see all three partitions
• Press w to write changes to disk and exit fdisk
Run the following command from the Slackware Installation Terminal to launch the installation utility:
root@slackware:/# setup
Resulting Output:

User the arrow keys to scroll down to ADDSWAP and press Enter, the installer should autodetect your swap
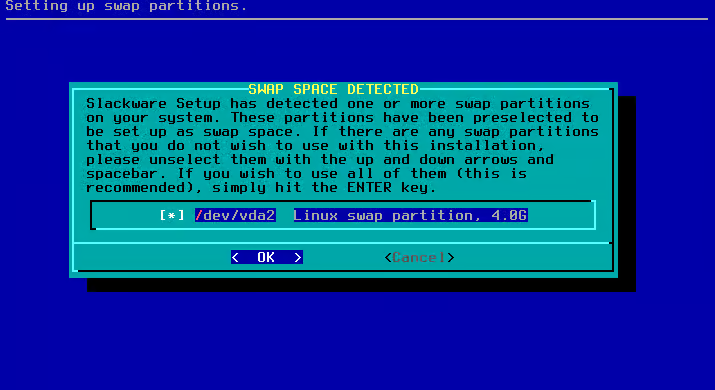
Press Enter to confirm the partition selection and press enter again to decline the check, configured:

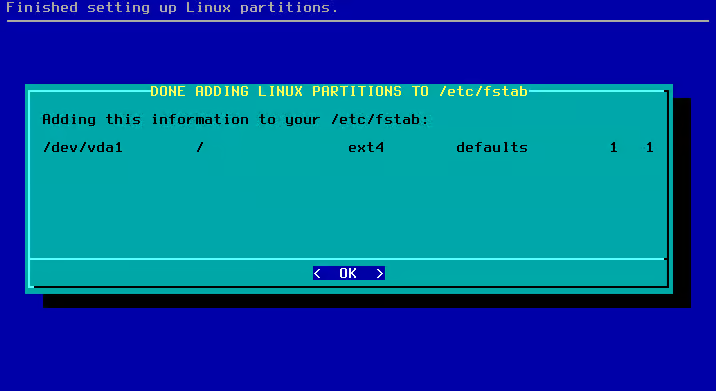
Press Enter to proceed to the next section, then press Enter to confirm the Linux Filesystem partition
Press Enter to perform a quick format of the Drive, then press Enter to select Ext4 Journaling Filesystem
Press Enter to proceed and you will see that the setup tool recognized our EFI System partition as well
If you have run Windows from this drive before you may get a message about FAT partitions, you can hit no
From here we are prompted to select our installation medium, scroll to Install from a Slackware USB stick
Now hit Enter > Enter and your system will detect the USB drive and bring you to the Package Selection
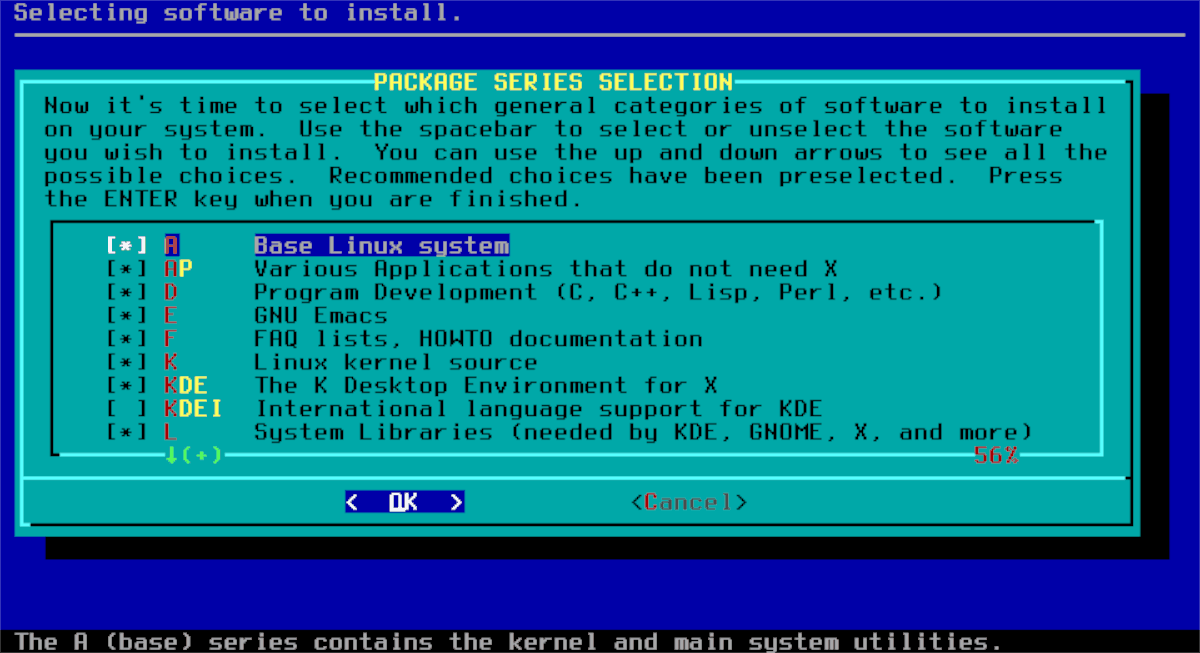
Slackware was first released before CD-ROMs became a standard in systems and before those fast internet
were cheap. Because of this, the distribution was broken down into software sets. Each set contains a
different group of programs. This allowed for someone to get the Slackware Linux distribution quickly
For example, if you know you don't want the X Window System, just skip all of the X software, hit Enter
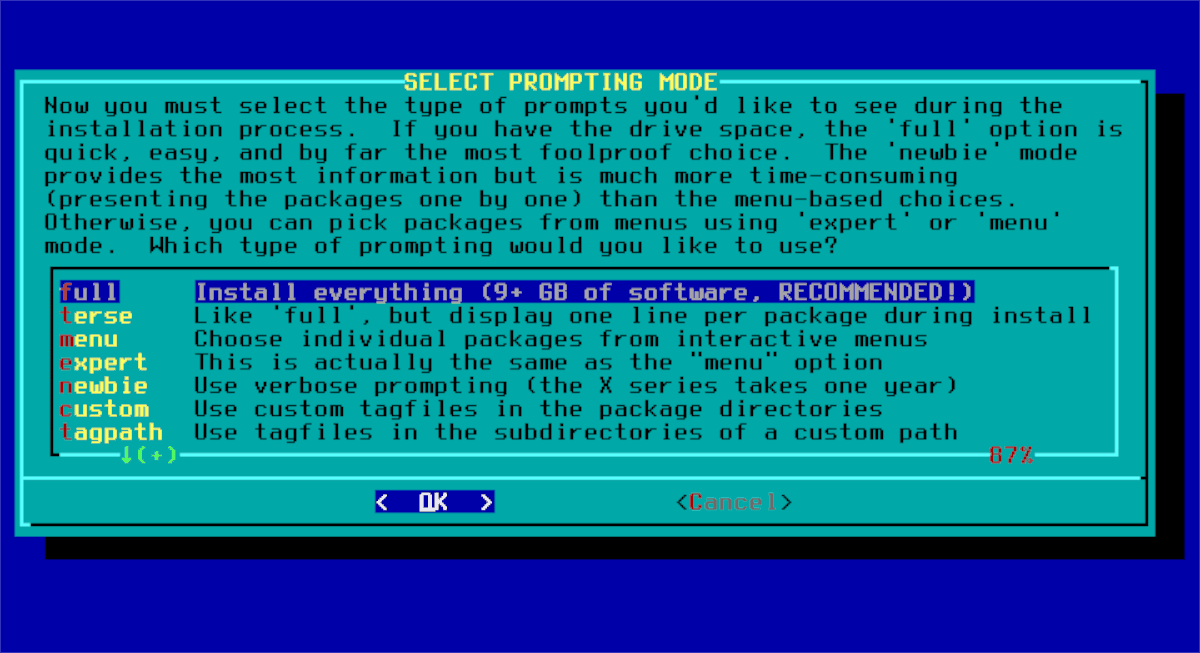
For the Install Type, scroll to select Full, this will help us avoid the dependency headaches, hit Enter
Now the system will begin installing all of the packages, you will see many prompts flash and disappear
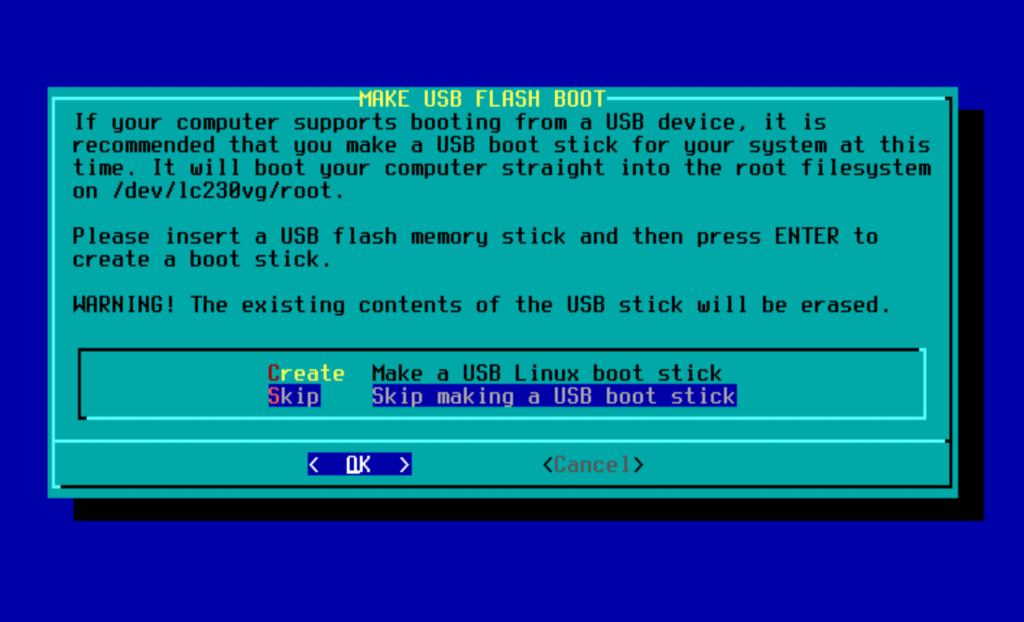
Now we are prompted to make a bootable USB, this is unnecessary on modern hardware, press Enter to skip
Modern hardware runs on UEFI rather than BIOS firmware, press Enter and Enter to install the ELILO tool
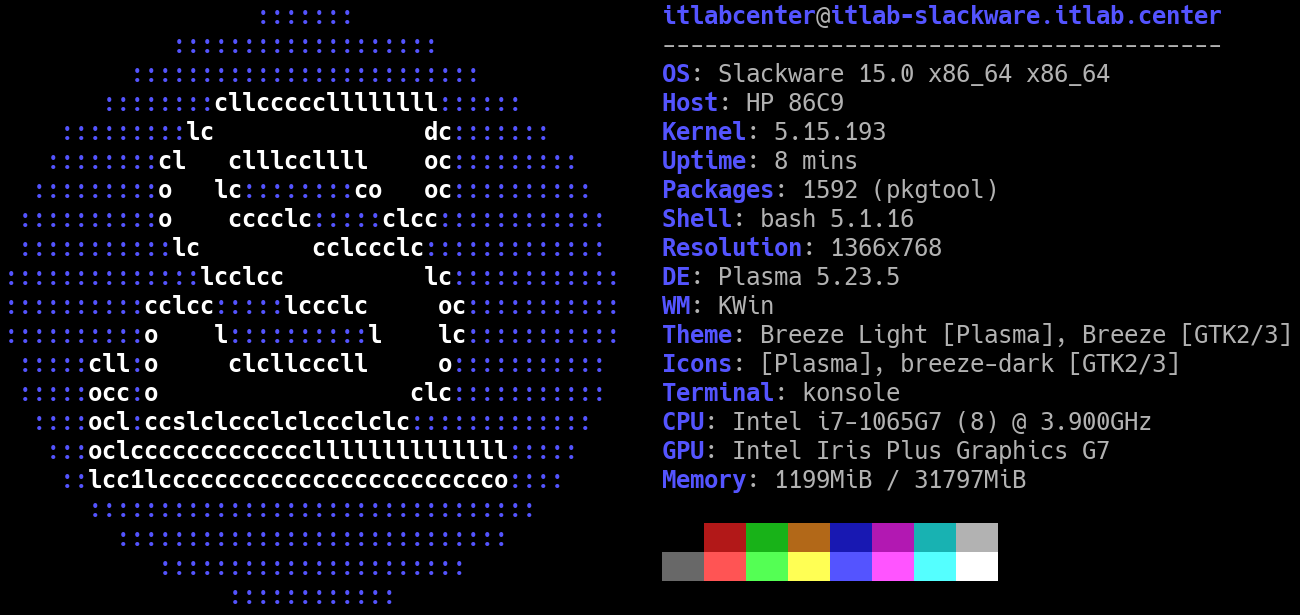
Now press Enter to Install a boot menu entry, then Enter > Enter > Enter and hostname itlab-slackware
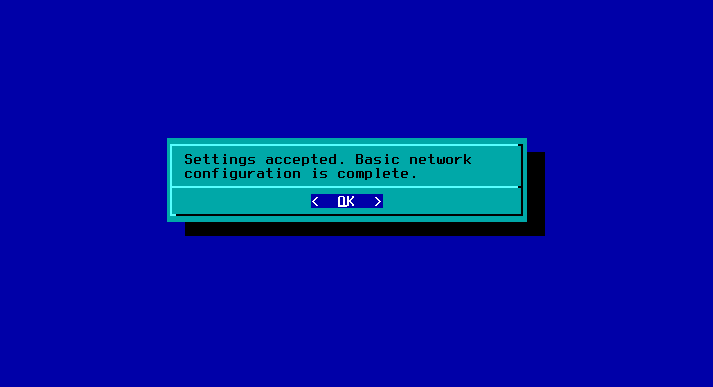
Now press Enter and key in the domain name itlab.center, now hit Enter > Enter and pick NetworkManager
Press Enter and Enter again to confirm the network configuration settings. We can see it was a success
Press Enter and we will be presented with a list of startup services available to install with Slackware
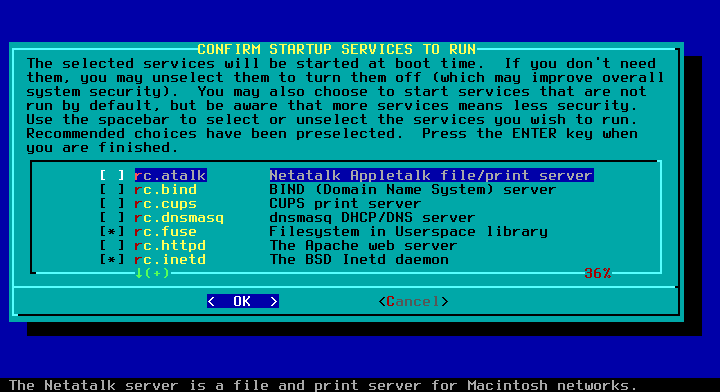
Slackware uses the BSD-style file layout for its system initialization files. These files are organized
and easy to edit. All of the system initialization files are stored in the /etc/rc.d directory. To prevent
a script from executing at startup you can remove the execute permission on the file, effectively disabling
Each of these scripts are conveniently written in BASH, we will look at some later, for now press Enter to
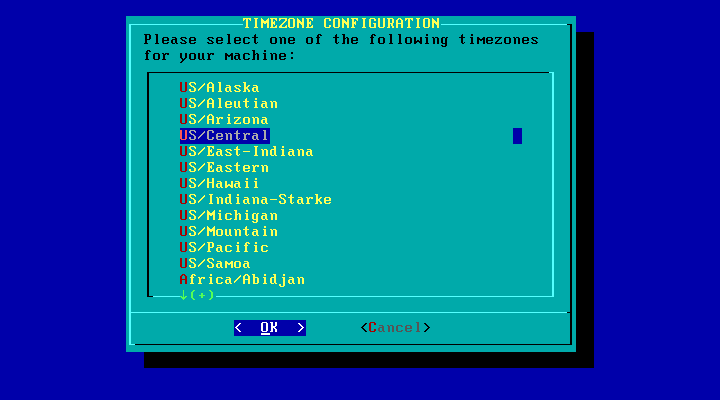
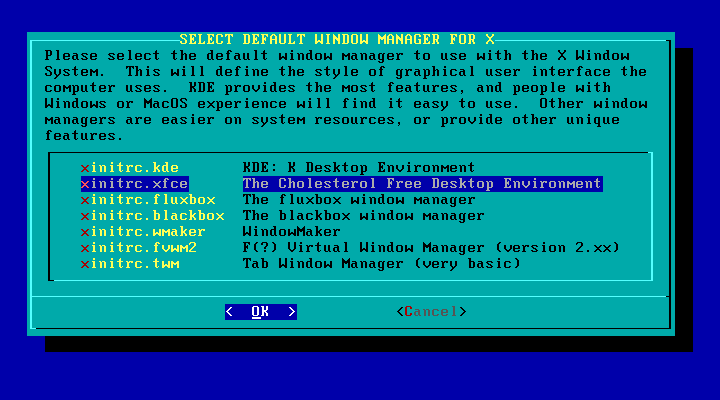
continue with the default startup scripts. Then hit Enter > Enter and now we are prompted for the time zone
Scroll to select your timezone and press Enter > Enter > Enter to select the KDE Plasma Desktop Environment
Now press Enter > Enter and set your root password for the system by entering it twice, then press Enter
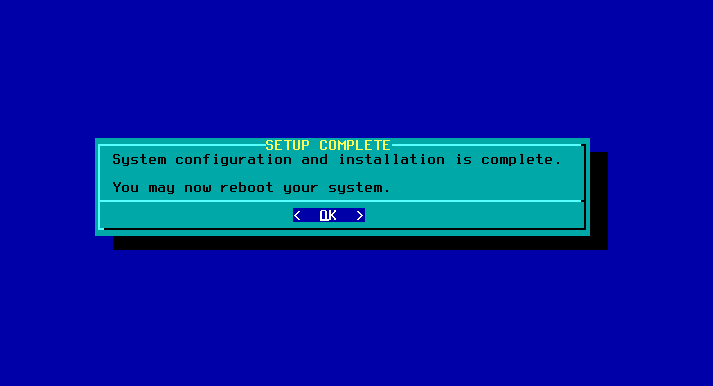
We can see that the setup utility succeeded. Press Enter and scroll down to Exit, then press Enter again
You will be prompted to remove the installation Media USB Stick, do so and hit Enter > Enter to reboot
Our system will now boot for the first time to a login prompt, type root and hit enter, then authenticate
3. Install Lab Tools
Though we now have our base operating system, we will be using more tools in this BASH Scripting lesson
Let's go and install these tools including a desktop environment, a code editor program, and admin tools
Run the following command from the Slackware Root Terminal to create our user account and add the groups
root@itlab-slackware:~# useradd -m -g users -G wheel,floppy,audio,video,cdrom,plugdev,power,netdev,lp,scanner -s /bin/bash itlabcenter
root@itlab-slackware:~# passwd itlabcenter
You will be prompted to set your new users password, do so by entering the password in twice and hit Enter
Run the following command from the Slackware Root Terminal to edit the sudoers configuration file with nano
root@itlab-slackware:~# nano /etc/sudoers
Now find the line below and remove the hashtag and space to allow members of the wheel group to use sudo:
# %wheel ALL=(ALL:ALL) ALL
Press CTRL+O followed by Enter to save our changes to the file. Then press CTRL+X to exit the nano editor
Now it is time to select our download mirror. Mirrors are hosted copies of the Slackware package repository
which are hosted by the community in varying locations. We will want to select a secure and local mirror
Run the following command from the Slackware Root Terminal to edit the package manager mirror configuration
root@itlab-slackware:~# nano /etc/slackpkg/mirrors
For our use case, being in the US, we will find the following mirror and remove the # and space to use it
# https://mirror/slackbuilds.org/slackware/slackware64-15.0/
Press CTRL+O followed by Enter to save our changes to the file. Then press CTRL+X to exit the nano editor
Run the following commands from the Slackware Root Terminal to update and synchronize the system packages
root@itlab-slackware:~# slackpkg update gpg
root@itlab-slackware:~# slackpkg update
root@itlab-slackware:~# slackpkg install-new
root@itlab-slackware:~# slackpkg upgrade-all
Here you will be prompted to install many modules, including a new version of the linux kernel, because
of this, we will need to create a new EFI boot entry in order for our operating system to properly boot
Additionally Kernel updates are not handled automatically in Slackware, we must generate an initrd file
Run the following commands from the Slackware Root Terminal to generate the initrd file and boot entry
root@itlab-slackware:~# VERSION=$(ls /var/log/packages/kernel-generic* | cut -c34-41)
root@itlab-slackware:~# PARTITION=$(df --output=source /home | tail -n 1)
root@itlab-slackware:~# mkinitrd -c -k $VERSION -m nvme:ext4 -f ext4 -r $PARTITION
root@itlab-slackware:~# cp "/boot/vmlinuz-generic-$VERSION" /boot/efi/EFI/Slackware/vmlinuz
root@itlab-slackware:~# cp /boot/initrd.gz /boot/efi/EFI/Slackware/
In the above commands we used a BASH variable to store the kernel version number by retrieving it from the
file and cutting it to the appropriate length. Then we operate on it to generate the required initrd file
Along with this the exact device name for the filesystem partition is also stored and used in the command
Now we need to set up our graphical login manager for the KDE Desktop Environment, which would be SDDM
Run the following command from the Slackware Root Terminal to edit the inittab system initialization file
root@itlab-slackware:~# nano /etc/inittab
Find the following line below and change the 3 into a 4 to enable X11/Wayland run-level with SDDM online
root@itlab-slackware:~# id:3:initdefault
Press CTRL+O followed by Enter to save our changes to the file. Then press CTRL+X to exit the nano editor
Run the following command from the Slackware Root Terminal to restart the system and load into the desktop
root@itlab-slackware:~# reboot
After the reboot, log in with our itlabcenter account and we will be taken to the KDE Desktop Environment

From here hit the KDE icon in the lower left corner and search for Konsole, open the terminal application
We will work primarily from this terminal for the remainder of this lab on BASH so keep this window open
Run the following command from the Slackware Linux Terminal to test our superuser administrative privilege
itlabcenter@itlab-slackware:~$ sudo whoami
Resulting Output:

Run the following command from the Slackware Linux Terminal to attempt to restart the operating system
itlabcenter@itlab-slackware:~$ sudo reboot
Resulting Output:

You've discovered one of the distribution's core philosophies: a sharp divide between the user space and
system administrator space. By default, Slackware does not include administrative directories in standard
user's $PATH. Since reboot is considered a system-altering tool, it is tucked away in restricted folders
Run the following commands from the Slackware Linux Terminal to search the filesystem for some commands
itlabcenter@itlab-slackware:~# whereis reboot
itlabcenter@itlab-slackware:~# whereis slackpkg
Resulting Output:

We can see that these tools are located in the /sbin and /usr/sbin directories respectively. To make them
usable we must add them to the secure path so that the sudo command can see them and execute them as tools
Run the following command from the Slackware Linux Terminal to edit the sudoers configuration file for sudo
itlabcenter@itlab-slackware:~# sudo nano /etc/sudoers
Scroll to the following line and remove the # symbol to uncomment the secure path to enable the directories
# Defaults secure_path="/usr/local/sbin:/usr/local/bin:/usr/sbin:/usr/bin:/sbin:/bin"
Press CTRL+O followed by Enter to save our changes to the file. Then press CTRL+X to exit the nano editor
Run the following command from the Slackware Linux Terminal to test our secure path with a system reboot
itlabcenter@itlab-slackware:~$ sudo reboot
With our base system setup we are ready to move onto creating some scripts and navigating the CLI with BASH
4. BASH One-Liners
One of the most common and clever BASH scripting techniques is the one-liner. A one-liner is a string of
Linux commands separated by a semicolon or a pipe that does something useful. In this first set of tasks
you will learn some cool one-liners. From here we will be primarily working from the Konsole application
Run the following command from the Slackware Linux Terminal to count the number of files in this directory
itlabcenter@itlab-slackware:~$ ls -la | grep -v '^d' | wc -l
Resulting Output:

One of the best ways to understand a piped command is to execute each piped section of the command in order
Run the following commands from the Slackware Linux Terminal to break the file count command into sections
itlabcenter@itlab-slackware:~$ ls -la
itlabcenter@itlab-slackware:~$ ls -la | grep -v '^d'
itlabcenter@itlab-slackware:~$ ls -la | grep -v '^d' | wc -l
Resulting Output:

Here is a breakdown of each section of this command string and their functions and interactions between:
• ls -la - Print all files and directories (including hidden files) to the screen
• grep -v '^d' - Search for things that do not (-v) start with (^) lowercase "d"
• wc -l - Count each line (-l)
Note that this one-liner takes advantage of the fact that directory listings start with lower-case "d"
What if you only wanted to count directories and not files? Simply remove the -v in the grep statement:
itlabcenter@itlab-slackware:~$ ls -la | grep '^d' | wc -l
Run the following command from the Slackware Linux Terminal to find all files in the current directory
itlabcenter@itlab-slackware:~$ find . -maxdepth 1 -type f
Resulting Output:
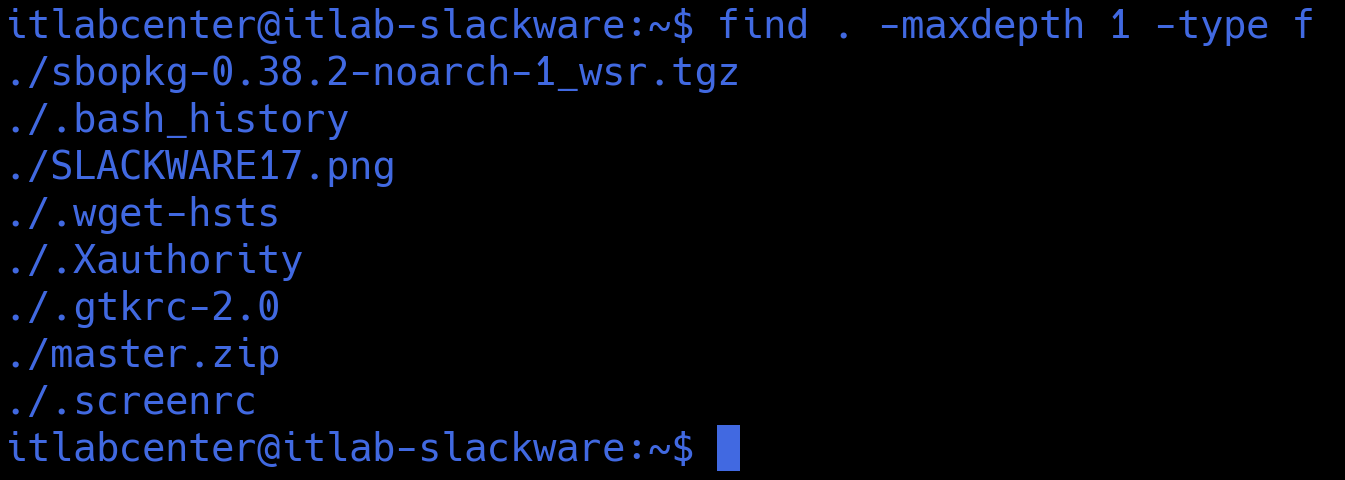
The find command is recursive, so we use -maxdepth 1 to limit the results to the current directory only
Run the following command from the Slackware Linux Terminal to find all directories in the current one
itlabcenter@itlab-slackware:~$ find . -maxdepth 1 -type d
What if we wanted to know how large these files are? We would execute the command and flags provided below
itlabcenter@itlab-slackware:~$ find . -maxdepth 1 -type f -exec du -h {} \;
Resulting Output:
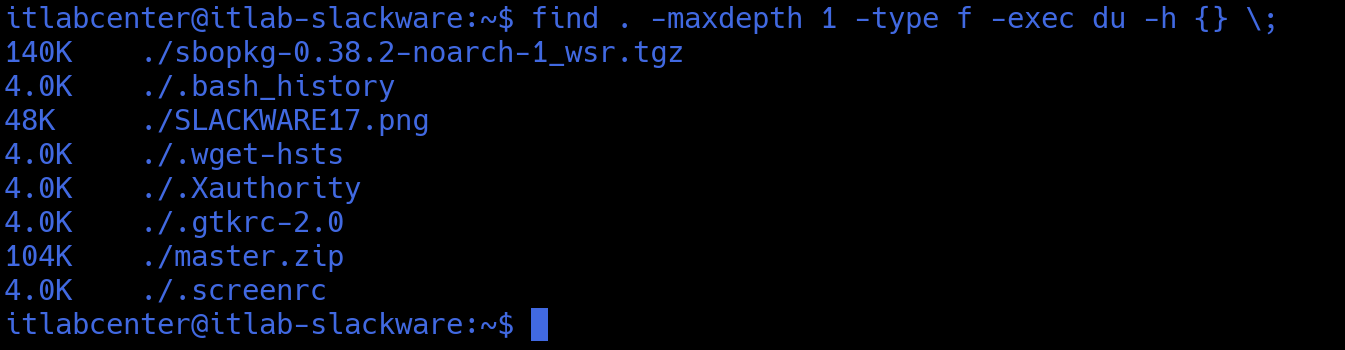
The du command stands for disk usage, and the -h flag makes the results human readable, as in KB not Bytes
You might have thought to try piping find into the du command: find . maxdepth 1 -type f | du -h. Feel free
to try this, but it does not work. Some commands cannot pipe directly into other commands. In these cases,
the -exec {} \; function works in much the same way, telling your shell to execute the commands fed to it
What if we want to sort the files from largest to smallest? the sort command defaults smallest to largest
However we can use the -r flag to reverse this. Execute the following command to sort the files this way
itlabcenter@itlab-slackware:~$ find . -maxdepth 1 -type f -exec du -h {} \; | sort -r
Resulting Output:
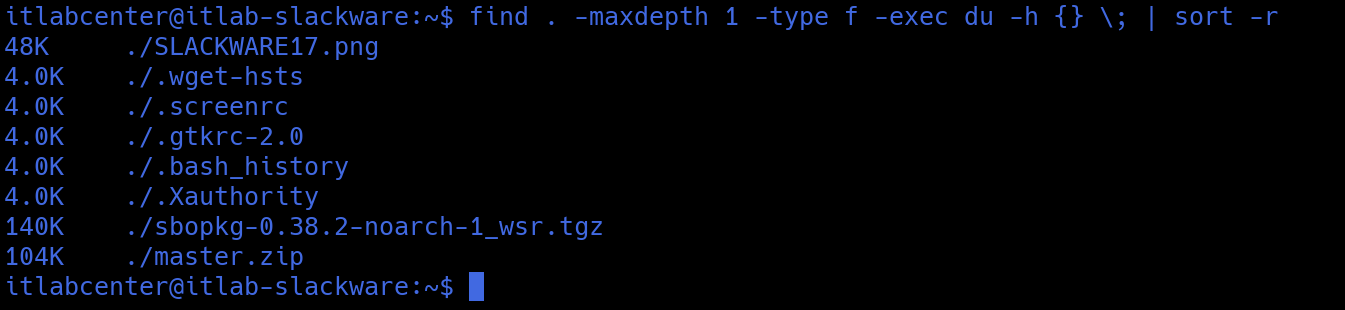
You might notice that the file sizes are sorted largest to smallest according to the first digit, not the
actual number (4.0K is less than 140K). Hang tight, we will address why this happens and how to fix this
What if we only want to see the five largest files? Then you can pipe one more time into the head command
itlabcenter@itlab-slackware:~$ find . -maxdepth 1 -type f -exec du -h {} \; | sort -r | head -5
Resulting Output:

Let's learn a little about looping using the for loop. For loops start with a value, set a maximum or a
minimum for the value, and increment or decrement the value until the maximum or the minimum is reached
Run the following command from the Slackware Linux Terminal to print the numbers 1 through 10 on screen
itlabcenter@itlab-slackware:~$ for ((a=1; a<=10; a++)); do echo $a; done
Resulting Output:
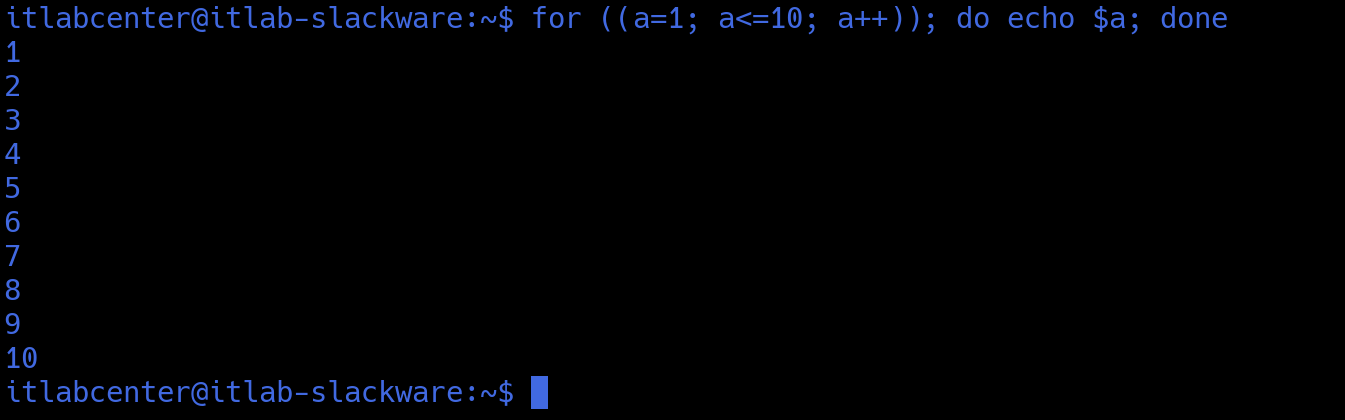
The for loop starts with variable a set to 1. Next, the for loop checks to see if a is less than or equal
to 10. Then a is incremented by 1. The for loop will continue to echo the value of a until it reaches 10
Run the following command from the Slackware Linux Terminal to reverse the for loop using a sort command
itlabcenter@itlab-slackware:~$ for ((a=1; a<=10; a++)); do echo $a; done | sort -r
Resulting Output:
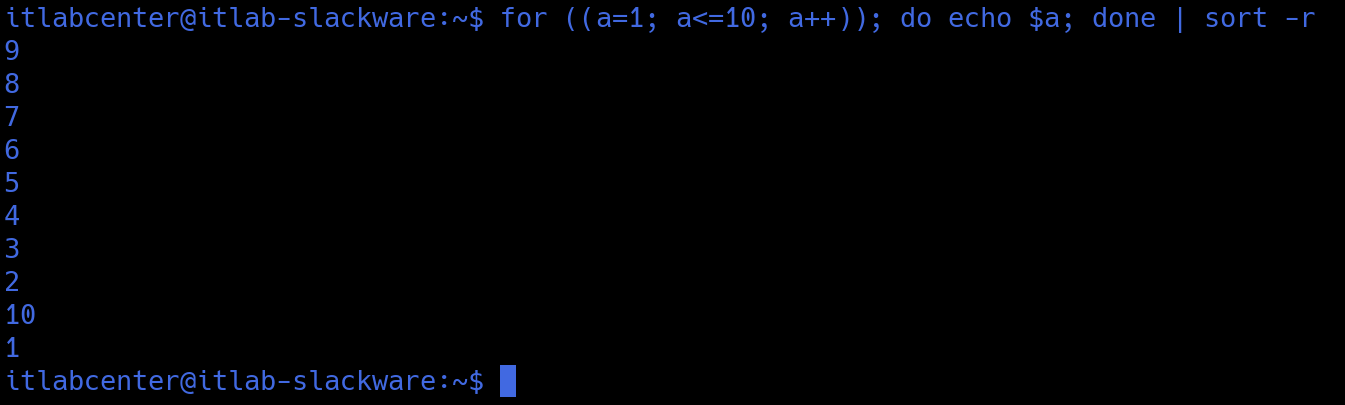
Notice that sort -r does not quite do what we want. It places the 10 over the 1. That is because BASH is
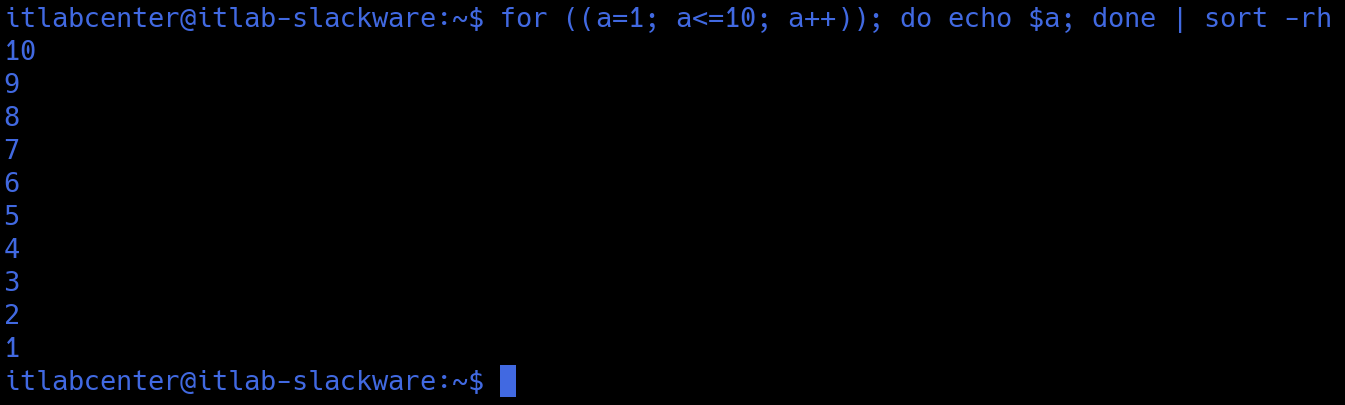
thinking like a computer. To fix this, add an h to the sort command so BASH sorts numbers as a human would
itlabcenter@itlab-slackware:~$ for ((a=1; a<=10; a++)); do echo $a; done | sort -rh
Resulting Output:
We can also much more simply count from 10 to 1 by decrementing the variable within the for loop instead
itlabcenter@itlab-slackware:~$ for ((a=10; a>=1; a--)); do echo $a; done
Notice the value of a starts at 10 and decrements down to 1. Brace expansion provides another way to loop
Brace expansion tells BASH to start with a first value and increment to a last value before the returning
Run the following command from the Slackware Linux Terminal to behold Brace Expansion for this function
itlabcenter@itlab-slackware:~$ echo {1..10}
Resulting Output:

Could you reverse the order using | sort -rh? Try it! Sadly this does not work but you could more simply:
itlabcenter@itlab-slackware:~$ echo {10..1}
Run the following command from the Slackware Linux Terminal to see how this method makes string patterns
itlabcenter@itlab-slackware:~$ echo {a..c}{1..5}
Resulting Output:

Run the following commands from the Slackware Linux Terminal to try other patterns with Brace Expansion
itlabcenter@itlab-slackware:~$ echo {a..c}{1..3}{x..z}
itlabcenter@itlab-slackware:~$ echo a{1..5}b
Resulting Output:

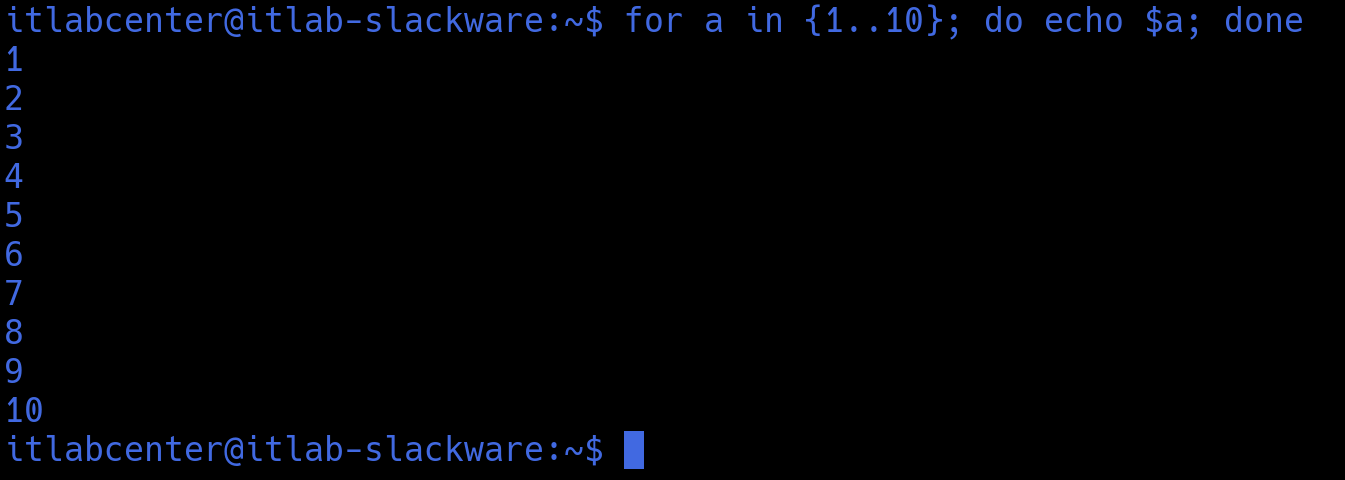
Run the following command from the Slackware Linux Terminal to combine for looping and Brace Expansion
itlabcenter@itlab-slackware:~$ for a in {1..10}; do echo $a; done
Resulting Output:
Since each character is on one line we can even use sort. We can also just as easily reverse this without
itlabcenter@itlab-slackware:~$ for a in {10..1}; do echo $a; done
Let's combine for loops and brace expansion to ping sweep a subnet. First find your workstations IP address
Run the following commands from the Slackware Linux Terminal to store the IP Address and use it to pingall
itlabcenter@itlab-slackware IP=$(sudo ip -o -4 addr list eth0 | awk '{print $4}' | cut -d/ -f1)
itlabcenter$itlab-slackware SUBNET="${IP%.*}"
itlabcenter@itlab-slackware for a in {1..254}; do (ping -c 1 "$SUBNET.$a" | grep "bytes from" &); done
Resulting Output:

BASH one-liners are an incredibly useful tool for Linux System Administration, keep exploring and creating
5. BASH Arrays
Next, let's learn about arrays. Arrays allow us to store and retrieve strings and integers stored in the
contiguous memory. We reference an array item by its identification number in the arrays list of values
Run the following command from the Slackware Linux Terminal to create an array composed with five names
itlabcenter@itlab-slackware:~$ names=('John' 'Fred' 'Sally' 'Billy' 'Charlie')
Run the following command from the Slackware Linux Terminal to print out the first name in the the array
itlabcenter@itlab-slackware:~$ echo ${names[0]}
Resulting Output:

Note that the array items always start at 0, for example you print out the second name with this command
itlabcenter@itlab-slackware:~$ echo ${names[1]}
Run the following command from the Slackware Linux Terminal to print out everything in the array at once
itlabcenter@itlab-slackware:~$ echo ${names[@]}
Resulting Output:

Run the following command from the Slackware Linux Terminal to print out the array indices or ID numbers
itlabcenter@itlab-slackware:~$ echo ${!names[@]}
Resulting Output:

Run the following command from the Slackware Linux Terminal to print out the overall size of the array
itlabcenter@itlab-slackware:~$ echo ${#names[@]}
Resulting Output:

Could we use a for loop to print all the names in the array? You could first use ${#names[@]} to find the
array's length. Then subtract one from that value as arrays always start from zero. In the case of names
${#names[@]}=5, so we want to loop from 0 to 4. Finally, you can use either incremental or decremental for
loops to accomplish this functionality. But there is an even better way we show below known as inclusion
itlabcenter@itlab-slackware:~$ for name in ${names[@]}; do echo $name; done
Resulting Output:

Using this method we don't need to know how many items are in the array. The for loop will simply iterate
through the list until there are no items left. Can we modify an array once created? Yes we can very easily
Run the following commands from the Slackware Linux Terminal to modify the third name and print the changes
itlabcenter@itlab-slackware:~$ names[2]='Thomas'
itlabcenter@itlab-slackware:~$ echo ${names[@]}
Resulting Output:

Run the following commands from the Slackware Linux Terminal to add Sally back at the end of the names array
itlabcenter@itlab-slackware:~$ names[5]='Sally'
itlabcenter@itlab-slackware:~$ echo ${names[@]}
Resulting Output:

What if you tried names[10]='Timmy'? If you validated using echo ${names[@]} it would look like Timmy was
added directly after Sally, but in truth, array items 6=9 are blank. If you try echo ${names[6]} or 7,8,9
the output would be completely empty. Only echo ${names[10]} would print the string Timmy to the terminal
6. Install Neovim
Neovim is a powerful code editor commonly used for linux development as an extension of the native vim
tool. Neovim is a refactor, and sometimes redactor, in the traditional Vim. It is not a rewrite but rather
a continuation and extension of Vim. While editors like VS Code may be the Enterprise Standard, NeoVim is
the open source editor of choice for power users and linux system administrators who prefer the efficiency
On Slackware, we don't have a central "App Store." Instead we use SlackBuilds. Slackware doesn't handle
dependencies automatically. If you try to build Neovim manually, it will fail because it's missing several
libraries like libuv, msgpack, and luajit. sbopkg is the browser for SlackBuilds, and sqg is the Slackware
queue generator that figures out all of the required dependencies for applications for you and your system
Run the following commands from the Slackware Linux Terminal to install the Slackware Build Generator tool
itlabcenter@itlab-slackware:~$ wget https://github.com/sbopkg/sbopkg/releases/download/0.38.2/sbopkg-0.38.2-noarch-1_wsr.tgz
itlabcenter@itlab-slackware:~$ sudo installpkg sbopkg-0.38.2-noarch-1_wsr.tgz
itlabcenter@itlab-slackware:~$ sudo sbopkg -r
Because Neovim has about a dozen dependencies, you don't want to build them one by one, instead we use SQG
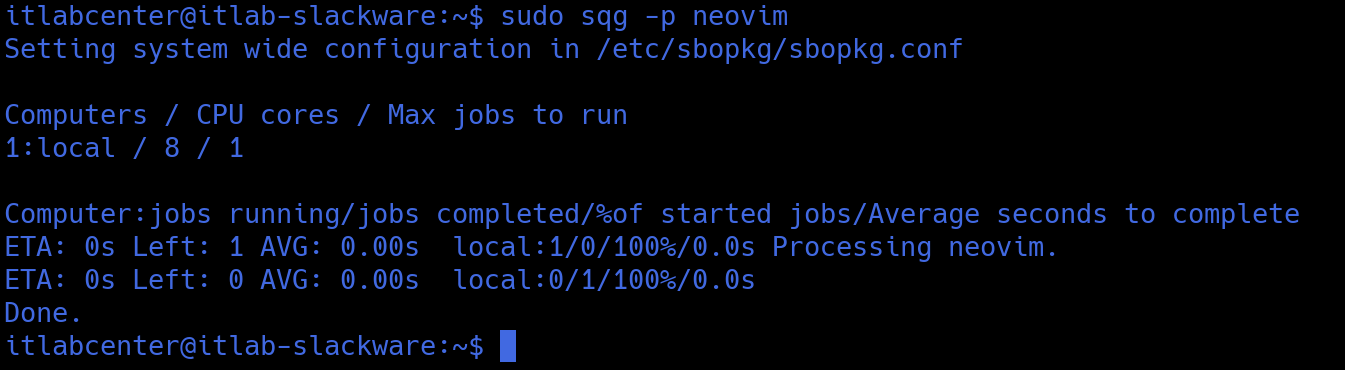
Run the following command from the Slackware Linux Terminal to generate the Neovim dependency list with SQG
itlabcenter@itlab-slackware:~$ sudo sqg -p neovim
Resulting Output:
Run the following command from the Slackware Linux Terminal to execute the neovim queue using the sbopkg
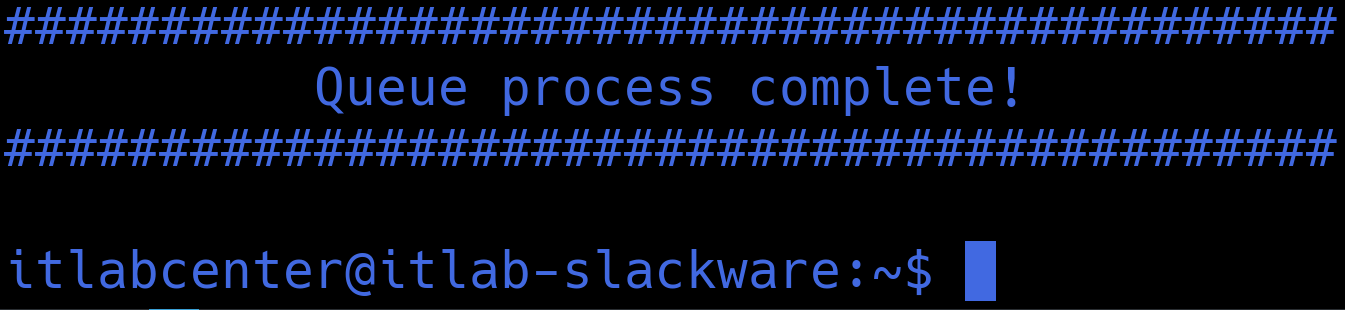
itlabcenter@itlab-slackware:~$ sudo sbopkg -i neovim
When prompted, type Q and pres Enter to select Queuefile and then type P and press Enter to Proceed through
sbopkg will now download the source code for every dependency, compile them into Slackware packages, and
install them one by one. Note: this may take 5-10 minutes to fully complete depending on your CPU strength
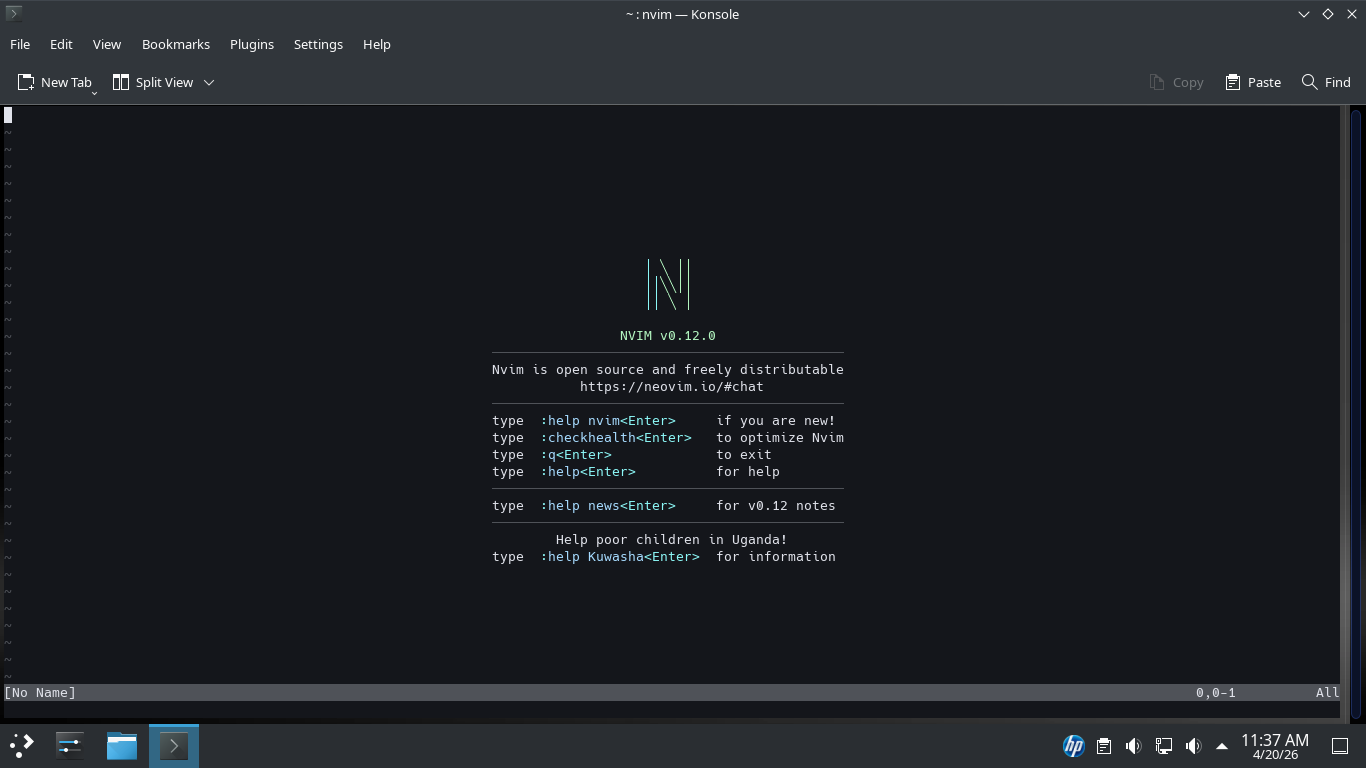
Run the following command from the Slackware Linux Terminal to launch the Neovim code editor application
itlabcenter@itlab-slackware:~$ nvim
Resulting Output:
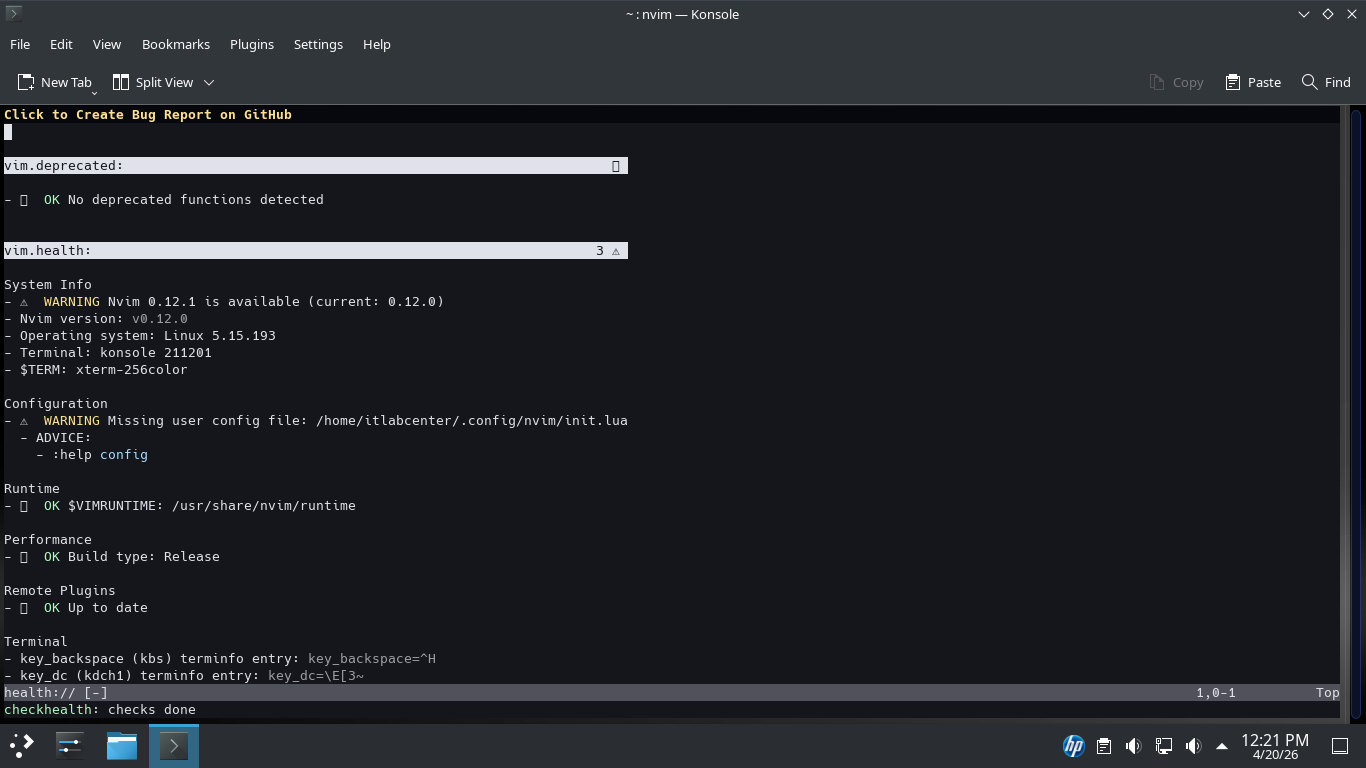
Type out the following into the Neovim application and press enter to run the built-in diagnostics tool
:checkhealth
Resulting Output:
Now that we have the program running we need to exit out of it to perform command line tasks. Type :q!
Now let's talk plugins. There are several plugins we can add to our Neovim to upgrade to a developer PC:
In the modern Neovim ecosystem, Lazy.nvim is the industry standard for plugin management. It is fast and
handled the dependencies automatically, plus it uses a clean Lua-based configuration file we can set up
For BASH scripting, you need the bash-language-server. This provides many features like: Go-to-definition
Autocomplete, and Real-time Linting which underlines detected errors in your syntax while you type scripts
Standard syntax highlighting uses regex, which often breaks in complex scrips. Treesitter parses your code
into a syntax tree, allowing for lightning-fast and highly accurate highlighting that understands the logic
In a professional lab, you'll eventually have dozens of scripts. Telescope is a highly extensible fuzzy
finder. It allows you to search through the file names, grep for specific strings, and browse git commits
Run the following commands from the Slackware Linux Terminal to create the directory and the config file
itlabcenter@itlab-slackware:~$ mkdir -p ~/.config/nvim
itlabcenter@itlab-slackware:~$ nano ~/.config/nvim/init.lua
Type out the following configuration file for Neovim below to install and configure each of our plugins
local lazypath = vim.fn.stdpath("data") .. "/lazy/lazy.nvim"
if not vim.loop.fs_stat(lazypath) then
vim.fn.system({
"git",
"clone",
"--filter=blob:none",
"https://github.com/folke/lazy.nvim.git",
"--branch=stable",
lazypath,
})
end
vim.opt.rtp:prepend(lazypath)
require("lazy").setup({
{ "folke/tokyonight.nvim", lazy = false, priority = 1000 },
{ "williamboman/mason.nvim" },
{ "williamboman/mason-lspconfig.nvim" },
{ "neovim/nvim-lspconfig" },
{ "nvim-treesitter/nvim-treesitter", build = ":TSUpdate" },
{
"nvim-telescope/telescope.nvim",
tag = '0.1.5',
dependencies = { "nvim-lua/plenary.nvim" }
},
})
require("mason").setup()
require("mason-lspconfig").setup({
ensure_installed = { "bashls" }
})
vim.cmd[[colorscheme tokyonight]]
vim.opt.number = true
vim.opt.shiftwidth = 2
vim.opt.expandtab = true
Press CTRL+O followed by Enter to save our changes to the file. Then press CTRL+X to exit the nano editor
Run the following command from the Slackware Linux Terminal to re-launch neovim and initiate the plugins
itlabcenter@itlab-slackware:~$ nvim
Resulting Output:
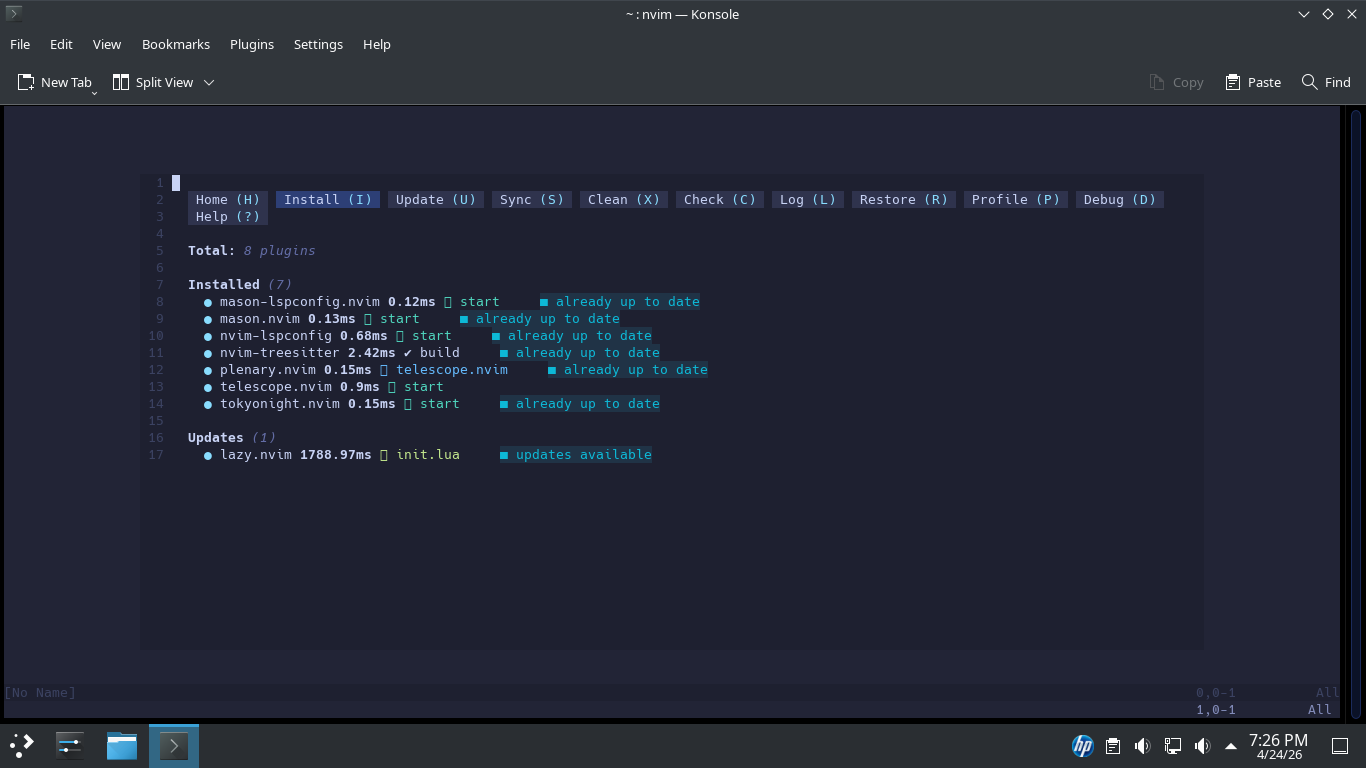
The plugins are now installed, but the Language Server (the actual logic that reads your BASH code) and
ShellCheck are external binaries. We use Mason to manage these so they don't interfere with your Slackware
system binaries. Inside Neovim, type ':Mason' and press Enter. A menu will appear, press / to begin search
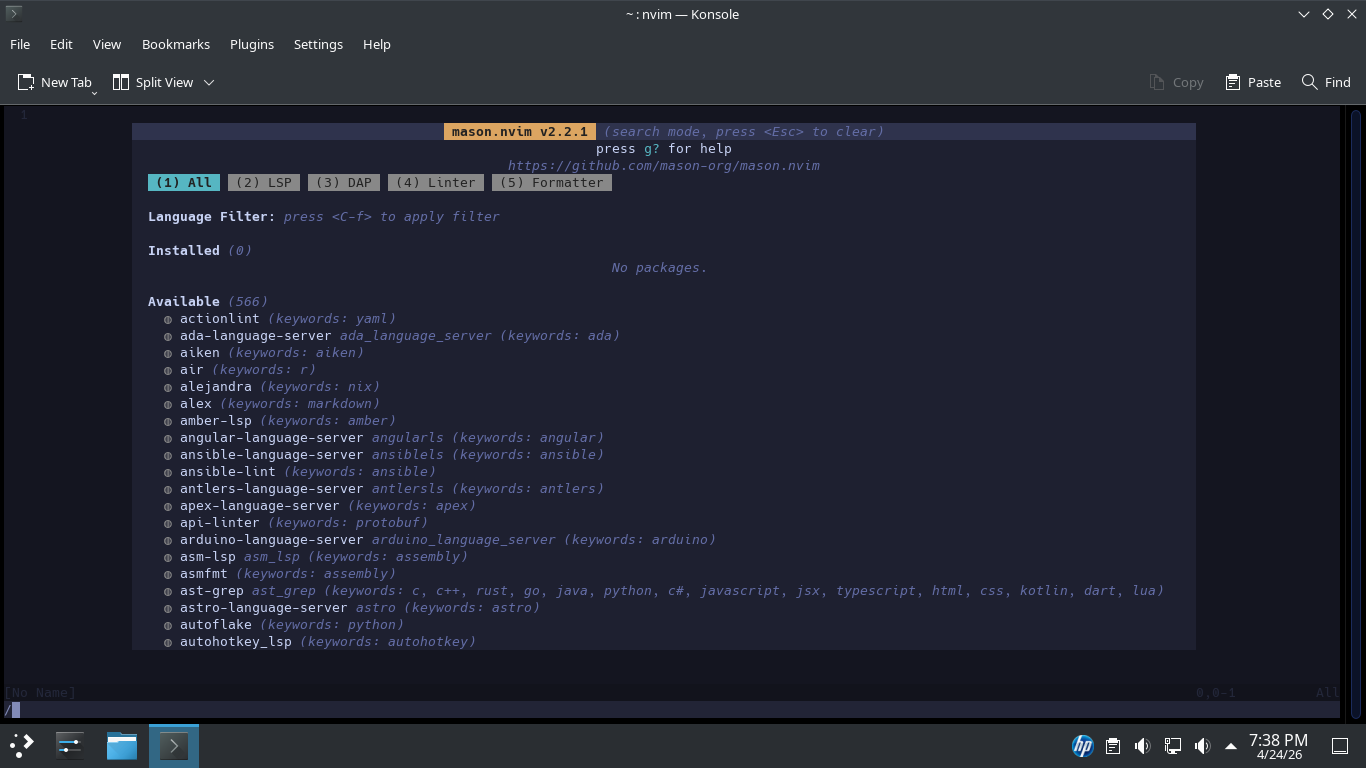
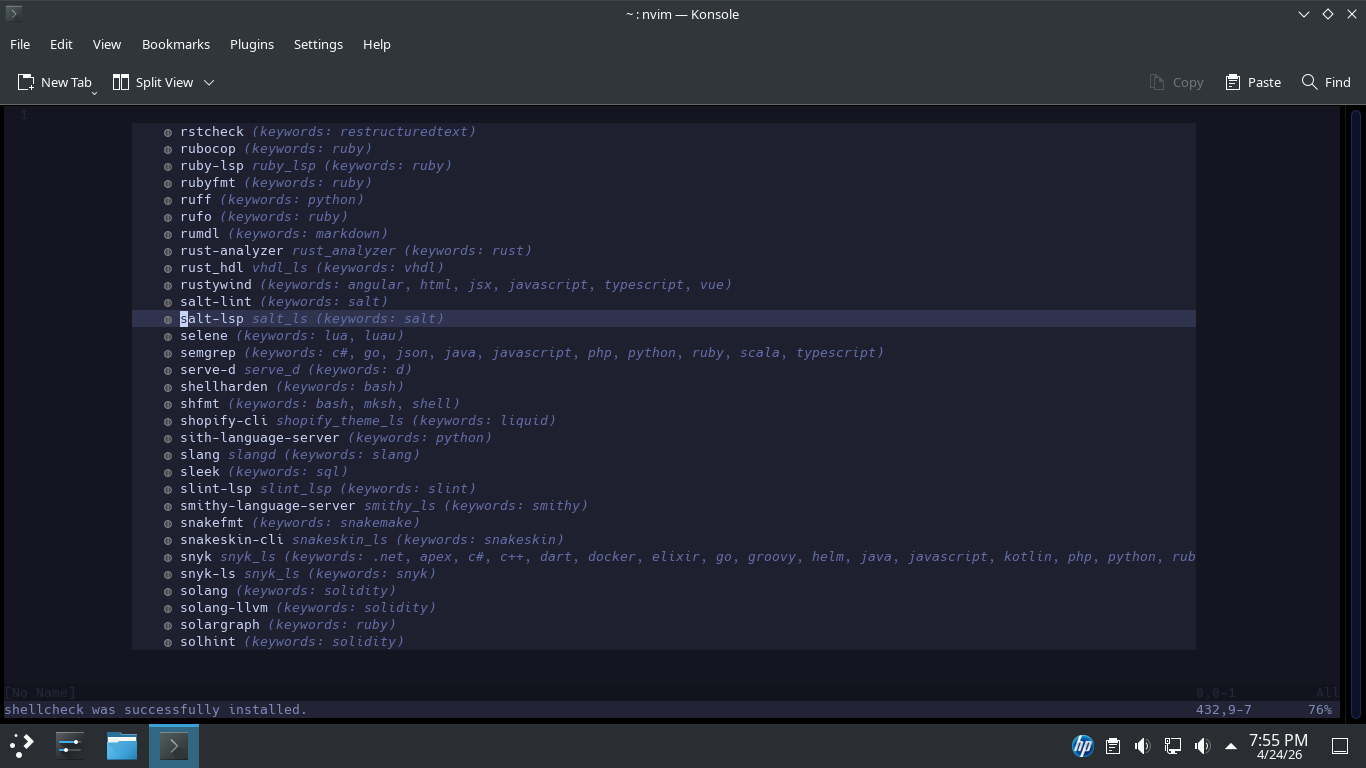
From here type ShellCheck to search for the item and hit enter, your cursor will jump to the item, press i
To use Neovim, you have to move past the idea that "typing" and "editing" are the same thing. In Neovim,
you are a surgeon with a scalpel, not just a writer with a keyboard. Here is the structural overview of
Neovim operations, organized by the logic of the editor. Unlike VC Code, Neovim starts in Normal Mode. You
don't actually type anything here, you issue commands instead. Neovim has several modes of operational use
• Normal Mode (Esc): Used for navigation and manipulation. This is your "home base."
• Insert Mode (i): Used for actually typing text or code.
• Visual Mode (v): Used for highlighting blocks of text (like using a mouse).
• Command Mode (:): Used for system-level tasks like saving or quitting.
In a professional terminal environment, your fingers should never leave the "home row." Using the arrow
inefficient and "anti-pattern" in the Neovim world. You can instead use these keys closer to the home row
• h: Move Left
• j: Move Down
• k: Move Up
• l: Move Right
Neovim is designed to maximize productivity and because of this there are many Advanced Movement shortcuts
• w: Jump to the start of the next word.
• b: Jump back to the start of a word.
• 0: Jump to the beginning of the line.
• $: Jump to the end of the line.
• G: Jump to the bottom of the file.
• gg: Jump to the top of the file.
Next comes the Grammar of Editing. Editing commands follow a linguistic structure: Verb + Number + Noun
• d: Delete
• c: Change (Delete and enter insert mode)
• y: Yank (Copy)
• p: Put (Paste)
• w: Word
• s: Sentence
• i(: Inside the Parentheses or any Container
• at: Around Tags (HTML/XML)
• dw: Delete Word
• d2s: Delete two Sentences
• ci": Change inside Quotes
• yy: Copy Entire Line
A large part of Neovim are the commands you can execute in command mode. Here are some essential-commands
• :w - Write (Save) the file.
• :q - Quit Neovim.
• :wq - Save and Quit
• :q! - Quit without saving (the "Emergency Exit").
• :set nu - Enable line numbers.
• :%s/old/new/g - Find "old" and replace with "new" everywhere in the file.
• :Explore - Open Netrw directory browser, type % to name a new file
Efficiency in a lab setting often comes down to how quickly you can find a bug. Use these in Normal mode
• /pattern: Search forward for a string. Press n to go to the next match
• ?pattern: Search backward for a string.
• u: Undo the last action.
• CTRL + r: Redo the last action.
• x: Delete a single character under the cursor.
There are many more shortcuts available as well. Neovim is definitely a learning curve but can be a huge
time-saver for the who take the time to master it. For the remainder of this lab we will list out each of
the commands and keystrokes you must use but do your best to get comfortable with them all on your own
7. Reusable Scripts
So far, all of our scripting has been done directly in the terminal. It's time to create reusable scripts
In the next section, we will write all of our scripts using Neovim. We will them execute the from Terminal
Press q to exit the Mason plugin utility. Then type :Explore and press enter to start the directory search
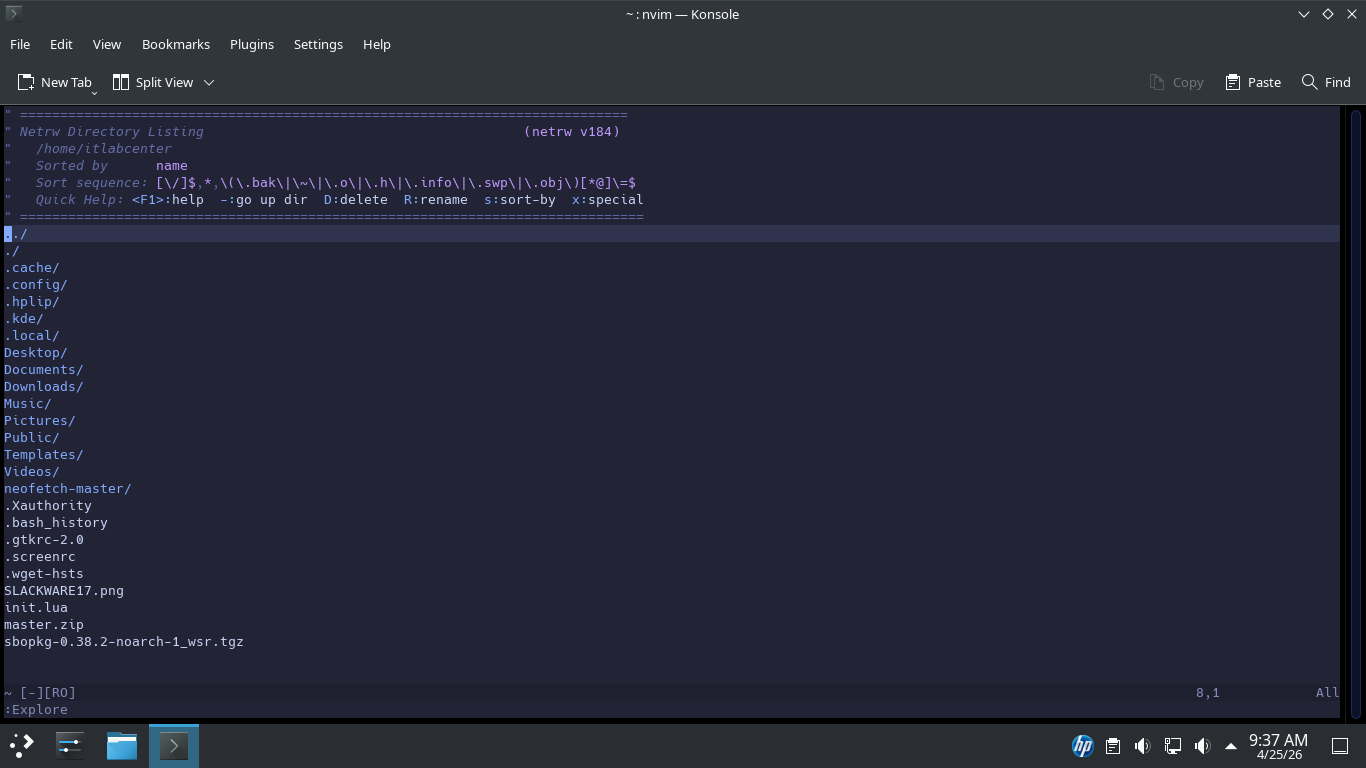
Now use the J key to scroll down to Desktop/ and press Enter. Then hit % and type script1.sh and hit Enter
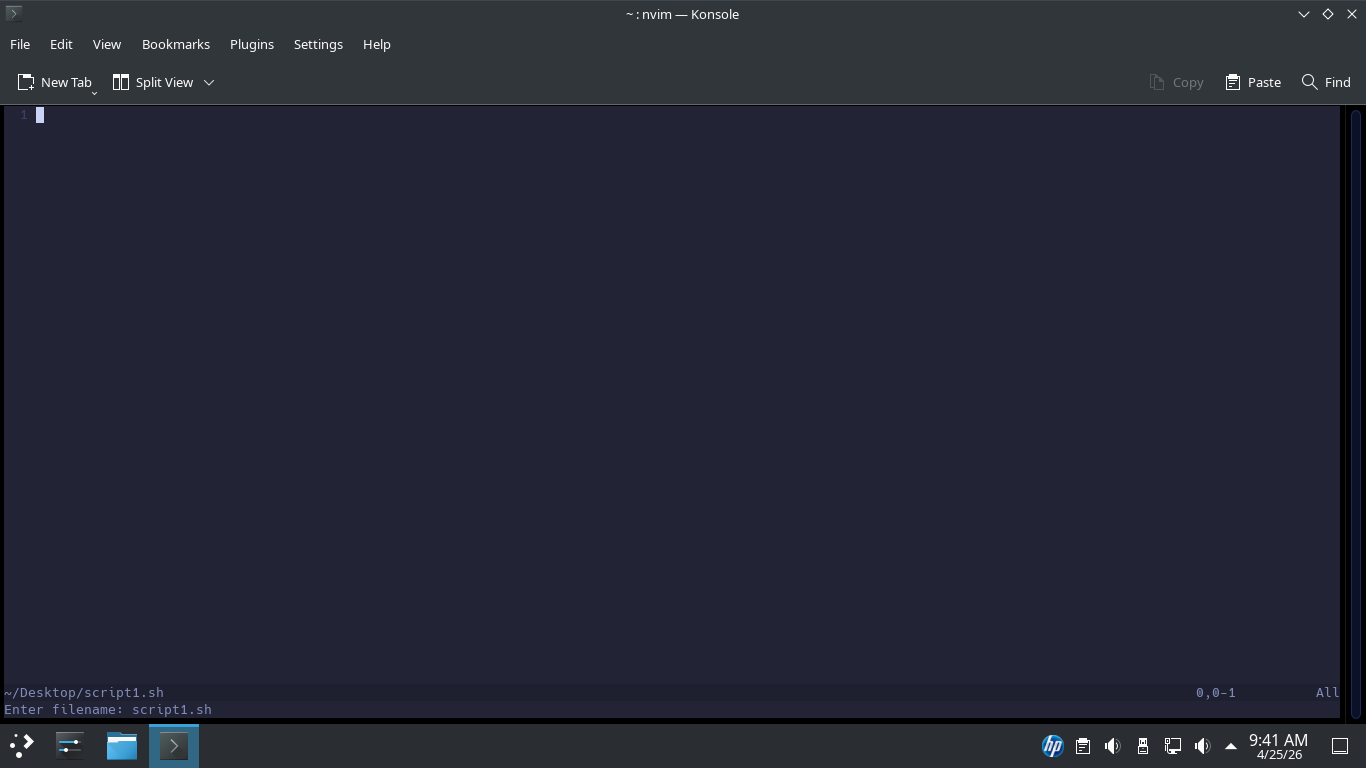
We are now editing a new file named script1.sh. Press the I key to enter insert mode and type the following
#!/bin/bash
You should start all your BASH scripts with this shebang. This ensures Linux runs your script using BASH
Some argue that #!/usr/bin/env bash is more universal. Our scripts will use the traditional #!/bin/bash
Next. you will write your script, line by line. Linux will execute each line as a command. There is no
need for line termination like semicolons. It's ok to skip a line to make the script more readable; blank
lines are simply ignored. Indentation is not required, but as you will see, it makes reading much easier
Spacing is crucial, so pay attempt to spacing in the examples below. Type out the following BASH script:
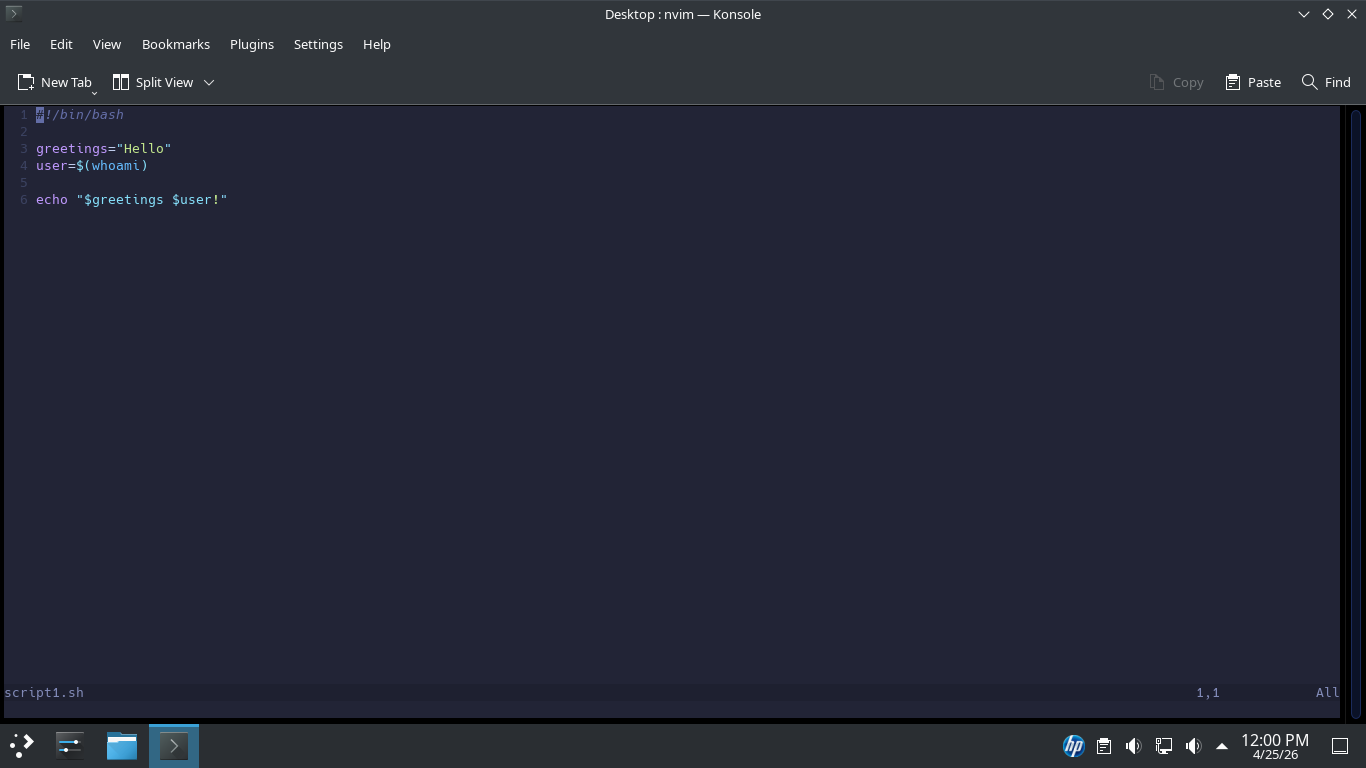
#!/bin/bash
greetings="Hello"
user=$(whoami)
echo "$greetings $user!"
This script assigns the string "Hello" to a variable called greetings. The whoami command is used for the
user variable. Then a greeting is echoed to the screen. Now hit ESC and type :wq + enter to save and quit
Run the following commands from the Slackware Linux Terminal to give the script file executable permission
itlabcenter@itlab-slackware:~$ cd Desktop
itlabcenter@itlab-slackware:~/Desktop$ chmod +x script1.sh
Run the following command from the Slackware Linux Terminal to execute our script file as a BASH script
itlabcenter@itlab-slackware:~$ ./script1.sh
Resulting Output:

Run the following command from the Slackware Linux Terminal to reopen the script file with our Neovim tool
itlabcenter@itlab-slackware:~/Desktop$ nvim script1.sh
Resulting Output:
As you can see we can launch Neovim with the filename directly instead of having to search for it with the
directory explorer. Press the I key to enter Insert mode, then modify the script to match the one shown:
#!/bin/bash
greetings="Hello"
echo "Please enter your name:"
read user
echo "$greetings $user!"
This script prompts the user for their name directly. Now hit ESC and type :wq + enter to save and quit
Run the following command from the Slackware Linux Terminal to execute our script file as a BASH script
itlabcenter@itlab-slackware:~/Desktop$ ./script1.sh
Resulting Output:

Run the following command from the Slackware Linux Terminal to reopen the script file with our Neovim tool
itlabcenter@itlab-slackware:~/Desktop$ nvim script1.sh
This time we will create a function called greet() and pass that function the user variable to get that
intended result. Now press the I key to enter Insert mode, then modify the script to match the one shown:
#!/bin/bash
greet() {
echo "Hello $user!"
}
echo "Please enter your name:"
read name
greet "$user"
This script also excludes that other greetings variable. Now hit ESC and type :wq + enter to save and quit
Run the following command from the Slackware Linux Terminal to execute our script file as a BASH script
itlabcenter@itlab-slackware:~/Desktop$ ./script1.sh
Resulting Output:

The following script is a little more challenging. Let's write a fruit taster. First, we will create a text
file with a list of fruits. You can do this by running the following command from the Slackware Terminal:
itlabcenter@itlab-slackware:~/Desktop$ nvim fruits.txt
We've made a new file. Now press the I key to enter Insert mode, then type out the list of fruits below:
apples
oranges
bananas
kiwis
grapes
melons
lemons
berries
Do not hit Enter after berries or our script will fail, Now hit ESC and type :wq + enter to save and quit
Run the following command from the Slackware Linux Terminal to create and edit a new script with Neovim
itlabcenter@itlab-slackware:~/Desktop$ nvim script2.sh
Now press the I key to enter Insert mode, then enter in the code displayed below to create our new script
#!/bin/bash
mapfile -t fruits < "fruits.txt"
arrayLength=${#fruits[@]}
firstFruit=0
lastFruit=$((arrayLength-1))
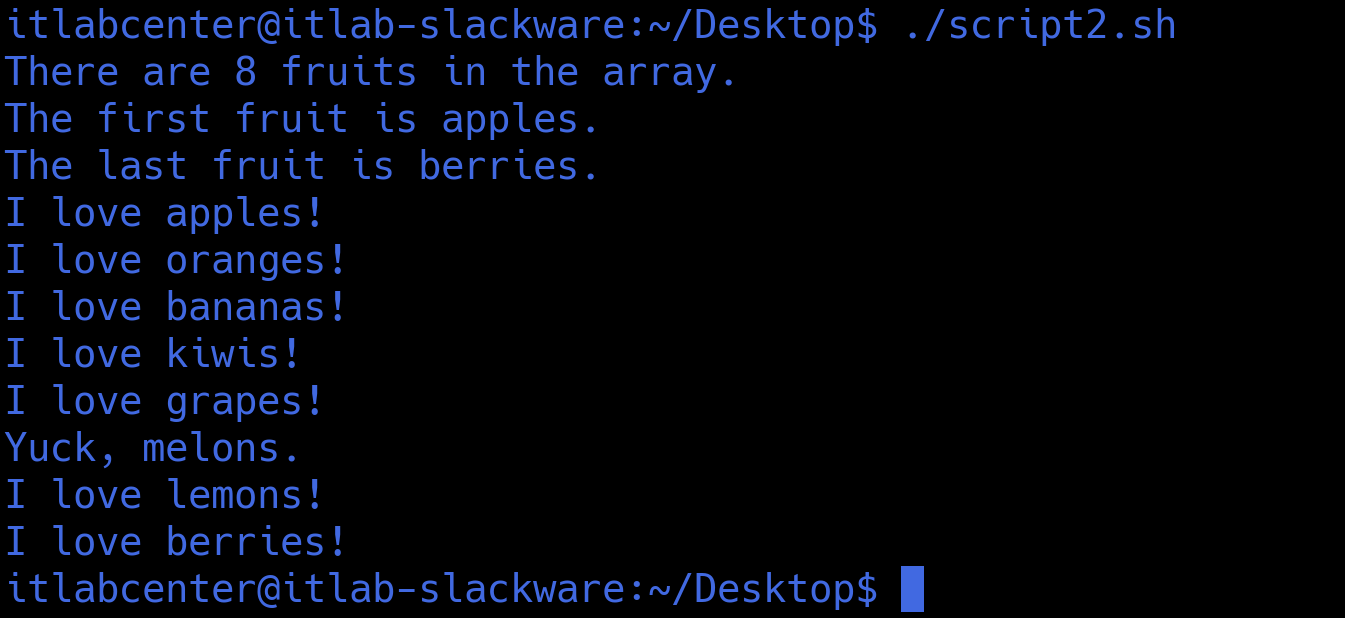
echo "There are $arrayLength fruits in the array."
echo "The first fruit is ${fruits[$firstFruit]}."
echo "The last fruit is ${fruits[$lastFruit]}."
In this script, we use the mapfile function to create an array called fruits from the fruits.txt text file
Mapfile will read fruits.txt line by line and put each line into the fruits array. Next, we set a variable
arrayLength to the length of the fruits array. We create a firstFruit variable and set it to zero, as zero
is always the first item in an array. Then we create a lastFruit variable and set it to the arrayLength - 1
Finally, we echo to the screen the array length, the first item in the array, and the last item in the array
Now hit ESC and type :wq + enter to save and quit, then run our new BASH script with the following commands
itlabcenter@itlab-slackware:~/Desktop$ sudo chmod +x script2.sh
itlabcenter@itlab-slackwareL~/Desktop$ ./script2.sh
Resulting Output:

Now that we know the fruits array works as expected, let's taste some fruit! Reopen the script2.sh file:
itlabcenter@itlab-slackware:~/Desktop$ nvim script2.sh
Now press the I key to enter Insert mode, then modify the script2.sh file as to match our example provided
#!/bin/bash
mapfile -t fruits < "fruits.txt"
arrayLength=${#fruits[@]}
firstFruit=0
lastFruit=$((arrayLength-1))
echo "There are $arrayLength fruits in the array."
echo "The first fruit is ${fruits[$firstFruit]}."
echo "The last fruit is ${fruits[$lastFruit]}."
for fruit in ${fruits[@]}
do
if [ $fruit != "melons" ]
then
echo "I love $fruit!"
else
echo "Yuck, $fruit."
fi
done
We have added a for loop that iterates through each array item in the fruits array. Each pass, the value
of the fruit variable is compared to the string "melons". If there is no match (!=), then we love the fruit
If fruit equals "melons" then we say yuck. Now hit the escape key and type :wq and enter to save and quit
Run the following command from the Slackware Linux Terminal to execute our script file as a BASH script
itlabcenter@itlab-slackware:~/Desktop$ ./script2.sh
Resulting Output:
Good variable names help make a script easy to read and support. In script2.sh above, we could've written
the code as shown below. This version works, but it is much easier to understand with well-named variables
#!/bin/bash
mapfile -t x < "fruits.txt"
a=${#x[@]}
z=0
r=$((a-1))
echo "There are $a fruits in the array."
echo "The first fruit is ${x[$z]}."
echo "The last fruit is ${x[$r]}."
for q in ${x[@]}
do
if [ $q != "melons" ]
then
echo "I love $q!"
else
echo "Yuck, $q."
fi
done
Another way to make your code more understandable is to use comments. A comment is text that is ignored
when a script executes. Comments describe what a script is doing and how it works. In BASH, the # symbol
is used to create a comment. Let's add some comments to our super judgy anti-melon fruit taster script:
#!/bin/bash
#Create the fruits array from the fruits text file
mapfile -t fruits < "fruits.txt"
#Assign variables based on the fruit array's length
arrayLength=${#fruits[@]}
firstFruit=0
lastFruit=$((arrayLength-1))
#Print array facts to the screen
echo "There are $arrayLength fruits in the array."
echo "The first fruit is ${fruits[$firstFruit]}."
echo "The last fruit is ${fruits[$lastFruit]}."
#Compare every fruit in the array to "melons"
for fruit in ${fruits[@]}
do
if [ $fruit != "melons" ]
then
echo "I love $fruit!"
else
echo "Yuck, $fruit."
fi
done
Note that #!/bin/bash is not a comment even though it starts with #. As seen above, describing in detail
what every line of code does is unnecessary. The person reading your code should understand BASH. However
it's good to explain what each code section is doing. Good variable names and informative comments will
help make your code easy to read and support long after you have forgotten what your code does yourself
Now let's pivot to making a primitive backup tool using BASH! Run the following command from the terminal
itlabcenter@itlab-slackware:~/Desktop$ nvim script3.sh
Now press the I key to enter Insert mode, then modify the script3.sh file as to match our example provided
#!/bin/bash
#Assign Variables
backup="script_backups"
#Check if the script_backups directory exists, and if not create it
if [ ! -d "$backup" ]
then
mkdir "$backup"
fi
#Put directory listing of .sh files into a text file
ls -la *.sh > scripts.txt
#Create an array containing script names from scripts.txt
scripts=$(cat scripts.txt | awk '{print $9}')
#Loop through the scripts array; copy scripts to script_backups
for script in ${scripts[@]}
do
echo "Copying $script to $backup"
cp "$script" "$backup"
done
#Validate the contents of script_backups
echo "Here are the contents of $backup :"
ls -la "$backup"
Now hit the escape key and type :wq and enter to save and quit, then run the following commands to execute
itlabcenter@itlab-slackware:~/Desktop$ sudo chmod +x script3.sh
itlabcenter@itlab-slackware:~/Desktop$ ./script3.sh
Resulting Output:
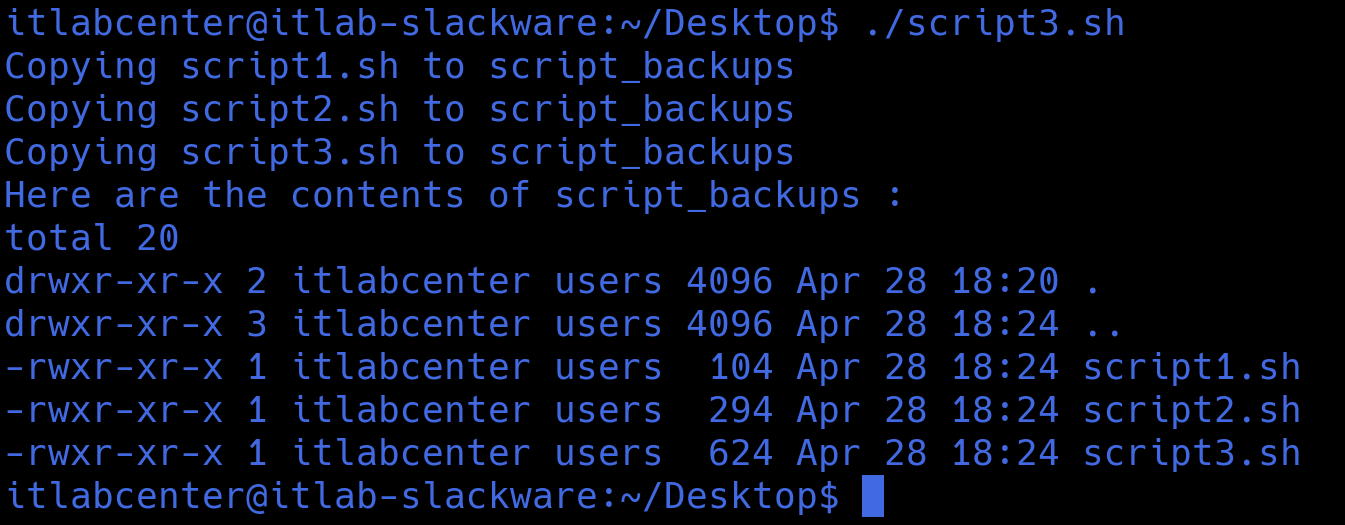
On the Desktop, you will see a folder called script_backups containing copies of each of our script files

The magic behind script3.sh is a tool called awk. Awk is a parsing tool for linux. Let's see how it works
Run the following command from the Slackware Linux Terminal to view the contents of the scripts.txt file
itlabcenter@itlab-slackware:~/Desktop$ cat scripts.txt
Resulting Output:

If we look at the output, we can see nine distinct columns. The text we want for our array is in column 9
Run the following command from the Slackware Linux Terminal to parse and print column 9 contents with awk
itlabcenter@itlab-slackware:~/Desktop$ cat scripts.txt | awk '{print $9}'
Resulting Output:

Run the following command from the Slackware Linux Terminal to create an array called scripts with these
scripts=$(cat scripts.txt | awk '{print $9}')
Run the following command from the Slackware Linux Terminal to print the contents of our new scripts array
itlabcenter@itlab-slackware:~/Desktop$ echo ${scripts[@]}
Resulting Output:

Let's pivot back to the fruits and create one final reusable script for fun which generates ASCII text art
We will use a Linux Utility jp2a, which is excellent for converting images to highly detailed ASCII based
on dimensions. Run the following commands from the Slackware Linux Terminal to install the jp2a utility
itlabcenter@itlab-slackware:~/Desktop$ sudo sqg -p jp2a
itlabcenter@itlab-slackware:~/Desktop$ sudo sbopkg -i jp2a
Run the following command from the Slackware Linux Terminal to create and edit a fourth BASH script file
itlabcenter@itlab-slackware:~/Desktop$ nvim generate_banana.sh
Now press the I key to enter Insert mode, then modify the BASH script file as to match our example below
#!/bin/bash
# Get the banana image if it doesn't exist
BANANA_IMG="banana.jpg"
if [ ! -f "$BANANA_IMG" ]; then
wget -O "$BANANA_IMG" https://media.istockphoto.com/id/925167342/photo/single-banana-against-white-background.jpg
fi
# Create a custom terminal header
export PS1='jorkis@dumpster: \w\$ '
# Clear the screen first for maximum impact
clear
# Generate the art and send it to the terminal
convert banana.jpg -resize 1660x340! "$BANANA_IMG"
jp2a --width=166 --height=34 "$BANANA_IMG"
Now hit the escape key and type :wq and enter to save and quit, then run the following commands to execute
itlabcenter@itlab-slackware:~/Desktop$ sudo chmod +x generate_banana.sh
itlabcenter@itlab-slackware:~/Desktop$ ./generate_banana.sh
Resulting Output:

Congratulations, this script is completely useless, but man does it look cool. Let's move onto more scripts
8. Configure Vulnerability Scanner & Environment
Here we will pivot to using these newfound BASH scripting skills to conduct networking scanning and create
a map of discoverable host information using the Nmap tool. This is a classic Lateral Movement scenario
Once an attacker has a foothold, the goal is to map the internal landscape as quickly and efficiently as
possible without tripping alarms. Designing a script like this is an excellent way to understand network
plumbing behind security tools. We will structure this into a modular script so you can see all the phases
Nmap is already included on the system with Slackware. We will need to install GVM for OpenVAS scanning
In a real-world information security role, you will rarely install GVM natively on a host OS. Why? Because
GVM requires dozens of specific versions of libraries which can pollute your system. Instead, use Docker
Run the following commands from the Slackware Linux Terminal to install and configure the docker toolkit
itlabcenter@itlab-slackware:~/Desktop$ cd /tmp
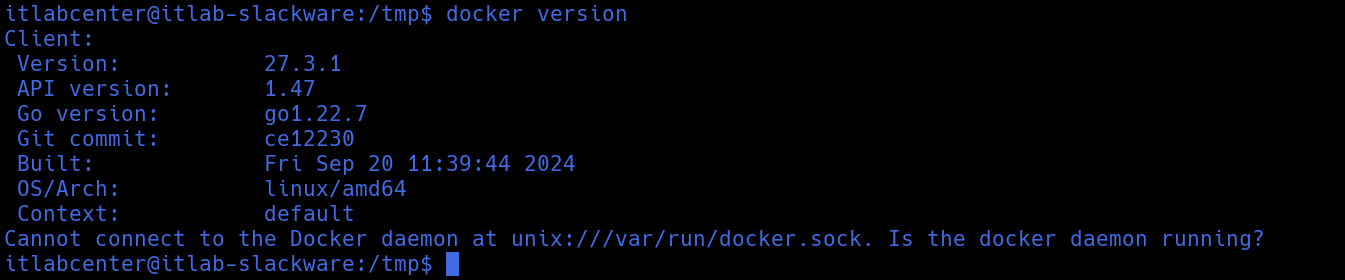
itlabcenter@itlab-slackware:/tmp$ wget https://download.docker.com/linux/static/stable/x86_64/docker-27.3.1.tgz
itlabcenter@itlab-slackware:/tmp$ tar xzvf docker-27.3.1.tgz
itlabcenter@itlab-slackware:/tmp$ sudo cp docker/* /usr/local/bin/
itlabcenter@itlab-slackware:/tmp$ docker version
Resulting Output:
Run the following commands from the Slackware Linux Terminal to configure the docker utility permissions
itlabcenter@itlab-slackware:/tmp$ sudo groupadd docker
itlabcenter@itlab-slackware:/tmp$ sudo usermod -aG docker $USER
itlabcenter@itlab-slackware:/tmp$ sudo reboot
Slackware uses the BSD-style init system. We need to create a script in /etc/rc.d that can start, stop,
and restart the Docker daemon. Run the following command from the Slackware Linux Terminal to create this
itlabcenter@itlab-slackware:~$ sudo nvim /etc/rc.d/rc.docker
Now press the I key to enter Insert mode, then enter in the code displayed below to create our new script
#!/bin/bash
BIN=/usr/local/bin/dockerd
PIDFILE=/var/run/docker.pid
LOGFILE=/var/log/docker.log
docker_start() {
if [ -f $PIDFILE ]; then
OLD_PID=$(cat $PIDFILE)
if ! ps -p $OLD_PID > /dev/null; then
echo "Removing stale PID file for Docker."
rm -f $PIDFILE
else
echo "Docker is already running (PID $OLD_PID)."
exit 1
fi
fi
echo "Starting Docker daemon..."
$BIN --pidfile=$PIDFILE >> $LOGFILE 2>&1 &
sleep 1
if ps -p $(cat $PIDFILE) > /dev/null; then
echo "Docker started successfully."
else
echo "Docker failed to start. Check $LOGFILE"
fi
}
docker_stop() {
if [ -f $PIDFILE ]; then
echo "Stopping Docker daemon..."
kill $(cat $PIDFILE)
for i in {1..10}; do
[ ! -f $PIDFILE ] && break
sleep 1
done
rm -f $PIDFILE
pkill containerd
else
echo "Docker is not running."
fi
}
case "$1" in
'start') docker_start ;;
'stop') docker_stop ;;
'restart') docker_stop; sleep 2; docker_start ;;
'status') [ -f $PIDFILE ] && echo "Docker is running." || echo "Docker is stopped." ;;
*) echo "Usage: $0 {start|stop|restart|status}"
esac
Now hit the escape key and type :wq and enter to save and quit. Now we must make it persistent and enabled
Run the following commands from the Slackware Linux Terminal to make our script executable and enable it
itlabcenter@itlab-slackware:~$ sudo chmod +x /etx/rc.d/rc.docker
itlabcenter@itlab-slackware:~$ sudo /etc/rc.d/rc.docker start
itlabcenter@itlab-slackware:~$ sudo nvim /etc/rc.d/rc.local
Now press the I key to enter Insert mode, then enter the code shown below at the bottom of the local file
if [ -x /etc/rc.d/rc.docker ]; then
/etc/rc.d/rc.docker start
fi
Now hit the escape key and type :wq and enter to save and quit. Now for a quick test to see if it's working
Run the following command from the Slackware Linux Terminal to check to ensure the docker daemon is healthy
itlabcenter@itlab-slackware:~$ docker info
Resulting Output:

Run the following commands from the Slackware Linux Terminal to install the docker compose command plugin
itlabcenter@itlab-slackware:~$ sudo mkdir -p /usr/local/lib/docker/cli-plugins
itlabcenter@itlab-slackware:~$ sudo curl -SL https://github.com/docker/compose/releases/download/v5.1.2/docker-compose-linux-x86_64 -o /usr/local/lib/docker/cli-plugins/docker-compose
itlabcenter@itlab-slackware:~$ sudo chmod +x /usr/local/lib/docker/cli-plugins/docker-compose
itlabcenter@itlab-slackware:~$ docker compose version
Resulting Output:

Run the following command from the Slackware Linux Terminal to deploy the Greenbone OpenVAS Suite of tools
itlabcenter@itlab-slackware:~$ sudo pip install gvm-tools
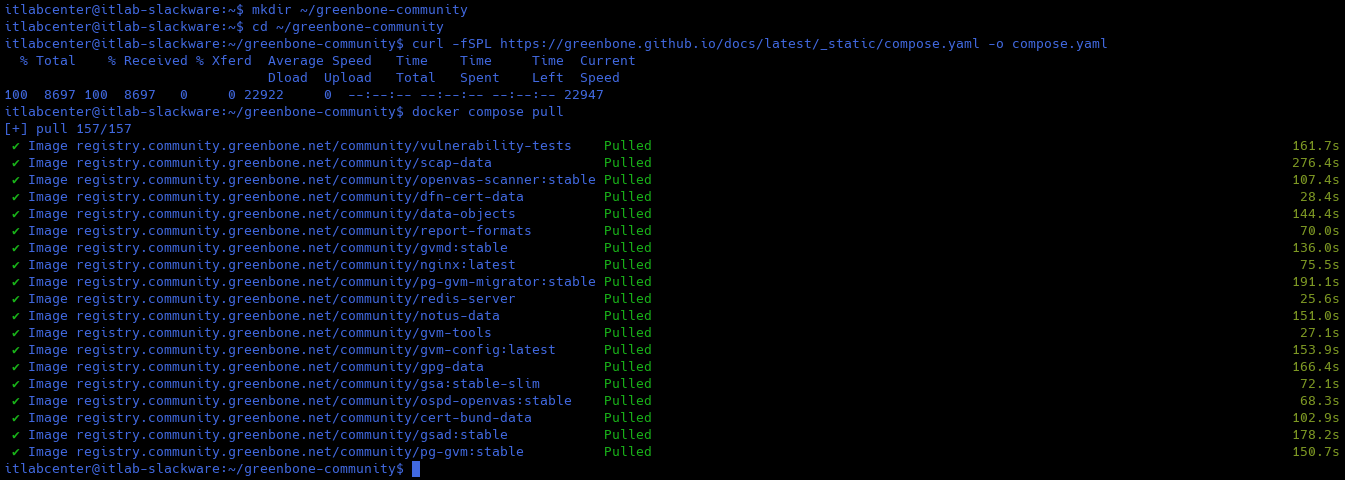
itlabcenter@itlab-slackware:~$ mkdir ~/greenbone-community && cd ~/greenbone-community
itlabcenter@itlab-slackware:~/greenbone-community$ curl -fSPL https://greenbone.github.io/docs/latest/_static/compose.yaml -o compose.yaml
itlabcenter@itlab-slackware:~/greenbone-community$ docker compose pull
Resulting Output:
Run the following command from the Slackware Linux Terminal to fire up the container in detached mode
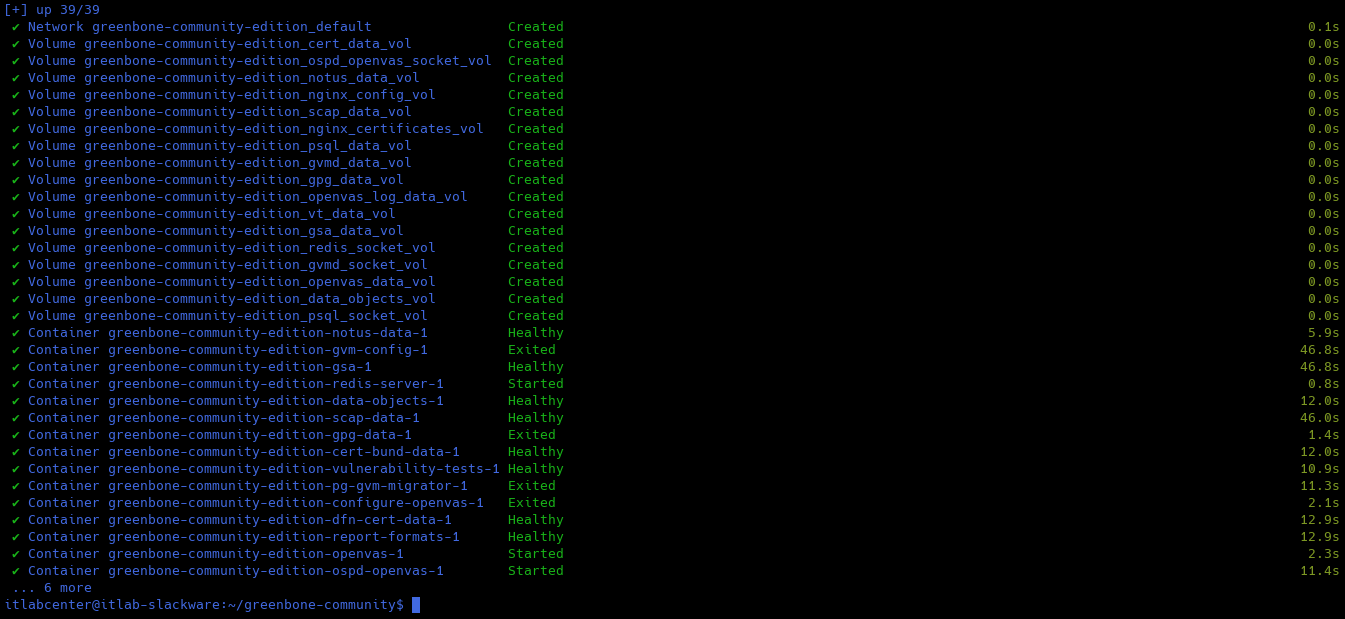
itlabcenter@itlab-slackware:~/greenbone-community$ docker compose up -d
Resulting Output:
Run the following command from the Slackware Linux Terminal to view the docker compose log entries live
itlabcenter@itlab-slackware:~$ docker compose logs -f
Resulting Output:
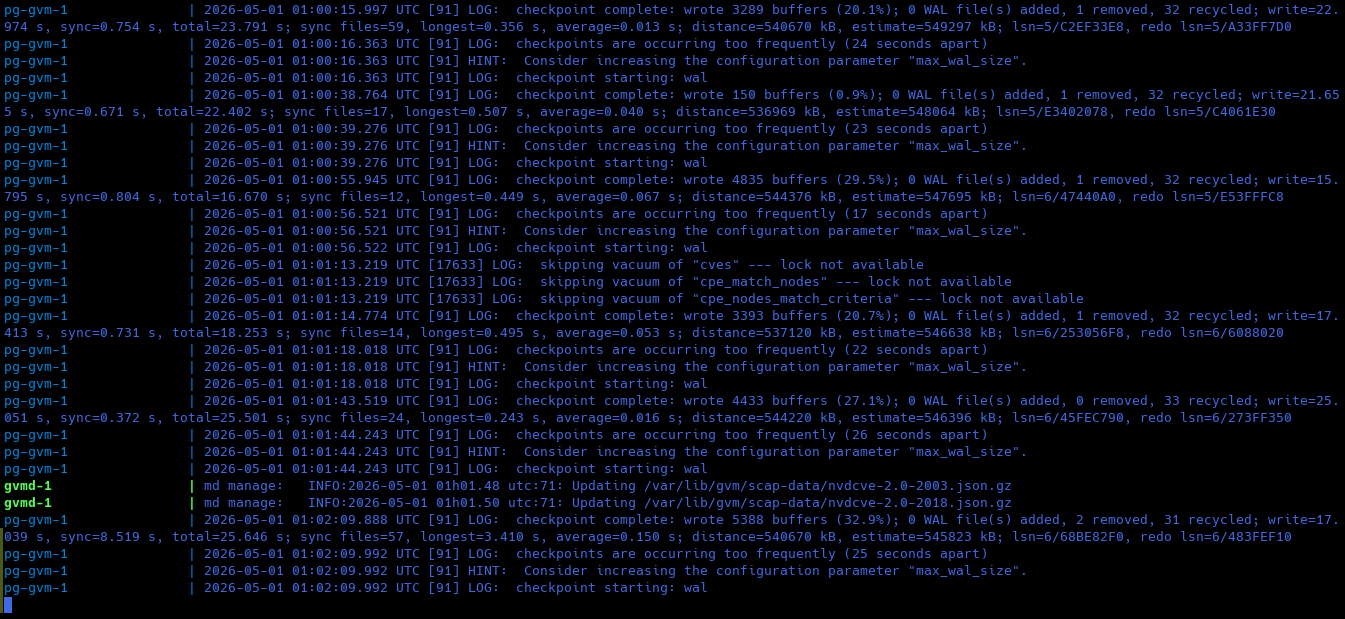
This will show the progress of the CVE database sync, which may take considerable time, even several hours
The database needs to fully complete before we can run any scans. You will see Updating Discovery VVTs done
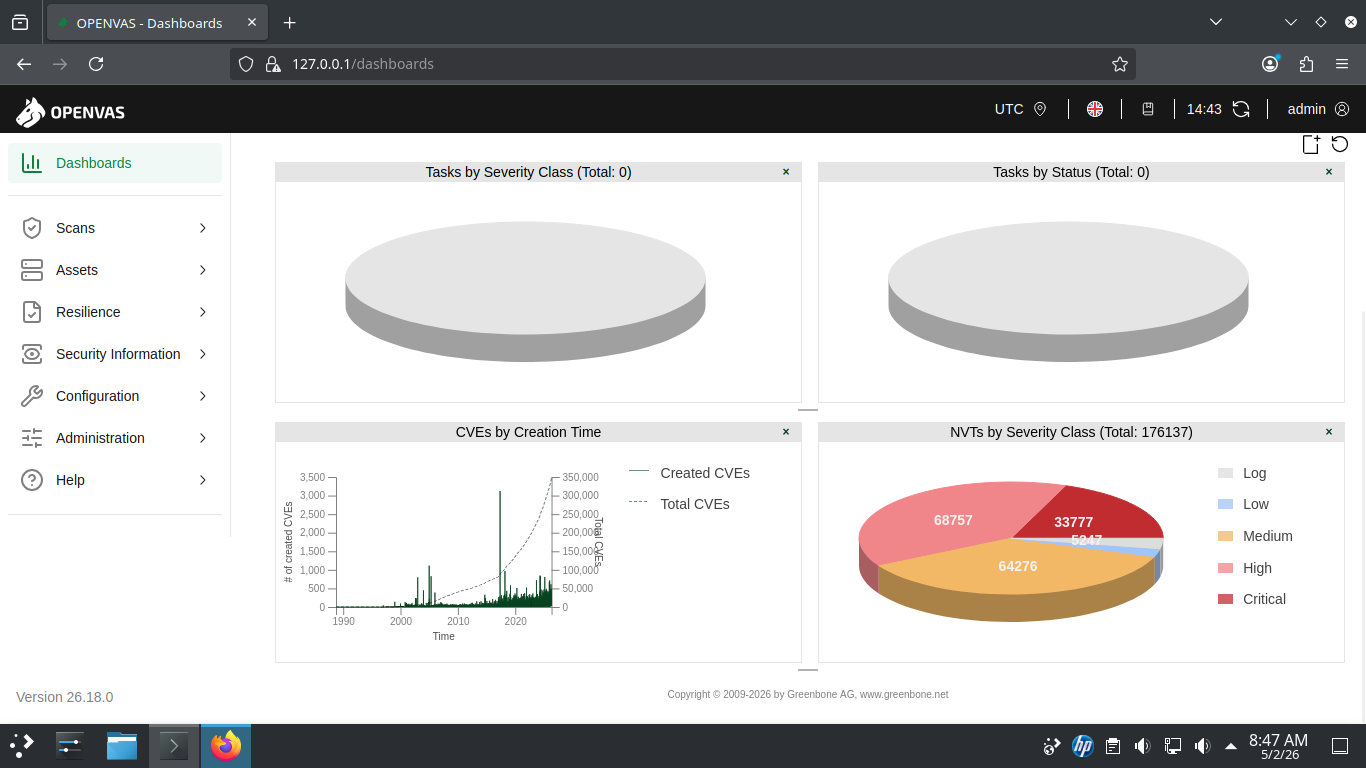
Head to 127.0.0.1:9392 in your firefox browser and login with the credentials admin, admin to view our GVM
Now we need to create a sacrificial lamb for our scripts to pick up on, we will use a Windows 11 machine
The Professional edition of Windows 11 is required to use the built-in RDP server, which we will get to
Download Windows 11 Disk Image (ISO): Microsoft Windows 11 ISO
Download Rufus Disk Imaging Software: Rufus Official Download
Insert USB Flash Drive, run rufus.exe, select target drive, select Windows 11 Disk Image, and hit start:
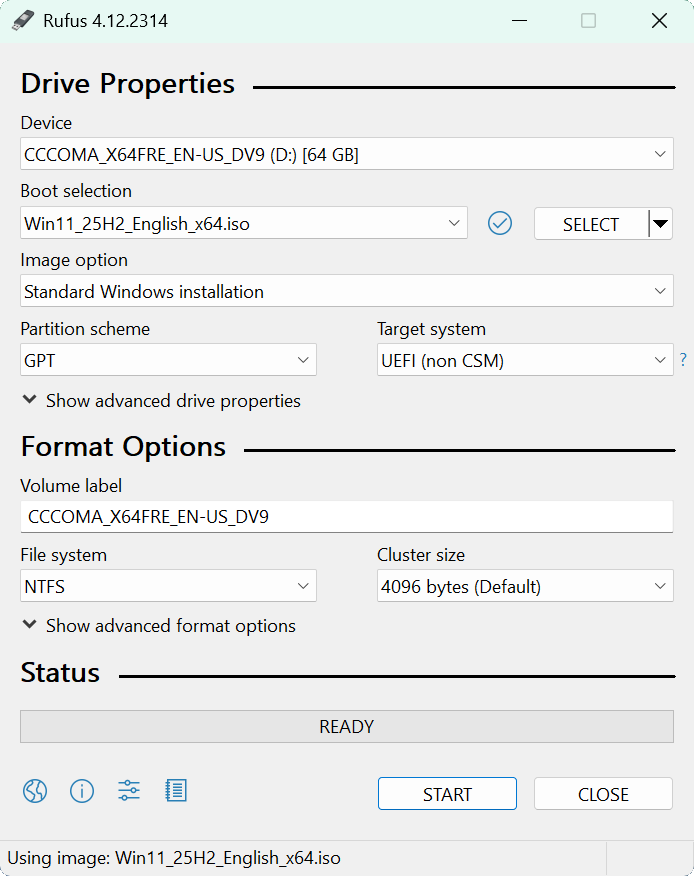
Use the rufus popup menu to customize the Windows 11 installation and disable data collection for this lab

Remove the USB Flash Drive and Insert into unused PC. Start PC and press the hot boot key at the startup:
Navigate through the installer and select the 11 Pro Edition to boot up to the Base Windows Pro Desktop

We want issues that produce distinct signatures for Nmap and OpenVAS to detect on our Windows 11 Endpoint
Since Windows 11 is secure by default, you'll need to manually degrade its security posture to achieve this
Vulnerable machines like this should never be connected to the internet or they could compromise security
We will create an isolated testing environment to ensure the lamb can talk to OpenVAS but not the internet
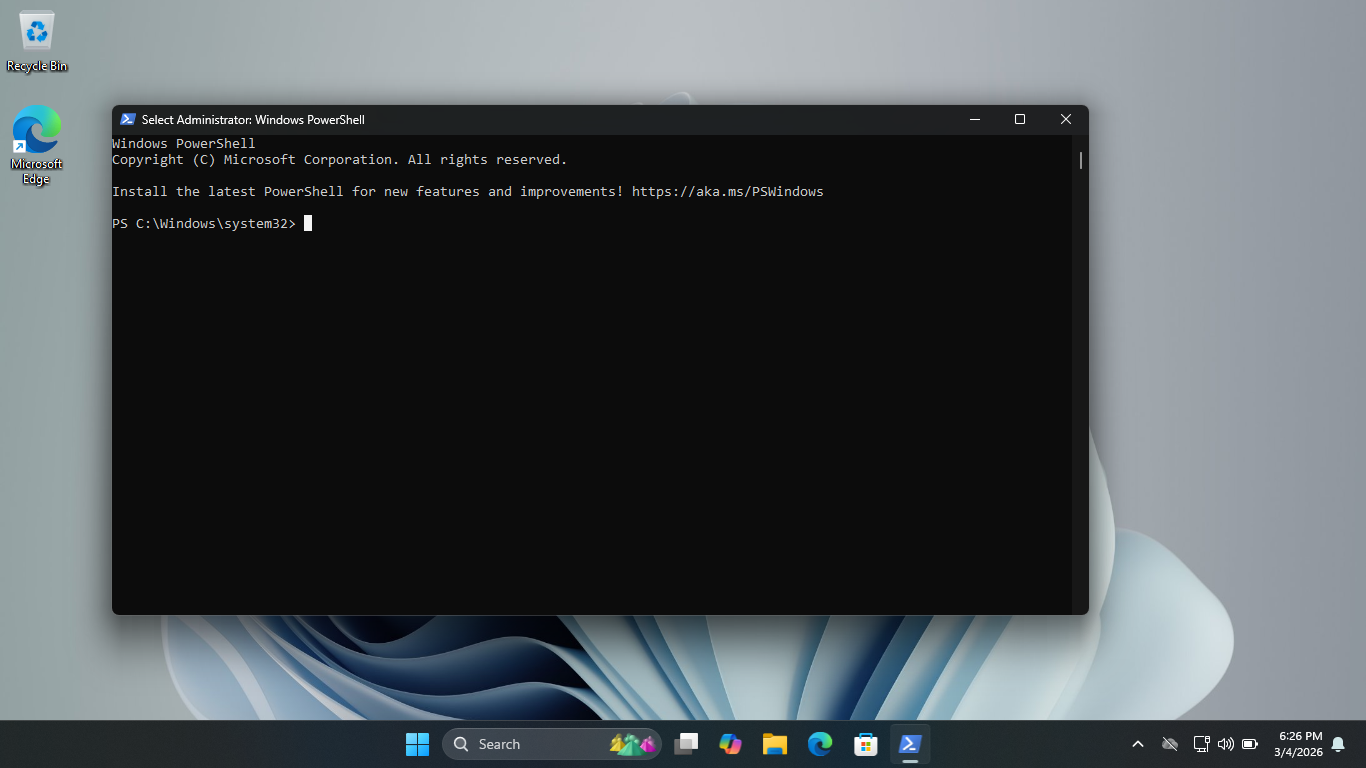
From the taskbar, search for PowerShell, then click on the option listed as Run as Administrator to launch
There are a few components we must download before placing our workstation into full network lockdown
Simple Network Management Protocol (SNMP) is often overlooked. If configured with a default community
string like public, it leaks massive amounts of information about the host, including running processes
Run the following command from the Administrator PowerShell to enable Simple Network Management Protocol
PS C:\Windows\system32> Add-WindowsCapability -Online -Name "SNMP.Client~~~~0.0.1.0"
PS C:\Windows\system32> Add-WindowsCapability -Online -Name "WMI-SNMP-Provider.Client~~~~0.0.1.0"
Run the following commands from the Administrator PowerShell to set a static IPv4 Address for our Endpoint
PS C:\Windows\system32> ipconfig /release
PS C:\Windows\system32> New-NetIPAddress -InterfaceAlias "Ethernet" -IPAddress 192.168.1.168 -PrefixLength 24 -DefaultGateway 192.168.1.1
PS C:\Windows\system32> Set-DnsClientServerAddress -InterfaceAlias "Ethernet" -ServerAddresses "192.168.1.1"
Run the following commands from the Administrator PowerShell to disable IPv6 and the DHCP Windows Service
PS C:\Windows\system32> Disable-NetAdapterBinding -Name "Ethernet" -ComponentID ms_tcpip6
PS C:\Windows\system32> Set-Service -Name "Dhcp" -StartupType Disabled
PS C:\Windows\system32> Stop-Service -Name "Dhcp" -Force
PS C:\Windows\system32> ipconfig /all
Resulting Output:
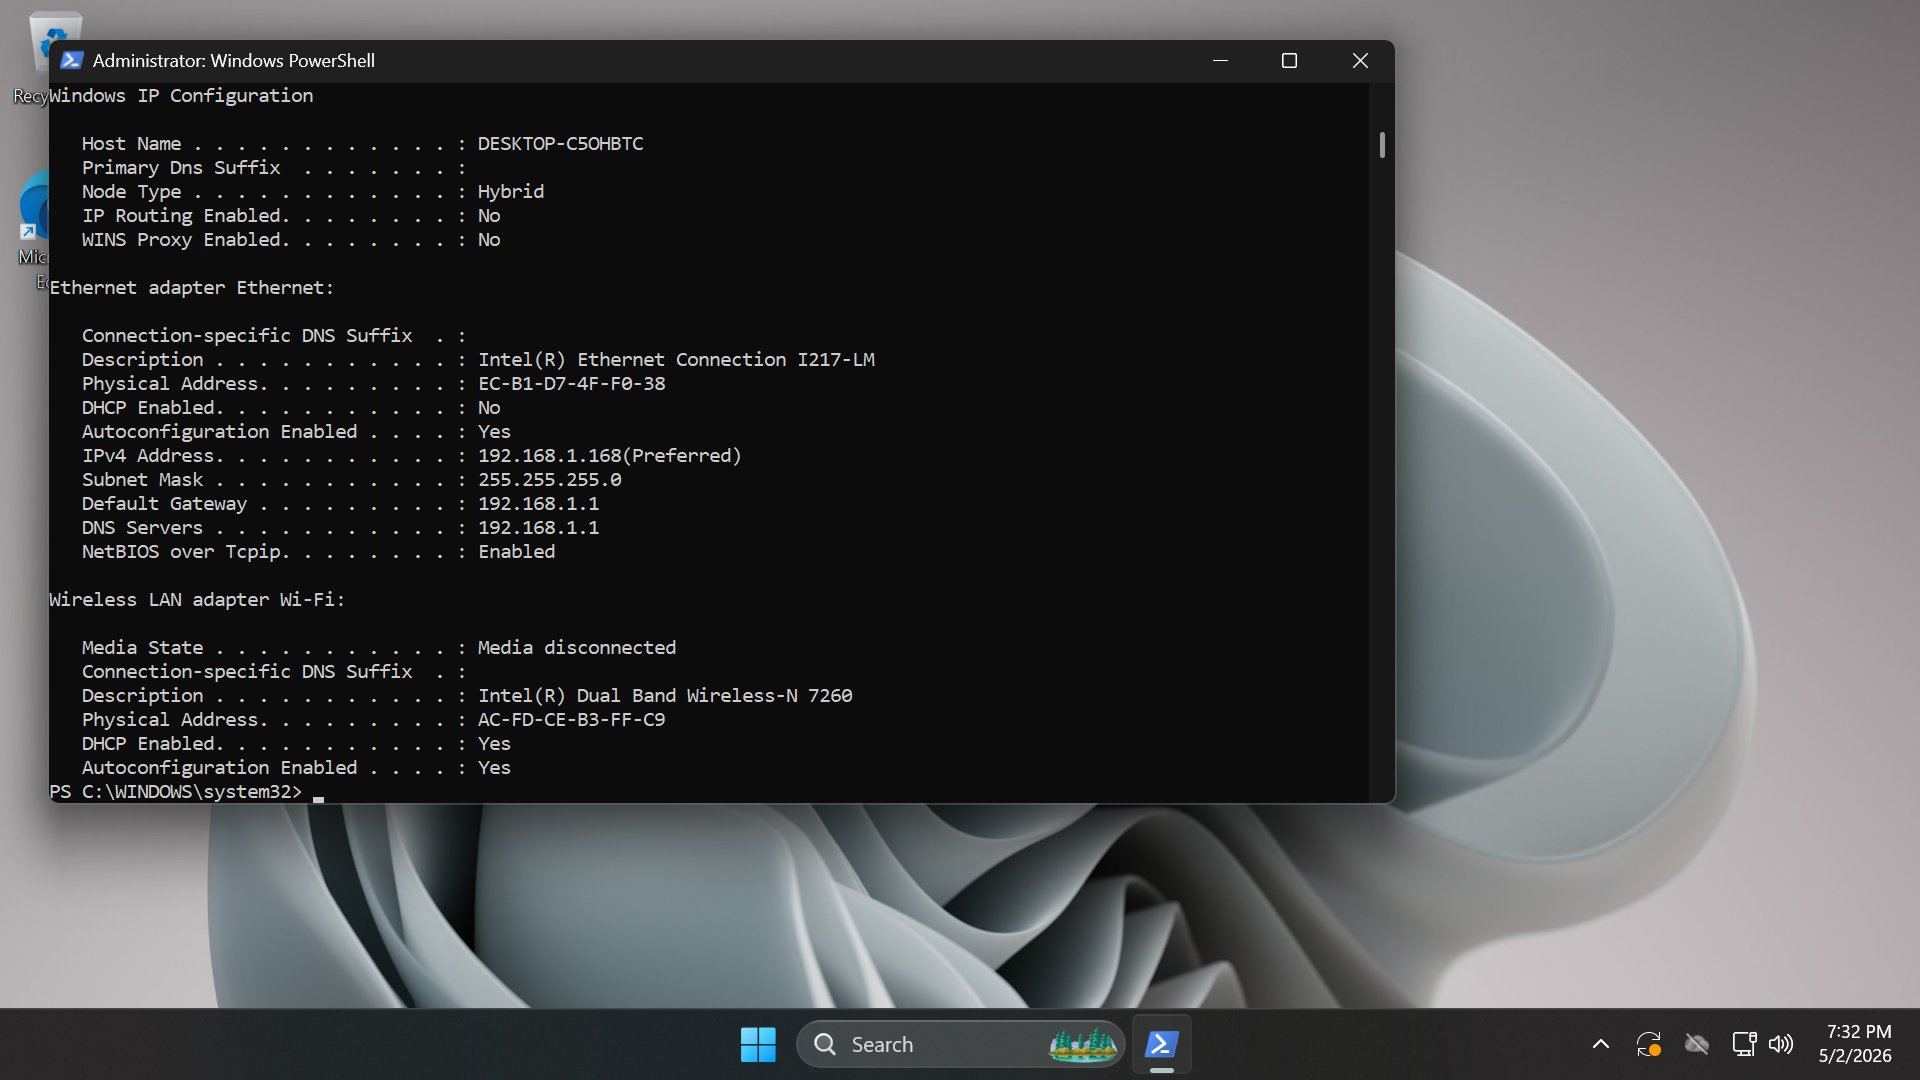
By disabling IPv6 and DHCP, we have effectively ensured that this host can only communicate using this IP
address. Now it's time to severe it's connection to the internet, login to your pfSense administration gui
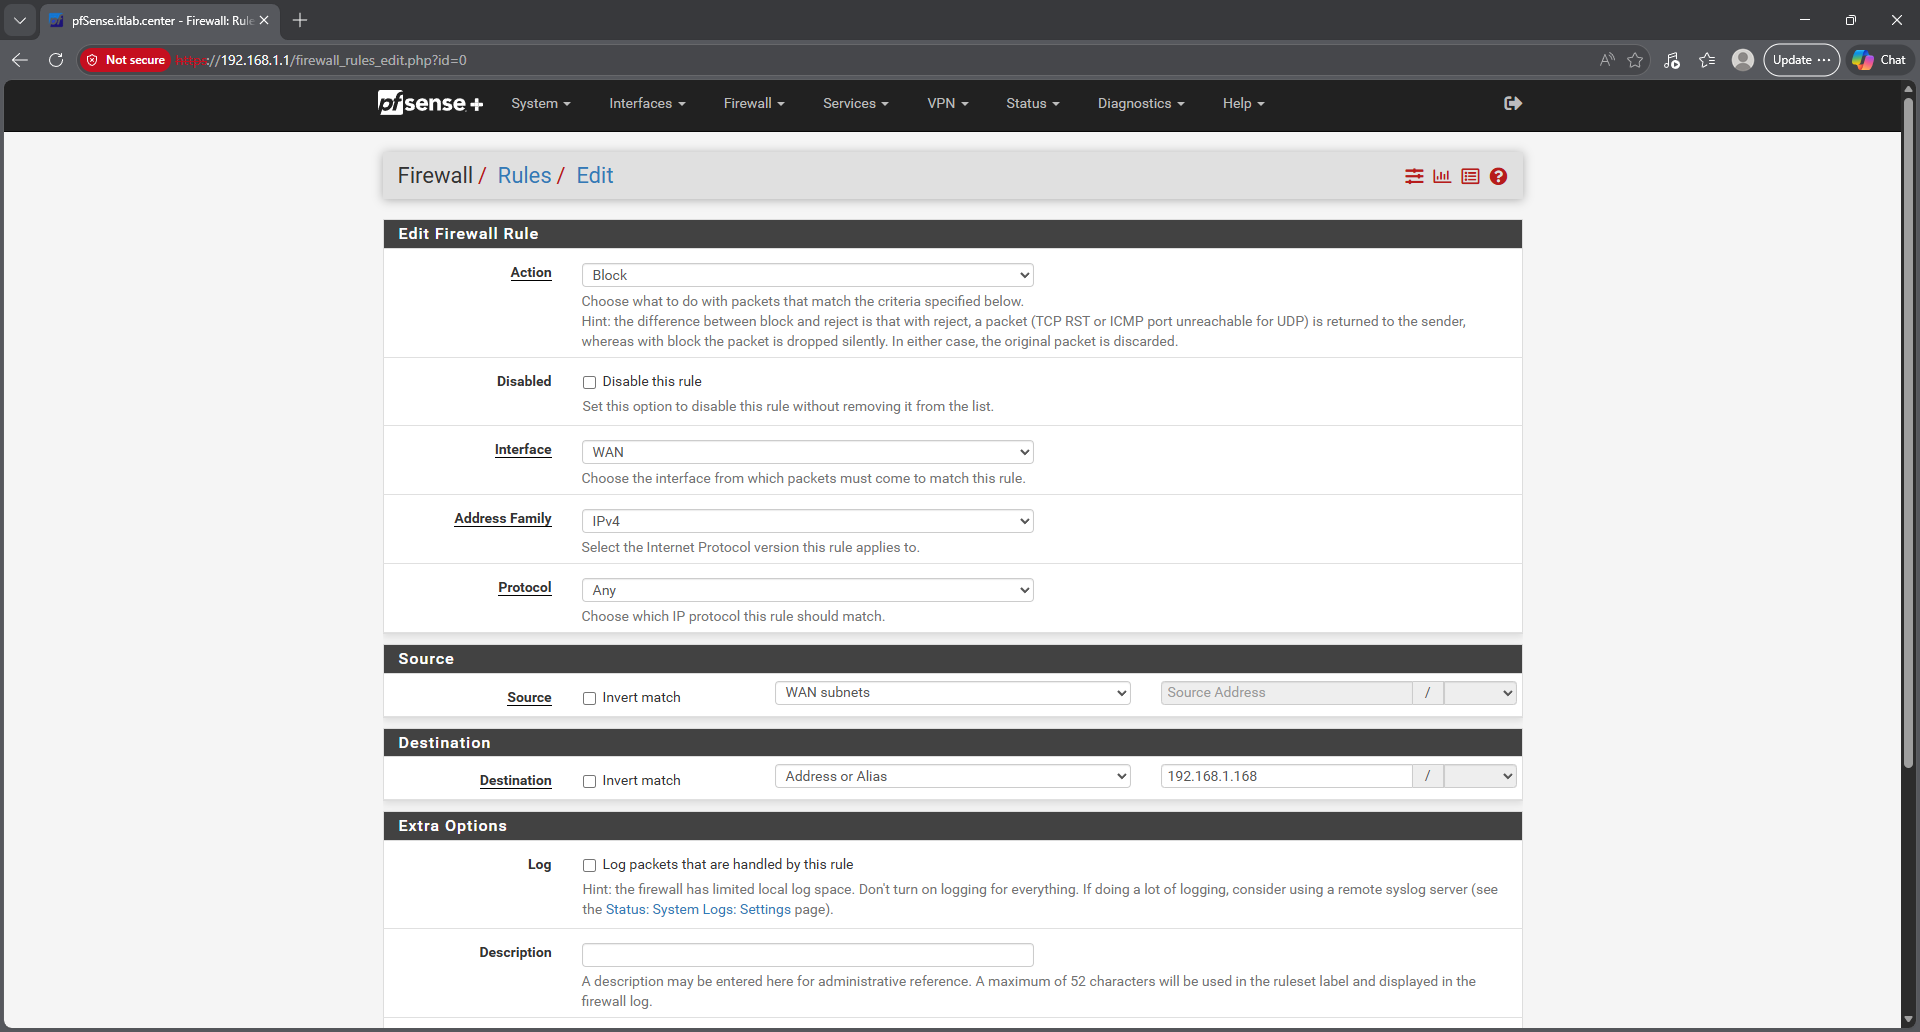
and from the top menu navigate to Firewall > Rules. Then add the following WAN and LAN rules to the top:
• Action: Block
• Interface: WAN
• Address Family: IPv4
• Protocol: Any
• Source: Any
• Destination: Address or Alias | 192.168.1.168
• Action: Pass
• Interface: LAN
• Address Family: IPv4
• Protocol: Any
• Source: LAN Subnets
• Destination: LAN Subnets

• Action: Block
• Interface: LAN
• Address Family: IPv4
• Protocol: Any
• Source: Address or Alias | 192.168.1.168
• Destination: Any
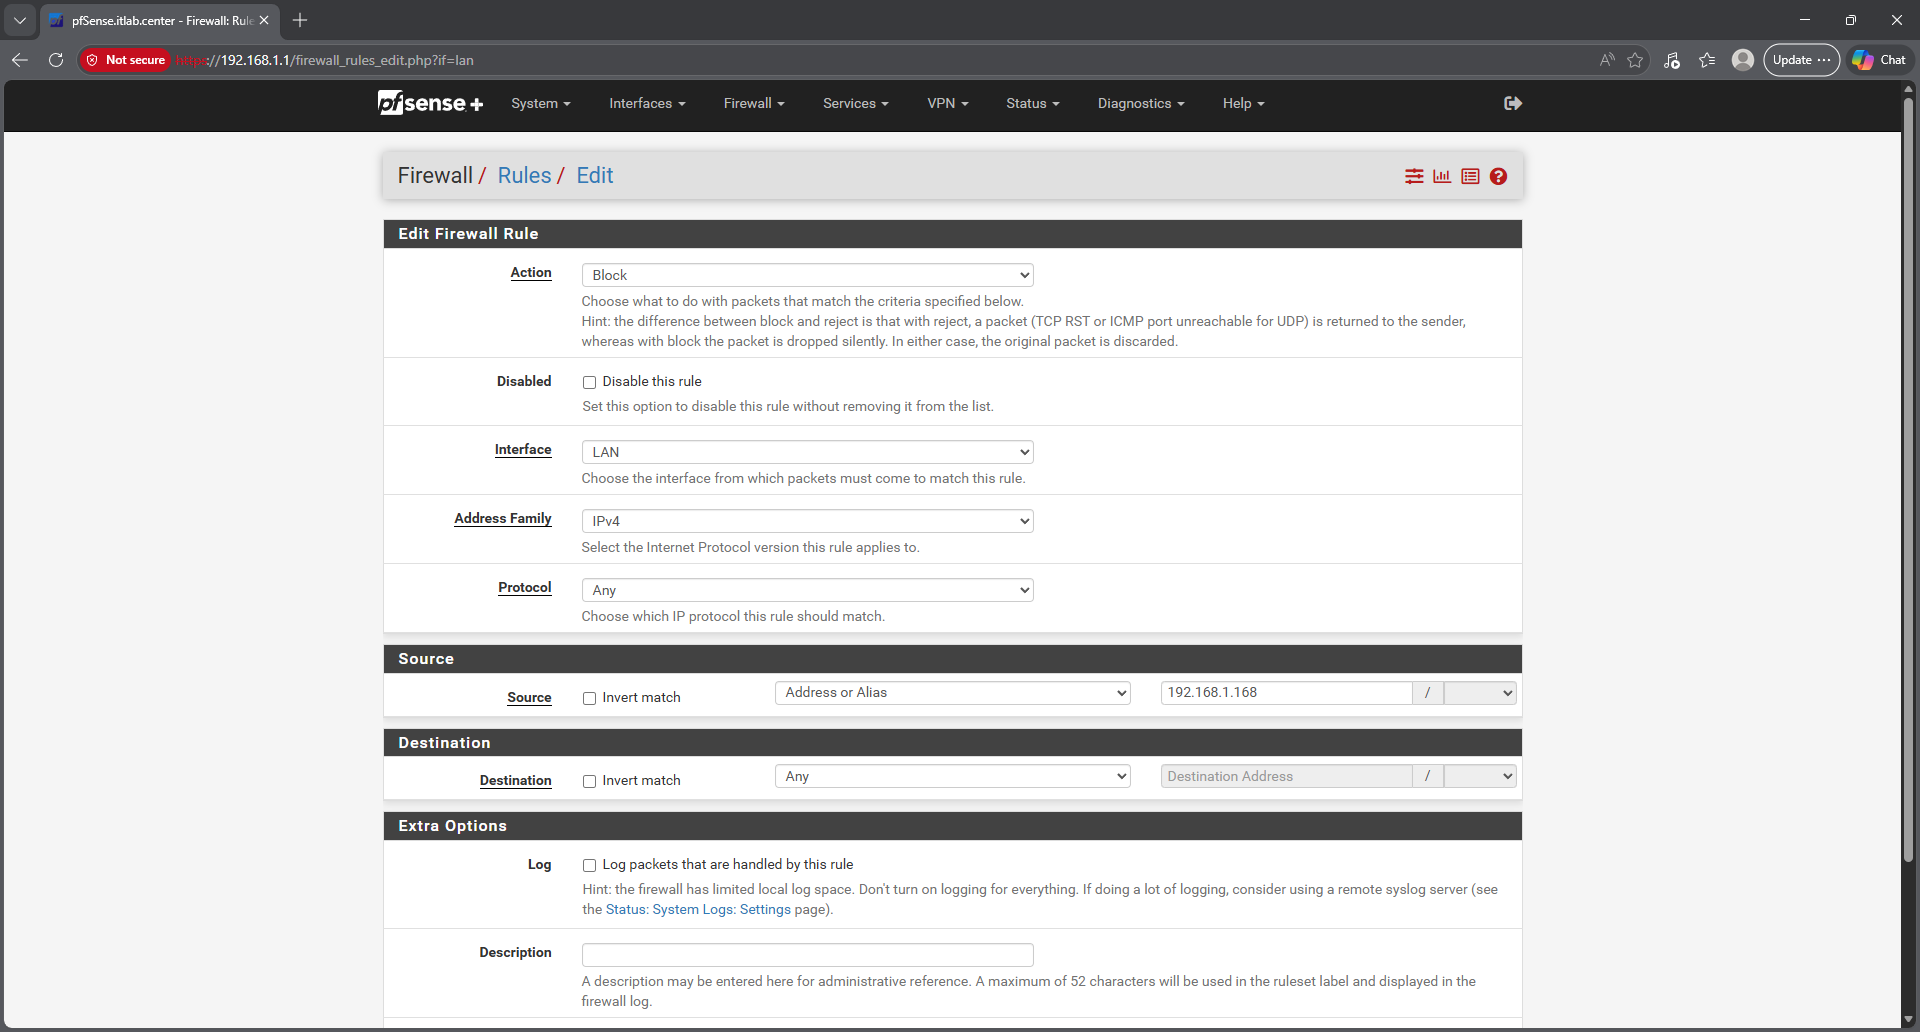
Now hit Apply to being the enforcement of our rules. This will place this host into full sandbox isolation
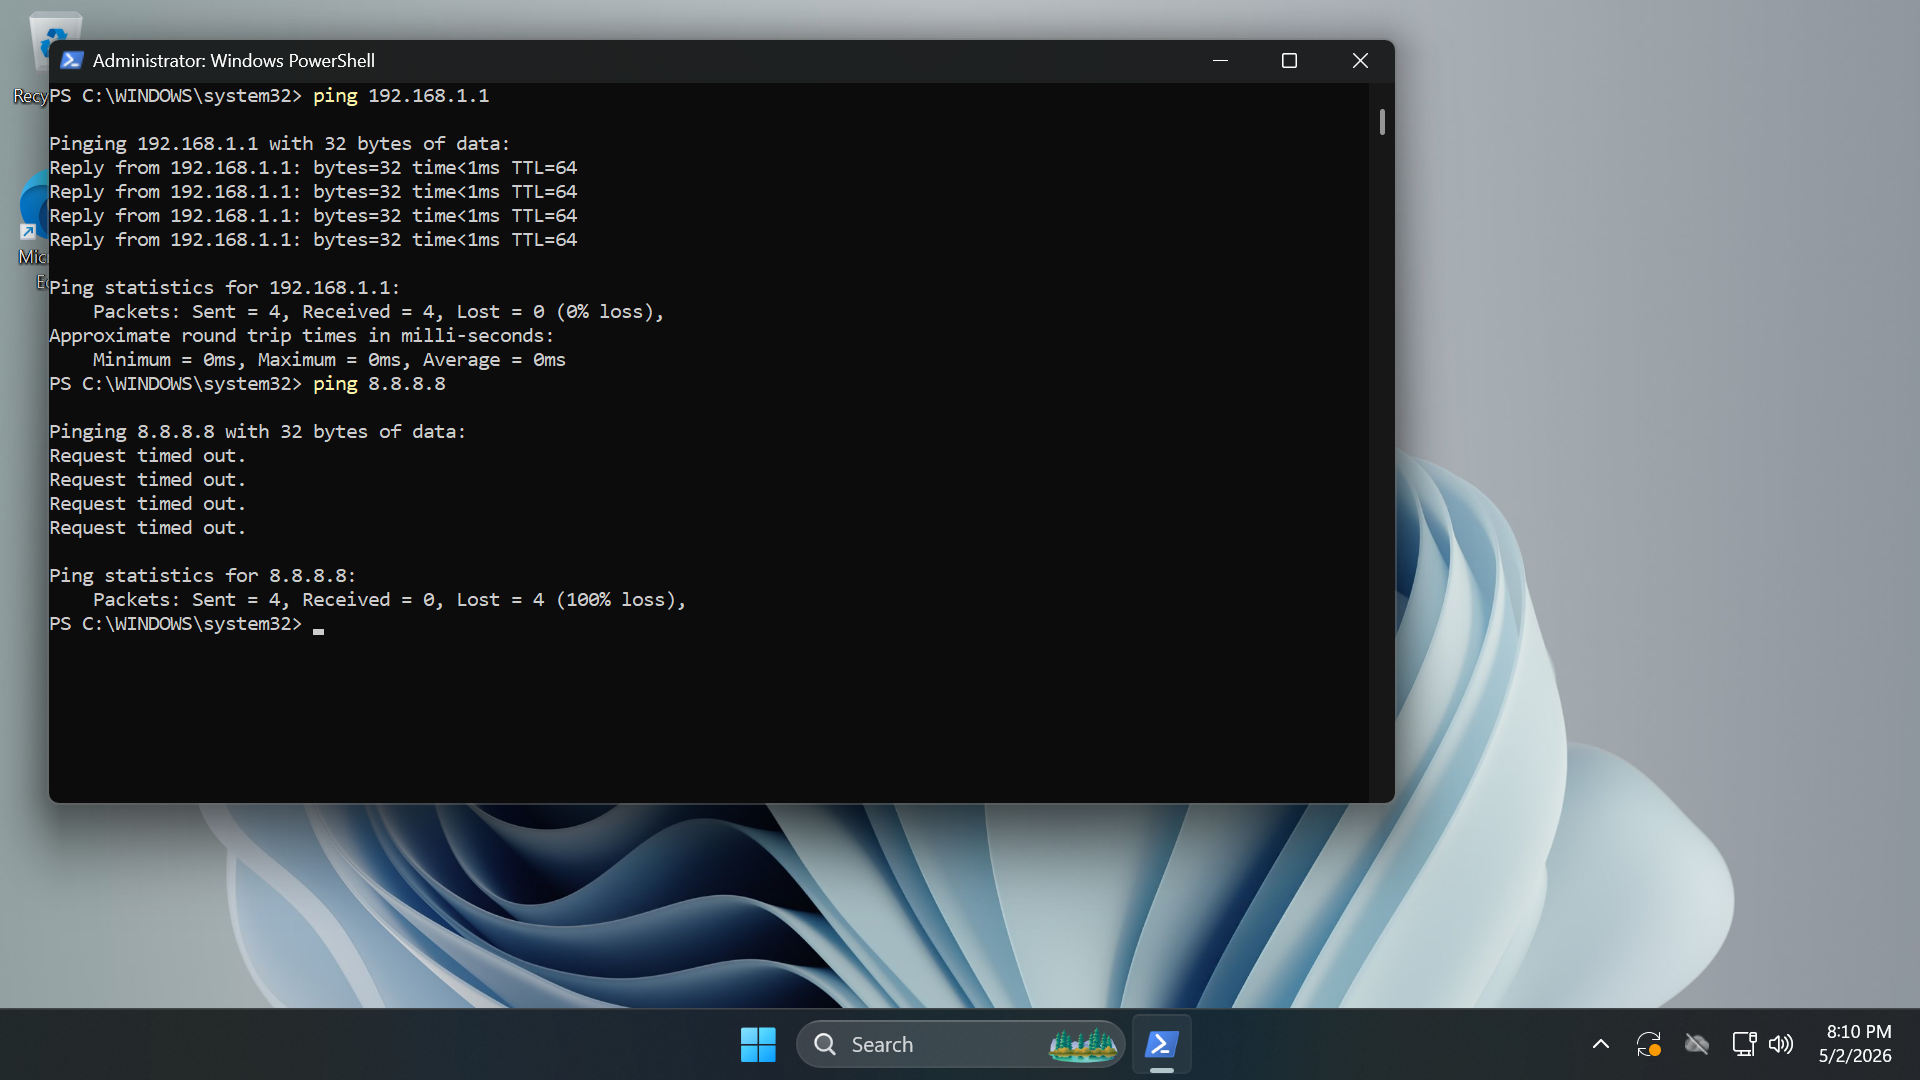
Run the following commands from the Administrator PowerShell to demonstrate the isolation's effectiveness
PS C:\Windows\System32> ping 192.168.1.1
PS C:\Windows\System32> ping 8.8.8.8
Resulting Output:
Run the following command from the Administrator PowerShell to open the windows services control manager
PS C:\Windows\system32> services.msc
Scroll down to the SNMP Service, right-click it and select Properties > Security and add community name
public with read-only rights. Then check the option to Accept SNMP packets from any host below the name
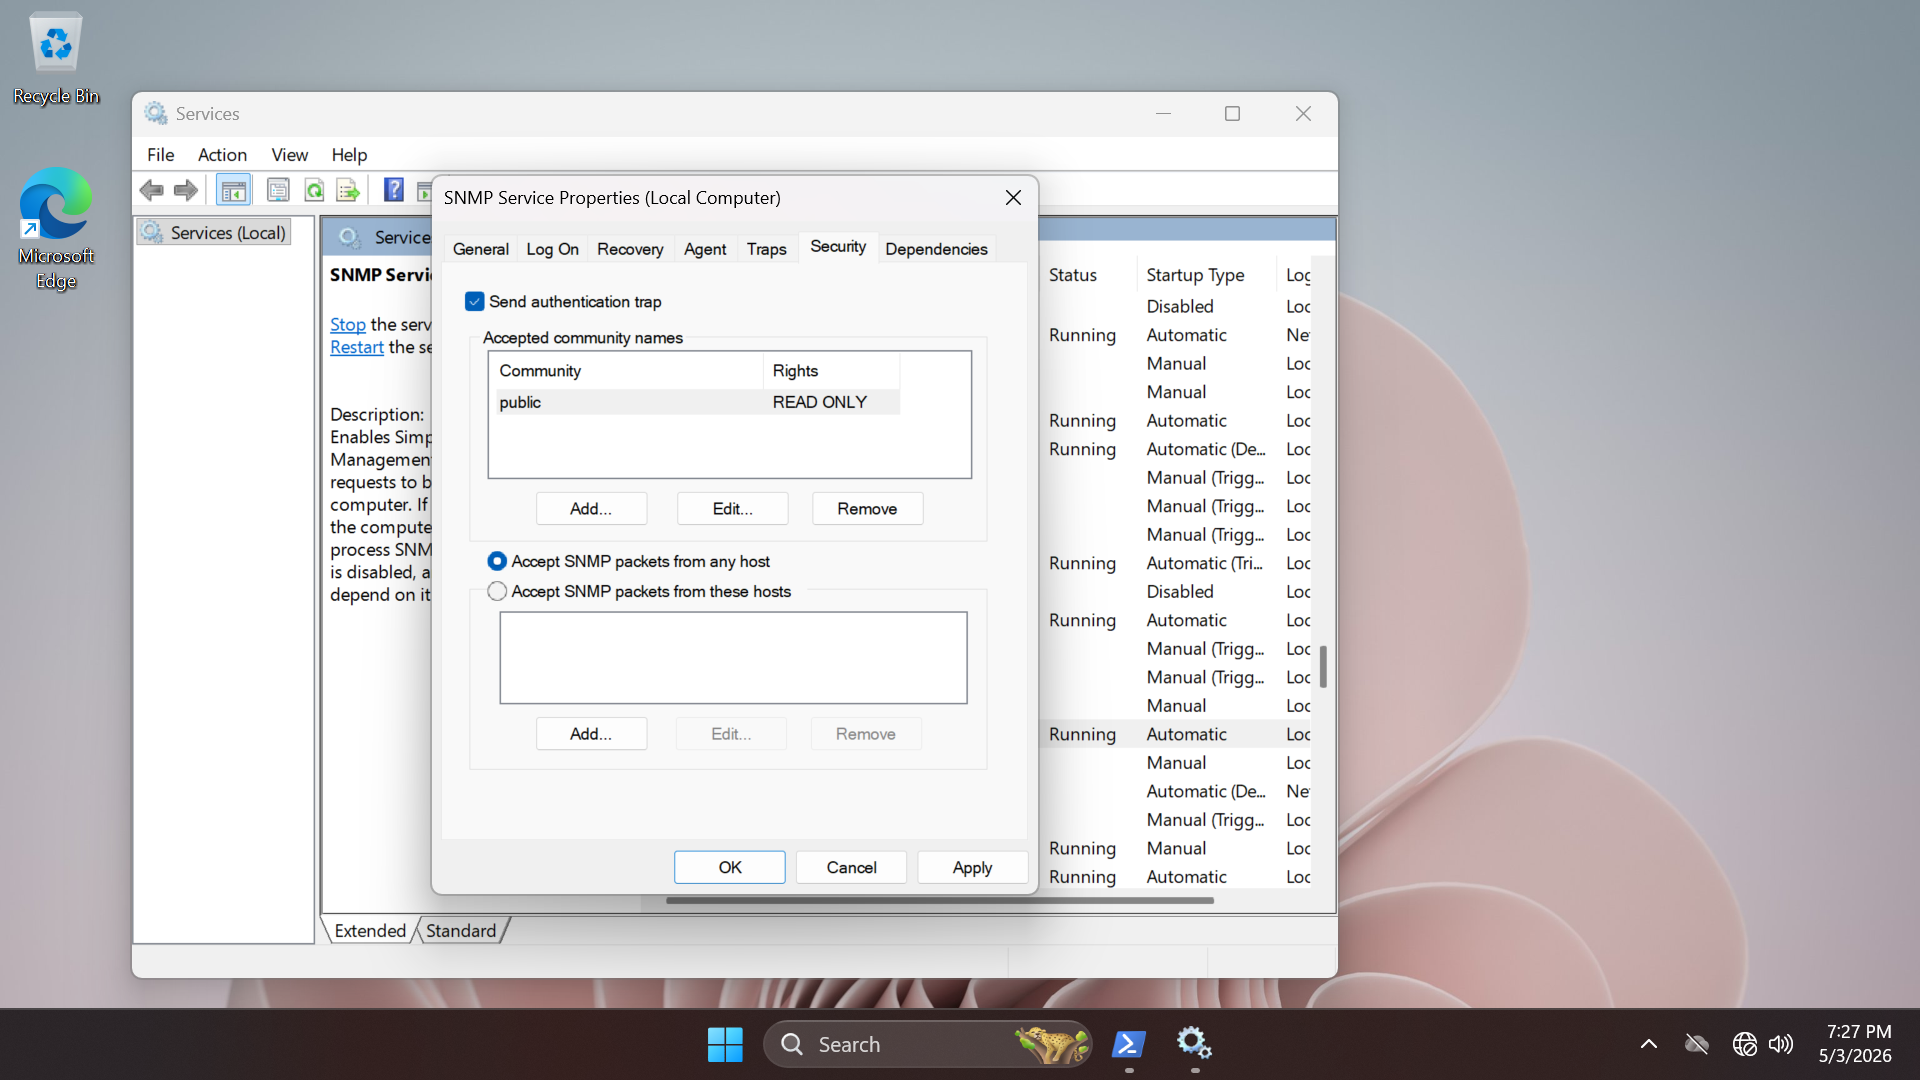
Run the following command from the Administrator PowerShell to restart the SNMP service with these changes
PS C:\Windows\system32> Restart-Service "SNMP Service"
SMBv1 is the protocol that allowed the spread of WannaCry (EternalBlue). While Windows 11 disables it by
default, re-enabling it is a perfect test case for OpenVAS, as it will trigger a High or Critical alert
Run the following command from the Administrator PowerShell to enable the windows SMBv1 protocol feature
PS C:\Windows\system32> Enable-WindowsOptionalFeatures -Online -FeatureName SMB1Protocol
You will be prompted to restart your computer, go ahead and do so. Now Nmap will show port 445 as open
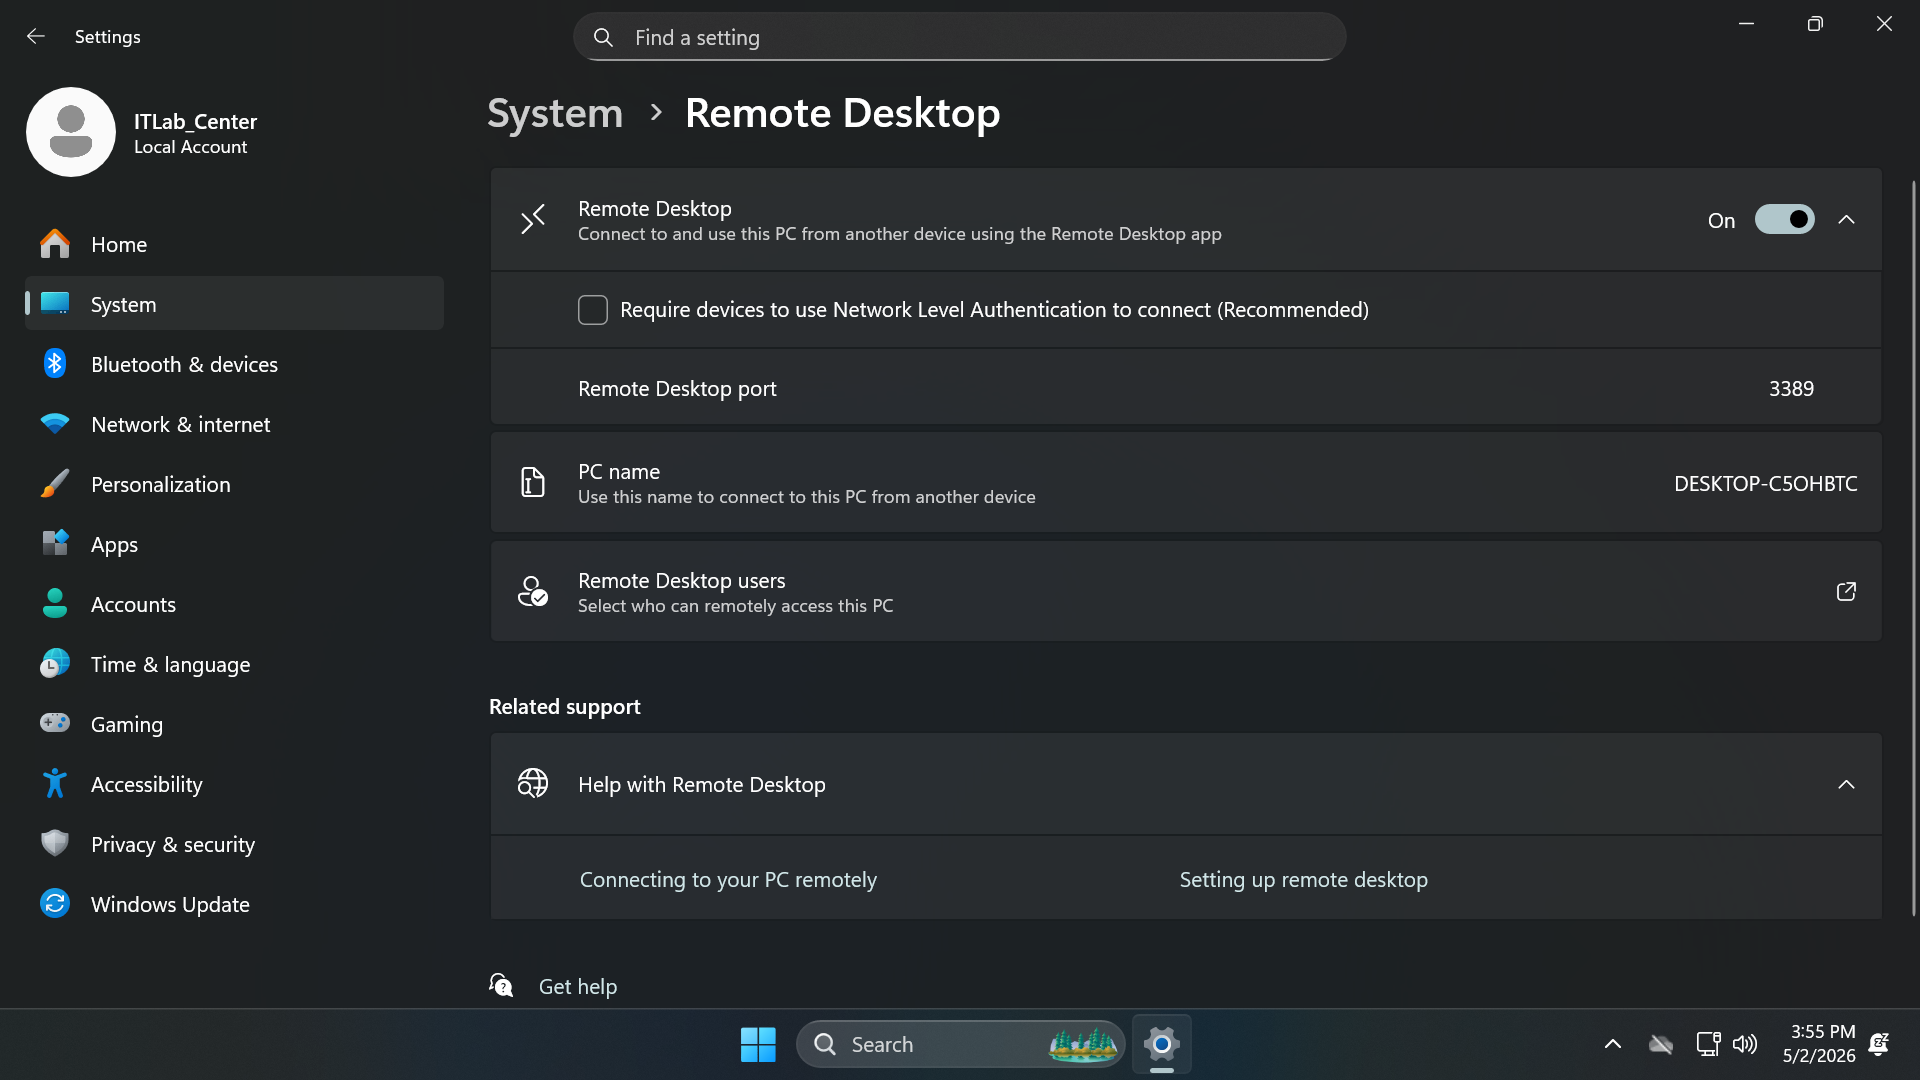
Remote Desktop is a primary target for attackers. By disabling Network Level Authentication (NLA), you
create a vulnerability where an attacker can interact with the login screen before even providing the
credentials. From the taskbar search for and open the Settings. Then head to System and Remote Desktop
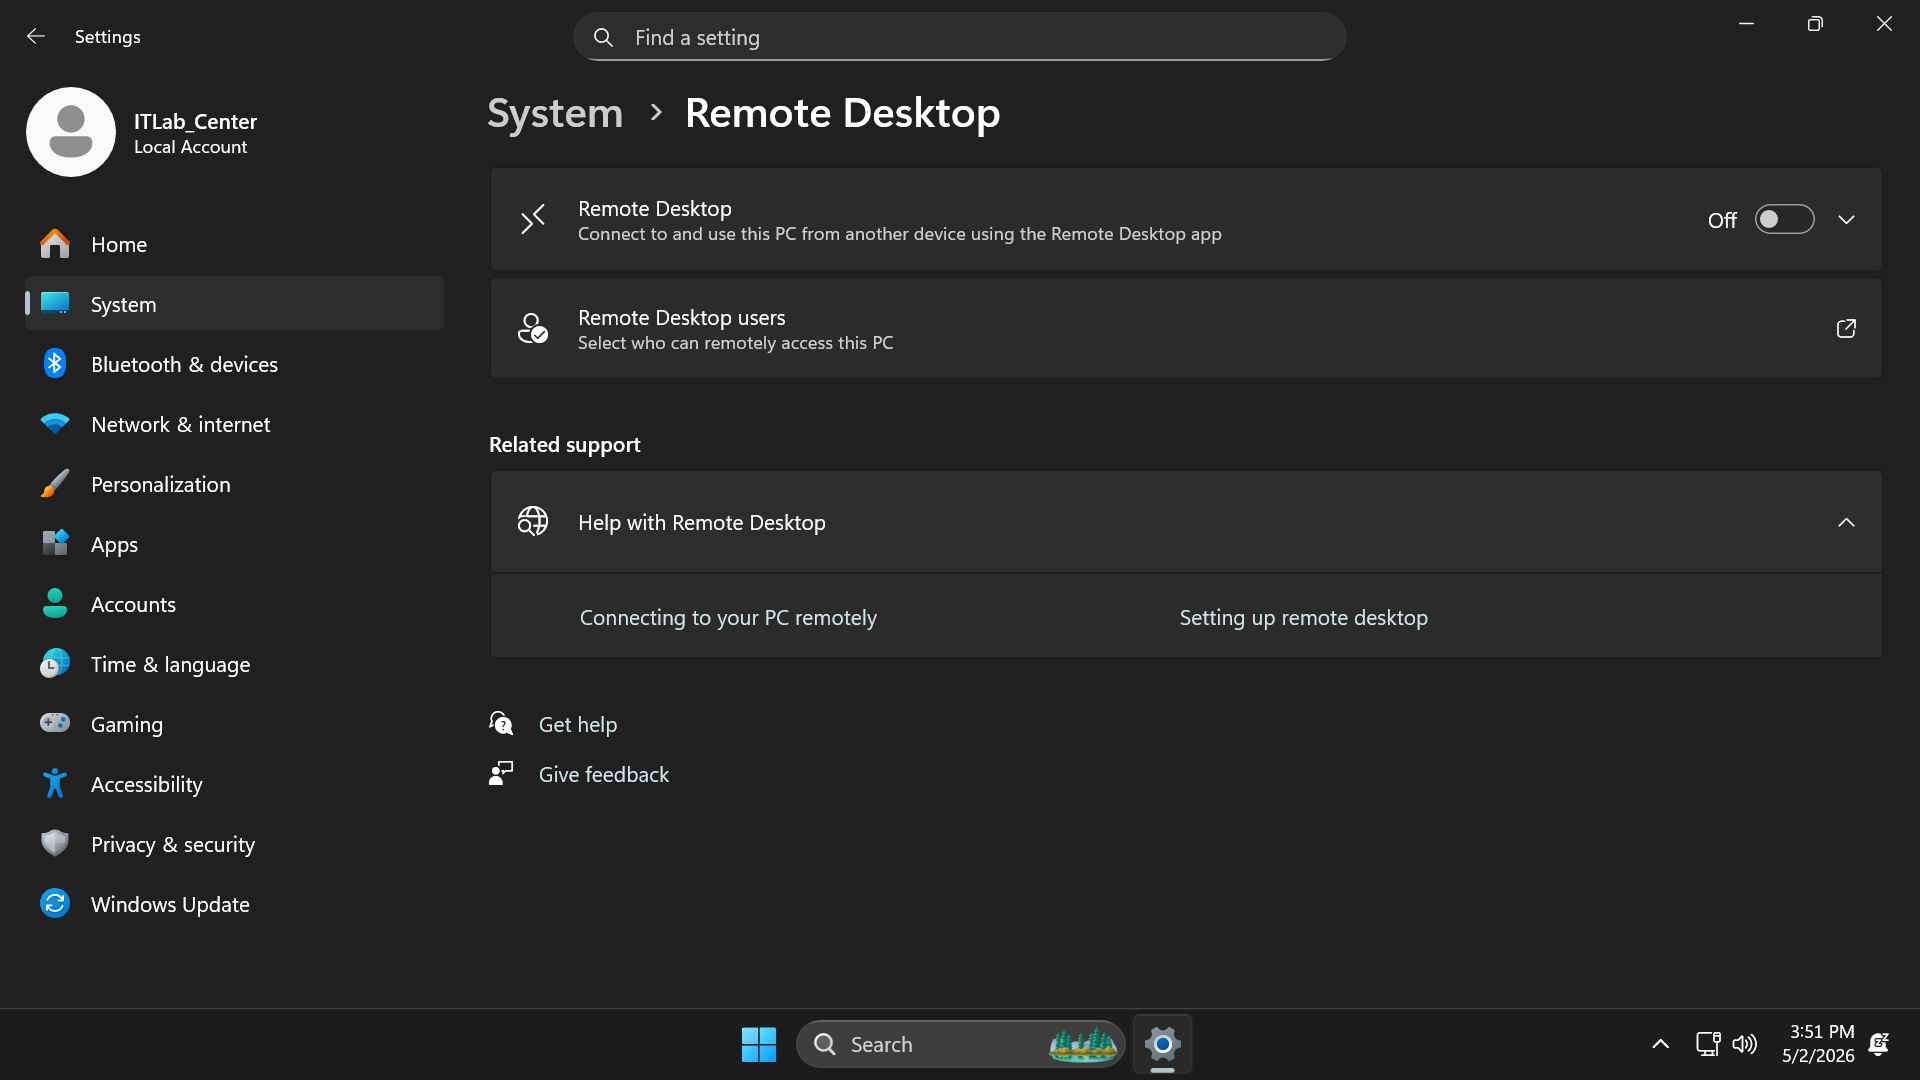
Toggle Remote Desktop to On, and confirm. Then hit the drop down and uncheck Network Level Authentication
Running a basic web server (IIS) and allowing "Directory Browsing" is a classic information disclosure
vulnerability. It allows an attacker to see every file in the web root without needing to know file names
From the search bar, open Turn Windows Feature on or off, then check Internet Information Services option
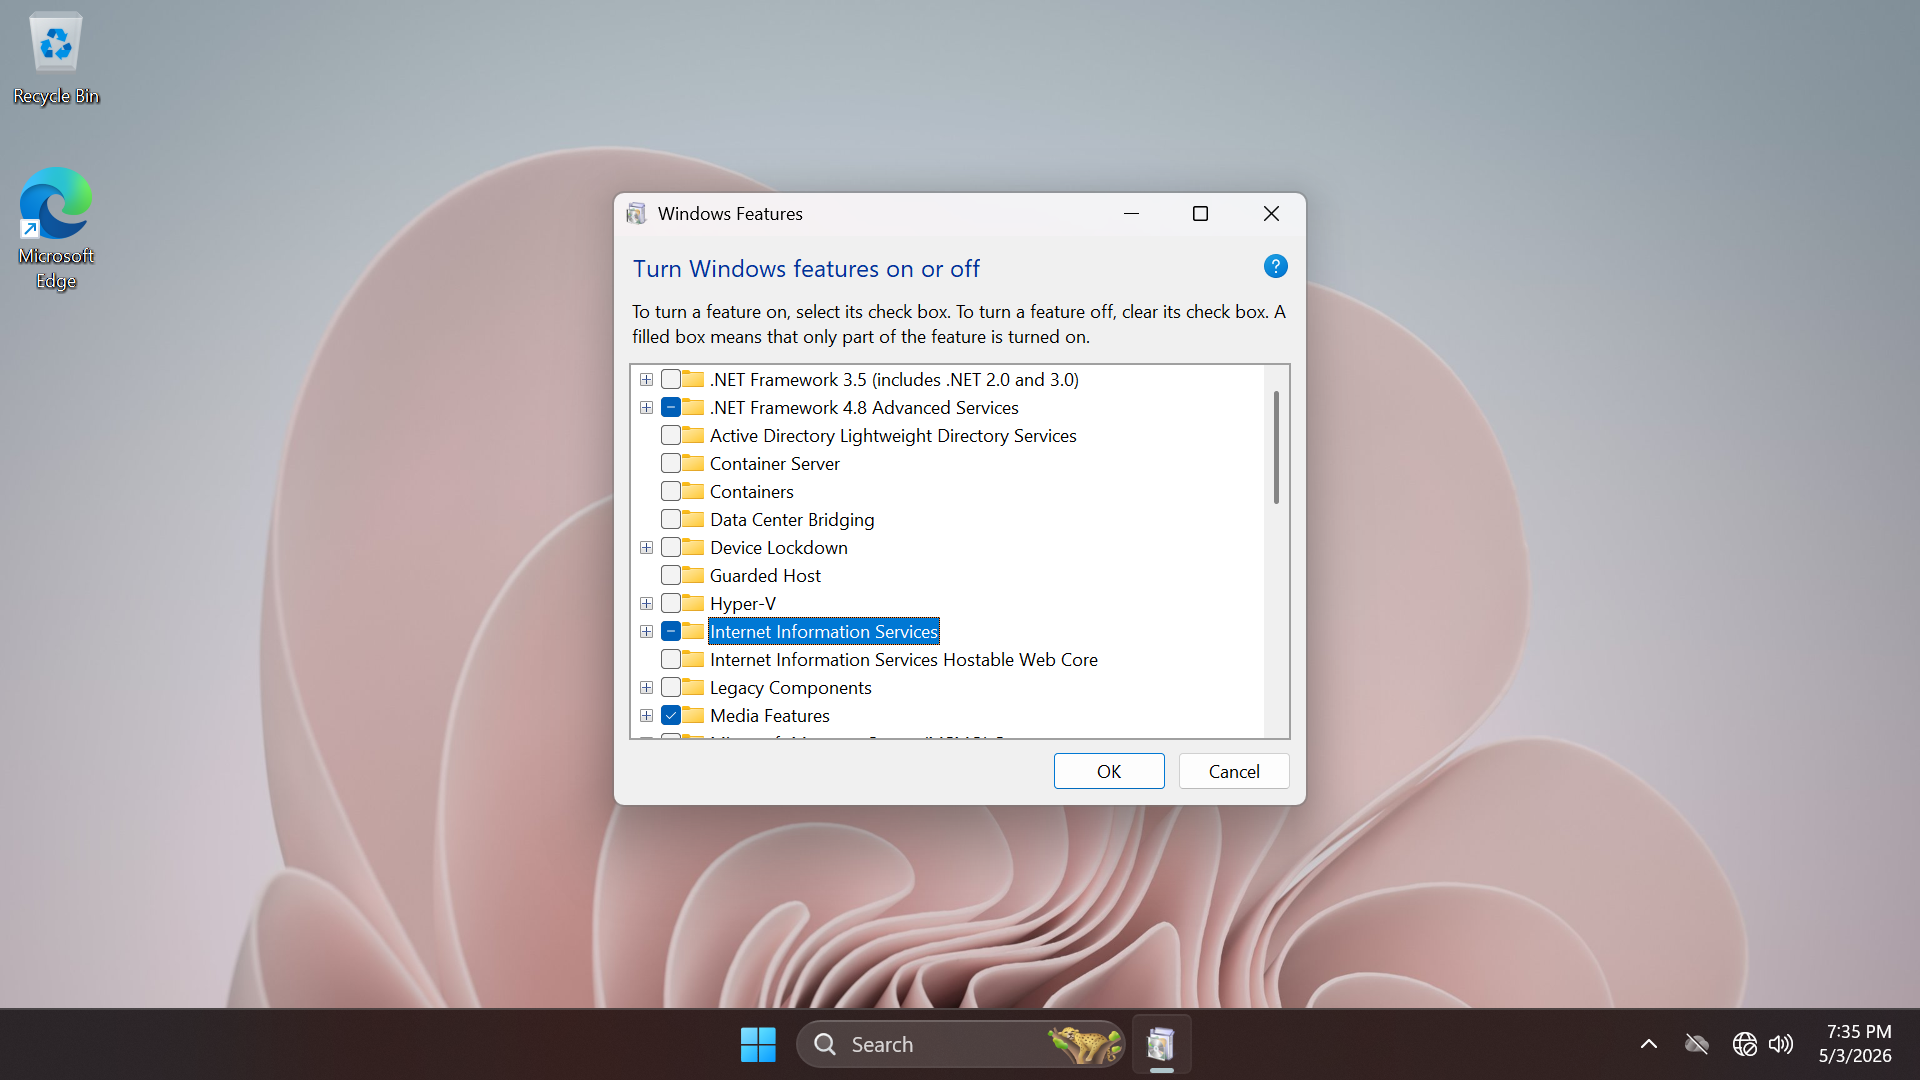
Now hit ok, the windows feature will be added. Now open the Internet Information Services (IIS) Manager
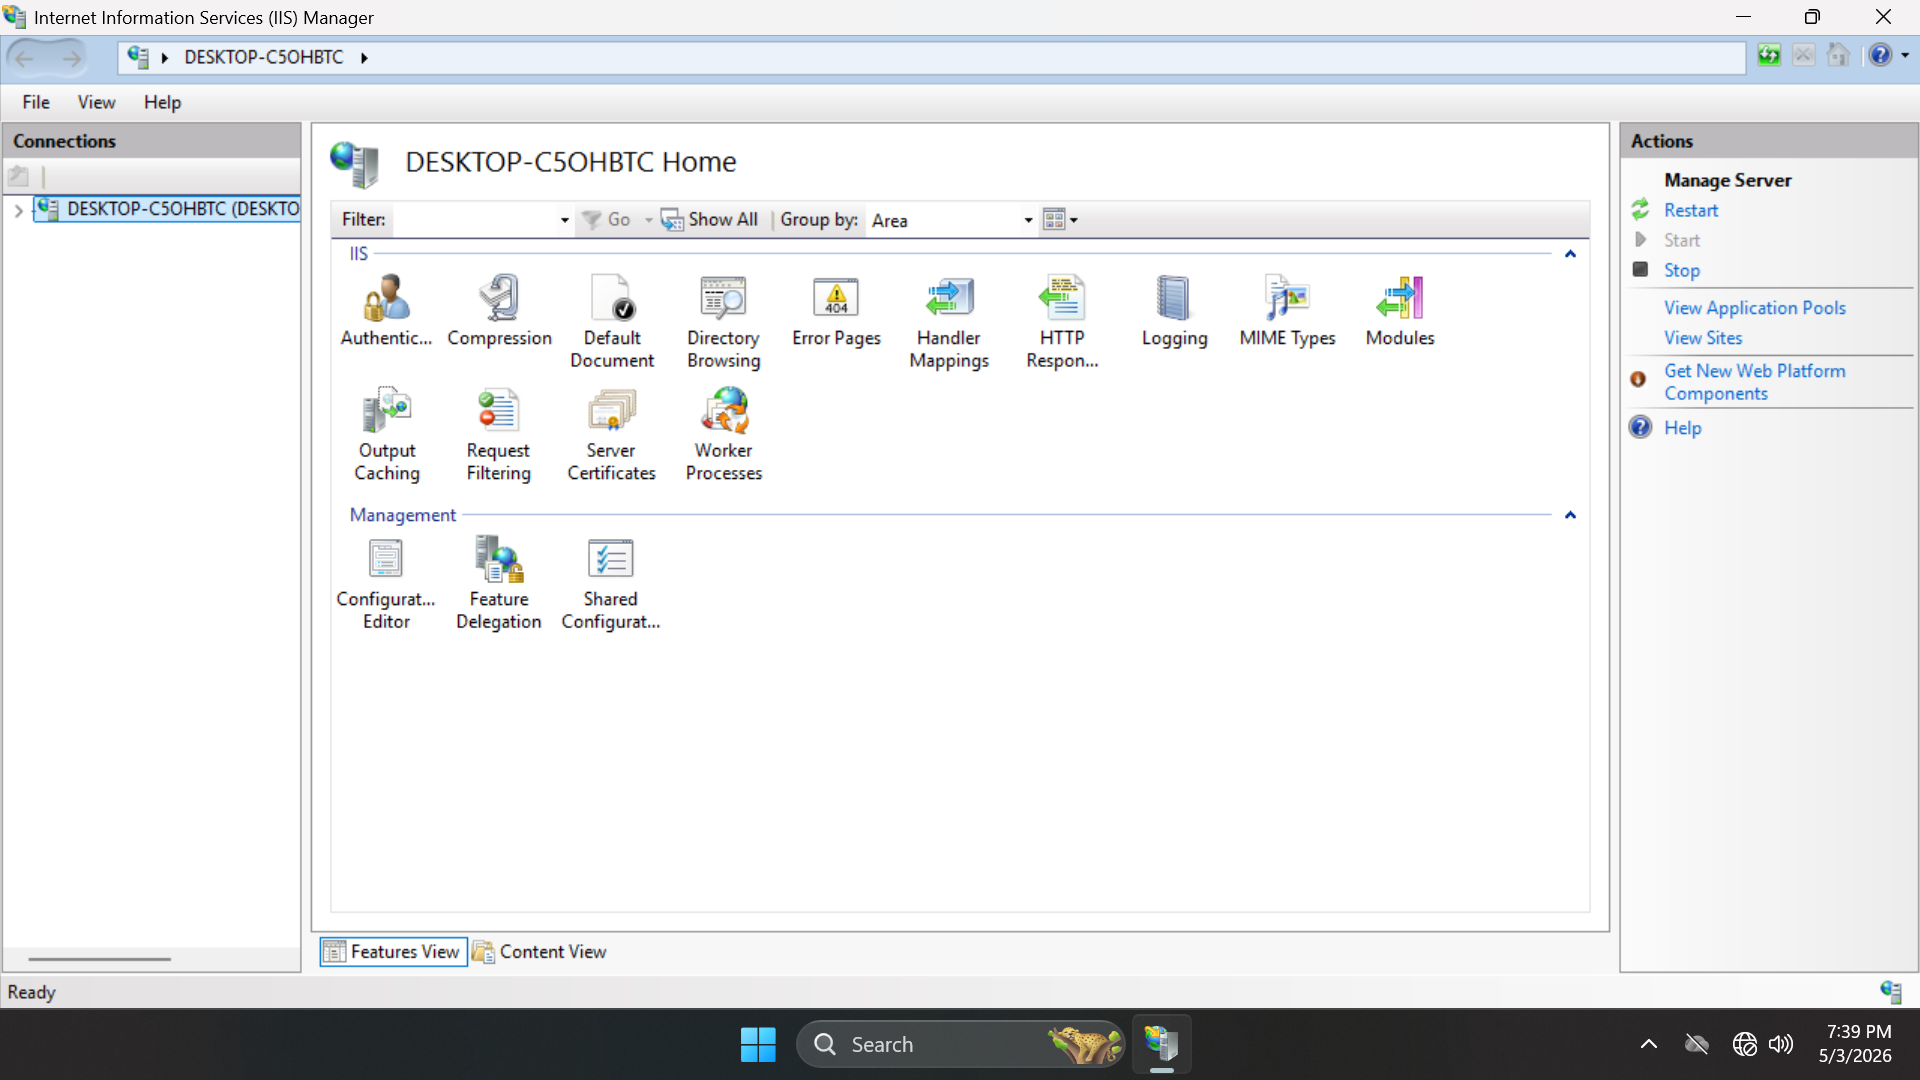
At the left panel, expand our hostname > Sites > Default Web Site, then double-click Directory Browsing
Click Enable in the right-hand actions panel. Now let's create a few sensitive looking files for the site
Run the following commands from the Administrator PowerShell to create new files in the webroot folder
PS C:\Windows\system32> Set-Content C:\inetpub\wwwroot\config.txt ""
PS C:\Windows\system32> Set-Content C:\inetpub\wwwroot\password.bak ""
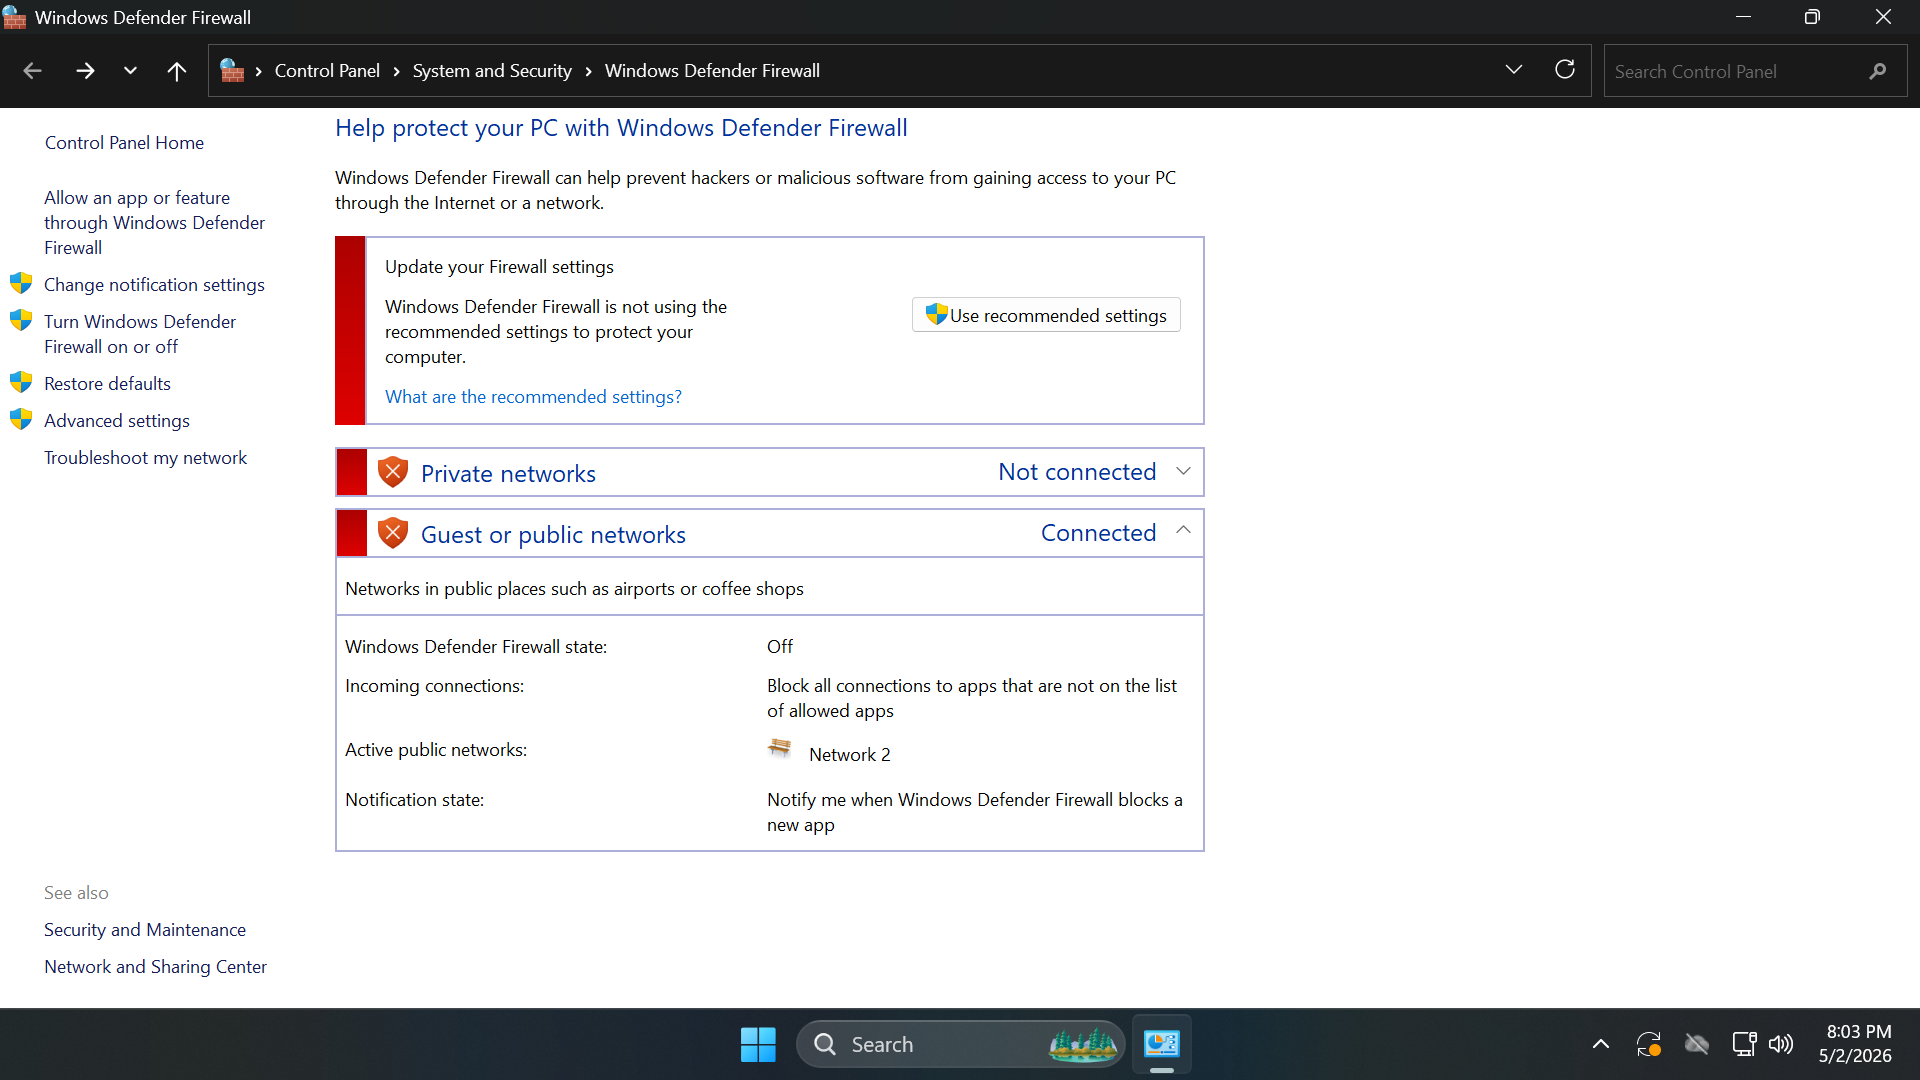
We must disable the Firewall on the Windows 11 Endpoint, search for Firewall from the Windows search bar
Select Windows Defender Firewall > Turn Windows Defender Firewall on or off and turn all options to off
Our sacrificial lamb has been set up in an isolated environment, let's move on to the network reconnaissance
9. BASH Scripting for Lateral Movement
Automating a full pipeline from initial discovery to vulnerability assessment is essentially building a
Red Team Orchestrator. To make this modular and clean, we will break the script into three logical units
• Discovery
• Enumeration
• Assessment
Although our Sacrificial Lamb has been set up, we want to perform this reconnaissance without knowledge of
it. We want to conduct this exercise from the perspective of an adversary with a foothold on the network
attempting to map their surroundings and create a target list to move laterally throughout the network
Since Greenbone is running in a Docker container, the easiest way to control it via BASH without having to
complex local dependencies is using docker exec to call the gvmd (Greenbone Vulnerability Manager Daemon)
We'll start with an Nmap scan that outputs to XML. XML is easier to parse reliably than standard output
Run the following commands from the Slackware Linux Terminal to create and edit our first BASH script file
itlabcetner@itlab-slackware:~/greenbone-community$ cd ~
itlabcenter@itlab-slackware:~$ nvim discovery.sh
Now press the I key to enter Insert mode, then modify the BASH script file as to match our example below
#!/bin/bash
CURRENT_SUBNET="$(sudo ip -4 addr show eth0 | grep -oP '(?<=inet\s)\d+(\.\d+){3}' | cut -c 1-10)0/24"
SCAN_DIR="./scan_results_$(date +%Y%m%d)"
RAW_XML="$SCAN_DIR/raw_scan.xml"
TARGETS_FILE="$SCAN_DIR/targets.txt"
# Prepare Environment
mkdir -p "$SCAN_DIR"
echo "IP MAC OS [PORT:SERVICE_VERSION]" > "$TARGETS_FILE"
echo "[+] Starting Nmap Discovery on $CURRENT_SUBNET..."
sudo nmap -sV -O --osscan-guess --open "$CURRENT_SUBNET" -oX "$RAW_XML" > /dev/null
echo "[+] Scan complete. Parsing XML into target file format..."
# Write the Header
echo "IP MAC OS [PORT:SERVICE_VERSION]" > "$TARGETS_FILE"
# State Machine Parser
# This loop reads the XML and only builds a host profile between <host> tags.
while read -r line; do
#1. Detect start of a new host block: reset variables
if [[ "$line" =~ "<host " ]]; then
ip="Unknown"
mac="Unknown"
os="Unknown"
port_list=""
in_host=true
fi
# 2. Only capture data if we are currently inside a host block
if [ "$in_host" = true ]; then
# Extract IPv4
if [[ "$line" =~ "addrtype=\"ipv4\"" ]]; then
ip=$(echo "$line" | sed -n 's/.*addr="\([^"]*\)".*/\1/p')
fi
# Extract MAC
if [[ "$line" =~ "addrtype=\"mac\"" ]]; then
mac=$(echo "$line" | sed -n 's/.*addr="\([^"]*\)".*/\1/p')
fi
#Extract OS (Only the first/best match)
if [[ "$line" =~ "<osmatch " ]] && [ "$os" = "Unknown" ]; then
os=$(echo "$line" | sed -n 's/.*name="\([^"]*\)".*/\1/p' | sed 's/ /_/g')
fi
# Extract Ports & Services
if [[ "$line" =~ "<port " ]]; then
current_port=$(echo "$line" | sed -n 's/.*portid="\([^"]*\)".*/\1/p')
fi
if [[ "$line" =~ "<service " ]]; then
svc=$(echo "$line" | sed -n 's/.*product="\([^"]*\)".*/\1/p' | sed 's/ /_/g')
if [ -z "$svc" ]; then
svc=$(echo "$line" | sed -n 's/.*name="\([^"]*\)".*/\1/p')
fi
if [ -n "$current_port" ]; then
entry="$current_port:$svc"
if [ -z "$port_list" ]; then port_list="$entry"; else port_list="$port_list,$entry"; fi
fi
fi
fi
# 3. Detect end of host block: print the summary and close state
if [[ "$line" =~ "</host>" ]]; then
[ -z "$port_list" ] && port_list="None"
[ -z "$ip" ] && ip="Unknown"
[ -z "$mac" ] && mac="Unknown"
[ -z "$os" ] && os="Unknown"
echo "$ip $mac $os [$port_list]" >> "$TARGETS_FILE"
in_host=false
fi
done < "$RAW_XML"
echo "Discovery Complete. Target list saved to $SCAN_DIR/targets.txt"
Now hit the escape key and type :wq and enter to save and quit, then run the following commands to execute
itlabcenter@itlab-slackware:~$ sudo chmod +x discovery.sh
itlabcenter@itlab-slackware:~$ ./discovery.sh
Resulting Output:

Run the following commands from the Slackware Linux Terminal to print the contents of the targets.txt file
itlabcenter@itlab-slackware:~$ cd scan_results*
itlabcenter@itlab-slackware:~/scan_results_20260503$ cat targets.txt | column -t
Resulting Output:

By standardizing the output into a single-line-per-host format, we have created an idempotent data source
Since our targets.txt file is now a strictly formatted source of trust, we can use standard Linux text
processing tools like awk and sed to feed those discovered IPs directly into the Greenbone Vulnerability
Manager container. This script acts as the "Bridge between your reconnaissance data and scanning engine
Run the following command from the Slackware Linux Terminal to create and edit our next BASH script file
itlabcenter-slackware:~/scan_results_20260503$ nvim ~/enumeration.sh
Now press the I key to enter Insert mode, then modify the BASH script file as to match our example below
#!/bin/bash
# Configuration
LATEST_DIR=$(ls -dt scan_results_* 2>/dev/null | head -n 1)
TARGETS_FILE="$LATEST_DIR/targets.txt"
GVM_USER="admin"
GVM_PASS="admin"
GVMD_CONTAINER=$(docker ps --filter "name=gvmd" --format "{{.Names}}" | head -n 1)
# IDs for "Full and Very Deep" Scan and the default OpenVAS Scanner
CONFIG_ID="daba56c8-73ec-11df-a475-002264764cea"
SCANNER_ID="08b69003-5fc2-4037-a479-93b440211c73"
# 1. Validation
if [[ -z "$GVMD_CONTAINER" ]]; then
echo "[!] Error: gvmd container not found." ; exit 1
fi
IP_LIST=$(tail -n +2 "$TARGETS_FILE" | awk '{print $1}' | grep -v "Unknown" | tr '\n' ',' | sed 's/,$//')
if [[ -z "$IP_LIST" ]]; then echo "[!] No IPs found."; exit 1; fi
# 2. The GMP Bridge Function
gvm_call() {
local xml_payload="$1"
local socket_path="/var/lib/docker/volumes/greenbone-community-edition_gvmd_socket_vol/_data/gvmd.sock"
if [[ ! -S "$socket_path" ]]; then
sudo chmod +x /var/lib/docker
sudo chmod +x /var/lib/docker/volumes
sudo chmod +x /var/lib/docker/volumes/greenbone-community-edition_gvmd_socket_vol
sudo chmod +x /var/lib/docker/volumes/greenbone-community-edition_gvmd_socket_vol/_data
fi
if [[ ! -w "$socket_path" ]]; then
sudo chmod 666 $socket_path
fi
gvm-cli --gmp-username "$GVM_USER" --gmp-password "$GVM_PASS" socket --socketpath "$socket_path" --xml "$xml_payload" 2>/dev/null
}
# 3. Target Creation
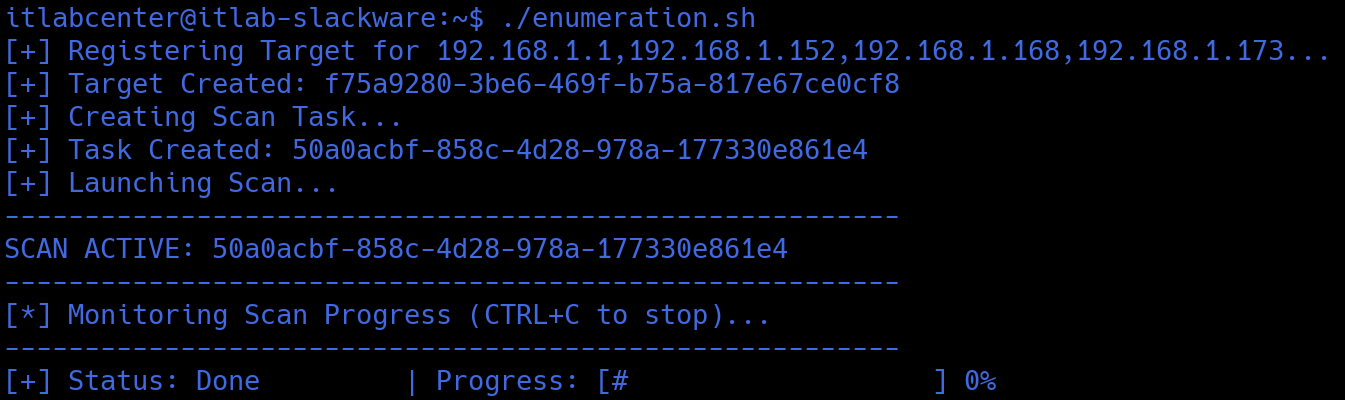
echo "[+] Registering Target for $IP_LIST..."
PORT_LIST_ID=$(gvm_call "<get_port_lists/>" | sed -n 's/.*<port_list id="\([^"]*\)">.*<name>All IANA assigned TCP<\/name>.*/\1/p' | head -n 1)
TARGET_NAME="Lab_Target_$(date +%s)"
XML_CREATE_TARGET="<create_target><name>$TARGET_NAME</name><hosts>$IP_LIST</hosts><port_list id='$PORT_LIST_ID'/></create_target>"
RESPONSE=$(gvm_call "$XML_CREATE_TARGET")
TARGET_ID=$(echo "$RESPONSE" | sed -n 's/.*id="\([^"]*\)".*/\1/p')
if [[ -z "$TARGET_ID" ]]; then
echo "[!] Target creation failed. Response: $RESPONSE" ; exit 1
fi
echo "[+] Target Created: $TARGET_ID"
# 4. Task Create
echo "[+] Creating Scan Task..."
TASK_NAME="Lateral_Movement_$(date +%H%M)"
XML_CREATE_TASK="<create_task><name>$TASK_NAME</name><target id='$TARGET_ID'/><config id='$CONFIG_ID'/><scanner id='$SCANNER_ID'/></create_task>"
RESPONSE=$(gvm_call "$XML_CREATE_TASK")
TASK_ID=$(echo "$RESPONSE" | sed -n 's/.*id="\([^"]*\)".*/\1/p')
if [[ -z "$TASK_ID" ]]; then
echo "[!] Task creation failed." ; exit 1
fi
echo "[+] Task Created: $TASK_ID"
# 5. Scan Launch
echo "[+] Launching Scan..."
gvm_call "<start_task task_id='$TASK_ID'/>" > /dev/null
echo "--------------------------------------------------------"
echo "SCAN ACTIVE: $TASK_ID"
echo "--------------------------------------------------------"
echo "[*] Monitoring Scan Progress (Ctrl+C to stop)..."
echo "--------------------------------------------------------"
while true; do
RESPONSE=$(gvm_call "<get_tasks task_id='$TASK_ID'/>")
STATUS=$(echo "$RESPONSE" | sed -n 's/.*<status>\([^<]*\)<\/status>.*/\1/p')
PROGRESS=$(echo "$RESPONSE" | sed -n 's/.*<progress>\([^<]*\)<\/progress>.*/\1/p')
if [[ "$PROGRESS" == "-1" ]]; then PROGRESS="0"; fi
printf "\r[+] Status: %-12s | Progress: [%-20s] %s%%" \
"$STATUS" \
"$(printf '#%.0s' $(seq 1 $((PROGRESS / 5))))" \
"$PROGRESS"
if [[ "$STATUS" == "Done" ]]; then
echo -e "\n[!] Scan Complete!"
break
elif [[ "$STATUS" == "Stopped" || "$STATUS" == "Error" ]]; then
echo -e "\n[!] Scan halted unexpectedly: $STATUS"
break
fi
sleep 10
done
Now hit the escape key and type :wq and enter to save and quit, then run the following commands to execute
itlabcenter@itlab-slackware:~/scan_results_20260503$ sudo chmod +x ~/enumeration.sh
itlabcenter@itlab-slackware:~/scan_results_20260503$ cd ~
itlabcenter@itlab-slackware:~$ ./enumeration.sh
Resulting Output:

Our vulnerability scan is now running. This can take some time, even up to several hours to fully complete
Now to take the scan results and turn them into an actionable report. Greenbone stores results in reports
A Task is just a recurring template; the Report contains the data like NVTs, CVSS scored and descriptions
Run the following command from the Slackware Linux Terminal to create and edit our final BASH script file
itlabcenter@itlab-slackware:~$ nvim assessment.sh
Now press the I key to enter Insert mode, then modify the BASH script file as to match our example below
#!/bin/bash
GVM_USER="admin"
GVM_PASS="admin"
OUTPUT_FILE="$(ls -dt scan_results_* 2>/dev/null | head -n 1)/vscan.txt"
echo "[*] Fetching the final vulnerability scan report..."
gvm_call() {
local xml_payload="$1"
local socket_path="/var/lib/docker/volumes/greenbone-community-edition_gvmd_socket_vol/_data/gvmd.sock"
if [[ ! -S "$socket_path" ]]; then
sudo chmod +x /var/lib/docker
sudo chmod +x /var/lib/docker/volumes
sudo chmod +x /var/lib/docker/volumes/greenbone-community-edition_gvmd_socket_vol
sudo chmod +x /var/lib/docker/volumes/greenbone-community-edition_gvmd_socket_vol/_data
fi
if [[ ! -w "$socket_path" ]]; then
sudo chmod 666 $socket_path
fi
gvm-cli --gmp-username "$GVM_USER" --gmp-password "$GVM_PASS" socket --socketpath "$socket_path" --xml "$xml_payload" 2>/dev/null
}
# 1. Get the Last Report ID from the Task
REPORT_ID=$(gvm_call "<get_tasks task_id='$TASK_ID'/>" | grep -B 5 "$TASK_ID" | sed -n 's/.*<report id="\([^"]*\)".*/\1/p' | tail -n 1)
if [[ -z "$REPORT_ID" ]]; then
echo "[!] Error: Could not locate a report for this task."
exit 1
fi
echo "[+] Report ID Found: $REPORT_ID"
echo "[*] Extracting vulnerabilities to $(ls -dt scan_results_* 2>/dev/null | head -n 1)$OUTPUT_FILE..."
# 2. Fetch the full report XML
RAW_REPORT=$(gvm_call "<get_reports report_id='$REPORT_ID' details='1'/>")
# 3. Format the output into vscan.txt
{
echo "==============================================================="
echo " VULNERABILITY SCAN RESULTS - $(date)"
echo " Task ID: $TASK_ID"
echo "==============================================================="
echo ""
echo "$RAW_REPORT" | tr -d '\n' | grep -oP '<result id=.*?">.*?</result>' | while read -r line; do
HOST=$(echo "$line" | sed -n 's/.*<host>\([^<]*\)<\/host>.*/\1/p')
PORT=$(echo "$line" | sed -n 's/.*<port>\([^<]*\)<\/port>.*/\1/p')
NAME=$(echo "$line" | sed -n 's/.*<name>\([^<]*\)<\/name>.*/\1/p')
SEV=$(echo "$line" | sed -n 's/.*<severity>\([^<]*\)<\/severity>.*/\1/p')
if (( $(echo "$SEV > 7.0" | bc -l) )); then LEVEL="[HIGH]";
elif (( $(echo "$SEV > 4.0" | bc -l) )); then LEVEL="[MEDIUM]";
else LEVEL="[LOW]"; fi
printf "%-8s %-15s %-10s %s\n" "$LEVEL" "$HOST" "$PORT" "$NAME"
done | sort -k1,1r # Sort by severity
} > "$(pwd)/$OUTPUT_FILE"
# 4. Output
echo "[+] Success! Structured results saved to $OUTPUT_FILE"
echo "--------------------------------------------------------"
Now hit the escape key and type :wq and enter to save and quit, then run the following commands to execute
itlabcenter@itlab-slackware:~$ sudo chmod +x assessment.sh
itlabcenter@itlab-slackware:~$ ./assessment.sh
Resulting Output:

Run the following command from the Slackware Linux Terminal to print our full report out to the terminal
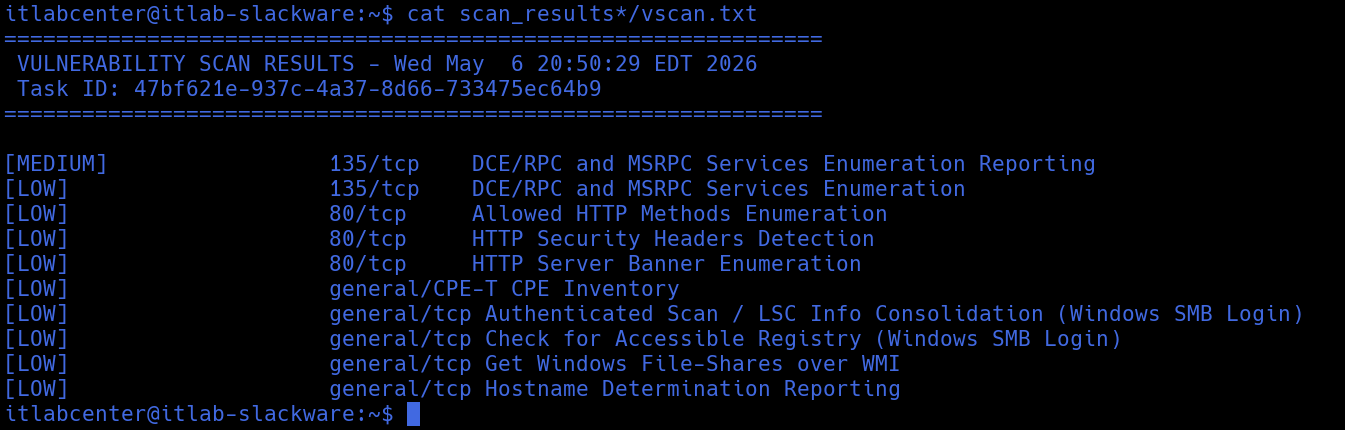
itlabcenter@itlab-slackware:~$ cat scan_results*/vscan.txt
Resulting Output:
In this lab, you learned a few handy BASH one-liners. You then learned about looping and arrays. Next,
you took on three simple scripts to explore looping, arrays, and if-then-else statements. You also learned
about creating arrays with mapfile (for reading text files) and awk (for parsing text files). As with any
new skill, your ability to use and understand scripting will grow as you actively use BASH to solve issues